Object Storage Service (OSS) is a secure, cost-effective, and highly reliable Alibaba Cloud storage service that allows you to store large volumes of unstructured data, such as images and audio and video data. After you deploy the CSI-Provisioner component provided by Alibaba Cloud on a self-managed Kubernetes cluster, you can mount OSS buckets as volumes on the cluster. You can mount OSS buckets only as statically provisioned volumes. This topic describes how to use a PersistentVolumeClaim (PVC) to mount an OSS bucket as a statically provisioned volume to multiple elastic container instance-based pods.
Prerequisites
A VNode is deployed in a self-managed Kubernetes cluster.
The version of the self-managed Kubernetes cluster is v1.16 or later, and the CSI-Provisioner component is deployed on the self-managed Kubernetes cluster.
If the self-managed Kubernetes cluster is deployed in a data center, the data center is connected to Alibaba Cloud.
Precautions
OSS is a shared storage service. You can mount an OSS bucket to multiple pods.
You cannot mount OSS buckets as dynamically provisioned volumes. OSS buckets do not support dynamically provisioned persistent volumes (PVs).
We recommend that you store no more than 1,000 files in the mount directory. If you store a large number of files in the mount directory, the OSSFS driver consumes excess memory. This may cause out of memory (OOM) errors in pods.
Procedure
You can mount OSS buckets only as statically provisioned volumes.
Create an OSS bucket.
Log on to the OSS console.
Create an OSS bucket.
For more information, see Create buckets.
Use one of the following methods to grant the permissions to manage OSS buckets:
Use a RAM role for authorization.
Create a RAM role and grant the RAM role the permissions to manage OSS buckets. When you create a RAM role, select Alibaba Cloud Service for the Select Trusted Entity parameter, Normal Service Role for the Role Type parameter, and Elastic Compute Service for the Select Trusted Service parameter. When you grant permissions to the RAM role, attach the AliyunOSSFullAccess policy to the RAM role.
For more information, see Create a RAM role for a trusted Alibaba Cloud service and Grant permissions to a RAM role.
Not recommended. Use your AccessKey pair for authorization.
Obtain your AccessKey ID and AccessKey secret. For more information, see Obtain an AccessKey pair.
Create a PV.
Create a file named oss-pv.yaml and copy the following template into the file:
apiVersion: v1
kind: PersistentVolume
metadata:
  name: oss-pv
  labels:
    alicloud-pvname: oss-pv
spec:
  capacity:
    storage: 25Gi
  accessModes:
    - ReadWriteMany
  persistentVolumeReclaimPolicy: Retain
  csi:
    driver: ossplugin.csi.alibabacloud.com
    volumeHandle: oss-pv
    volumeAttributes:
      bucket: "oss-test"
      url: "oss-cn-beijing-internal.aliyuncs.com"
      otherOpts: "-o max_stat_cache_size=0 -o allow_other"
      path: "/"
      ramRole: "<your RAM Role Name>"
In the preceding example, a RAM role is used for authorization. If you want to use your AccessKey pair for authorization, replace
ramRole: "<Your RAM role name>"with the following lines:akId: "<your AccessKey ID>" akSecret: "<your AccessKey Secret>"The following table describes the parameters in the template.
Parameter
Description
driver
The type of the driver used. In this example, the parameter is set to
ossplugin.csi.alibabacloud.com. This indicates that the Container Storage Interface (CSI) plug-in provided by Alibaba Cloud for OSS is used.volumeHandle
The unique ID of the PV. The value must be the same as the name defined in metadata.
bucket
The name of the OSS bucket.
You can mount only OSS buckets. You cannot mount the subdirectories or files in OSS buckets.
url
The endpoint of the OSS bucket.
If the OSS bucket resides in the same region as the VNode to which you want to mount the OSS bucket, use the internal endpoint of the OSS bucket.
If the OSS bucket resides in a region different from the VNode to which you want to mount the OSS bucket, use the public endpoint of the OSS bucket.
otherOpts
The custom options that are specified to mount the OSS bucket. Format:
-o *** -o ***. Example:-o max_stat_cache_size=0 -o allow_other.path
The path relative to the root directory of the OSS bucket to be mounted. Default value:
/.ramRole
The RAM role that is used for authorization. Specify the parameter if you use a RAM role for authorization.
akId and akSecret
The AccessKey ID and AccessKey secret that are used for authorization. Specify the two parameters if you use your AccessKey pair for authorization.
Run the following command to create a PV:
kubectl create -f oss-pv.yaml
Create a PVC.
Create a file named oss-pvc.yaml and copy the following template into the file:
apiVersion: v1
kind: PersistentVolumeClaim
metadata:
  name: oss-pvc
spec:
  accessModes:
    - ReadWriteMany
  resources:
    requests:
      storage: 25Gi
  selector:
    matchLabels:
      alicloud-pvname: oss-pv
Run the following command to create a PVC:
kubectl create -f oss-pvc.yaml
Mount the OSS bucket to two elastic container instance-based pods.
Create a file named oss-test.yaml and copy the following template into the file:
apiVersion: apps/v1
kind: Deployment
metadata:
  name: oss-test
  labels:
    app: nginx
spec:
  replicas: 2
  selector:
    matchLabels:
      app: nginx
  template:
    metadata:
      labels:
        app: nginx
    spec:
      nodeSelector:
        k8s.aliyun.com/vnode: "true"
      tolerations:
      - key: k8s.aliyun.com/vnode
        operator: "Equal"
        value: "true"
        effect: "NoSchedule"
      containers:
      - name: nginx
        image: registry-vpc.cn-beijing.aliyuncs.com/eci_open/nginx:1.14.2
        ports:
        - containerPort: 80
        volumeMounts:
          - name: pvc-oss
            mountPath: "/data"
      volumes:
        - name: pvc-oss
          persistentVolumeClaim:
            claimName: oss-pvc
Run the following command to create a Deployment:
kubectl create -f oss-test.yamlView the results.
kubectl get pods -o wideThe following command output is expected:
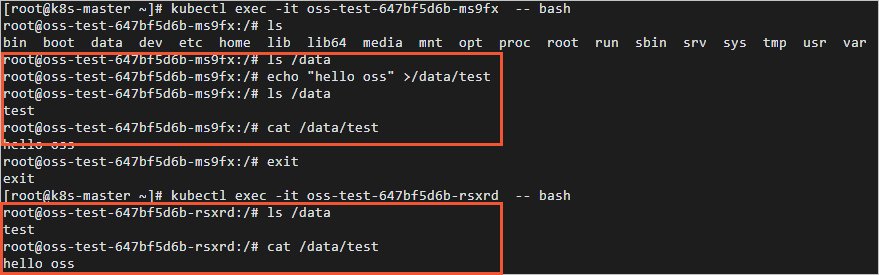
NAME                              READY   STATUS    RESTARTS   AGE     IP             NODE                                  NOMINATED NODE   READINESS GATES

oss-test-647bf5d6b-ms9fx          1/1     Running   0          21s     172.16.XX.XX   cn-beijing.vnd-2ze8nd8xcl33t4pa****   <none>           <none>
oss-test-647bf5d6b-rsxrd          1/1     Running   0          21s     172.16.XX.XX   cn-beijing.vnd-2ze8nd8xcl33t4pa****   <none>           <none>
Check the file directories in the pods and verify that the
/datamount directory is generated for the OSS bucket. In addition, verify that the files written to the first pod can be viewed in the second pod. This indicates that the two pods share the OSS bucket.