The Client is the main entry point for the OSS SDK for Node.js, used to manage OSS resources such as buckets and objects. To make requests to OSS, you must first initialize a Client instance and optionally customize its default configuration.
Usage notes
You must configure access credentials before you initialize an OSSClient instance. This topic provides an example of using environment variables. For more information, see Configure access credentials (Node.js SDK).
For information about OSS regions and their corresponding endpoints, see Regions and endpoints.
For information about how to create an AccessKey pair for a Resource Access Management (RAM) user, see Create an AccessKey pair.
Prerequisites
Before you configure the client, you must set the environment variables using the AccessKey of a RAM user.
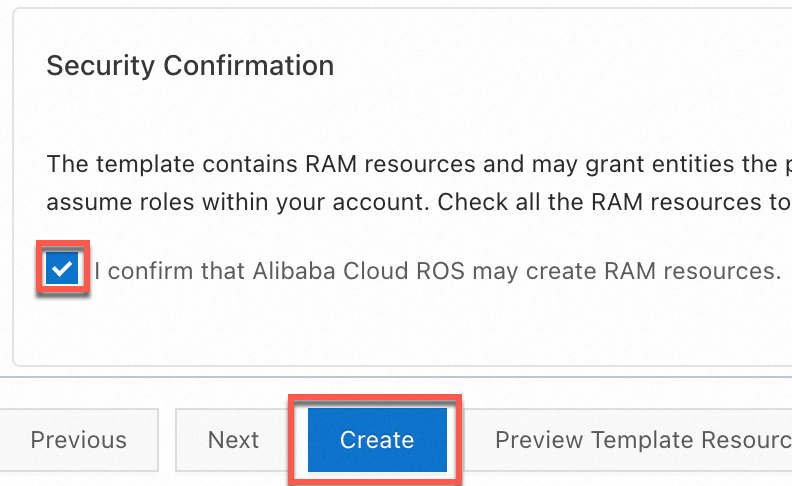
You can quickly create an AccessKey pair for a RAM user that has full OSS access permissions by using a Resource Orchestration Service (ROS) script. To do so, go to the wizard for template-based stack creation, select I confirm that Alibaba Cloud ROS may create RAM resources in the Security Confirmation section, and click Create.
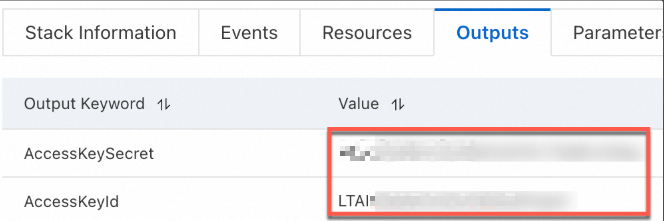
After the AccessKey pair is created, copy the AccessKey pair on the Outputs tab.
Configure environment variables for the AccessKey pair.
Linux
Run the following commands on the CLI to add the configurations of the environment variables to the
~/.bashrcfile:echo "export OSS_ACCESS_KEY_ID='YOUR_ACCESS_KEY_ID'" >> ~/.bashrc echo "export OSS_ACCESS_KEY_SECRET='YOUR_ACCESS_KEY_SECRET'" >> ~/.bashrcApply the changes.
source ~/.bashrcCheck whether the environment variables have taken effect:
echo $OSS_ACCESS_KEY_ID
echo $OSS_ACCESS_KEY_SECRET
macOS
Run the following command in the terminal to view the default shell type:
echo $SHELLConfigure environment variables based on the default shell type.
Zsh
Run the following commands to add the configurations of the environment variables to the
~/.zshrcfile:echo "export OSS_ACCESS_KEY_ID='YOUR_ACCESS_KEY_ID'" >> ~/.zshrc echo "export OSS_ACCESS_KEY_SECRET='YOUR_ACCESS_KEY_SECRET'" >> ~/.zshrcApply the changes.
source ~/.zshrcCheck whether the environment variables have taken effect:
echo $OSS_ACCESS_KEY_ID
echo $OSS_ACCESS_KEY_SECRET
Bash
Run the following commands to add the configurations of the environment variables to the
~/.bash_profilefile:echo "export OSS_ACCESS_KEY_ID='YOUR_ACCESS_KEY_ID'" >> ~/.bash_profile echo "export OSS_ACCESS_KEY_SECRET='YOUR_ACCESS_KEY_SECRET'" >> ~/.bash_profileApply the changes.
source ~/.bash_profileCheck whether the environment variables have taken effect:
echo $OSS_ACCESS_KEY_ID
echo $OSS_ACCESS_KEY_SECRET
Windows
CMD
Run the following commands in CMD:
setx OSS_ACCESS_KEY_ID "YOUR_ACCESS_KEY_ID"
setx OSS_ACCESS_KEY_SECRET "YOUR_ACCESS_KEY_SECRET"
Check whether the environment variables take effect:
echo %OSS_ACCESS_KEY_ID%
echo %OSS_ACCESS_KEY_SECRET%
PowerShell
Run the following commands in PowerShell:
[Environment]::SetEnvironmentVariable("OSS_ACCESS_KEY_ID", "YOUR_ACCESS_KEY_ID", [EnvironmentVariableTarget]::User)
[Environment]::SetEnvironmentVariable("OSS_ACCESS_KEY_SECRET", "YOUR_ACCESS_KEY_SECRET", [EnvironmentVariableTarget]::User)
Check whether the environment variable takes effect:
[Environment]::GetEnvironmentVariable("OSS_ACCESS_KEY_ID", [EnvironmentVariableTarget]::User)
[Environment]::GetEnvironmentVariable("OSS_ACCESS_KEY_SECRET", [EnvironmentVariableTarget]::User)
After you set the environment variables, you must restart any open terminal sessions or IDEs for the changes to take effect.
Default configuration examples
The following code examples show how to configure an OSSClient instance using Signature V4 and Signature V1.
Signature V1 (not recommended)
Configuration examples for common use cases
The following code examples show how to configure other domain names. By default, these examples use Signature V4 and the AccessKey information of a RAM user.
Internal domain name configuration example
If your application is deployed on an Alibaba Cloud ECS instance and needs to frequently access OSS resources in the same region, use an internal domain name to reduce traffic costs and improve access speed.
The following code shows an example of how to configure an OSSClient instance using an OSS internal domain name.
const OSS = require('ali-oss');

const client = new OSS({
  // Obtain access credentials from environment variables. Before you run this code, make sure that the OSS_ACCESS_KEY_ID and OSS_ACCESS_KEY_SECRET environment variables are set.
  accessKeyId: process.env.OSS_ACCESS_KEY_ID,
  accessKeySecret: process.env.OSS_ACCESS_KEY_SECRET,
  // Set region to the region where the bucket is located. For example, for China (Hangzhou), set region to oss-cn-hangzhou.
  region: 'oss-cn-hangzhou',
  //Use Signature V4.
  authorizationV4: true,
  // Set bucket to the name of your bucket.
  bucket: 'yourBucketName',
  // Set endpoint to the internal endpoint of the region where the bucket is located. For example, for China (Hangzhou), set endpoint to https://oss-cn-hangzhou-internal.aliyuncs.com.
  endpoint: 'yourEndpoint',
});
Custom domain name configuration example
The following code shows an example of how to configure an OSSClient instance using a custom domain name.
You must first attach the custom domain name to the default domain name of the bucket. Otherwise, an error occurs. For more information about how to attach a custom domain name, see Access OSS using a custom domain name.
const OSS = require('ali-oss');

const client = new OSS({
  // Obtain access credentials from environment variables. Before you run this code, make sure that the OSS_ACCESS_KEY_ID and OSS_ACCESS_KEY_SECRET environment variables are set.
  accessKeyId: process.env.OSS_ACCESS_KEY_ID,
  accessKeySecret: process.env.OSS_ACCESS_KEY_SECRET,
  // Set region to the region where the bucket is located. For example, for China (Hangzhou), set region to oss-cn-hangzhou.
  region: 'oss-cn-hangzhou',
  // Use the Signature V4 algorithm.
  authorizationV4: true,
  // Set bucket to the name of your bucket.
  bucket: 'yourBucketName',
  // Set endpoint to your custom domain name. For example, https://static.example.com.
  endpoint: 'yourEndpoint',
  // Set cname to true to enable the CNAME option.
  cname: true,
});
Acceleration endpoint configuration example
The following code shows an example of how to configure an OSSClient instance using an acceleration endpoint.
const OSS = require('ali-oss');

const client = new OSS({
  // Obtain access credentials from environment variables. Before you run this code, make sure that the OSS_ACCESS_KEY_ID and OSS_ACCESS_KEY_SECRET environment variables are set.
  accessKeyId: process.env.OSS_ACCESS_KEY_ID,
  accessKeySecret: process.env.OSS_ACCESS_KEY_SECRET,
  // Set region to the region where the bucket is located. For example, for China (Hangzhou), set region to oss-cn-hangzhou.
  region: 'oss-cn-hangzhou',
  //Use Signature V4.
  authorizationV4: true,
  // Set bucket to the name of your bucket.
  bucket: 'yourBucketName',
  // Set endpoint to an acceleration endpoint. For example, oss-accelerate.aliyuncs.com.
  endpoint: 'oss-accelerate.aliyuncs.com',
});
References
For more information about OSSClient configuration options, see Examples on GitHub.