This topic describes how to configure the development environment on different operating systems before developing client applications.
Before developing a client, you must configure your development environment:
Configure the Windows development environment
Follow these instructions to configure the Windows development environment.
Configure the Java 8 environment
The mPaaS framework supports only Java Development Kit (JDK) 8 and later.
Download and install JDK 8.
Set the
JAVA_HOMEenvironment variable and add itsbinfolder to thePATHenvironment variable.After the configuration is complete, run the
java -versioncommand. The JDK version information appears:
Configure the Gradle 4.4 environment
The mPaaS framework supports only Gradle 4.4.
Use Gradle Wrapper (recommended)
If your project already uses Gradle Wrapper for builds, change the version number to 4.4 in the
/gradle/wrapper/gradle.propertiesfile.If your project does not use Gradle Wrapper, ensure that your global Gradle version is 4.4. Then, run the
gradle wrapper --gradle-version=4.4command to install a Gradle wrapper. You can then build your project using./gradlew. This method minimizes changes to your development environment.
Use standalone Gradle
Download
Unzip the
.zippackage. Set theGRADLE_HOMEenvironment variable to the unzipped path and add itsbinfolder to thePATHenvironment variable.After the configuration is complete, run the
gradle -vcommand. The Gradle version information appears: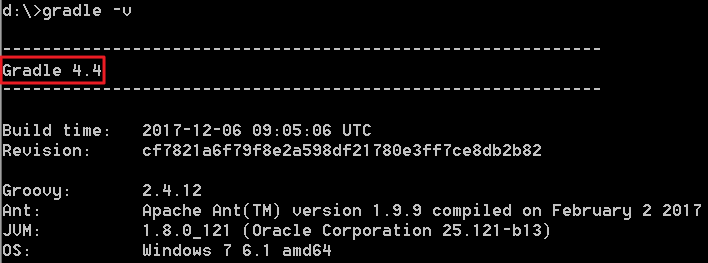
Install and configure Android Studio
Install Android Studio
The latest mPaaS plug-in supports only Android Studio 4.0 and later.
For Android Studio downloads, see Android Developers.
See the installation guide.
If you used an earlier version of Android Studio with the mPaaS plug-in installed, you must upgrade the mPaaS plug-in to the latest version after you upgrade Android Studio to 4.0 or later. For more information, see Update the mPaaS plug-in.
If you need an mPaaS plug-in that supports Android Studio versions earlier than 4.0, download the offline installation package and perform an offline installation. For more information about offline installation, see Install the mPaaS plug-in offline.
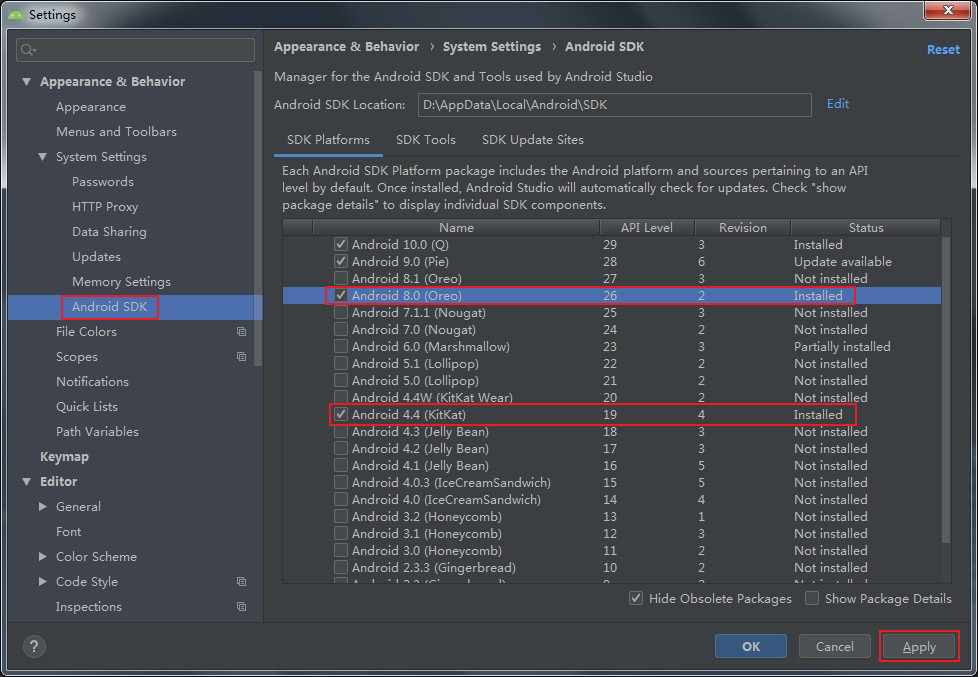
Install the Android SDK
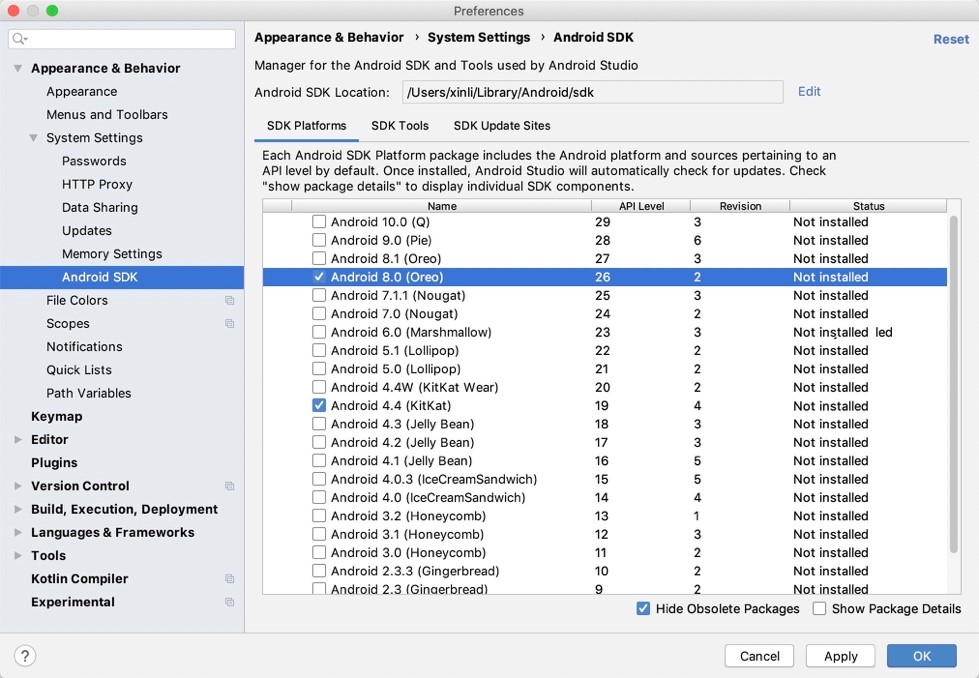
Install the Android SDKs for API Level 19 and 26.
In Android Studio, choose File > Settings to open the Settings dialog box.
In the Android SDK dialog box, select the SDKs for API Level 19 and 26, and then click Apply to install them.
Install the mPaaS plug-in
For more information about installing the mPaaS plug-in, see Install the mPaaS plug-in.
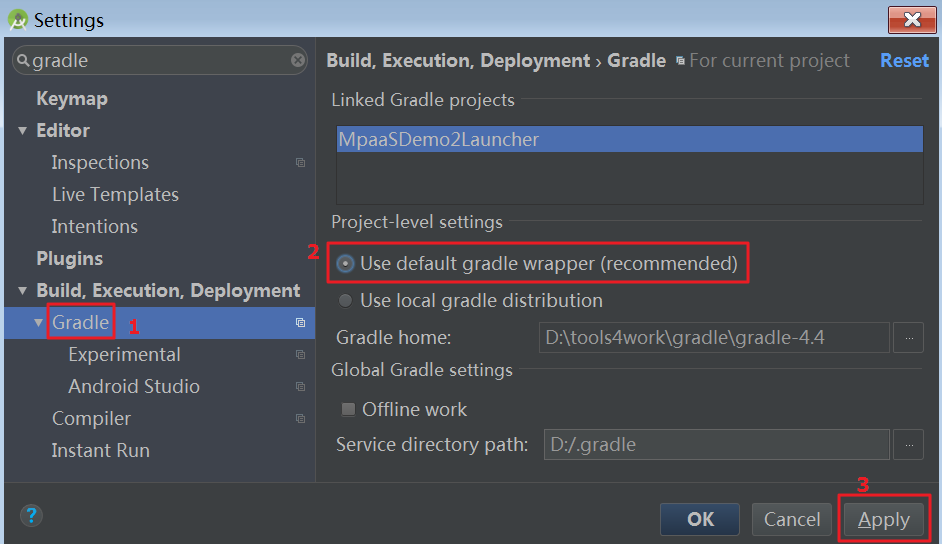
Configure the Gradle build tool
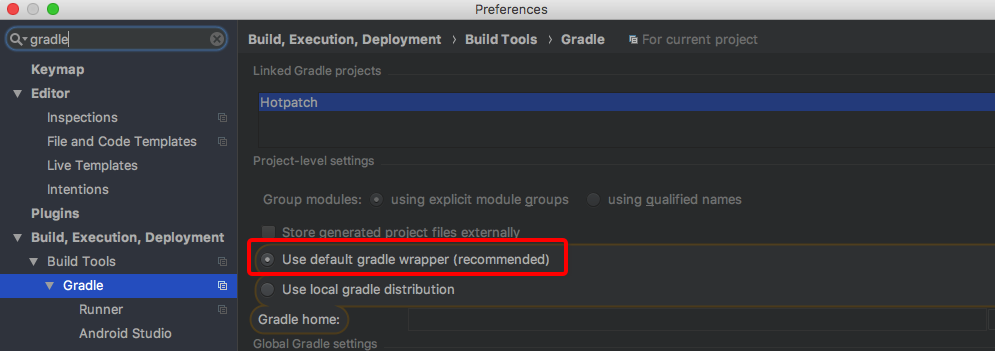
Ensure that your project uses the Gradle Wrapper for builds.
In Android Studio, choose File > Settings to open the Settings dialog box.
In the Gradle dialog box, select Use default gradle wrapper and click Apply.
Configure the macOS development environment
Follow these instructions to configure the macOS development environment.
Configure the Java 8 environment
The mPaaS framework supports only JDK 8 and later.
Download and install JDK 8.
Set the
JAVA_HOMEenvironment variable and add itsbinfolder to thePATHenvironment variable.After the configuration is complete, run the
java -versioncommand. The JDK version information appears:
Configure the Gradle 4.4 environment
The mPaaS framework supports only Gradle 4.4.
Use Gradle Wrapper (recommended)
If your project already uses Gradle Wrapper for builds, change the version number to 4.4 in the
/gradle/wrapper/gradle.propertiesfile.If your project does not use Gradle Wrapper, ensure that your global Gradle version is 4.4. Then, run the
gradle wrapper --gradle-version=4.4command to install a Gradle wrapper. You can then build your project using./gradlew. This method minimizes changes to your development environment.
Use standalone Gradle
Download
Unzip the
.zippackage. Set theGRADLE_HOMEenvironment variable to the unzipped path and add itsbinfolder to thePATHenvironment variable.After the configuration is complete, run the
gradle -vcommand. The Gradle version information appears: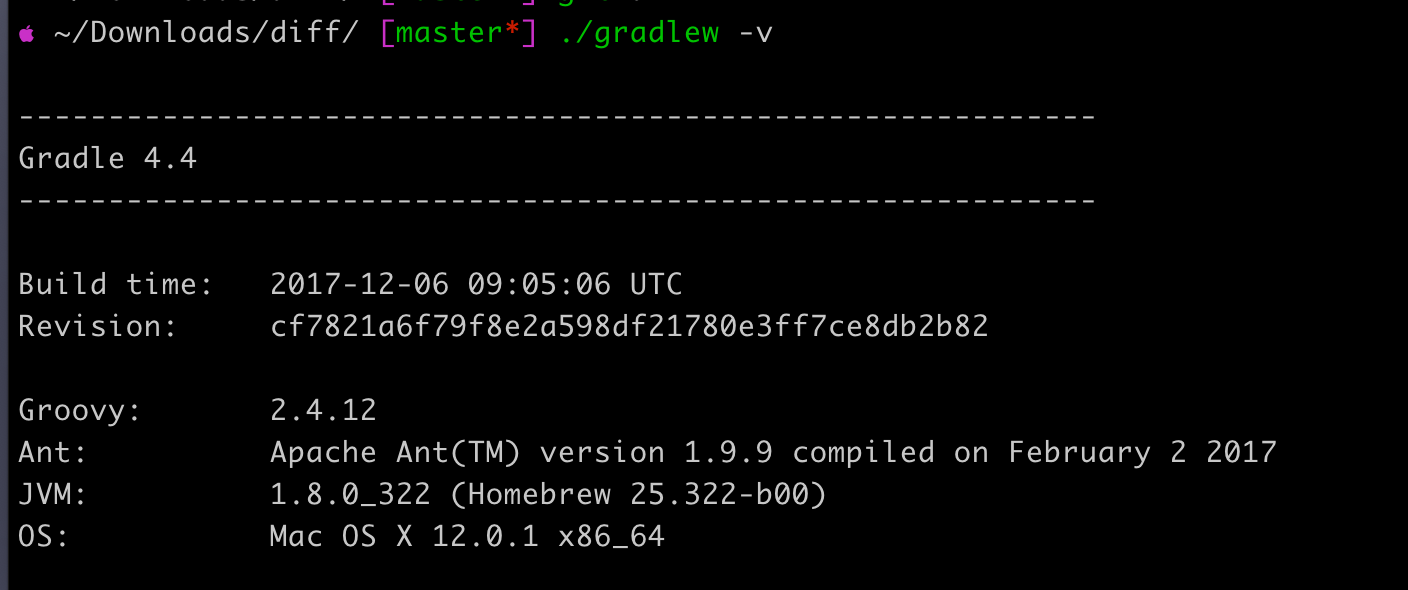
Install and configure Android Studio
Install Android Studio
The latest mPaaS plug-in supports only Android Studio 4.0 and later.
For Android Studio downloads, see Android Developers.
See the installation guide.
If you used an earlier version of Android Studio with the mPaaS plug-in installed, you must upgrade the mPaaS plug-in to the latest version after you upgrade Android Studio to 4.0 or later. For more information, see Update the mPaaS plug-in.
If you need an mPaaS plug-in that supports Android Studio versions earlier than 4.0, download the offline installation package and perform an offline installation. For more information about offline installation, see Install the mPaaS plug-in offline.
Install the Android SDK
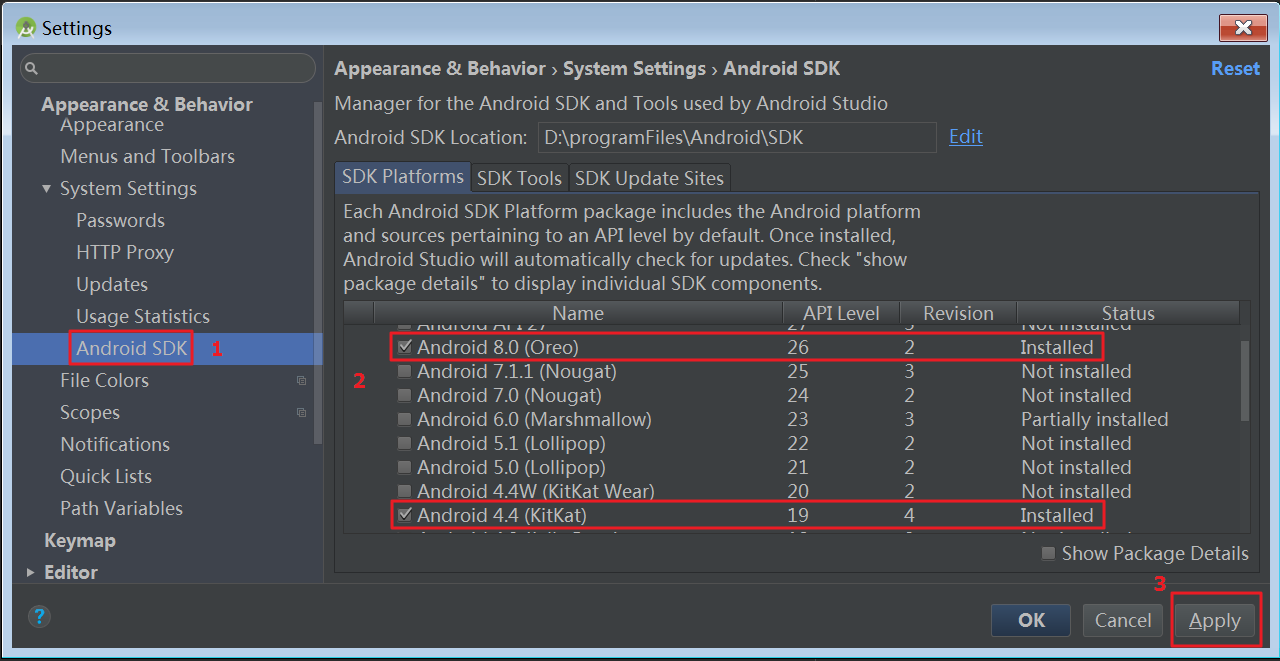
Install the Android SDKs for API Level 19 and 26.
In Android Studio, choose Android Studio > Preferences to open the Preferences dialog box.
In the Android SDK dialog box, select the SDKs for API Level 19 and 26, and then click Apply to install them.
Install the mPaaS plug-in
For more information about installing the mPaaS plug-in, see Install the mPaaS plug-in.
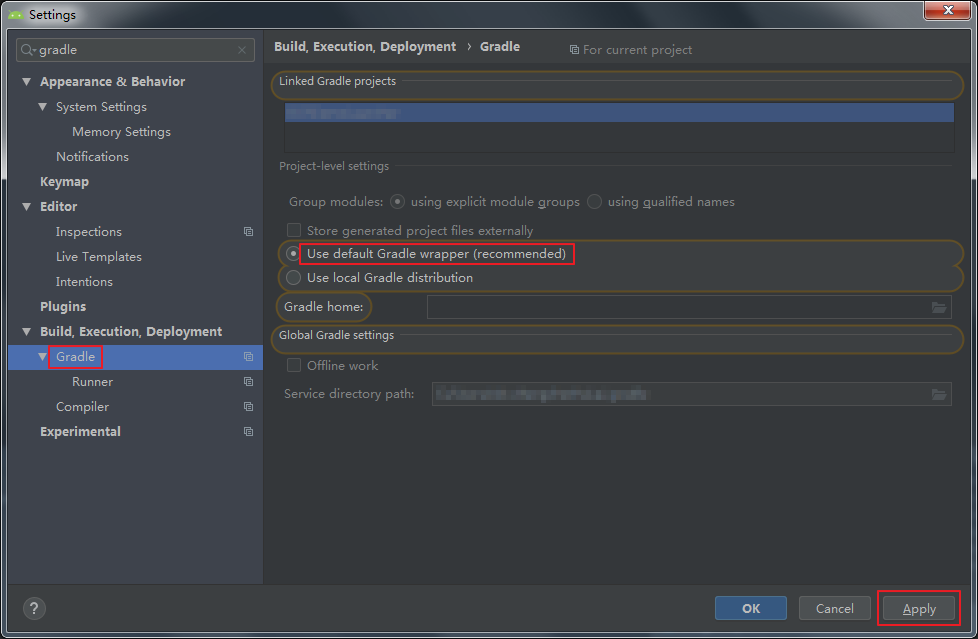
Configure the Gradle build tool
Ensure that your project uses the Gradle Wrapper for builds.
In Android Studio, open any Android project.
Open the Preferences dialog box.
In the Gradle dialog box, select Use default gradle wrapper and click Apply.
Configure the Linux development environment
This section describes how to configure the development environment on Linux. Note that Linux has many distributions and these instructions apply only to CentOS and Ubuntu.
Configure the Java 8 environment
The mPaaS framework supports only JDK 8 and later.
Download and install JDK 8.
Set the
JAVA_HOMEenvironment variable and add itsbinfolder to thePATHenvironment variable.After the configuration is complete, run the
java -versioncommand. The JDK version information appears:
Configure the Gradle 4.4 environment
Use Gradle Wrapper (recommended)
If your project already uses Gradle Wrapper for builds, change the version number to 4.4 in the
/gradle/wrapper/gradle.propertiesfile.If your project does not use Gradle Wrapper, ensure that your global Gradle version is 4.4. Then, run the
gradle wrapper --gradle-version=4.4command to install a Gradle wrapper. You can then build your project using./gradlew. This method minimizes changes to your development environment.
Use standalone Gradle
Download
Unzip the
.zippackage. Set theGRADLE_HOMEenvironment variable to the unzipped path and add itsbinfolder to thePATHenvironment variable.After the configuration is complete, run the
gradle -vcommand. The Gradle version information appears.
Install 32-bit compatibility libraries
Linux distributions such as CentOS 6, CentOS 7, and Ubuntu do not include the ia32-lib library by default. You must install 32-bit compatibility libraries on all 64-bit Linux systems. For installation instructions, see android-sdk.
Ubuntu:
sudo apt-get install zlib1g:i386

CentOS:
yum install libstdc++.i686
Install and configure Android Studio
Install Android Studio
The latest mPaaS plug-in supports only Android Studio 4.0 and later.
For Android Studio downloads, see Android Developers.
See the installation guide.
If you used an earlier version of Android Studio with the mPaaS plug-in installed, you must upgrade the mPaaS plug-in to the latest version after you upgrade Android Studio to 4.0 or later. For more information, see Update the mPaaS plug-in.
If you need an mPaaS plug-in that supports Android Studio versions earlier than 4.0, download the offline installation package and perform an offline installation. For more information about offline installation, see Install the mPaaS plug-in offline.
Install the Android SDK
Install the Android SDKs for API Level 19 and 26.
In Android Studio, choose File > Settings to open the Settings dialog box.
In the Android SDK dialog box, select the SDKs for API Level 19 and 26, and then click Apply to install them.
Install the mPaaS plug-in
For more information about installing the mPaaS plug-in, see Install the mPaaS plug-in.
Configure the Gradle build tool
Ensure that your project uses the Gradle Wrapper for builds.
In Android Studio, open any Android project.
Open the Settings dialog box.
In the Gradle dialog box, select Use default gradle wrapper and click Apply.