Physical backup files contain raw data files copied directly from the instance's data directory. This guide shows how to restore those files to a self-managed MongoDB database in standalone mode or replica set mode on an Elastic Compute Service (ECS) instance.
Physical backup files are incompatible withmongorestore. To access the data, start amongodinstance pointing to the extracted directory, as described in this guide.
Limitations
Physical backup restore is supported only when all of the following conditions are met:
-
The ApsaraDB for MongoDB instance is a replica set instance that uses local disks for storage.
-
Transparent Data Encryption (TDE) is disabled on the instance. See Configure TDE for an instance.
-
The storage engine of the instance is WiredTiger or RocksDB.
-
If the engine is TerarkDB, use logical backup instead. See Restore the instance data to a self-managed MongoDB database by using logical backup.
-
If the engine is RocksDB, compile and install a MongoDB build that includes the RocksDB storage engine before proceeding.
-
To check the storage engine, go to the Basic Information page in the ApsaraDB for MongoDB console.
Before you begin
Before starting the restore, confirm the following:
-
You have MongoDB of the required version installed on the ECS instance. The self-managed MongoDB version must match the instance version: For installation instructions, see Install MongoDB.
ApsaraDB for MongoDB instance Self-managed MongoDB database MongoDB 3.2 MongoDB 3.2 or 3.4 MongoDB 3.4 MongoDB 3.4 MongoDB 4.0 MongoDB 4.0 MongoDB 4.2 MongoDB 4.2 -
You know the format of your physical backup file. The format depends on when the instance was created:
The xbstream format requires the Percona XtraBackup tool, which is available on Linux only. Windows is not supported for xbstream files.
Format Extension Applies to TAR .tar.gzInstances created before March 26, 2019 xbstream _qp.xbInstances created on or after March 26, 2019
This guide uses an ECS instance running Ubuntu 16.04 (64-bit). The following directories are used throughout:
-
/test/mongo/data— Node 1 data (restored from backup) -
/test/mongo/data1— Node 2 data (empty node for replica set) -
/test/mongo/data2— Node 3 data (empty node for replica set)
Step 1: Configure environment variables
Configure environment variables so you can run mongod and mongo commands without specifying full paths each time. If environment variables are already configured for MongoDB, skip to Step 2.
-
Open
/etc/profile:sudo vi /etc/profile -
Press
ito enter edit mode, then add the following line at the end of the file. Replace the path with your actual MongoDB installation path:export PATH=$PATH:/test/mongo/bin -
Press
Esc, then type:wqto save and exit. -
Apply the changes:
source /etc/profile
Step 2: Download and decompress a physical backup file
-
Download the physical backup file. Copy the external download URL from the ApsaraDB for MongoDB console. For details, see Download the physical backup data of a replica set instance.
wget -c '<External download URL>' -O <filename>.<extension>The extension must be
.tar.gzor_qp.xb, depending on the instance creation date. -
Create the data directory and move the backup file into it:
mkdir -p /test/mongo/data && mv <filename>.<extension> /test/mongo/data -
Decompress the backup file based on its format:
-
For `.tar.gz` files (for example,
hins20190412.tar.gz):cd /test/mongo/data/ && tar xzvf hins20190412.tar.gz -
For `_qp.xb` files (for example,
hins20190412_qp.xb):-
a. Install Percona XtraBackup and qpress. For installation instructions, see Installing Percona XtraBackup on Debian and Ubuntu.
-
b. Decompress the backup file:
# Go to the directory containing the backup file cd /test/mongo/data/ # Extract the xbstream archive cat hins20190412_qp.xb | xbstream -x -v # Decompress the extracted files innobackupex --decompress --remove-original /test/mongo/data
-
-
Step 3: Restore data in standalone mode
Start MongoDB in standalone mode first. This lets you verify that the backup data is intact before switching to replica set mode.
-
Create a
mongod.confconfiguration file:touch /test/mongo/mongod.conf -
Open the file and add the configuration for your storage engine:
ApsaraDB for MongoDB enables
directoryPerDBby default, so this option must be set totruein the configuration.vi /test/mongo/mongod.confPress
ito enter edit mode, then paste one of the following configurations: WiredTiger (default for ApsaraDB for MongoDB):systemLog: destination: file path: /test/mongo/mongod.log logAppend: true security: authorization: enabled storage: dbPath: /test/mongo/data directoryPerDB: true net: port: 27017 unixDomainSocket: enabled: false processManagement: fork: true pidFilePath: /test/mongo/mongod.pidRocksDB:
systemLog: destination: file path: /test/mongo/logs/mongod.log logAppend: true security: authorization: enabled storage: dbPath: /test/mongo/data engine: rocksdb net: port: 27017 unixDomainSocket: enabled: false processManagement: fork: true pidFilePath: /test/mongo/mongod.pid -
Press
Esc, then type:wqto save and exit. -
Start MongoDB using the configuration file:
mongod -f /test/mongo/mongod.conf -
Log in to the mongo shell to verify the restored data:
mongo --host 127.0.0.1 -u <username> -p <password> --authenticationDatabase adminThe default username is
root. If the password contains special characters, enclose it in single quotation marks (for example,'test123!@#'). -
List all databases to verify the restore:
show dbsIf the databases from the backup appear in the output, the data was restored successfully.
-
Exit the mongo shell:
exit
At this point, your self-managed MongoDB database is running in standalone mode with the restored data. To configure it as a replica set, continue to Step 4.
Step 4: Start the self-managed MongoDB database in replica set mode
Physical backup files include the original instance's replica set configuration. If you start the self-managed database without removing this configuration, MongoDB attempts to connect to the original instance's replica set members, which fails. This step removes that configuration and reconfigures the database with a new replica set.
Remove the original replica set configuration
-
Log in to the database as the
testuser:mongo --host 127.0.0.1 -u test -p <Password of the test account> --authenticationDatabase adminIf the password contains special characters, enclose it in single quotation marks (for example,
'test123!@#'). -
Run the following script to remove the original replica set configuration. Replace
<Password of the test account>with the actual password. The script creates a temporary role with permission to delete fromlocal.system.replset, removes the original configuration, then cleans up the temporary role and user.use admin db.runCommand({ createRole: "tmprole", roles: [ { role: "test", db: "admin" } ], privileges: [ { resource: { db: 'local', collection: 'system.replset' }, actions: [ 'remove' ] } ] }) db.runCommand({ createUser: "tmpuser", pwd: "tmppwd", roles: [ 'tmprole' ] }) db.auth('tmpuser','tmppwd') use local db.system.replset.remove({}) use admin db.auth('test','<Password of the test account>') db.dropRole('tmprole') db.dropUser('tmpuser') -
Shut down the MongoDB service and exit the shell:
use admin
db.shutdownServer()
exit
Create the key file for replica set authentication
Each node in the replica set uses a shared key file to authenticate with the other nodes.
-
Create the key file:
mkdir -p /test/mongo/keyFile && touch /test/mongo/keyFile/mongodb.key -
Open the file and add a key string:
-
6 to 1,024 characters
-
Base64-encoded characters only
-
No equal signs (
=)
vi /test/mongo/keyFile/mongodb.keyPress
i, enter a key string (for example,MongoDB Encrypting File), then pressEscand type:wqto save. Key requirements: -
-
Restrict the file permissions so only the owner can read it:
sudo chmod 400 /test/mongo/keyFile/mongodb.keyAll replica set nodes must use this same key file.
Prepare two empty nodes for the replica set
-
Copy the configuration file for the two additional nodes:
cp /test/mongo/mongod.conf /test/mongo/mongod1.conf && cp /test/mongo/mongod.conf /test/mongo/mongod2.conf -
Create data directories for the additional nodes:
mkdir -p /test/mongo/data1 && mkdir -p /test/mongo/data2
Configure each node
Update all three configuration files to enable replica set mode. The additions are security.keyFile and replication.replSetName.
Node 1 — `mongod.conf` (port 27017, holds the restored data):
vi /test/mongo/mongod.confsystemLog:
destination: file
path: /test/mongo/mongod.log
logAppend: true
security:
authorization: enabled
keyFile: /test/mongo/keyFile/mongodb.key
storage:
dbPath: /test/mongo/data
directoryPerDB: true
net:
bindIp: 127.0.0.1
port: 27017
unixDomainSocket:
enabled: false
processManagement:
fork: true
pidFilePath: /test/mongo/mongod.pid
replication:
replSetName: "rs0"Node 2 — `mongod1.conf` (port 27018, empty node):
vi /test/mongo/mongod1.confsystemLog:
destination: file
path: /test/mongo/mongod1.log
logAppend: true
security:
authorization: enabled
keyFile: /test/mongo/keyFile/mongodb.key
storage:
dbPath: /test/mongo/data1
directoryPerDB: true
net:
bindIp: 127.0.0.1
port: 27018
unixDomainSocket:
enabled: false
processManagement:
fork: true
pidFilePath: /test/mongo/mongod1.pid
replication:
replSetName: "rs0"Node 3 — `mongod2.conf` (port 27019, empty node):
vi /test/mongo/mongod2.confsystemLog:
destination: file
path: /test/mongo/mongod2.log
logAppend: true
security:
authorization: enabled
keyFile: /test/mongo/keyFile/mongodb.key
storage:
dbPath: /test/mongo/data2
directoryPerDB: true
net:
bindIp: 127.0.0.1
port: 27019
unixDomainSocket:
enabled: false
processManagement:
fork: true
pidFilePath: /test/mongo/mongod2.pid
replication:
replSetName: "rs0"The configurable parameters in each file are:
| Parameter | Description |
|---|---|
systemLog.path |
Path for MongoDB log files on this node |
storage.dbPath |
Path for MongoDB data files on this node |
processManagement.pidFilePath |
Path for the process ID (PID) file on this node |
security.keyFile |
Path to the shared key file — must be identical across all nodes |
net.bindIp |
IP address of this node |
net.port |
Port number — must be unique per node if all nodes run on the same server |
replication.replSetName |
Name of the replica set |
Start and initialize the replica set
-
Start all three nodes:
mongod -f /test/mongo/mongod.conf && mongod -f /test/mongo/mongod1.conf && mongod -f /test/mongo/mongod2.conf -
Log in as the
testuser:mongo --host 127.0.0.1 -u test -p <Password of the test account> --authenticationDatabase adminIf the password contains special characters, enclose it in single quotation marks (for example,
'test123!@#'). -
Initialize the replica set. Node 1 (port 27017) is set as the primary with
priority: 1; the other two nodes are secondary withpriority: 0.rs.initiate( { _id : "rs0", version : 1, members: [ { _id: 0, host: "127.0.0.1:27017" , priority : 1}, { _id: 1, host: "127.0.0.1:27018" , priority : 0}, { _id: 2, host: "127.0.0.1:27019" , priority : 0} ] })A successful response looks like:
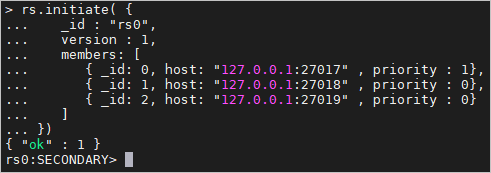 For details on this command, see rs.initiate().
Verify the replica set
After rs.initiate() completes, MongoDB begins syncing data from the primary node to the two secondary nodes. Sync time depends on the size of the backup. System performance may be lower than normal during sync and returns to normal after sync completes.
To confirm the replica set is running:
-
Exit the mongo shell:
exit -
Log in again:
mongo -u <username> -p <password> --authenticationDatabase adminThe default username is
root. If the password contains special characters, enclose it in single quotation marks. -
Check the prompt on the left side of the shell. If it shows
<replica set name>:PRIMARY>, the self-managed MongoDB database is running in replica set mode.
Troubleshooting
MongoDB fails to start with the `mongod.conf` configuration file
The most common causes:
-
A `storage.bson` file exists in the data directory. This file is generated automatically if MongoDB was started without a configuration file. Remove it and try again.
-
Another `mongod` process is already running. Find and stop it before starting again:
ps -e | grep mongod kill <PID> -
The log path in `systemLog.path` is invalid. Check that the directory exists and the filename ends with
.log. For example:path: /test/mongo/mongod.log.
Replica set mode fails to start
The key file permissions may not be set correctly. Run the following command to correct the permissions:
sudo chmod 600 /test/mongo/keyFile/mongodb.keySystem performance is lower than expected after starting replica set mode
This is expected behavior. After rs.initiate(), MongoDB automatically syncs data from the primary node to the secondary nodes. Performance returns to normal after the sync completes.