This topic provides an example on how to use the EasyRec algorithm library to train models and build a routine pipeline.
Prerequisites
- A Data Science cluster is created, and Kubeflow is selected from the optional services when you create the cluster. For more information, see Create a cluster.
- PuTTY and SSH Secure File Transfer Client are installed on your on-premises machine.
- The dsdemo code is downloaded. If you have created a Data Science cluster, you can join the DingTalk group numbered 32497587 to obtain the dsdemo code.
Procedure
- Step 1: Make preparations
- Step 2: Submit tasks
- (Optional) Step 3: Create an image for Hive CLI, Spark CLI, ds-controller, Hue, a notebook server, or HTTPd
- Step 4: Build a pipeline
- Step 5: Upload the ***_mlpipeline.tar.gz file
- Step 6: Create and run an experiment
- (Optional) Step 7: View the status of the pipeline
- Step 8: Perform model prediction
Step 1: Make preparations
- Optional:Install SDKs.
- Log on to the Container Registry console. Activate Container Registry Personal Edition and create a namespace. For more information about how to create a namespace, see Manage namespaces.Note Container Registry Enterprise Edition provides higher security than Container Registry Personal Edition. Therefore, we recommend that you use Container Registry Enterprise Edition. If you use Container Registry Enterprise Edition, you must set Default Repository Type to Public when you create a namespace.
- Modify the address of the registry and the name of the experiment namespace in the config file. Then, log on to your registry.
- Configure a Network Address Translation (NAT) gateway to access Container Registry resources. For more information, see Create and manage Internet NAT gateways.
- Prepare test data. Important You can write test data to the Hadoop Distributed File System (HDFS) service of your Data Science cluster or to a self-managed HDFS based on your business requirements. You must make sure normal network connection in the write operation.
sh allinlone.shSelect
ppd) Prepare dataas prompted.
Step 2: Submit tasks
- Run the allinone.sh file.
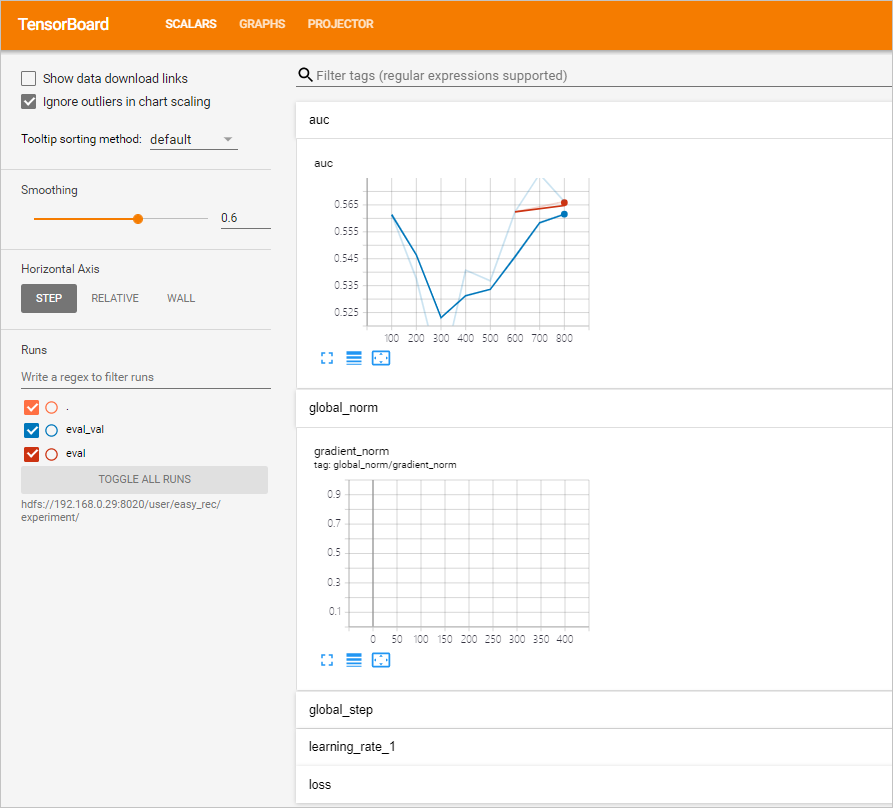
sh allinone.sh -dThe following output is returned:loading ./config You are now working on k8snamespace: default *** Welcome to DataScience *** 0) Exit k8s: default ppd) Prepare data ppk) Prepare DS/K8S config cacr) checking ACR 1|build) build training image bnt) build notebook image buildall) build all images(slow) dck) deletecheckpoint ser) showevalresult apc) applyprecheck dpc) deleteprecheck 2) applytraining 3) deletetraining 4) applyeval 5) deleteeval 4d) applyevaldist 5d) deleteevaldist 4hr) applyevalhitrate 5hr) deleteevalhitrate 6) applyexport 7) deleteexport 8) applyserving 9) deleteserving 10) applypredict 11) deletepredict 12) applyfeatureselection 13) deletefeatureselection 14) applycustomizeaction 15) deletecustomizeaction 16) applypytorchtraining 17) deletepytorchtraining mt) multidaystraining dmt) deletemultidaystraining me) multidayseval dme) deletemultidayseval cnt) createnotebook dnt) deletenotebook snt) shownotebooklink cft) createsftp dft) deletesftp sft) showsftplink che) createhue dhe) deletehue she) showhuelink chd) createhttpd dhd) deletehttpd shd) showhttpdlink cvs) createvscode dvs) deletevscode svs) showvscodelink a) kubectl get tfjobs b) kubectl get sdep c) kubectl get pytorchjobs mp|mpl) compile mlpipeline bp|bpl) compile bdpipeline bu) bdupload tb) tensorboard vc) verifyconfigfile spl) showpaireclink tp) kubectl top pods tn) kubectl top nodes util) show nodes utils logs) show pod logs setnl) set k8s node label e|clean) make clean cleanall) make cleanall sml) showmilvuslink sall) show KubeFlow/Grafana/K8SOverview/Spark/HDFS/Yarn/EMR link 99) kubectl get pods 99l) kubectl get pods along with log url > - Enter options and press Enter after you enter each option. You can use TensorBoard to view the AUC curve during training:
- Run the following command to access the ml_on_ds directory:
sudo cd /root/dsdemo/ml_on_ds - Run the following command to run TensorBoard:
sh run_tensorboard.shSelect
tbto display the TensorBoard information at a checkpoint in the current experiment. Alternatively, run thesh run_tensorboard.sh 20211209command to view the TensorBoard information at a checkpoint in the training task that is run on December 9, 2021.Note- By default, the model directory that is specified by the TODAY_MODELDIR parameter in the config file is used. You can also run a command such as
sh run_tensorboard.sh hdfs://192.168.**.**:9000/user/easy_rec/20210923/to specify a date-specific model directory. - You can modify parameters in the run_tensorboard.sh script based on your business requirements.
- By default, the model directory that is specified by the TODAY_MODELDIR parameter in the config file is used. You can also run a command such as
- Open your browser, enter http://<yourPublicIPAddress>:6006 in the address bar, and then press Enter to view the AUC curve on the page that appears.
- Run the following command to access the ml_on_ds directory:
(Optional) Step 3: Create an image for Hive CLI, Spark CLI, ds-controller, Hue, a notebook server, or HTTPd
- The purpose of creating an image for Hive CLI or Spark CLI is to submit Hive or Spark tasks for big data processing and generate the data to be trained. If you have prepared related data, you can skip this step. For Spark tasks, the Spark service in the Data Science cluster is used. For Hive tasks, a separate Hadoop or Hive service is required.
- An image that is created for ds-controller is used for dynamic scaling.
- Hive CLIGo to the directory where Hive CLI is installed and make an image.
cd hivecli && make - Spark CLIGo to the directory where Spark CLI is installed and make an image.
cd sparkcli && make - dscontrollerGo to the directory where ds-controller is installed and make an image.
cd dscontroller && make - HueGo to the directory where Hue is deployed and make an image.
cd hue && make - notebookGo to the directory where a notebook server is deployed and make an image.
cd notebook && make - httpdGo to the directory where HTTP Daemon (HTTPd) is installed and make an image.
cd httpd && make
Step 4: Build a pipeline
For more information about the pipeline code, see the mlpipeline.py file.
- Run the following command to access the /ml_on_ds directory:
sudo cd /root/dsdemo/ml_on_ds - Run the following command to build a pipeline:
make mplNote You can also run thesh allinone.shcommand and selectmplto build a pipeline.After the pipeline is built, a file named ***_mlpipeline.tar.gz is generated. Use SSH Secure File Transfer Client to download the ***_mlpipeline.tar.gz file to your on-premises machine.
Step 5: Upload the ***_mlpipeline.tar.gz file
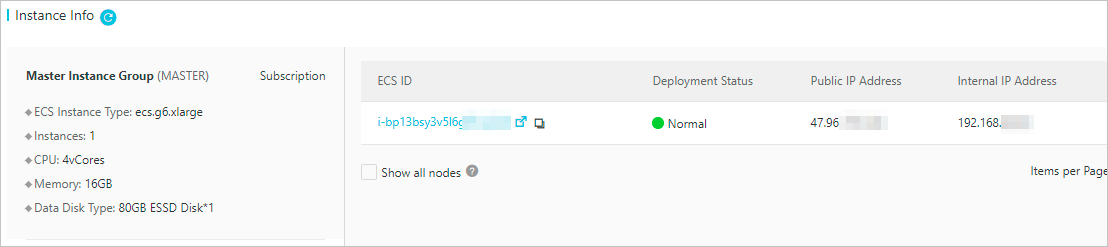
- In the Instance Info section of the Cluster Overview page, view the public IP address of the master node.
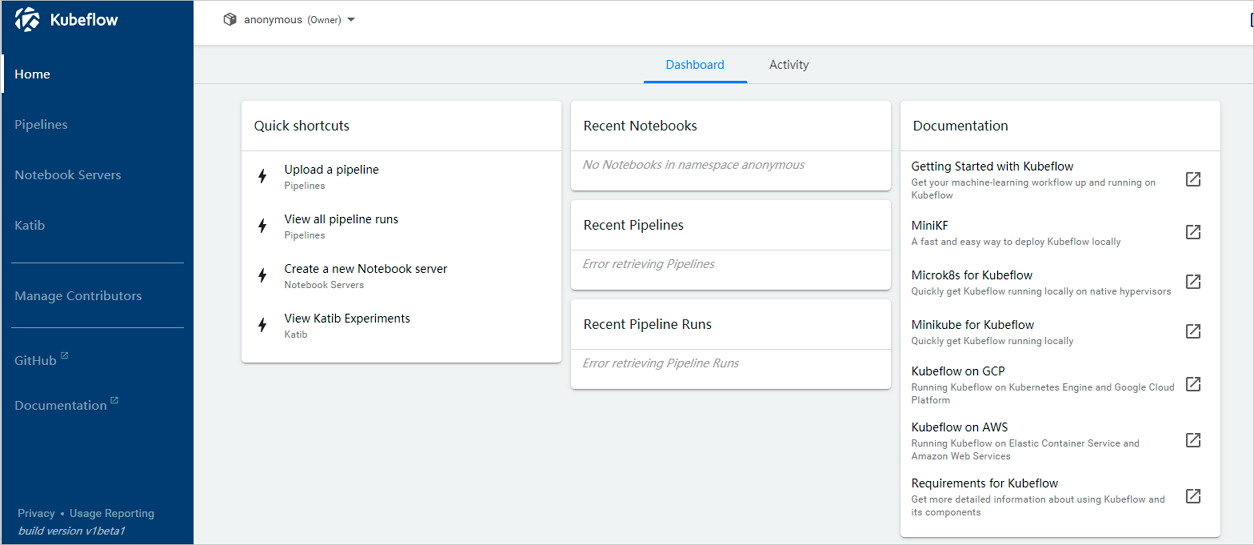
- Open your browser, enter http://<yourPublicIPAddress>:31380 in the address bar, and then press Enter. The homepage of Kubeflow appears, as shown in the following figure. Use the default anonymous namespace.Note Replace <yourPublicIPAddress> with the public IP address that you obtained in the preceding step.
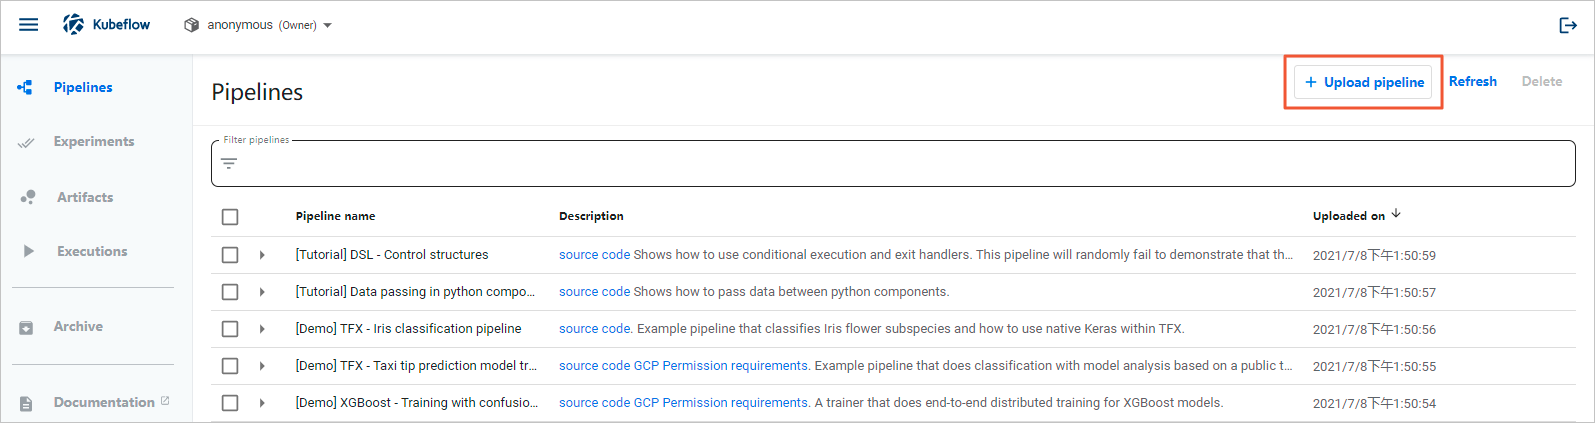
- In the left-side navigation pane, click Pipelines.
- In the upper-right corner of the Pipelines page, click Upload pipeline.
- On the Upload Pipeline or Pipeline Version page, configure the Pipeline Name and Pipeline Description parameters, select Upload a file, and then select the ***_mlpipeline.tar.gz file.
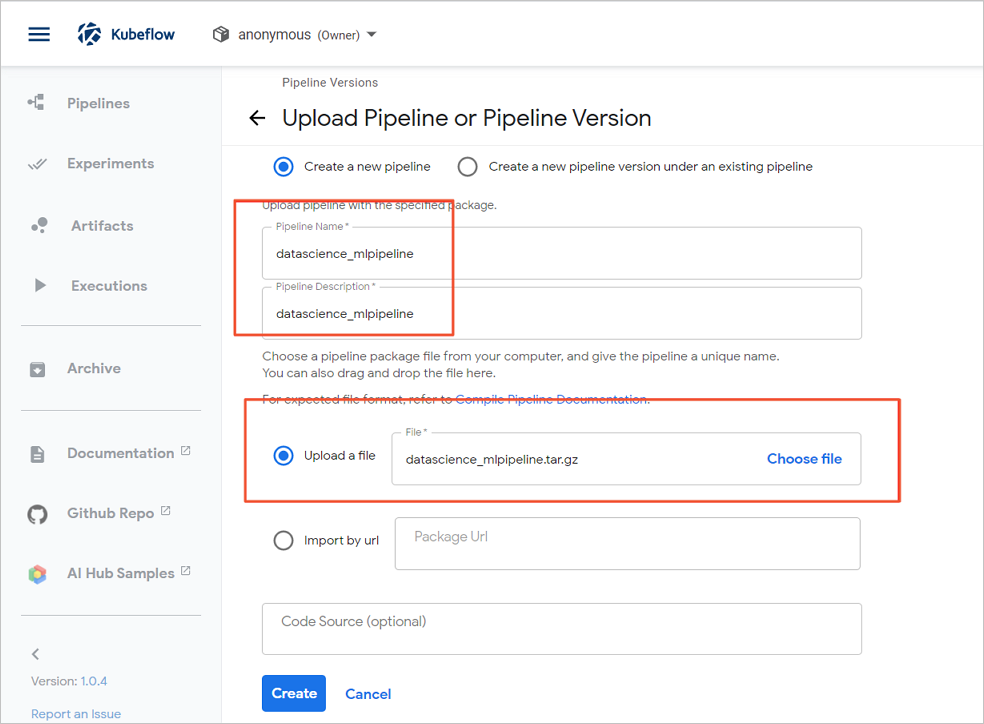
- Click Create.
Step 6: Create and run an experiment
- In the left-side navigation pane, click Experiments.
- In the upper-right corner of the page that appears, click Create experiment.
- On the New experiment page, specify Experiment name.
- Click Next.
- On the Start a run page, configure parameters.
- Select the ***_mlpipeline.tar.gz file that you downloaded to your on-premises machine in Step 4: Build a pipeline.
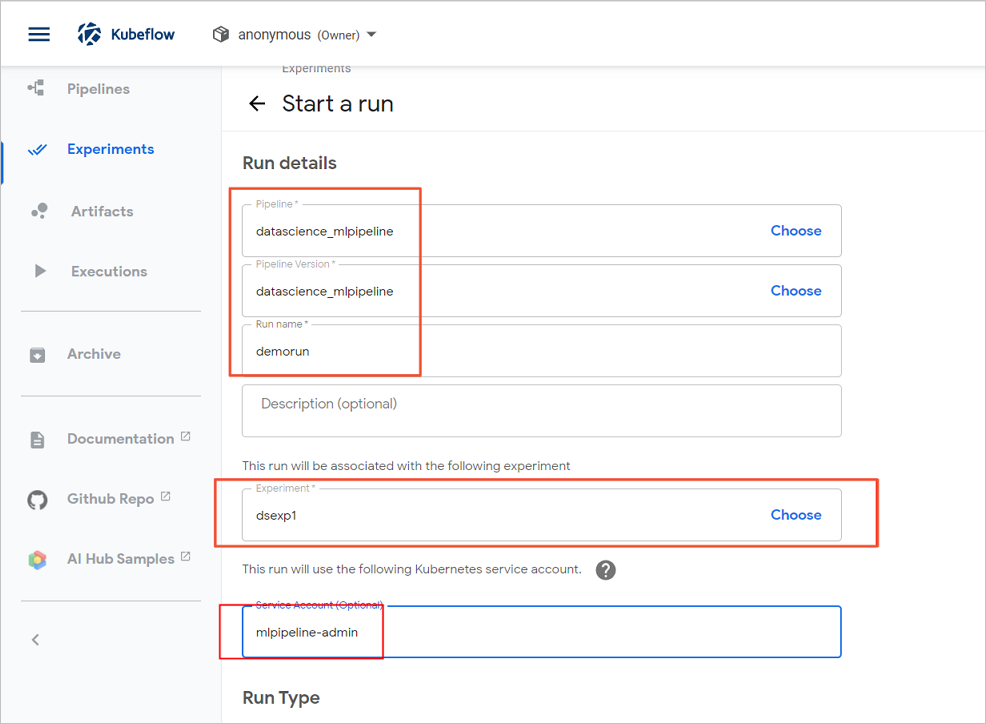
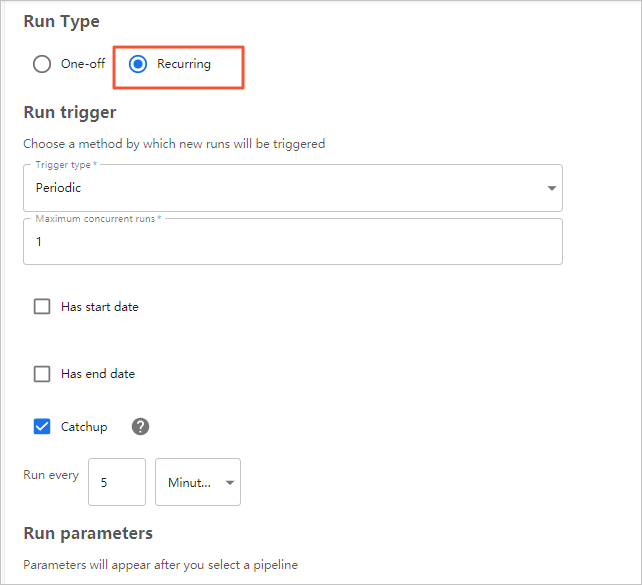
- Select Recurring for Run Type.
- Select the ***_mlpipeline.tar.gz file that you downloaded to your on-premises machine in Step 4: Build a pipeline.
- Click Start.
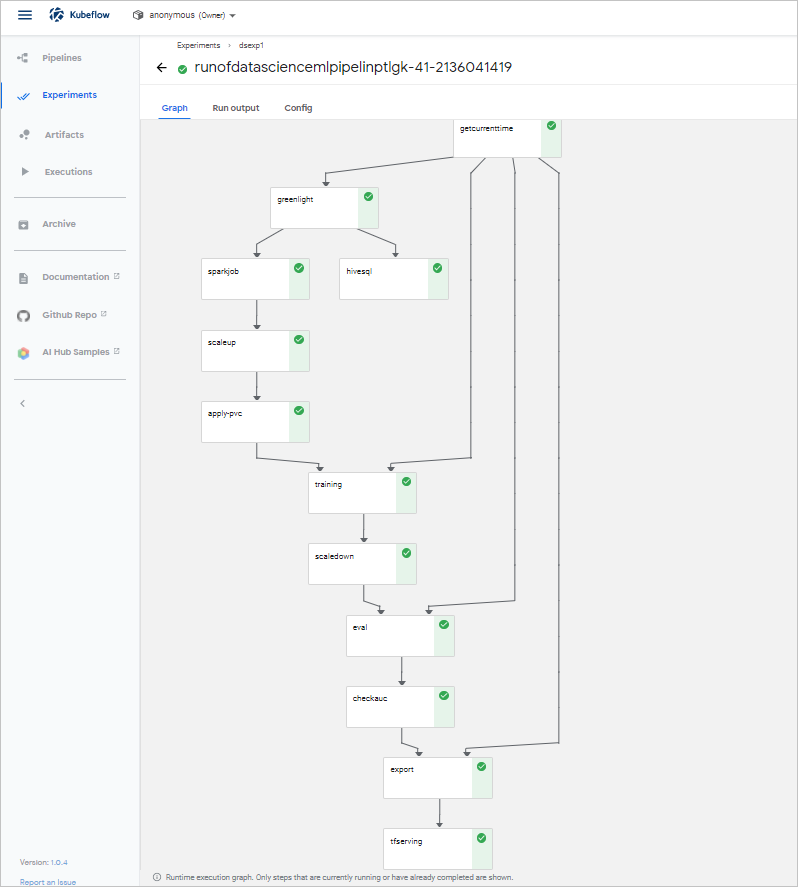
(Optional) Step 7: View the status of the pipeline
Step 8: Perform model prediction
- (Recommended) Use the HTTP request method
All development languages are supported for this method. The predict_rest.sh file contains the prediction code.
Run the following command to perform model prediction:Important In the command,defaultindicates the default namespace.easyrec-tfservingis the default name that is used to deploy the Serving service. You can modify configurations based on your business requirements.!/bin/sh curl -X POST http://127.0.0.1:31380/seldon/default/easyrec-tfserving/api/v1.0/predictions -H 'Content-Type: application/json' -d ' { "jsonData": { "inputs": { "app_category":["10","10"], "app_domain":["1005","1005"], "app_id":["0","0"], "banner_pos":["85f751fd","4bf5bbe2"], "c1":["c4e18dd6","6b560cc1"], "c14":["50e219e0","28905ebd"], "c15":["0e8e4642","ecad2386"], "c16":["b408d42a","7801e8d9"], "c17":["09481d60","07d7df22"], "c18":["a99f214a","a99f214a"], "c19":["5deb445a","447d4613"], "c20":["f4fffcd0","cdf6ea96"], "c21":["1","1"], "device_conn_type":["0","0"], "device_id":["2098","2373"], "device_ip":["32","32"], "device_model":["5","5"], "device_type":["238","272"], "hour":["0","3"], "site_category":["56","5"], "site_domain":["0","0"], "site_id":["5","3"] } } }'The following output is returned:{"jsonData":{"outputs":{"logits":[-7.20718098,-4.15874624],"probs":[0.000740694755,0.0153866885]}},"meta":{}} - Use Seldon CoreRun the following command to perform model prediction over the REST protocol:
python3.7 predict_rest.pyThe following output is returned:Response: {'jsonData': {'outputs': {'logits': [-2.66068792, 0.691401482], 'probs': [0.0653333142, 0.66627866]}}, 'meta': {}}Note For information about the prediction code, see the predict_rest.py file.
Feedback
If you have any questions when you use a Data Science cluster,contact technical support for further assistance. You can also join the DingTalk group numbered 32497587 for feedback or communication.