To protect your non-website services, such as client applications, with Anti-DDoS Pro and Anti-DDoS Premium, you must configure port forwarding rules. These rules ensure that traffic is scrubbed by Anti-DDoS Pro or Anti-DDoS Premium before it is forwarded to your origin server. This topic describes how to configure port forwarding rules for non-website services.
Usage notes
You can configure rules in batches only for Anti-DDoS Pro and Anti-DDoS Premium instances in the Chinese mainland.
For Anti-DDoS Pro and Anti-DDoS Premium instances in the Chinese mainland, you can turn on the Application-layer Protection switch to protect against application-layer attacks that use non-HTTP/HTTPS protocols.
After all Anti-DDoS Proxy instances under your account are released for 30 days, the system automatically clears all associated domain and port forwarding rules. The 30-day countdown starts from the release of the last instance.
When you purchase an Anti-DDoS Pro or Anti-DDoS Premium instance with the Enhanced Function Plan, ports commonly targeted by UDP reflection attacks are automatically blocked after you configure UDP port forwarding rules. This blocking typically does not affect your services. However, if your services use one of these ports, you must manually unblock it. For more information, see Set up UDP reflection attack mitigation.
NoteIf you have customized the ports for UDP reflection attack mitigation, your custom settings take precedence.
Prerequisites
An Anti-DDoS Proxy (Chinese Mainland) or Anti-DDoS Proxy (Outside Chinese Mainland) instance is purchased. For more information, see Purchase an Anti-DDoS Pro or Anti-DDoS Premium instance.
Add port forwarding rules
Add a single port forwarding rule
Log on to the Anti-DDoS Proxy console.
In the top navigation bar, select the region of your instance.
Anti-DDoS Proxy (Chinese Mainland): Choose the Chinese Mainland region.
Anti-DDoS Proxy (Outside Chinese Mainland): Choose the Outside Chinese Mainland region.
In the left-side navigation pane, choose .
Select an Anti-DDoS Pro or Anti-DDoS Premium instance and click Create Port Forwarding Rule. Configure the rule and click Confirm.
NoteThe
 icon next to Forwarding Protocol indicates a rule that is automatically generated to forward traffic for a website service. You cannot manually edit or delete these rules. The rule is automatically deleted when all website configurations that use it are removed from your Anti-DDoS Pro or Anti-DDoS Premium instance. For more information, see Add a website configuration.
If the server port in the website information is 80, a rule is automatically generated to forward TCP traffic over forwarding port 80.
If the server port in the website information is 443, a rule is automatically generated to forward TCP traffic over forwarding port 443.
Parameter
Description
Forwarding Protocol
The protocol used to forward traffic. Valid values: TCP and UDP.
ImportantThe Sec-MCA does not support UDP port forwarding.
Forwarding Port
The port used by the Anti-DDoS Pro or Anti-DDoS Premium instance to forward traffic.
NoteFor easier management, we recommend that you set Forwarding Port and Origin Server Port to the same value.
To prevent users from building their own DNS servers for protection, Anti-DDoS Pro and Anti-DDoS Premium does not support port 53.
For a single instance, each rule that uses the same protocol must have a unique forwarding port. If you try to add a rule with a protocol and forwarding port that are already in use, a rule conflict error occurs.
Avoid conflicts with rules that are automatically generated for website configurations.
Origin Server Port
The port used by the origin server.
Back-to-origin Scheduling Algorithm
The default mode is polling. This cannot be changed.
Application-layer Protection
This feature is available only for TCP-based services on Anti-DDoS Pro or Anti-DDoS Premium instances that have the enhanced function plan. It protects against application-layer attacks that use non-HTTP/HTTPS protocols.
For more information about attack types, see DDoS attack types that can be mitigated.
Set back-to-origin new connection timeout: The value must be an integer from 1 to 3. Unit: seconds.
When Anti-DDoS Pro and Anti-DDoS Premium tries to establish a new connection with a backend origin server, the connection times out if it is not established within the specified period. This setting can prevent attackers from using many fake HTTP requests, such as in a CC attack, to establish TCP connections with the backend origin server without sending valid data for an extended period.
Set back-to-origin read/write connection timeout: The value must be an integer from 60 to 600. Unit: seconds.
Read timeout: The period that Anti-DDoS Pro and Anti-DDoS Premium waits for a response from the backend origin server after sending a request. If no data response is received from the backend origin server within this period, the connection times out.
Write timeout: The period within which Anti-DDoS Pro and Anti-DDoS Premium must successfully send data to the backend origin server. If data is not sent within this period, the connection times out.
This setting can prevent attackers from establishing legitimate connections and then sending or receiving data at an extremely low rate to occupy backend origin server resources for an extended period.
Origin IP Address
The IP address of the origin server.
NoteThe origin server can be an Alibaba Cloud service or a service from a third-party provider. If the origin server is an Alibaba Cloud service, make sure that it belongs to your Alibaba Cloud account. If it belongs to another Alibaba Cloud account, contact your account manager before you add it.
You can add multiple origin IP addresses to implement automatic load balancing. Separate multiple IP addresses with commas (,). You can configure a maximum of 20 origin IP addresses.
Add port forwarding rules in a batch
You cannot enable the Application-layer Protection switch when you add port forwarding rules in batches. To enable this feature, you must first add the rules and then enable the Application-layer Protection switch for the rules in a separate batch operation.
On the Port Config page, click .
In the Add Rule dialog box, configure the rule and click OK.
Each line represents one rule and must contain the following four parameters separated by spaces: protocol, forwarding port, origin server port, and origin IP address.
In the Add Rule dialog box, select the rules to upload, and then click Upload.
What to do next
After you add the port forwarding rules, you must add the back-to-origin IP addresses of your instance to an allowlist on your origin server. Then, you must verify that the forwarding rules are effective on a local machine before you switch the traffic of your non-website services to your instance.
On your origin server, add the back-to-origin IP addresses of Anti-DDoS Pro and Anti-DDoS Premium to an allowlist. This step prevents security software on your origin server from blocking traffic that is forwarded from your instance. For more information, see Add back-to-origin IP addresses of Anti-DDoS Pro and Anti-DDoS Premium to an allowlist.
On a local machine, verify that the rule configuration is effective. This step prevents service interruptions that are caused by incorrect rule configurations. For more information, see Verify that traffic forwarding configurations are effective on a local machine.
WarningIf you switch your service traffic to your instance before the port forwarding rules take effect, your services may be interrupted.
Switch the traffic of your non-website services to your Anti-DDoS Pro or Anti-DDoS Premium instance.
Typically, you can switch the traffic by replacing the service IP address with the exclusive IP address of your instance. The specific method depends on your service development platform.
NoteIf your service uses a domain name to specify the server address, for example, the domain name is set as the server address in a game client or hard-coded in the client program, you must change the DNS record. At your DNS service provider, point the A record of the domain name to the exclusive IP address of your instance. For more information, see Change a DNS record.
In some scenarios, you may need to use a domain name to add a Layer 4 service. This lets you associate the service with multiple Anti-DDoS Pro or Anti-DDoS Premium IP addresses and enable automatic traffic switchover between them. In this case, we recommend that you add the non-website service by adding the domain name and modifying its CNAME record. For more information, see Use a CNAME record to add a non-website service.
More operations
Modify the origin IP address
The following figure shows how to modify the origin IP address for a single rule (①) and for multiple rules in a batch (②).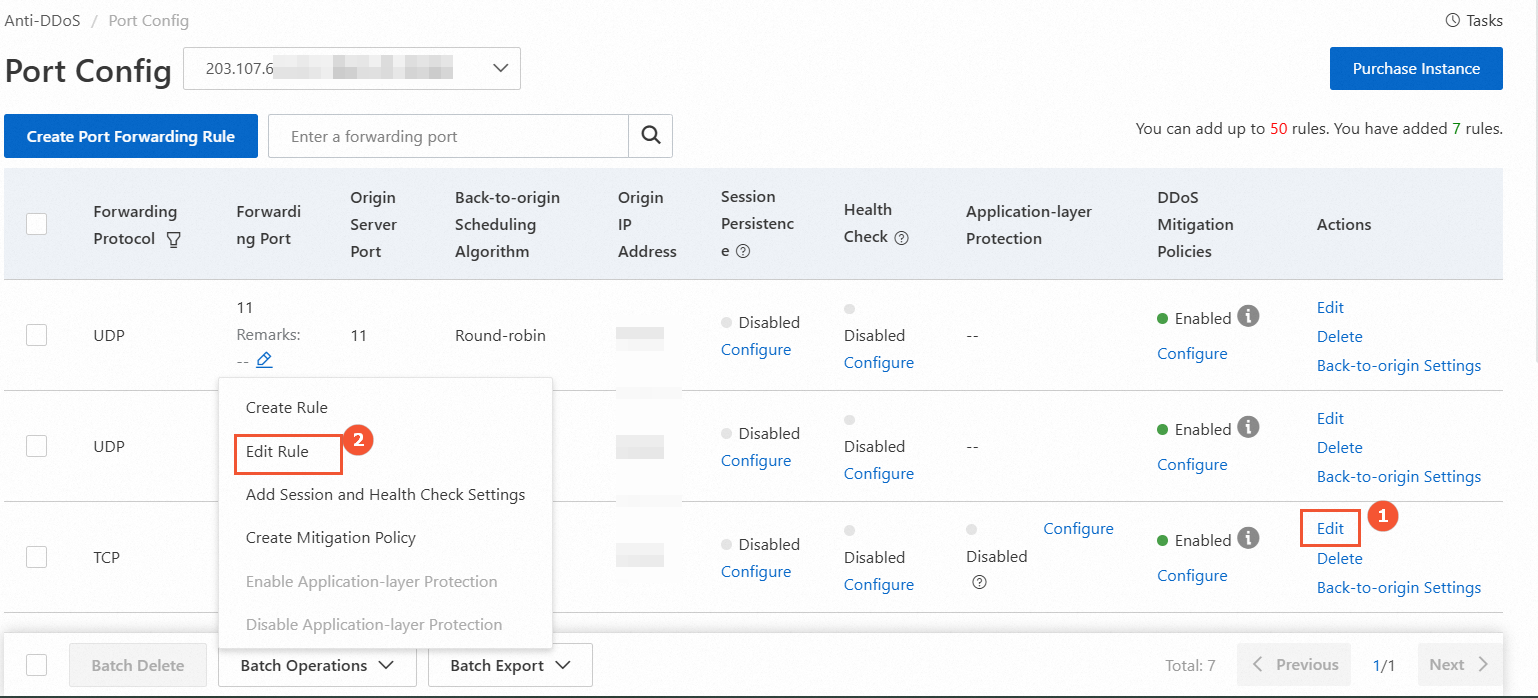
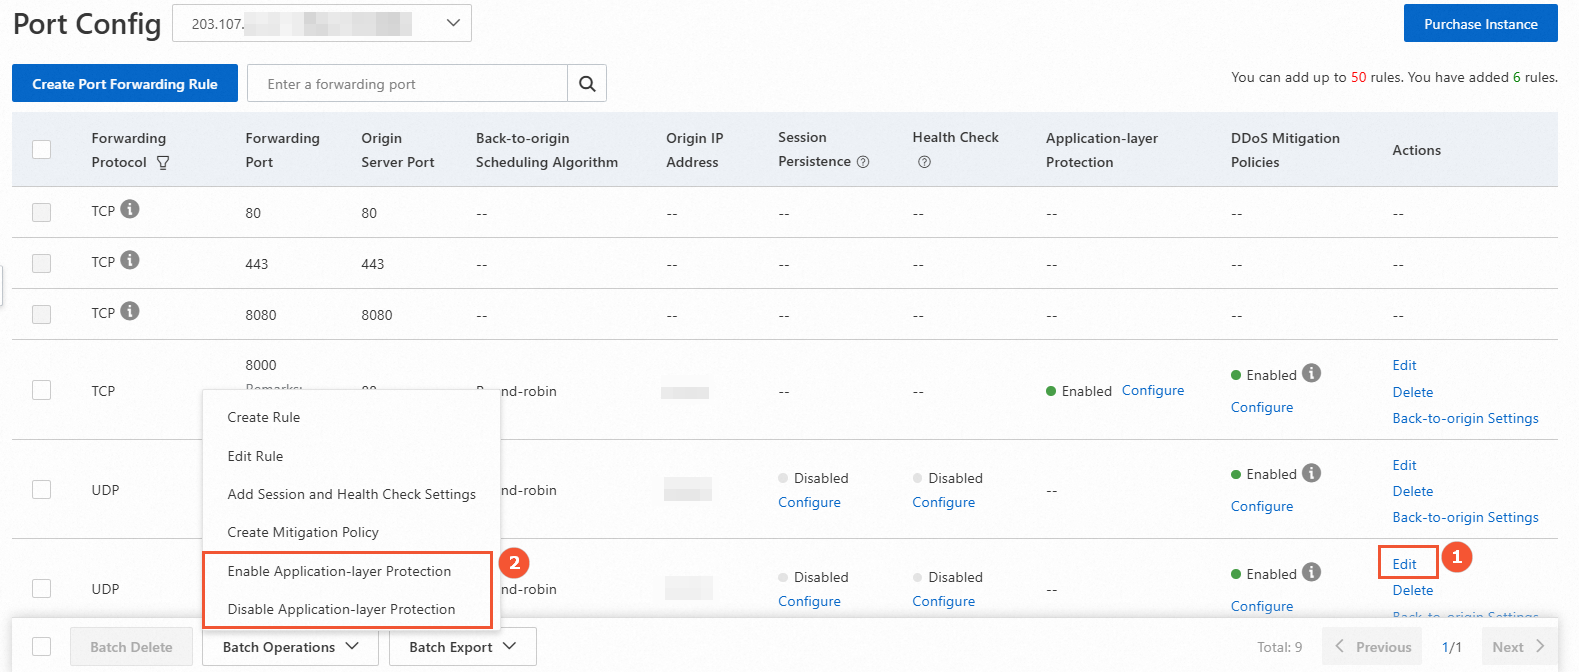
Modify the Application-layer Protection switch
The following figure shows how to modify the switch for a single rule (①) and for multiple rules in a batch (②). Do not click the Configure button under Application-layer Protection. This button opens the mitigation policies page.
When you turn on the switch in a batch, the default back-to-origin new connection timeout is 3 seconds, and the default back-to-origin read/write connection timeout is 600 seconds.
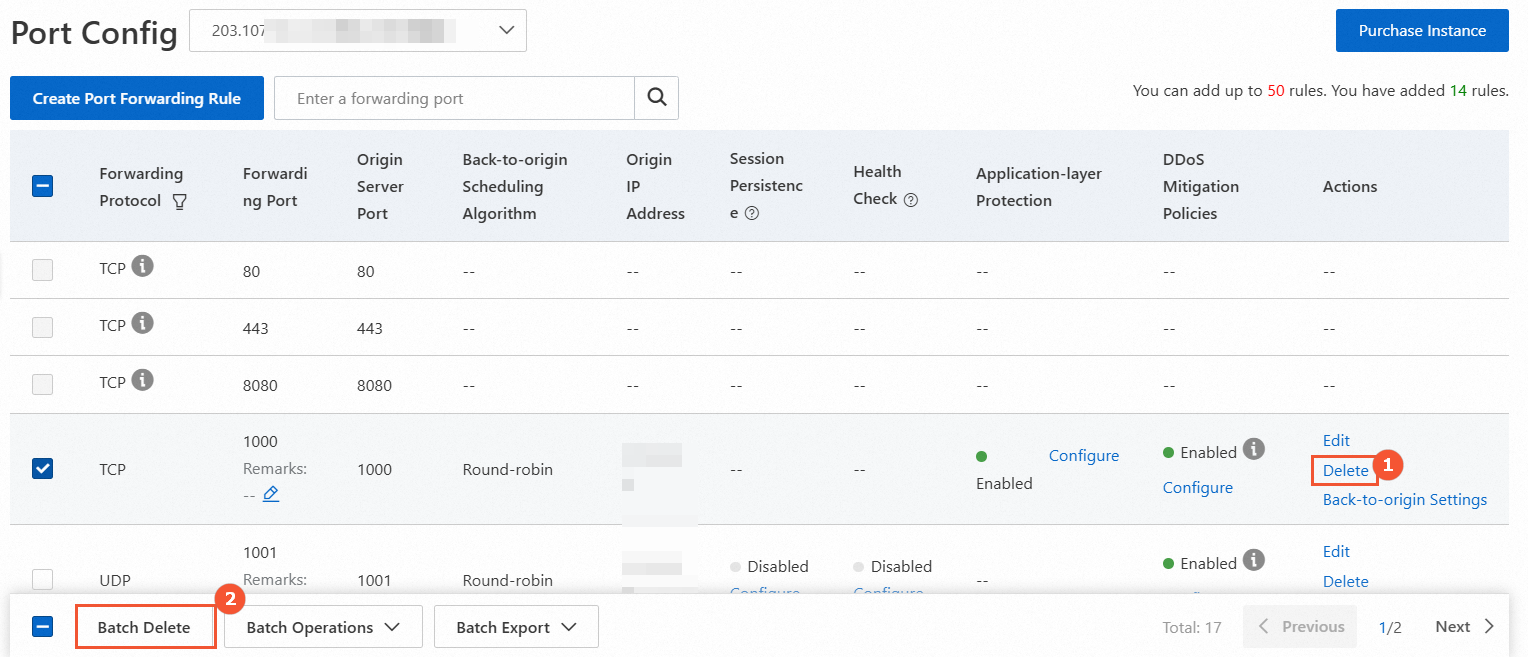
Delete port forwarding rules
If you no longer need to use an Anti-DDoS Pro or Anti-DDoS Premium IP address to forward traffic for a service, you can delete the manually added rule for that service. Before you delete the rule, you must point your service traffic back to the original service IP address. If you delete the rule before you redirect the traffic, your service may be interrupted.
The following figure shows how to delete a single rule (①) and multiple rules in a batch (②).