You can use secondary DNS with Private Zone to synchronize DNS data from your on-premises Internet Data Center (IDC) to Alibaba Cloud.
Basic concepts
For more information about the concepts and scenarios of secondary DNS, see Secondary DNS.
Limitations
After you enable secondary DNS for Private Zone, you cannot manually modify DNS records in the resolution settings. All DNS records must be synchronized from the primary DNS server.
The primary DNS server in your on-premises IDC must have a public IP address that supports data synchronization and have TCP/UDP port 53 open.
Enable secondary DNS
1. Modify your on-premises DNS configuration
To enable secondary DNS, you must first complete the required configuration on the primary DNS server. Then, you can enable secondary DNS synchronization for your internal domain name in the Alibaba Cloud DNS console. DNS system implementations vary. The following example shows how to configure a primary DNS server that uses BIND 9.9.4 or later.
In the BIND 9 configuration file
named.conf, add the following configuration:zone "domain name (such as example.com)" IN { type master; allow-update { 127.0.0.1; }; allow-transfer {key test_key;}; notify explicit; also-notify {39.107.XXX.XXX port 53 key test_key; 39.107.XXX.XXX port 53 key test_key;}; file "zone_file"; };Configuration description
zone: Specify your domain name (zone).
allow-transfer: Communication between the primary and secondary DNS servers is secured using TSIG. Specify the key name that allows the server to update records using TSIG.
Note: According to RFC standards, you can use Transaction Signature (TSIG) to secure DNS messages. TSIG uses a shared key and a one-way hash function to authenticate DNS messages. This ensures secure synchronization between the primary and secondary DNS servers. You can generate a TSIG key using MD5, SHA256, or SHA1, and then configure the key on both your primary and secondary DNS servers.
also-notify: When the zone changes, the primary DNS server notifies the secondary DNS servers. Multiple IP addresses are supported. You must enter the IP addresses of the Alibaba Cloud DNS secondary servers in this field. You can find the IP addresses on the Secondary DNS configuration page in the console.
Secondary DNS servers: 39.107.XXX.XXX, 39.107.XXX.XXXNote: After you update the
named.conffile, you must restart the application.rndc reconfig
2. Generate a TSIG key
You can use the dnssec-keygen tool to generate a TSIG key. Run the following command:
# BIND 9.9.4 dnssec-keygen -a HMAC-SHA256 -b 128 -n HOST test_key # BIND 9.16 or later tsig-keygen -a hmac-sha256 test_keyWarningYou can run this command only with root user permissions. Using root permissions involves risks. Improper operations may cause system instability or data security issues. Proceed with caution.
Parameter description:
-a: Specifies the encryption algorithm. Supported algorithms are HMAC-MD5, HMAC-SHA1, and HMAC-SHA256.
-b: Specifies the key size in bits. The key size depends on the algorithm. HMAC keys must be 1 to 512 bits in length.
-n: Specifies the key owner type. Valid values are ZONE, HOST, ENTITY, and USER. In most cases, you can use HOST or ZONE.
test_key: Specifies the key file name. You must use this name in the allow-transfer setting when you configure the primary DNS server with BIND, and in the TSIG key name field when you add the primary DNS server information.
After you run the command, two files are generated in the current directory: a
.keyfile and a.privatefile. For example, Ktest_key.+157+64252.key and Ktest_key.+157+64252.private. The.keyfile contains the DNS KEY record. You must use the value of this record in the TSIG key value field when you add the primary DNS server information. The.privatefile contains algorithm-specific fields.
Add the generated key to the
named.conffile.
You can paste the key into the
named.conffile in the following format:key "test_key" { algorithm hmac-sha256; secret "key_content";};Alternatively, you can use an include file.
Add the key to the
named.conffile using an include statement, such as:include "/etc/named/dns-key";The format of the /etc/named/dns-key file is as follows:
key "test_key" {
        algorithm hmac-sha256;
        secret "key-content";
};
3. Update internal domain name resolution settings
Log on to Alibaba Cloud DNS - Private Zone.
On the Authoritative Zone page, click the User Defined Zones tab and find the target domain name.
In the Actions column of the target domain name, click Secondary DNS.
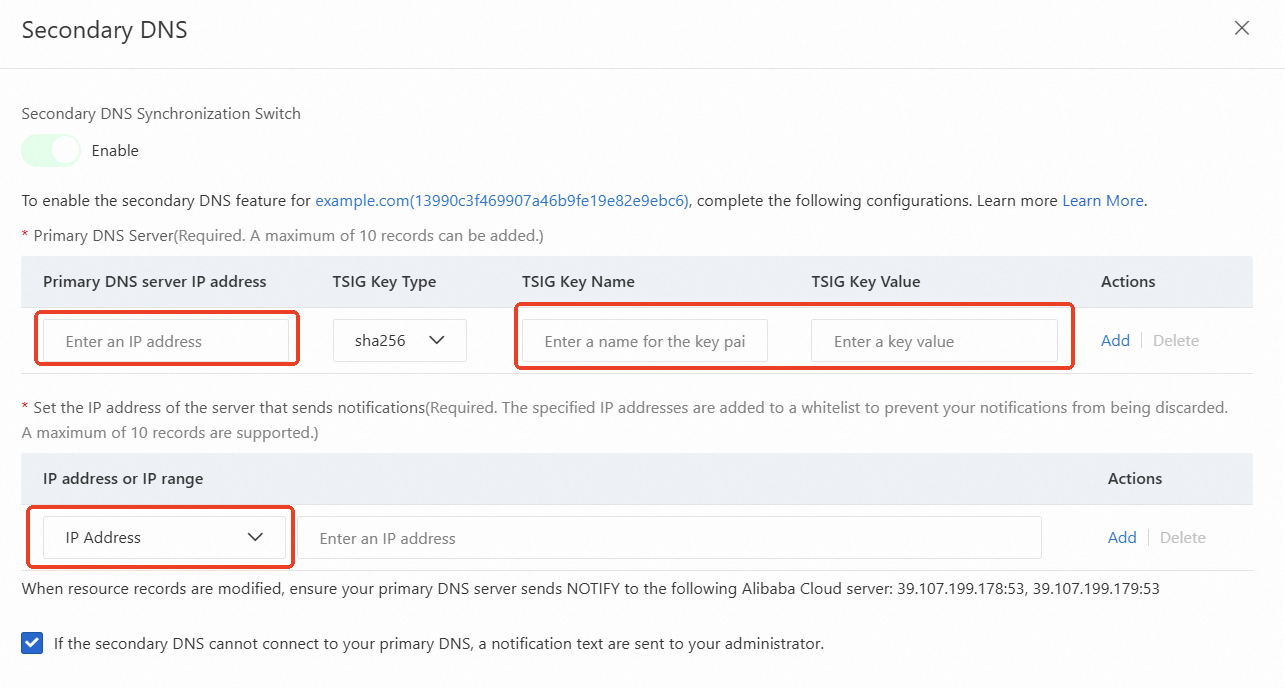
Complete the form.
Field
Description
Primary DNS Server
Configure the following parameters to add a primary DNS server:
Primary DNS server IP address: Enter the IP address of your primary DNS server. Make sure that the server is accessible from the internet.
TSIG Key Type: Select an encryption algorithm. The options are SHA1, SHA256, and MD5.
TSIG Key Name: Enter the generated TSIG key name.
TSIG Key Value: Enter the generated TSIG key value.
Set the IP address of the server that sends notifications
Enter the IP address or IP range of the server that sends notifications. When DNS records on the primary DNS server change, the primary DNS server sends a NOTIFY message to the secondary DNS server based on the standard NOTIFY protocol. You must configure the IP address of the sender to prevent request rejection.
If the secondary DNS cannot connect to your primary DNS, a notification text are sent to your administrator.
If you enable this feature, Alibaba Cloud DNS sends an SMS notification when the connection between the primary and secondary DNS servers is interrupted.
Other operations
Update synchronization settings
If the information about your primary DNS server changes, you must update the configuration of the secondary DNS server.
Log on to Alibaba Cloud DNS - Private Zone.
On the Authoritative Zone page, click the User Defined Zones tab and find the target domain name.
After you update the configuration, the secondary DNS server automatically connects to the primary DNS server to retrieve the latest resource record data.
Disable or delete secondary DNS
If you want to stop data synchronization between the primary and secondary DNS servers or stop using secondary DNS, you can disable the feature.
Log on to Alibaba Cloud DNS - Private Zone.
On the Authoritative Zone page, click the User Defined Zones tab and find the target domain name.
Click Secondary DNS to open the configuration page.
Click the Secondary DNS Synchronization Switch to enable or disable secondary DNS.
To permanently remove the secondary DNS server, click Delete secondary DNS. Then, in your on-premises BIND 9 DNS software, you must remove the notify server configuration.