This topic describes how to enable the Secondary DNS service.
Feature limits
Secondary DNS is available to users of Ultimate Edition. Purchase now Hosted Public Zone.
DNSSEC is not supported.
Alibaba Cloud DNS can only be used as a secondary DNS server, and your current DNS server is the primary DNS server.
After secondary DNS is enabled for a domain, you cannot manually modify the DNS records. All DNS records must be synchronized from the primary DNS server.
The secondary DNS feature is applicable to users who use on-premises DNS servers or third-party DNS hosting services. If you use a third-party DNS hosting service, make sure that your current service provider also supports the Secondary DNS feature.
If you use an on-premises DNS server, tests show that secondary DNS is compatible with BIND v9.1.0 and later. Your DNS server must support the XFR and NOTIFY protocols that comply with RFC standards.
I. Preparations
To enable secondary DNS, you must first configure the primary DNS server, and enable secondary DNS in Alibaba Cloud DNS. Because DNS systems can be implemented in various ways, the following example shows how to configure a self-built primary DNS server (BIND 9.9.4 and later).
1. Generate a TSIG key
You can use the dnssec-keygen tool to generate a TSIG key. The command is as follows:
dnssec-keygen -a HMAC-SHA256 -b 128 -n HOST test_key
If the key file cannot be generated for a long time, you can try adding the parameter -r /dev/urandom, as follows:
dnssec-keygen -a HMAC-SHA256 -b 128 -n HOST -r /dev/urandom test_key
Command description
• -a: Specifies the encryption algorithm. We support HMAC-MD5, HMAC-SHA1, or HMAC-SHA256.
• -b: Specifies the number of bytes in the key. The size of the key file depends on the algorithm used. HMAC keys must be between 1 and 512 bits.
• -n: Specifies the owner type of the key file. Valid values include the following: ZONE, HOST, ENTITY, and USER. HOST or ZONE is commonly used.
• test_key: Specifies the name of the key file. This name is used to fill in the allow-transfer field when configuring the primary DNS server with BIND, and to fill in the TSIG name when adding primary DNS server information.
• -r /dev/urandom: Random number generator.
After the command is executed, two files with the extensions ".key" and ".private" are generated in the current directory (for example, "Ktest_key.+157+64252.key" and "Ktest_key.+157+64252.private"). The ".key" file contains the DNS KEY record, which is used to fill in the TSIG value when adding primary DNS server information during Secondary DNS configuration. The ".private" file contains fields specified by the algorithm.
2. Configure the primary DNS server using BIND
Complete the following configuration in the configuration file /etc/named.conf:
zone "domain name (e.g., xxx.com)" IN {
type master;
allow-update { 127.0.0.1; };
allow-transfer {key test_key;};
notify explicit;
also-notify {47.92.XX.XX port 53  key test_key;47.92.XX.XXX port 53  key test_key;};
file "zone_file";
};
Description
zone: Configure your specified domain name.
allow-transfer: Currently, communication between primary and secondary DNS servers is supported through TSIG. Specify the KEY name that allows servers through TSIG.
Note: According to RFC standard protocols, we recommend using Transaction Signatures (TSIG) to ensure the security of DNS messages. In most cases, TSIG uses shared secret keys and one-way hashing to authenticate DNS records. This ensures that data can be synchronized between the primary and secondary DNS servers in a secure manner. You can generate a TSIG key that is encrypted by the MD5, SHA-256, or SHA-1 algorithm and then specify the key in the configurations of your primary and secondary DNS servers. For more information, see the Generate a TSIG key section above.
also-notify: When a zone changes, you need to notify the IP addresses of the secondary DNS servers. Multiple IP addresses are supported. Specify the Cloud DNS secondary DNS server IP addresses here. You can find the specific IP addresses on the Secondary DNS configuration page in the console.
DNS server name:
Corresponding IP addresses: 47.92.XX.XX,47.92.XX.XXXtest_key: Specifies the name of the key file. This name is used to fill in the allow-transfer field when configuring the primary DNS server with BIND, and to fill in the TSIG name when adding primary DNS server information.
3. Add the generated key to the named.conf file using one of the following two methods
Paste it into named.conf in the following format
key "test_key" { algorithm hmac-sha256; secret "encrypted string from the .key file";};
Using the include file method
You need to add it to the named.conf file using the include method, for example:
include "/etc/named/dns-key";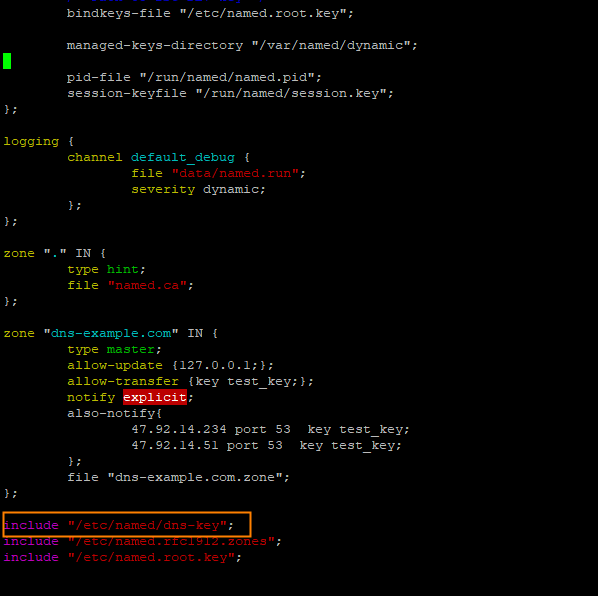 /etc/named/dns-key file format is as follows
key "test_key" {
        algorithm hmac-sha256;
        secret "encrypted string from the .key file";
};Note: After you complete the configuration in the named.conf file, you need to restart the application.
1. Restart command: systemctl restart named
II. Start configuration
4. Configure secondary DNS
Log on to Alibaba Cloud DNS - Public Zone.
In the Actions column of the domain name for which you want to enable secondary DNS, select
 > Secondary DNS.
In the Secondary DNS panel, configure Primary DNS Server and Set the IP address of the server that sends notifications. After the configuration is complete, click OK.
Primary DNS Server Information Settings: You can click Add in the Actions column on the right to add a primary DNS record.
Primary DNS Server IP Address: Enter the IP address of the primary DNS server. Make sure that the address is accessible from the public network.
TSIG Key Type: Select an appropriate encryption algorithm type. Valid values include the following: md5, sha1, and sha256.
TSIG Key Name: Enter the generated TSIG name, which is test_key.
TSIG Key Value: Enter the generated TSIG value, which is the encrypted string in the TSIG key file .key.
Set Server IP Addresses for Sending NOTIFY Messages: You can click Add in the Actions column on the right to enter the IP address or IP range of the server that sends notifications.
IP Address or Range: Select IP Address or IP Range.
IP Address: When a primary DNS record changes, a change notification needs to be sent to the Cloud DNS secondary DNS server (based on the standard NOTIFY protocol). Therefore, you need to configure the IP address of the server that sends change notifications here to prevent your requests from being rejected.
IP Range: Enter the start IP address and end IP address.
Select whether to use fault notifications: When enabled, we will send an SMS notification to your administrator if the secondary DNS server cannot connect to your primary DNS server. Finally, click OK.
After completing the Secondary DNS configuration above, on the Public Zone page, you can see the configured domain names. Domain names with the
 icon indicate that Secondary DNS is enabled.
Click a domain name with Secondary DNS enabled. On the Settings page, you can view the primary-secondary link status.
If the primary-secondary link status is Normal: This indicates that the secondary DNS server can connect to the primary DNS server normally.
If the primary-secondary link status is Blocked: This indicates that the secondary DNS server cannot connect to the primary DNS server.
Please check the following 3 points:
① Whether the Secondary DNS configuration parameters are filled in correctly, and whether the IP address of the primary DNS server is accessible from the public network.
② Whether the primary DNS server is currently operating normally.
③ Whether the primary DNS configuration file complies with RFC standards. For example, the serial number value in the SOA record must be within the range of 1 to 2^32-1. If the serial number value in the SOA of the primary DNS exceeds this range, the secondary DNS will stop synchronizing resource records from the primary DNS. For more information, see: Synchronization exception description.
After secondary DNS is enabled and the status is normal, if you want to trigger synchronization directly without using the NOTIFY protocol, you can perform the following operations: Domain Resolution - Click the domain name with Secondary DNS enabled - DNS Settings - Manually Trigger Synchronization.
5. Configure Domain DNS
After enabling Secondary DNS, there are three ways to work with the primary DNS:
(1) Configure only the primary DNS
All domain resolution is performed by the primary DNS. The secondary DNS performs real-time data backup.
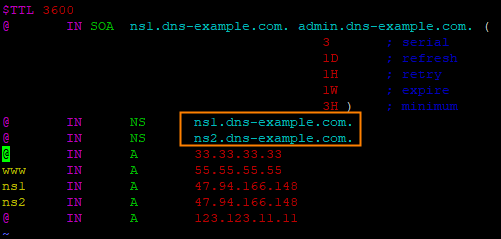
NS record configuration for the domain @ record:
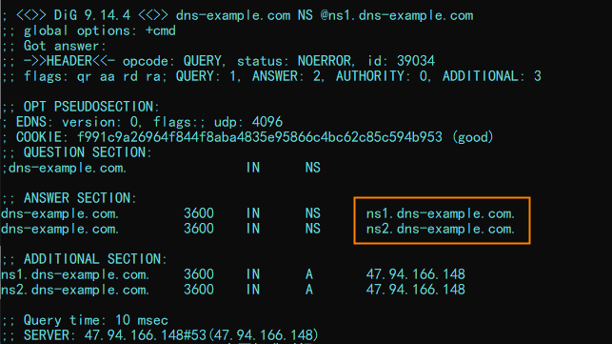
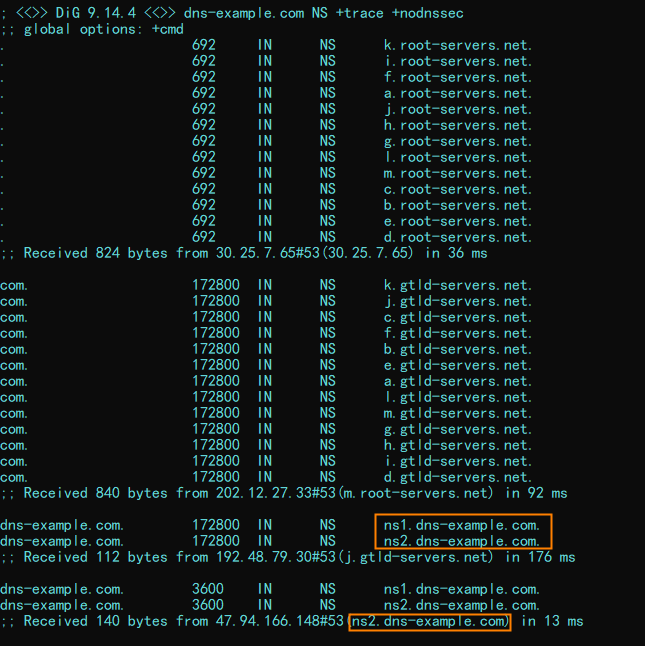
To view the authoritative response, execute dig dns-example.com NS @ns1.dns-example.com. The result is:
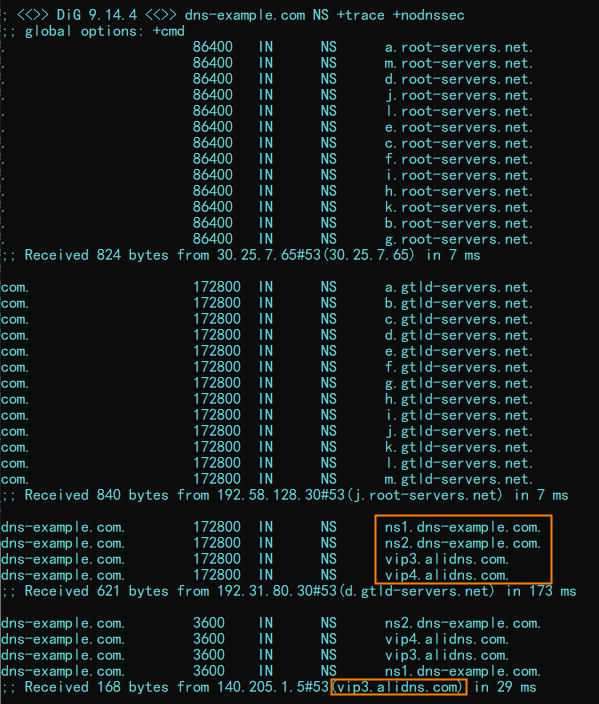
To view the recursive resolution response, execute dig dns-example.com NS +trace +nodnssec. The result is:
(2) Configure only the secondary DNS
All domain resolution is provided by the secondary DNS (Cloud DNS), which better protects the security of the primary DNS.
NS record configuration for the root domain @:

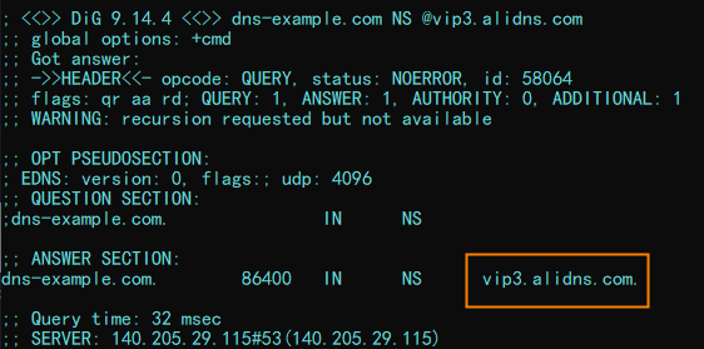
To view the authoritative response, execute dig dns-example.com NS @vip3.alidns.com. The result is:
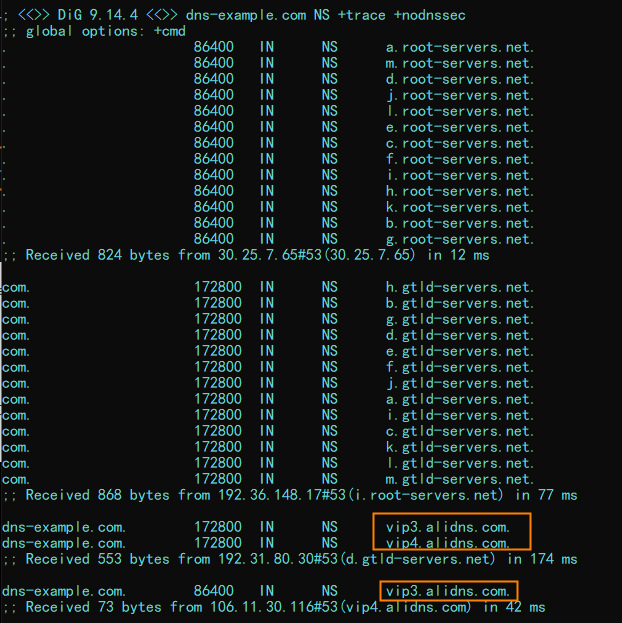
To view the recursive resolution response, execute dig dns-example.com NS +trace +nodnssec. The result is:
(3) Configure both primary and secondary DNS
LocalDNS uses a specific algorithm to send authoritative requests to one of the authoritative server groups, which then responds with answers.
NS record configuration for the root domain @:

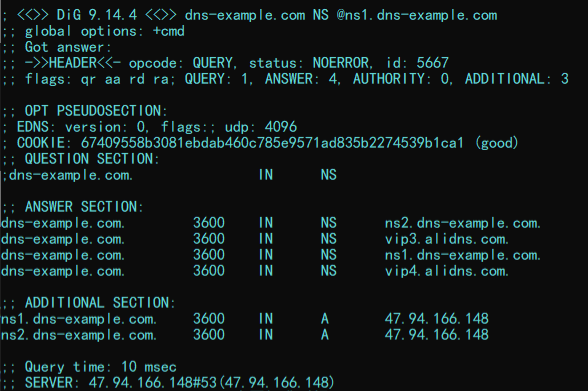
To view the authoritative response, execute dig dns-example.com NS @ns1.dns-example.com. The result is:
To view the recursive resolution response, execute dig dns-example.com NS +trace +nodnssec. The result is: