Anti-DDoS Diversion mitigates volumetric DDoS attacks for data centers, small Internet service providers (ISPs), customers outside the Chinese mainland, and customers with their own Border Gateway Protocol (BGP) networks. You do not need to change your service IP addresses or network architecture. By combining CloudMonitor alerts with API calls, you can automate the full detect-activate-restore cycle.
How Anti-DDoS Diversion works
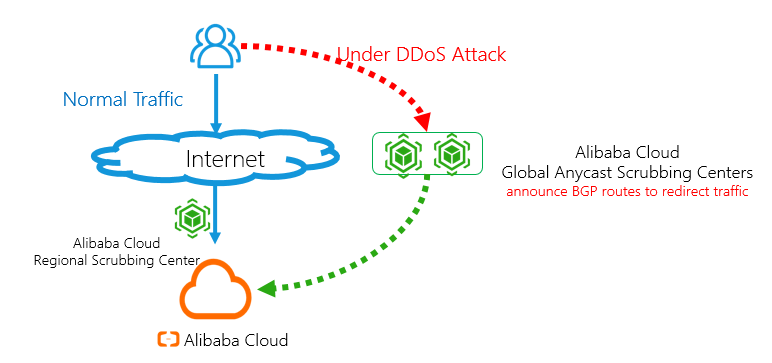
Normal traffic or small-scale attacks: Traffic is forwarded to the local scrubbing center of the Anti-DDoS Origin instance of a paid edition. Service latency does not increase.
Volumetric DDoS attacks: Scrubbing centers distributed across the world announce routes to forward and scrub the traffic. Service latency slightly increases, but the mitigation capability can reach a Tbit/s level.
End-to-end workflow
The automated protection workflow consists of five stages:
Detect: A CloudMonitor alert rule monitors blackhole filtering and traffic scrubbing events from your Anti-DDoS Origin instance of a paid edition.
Activate: When an alert fires, call
ConfigNetStatusto redirect traffic to the global anycast scrubbing centers.Deactivate blackhole filtering (if triggered): Call
DeleteBlackholeto restore connectivity.Monitor: Call
DescribeTrafficto check whether the attack has stopped.Restore: After the attack stops, call
ConfigNetStatusagain to disable traffic redirection during off-peak hours.
Prerequisites
Before you begin, make sure that you have:
An Anti-DDoS Origin instance of a paid edition. For more information, see Purchase an Anti-DDoS Origin instance
An Anti-DDoS Diversion instance (contact the sales team to enable)
Alert contacts and alert contact groups in CloudMonitor. For more information, see Create an alert contact or alert contact group
API request parameters in this guide use the<parameter description>placeholder format. For example,SaleId=<yourInstanceId>means you must replace<yourInstanceId>with your actual Anti-DDoS Diversion instance ID. Contact the sales team to get your instance IDs.
Step 1: Set up a CloudMonitor alert rule
Configure an alert rule to monitor blackhole filtering and traffic scrubbing events in the local scrubbing center of your Anti-DDoS Origin instance of a paid edition.
Log on to the CloudMonitor console.
In the left-side navigation pane, choose Event Center > System Event.
On the Event Monitoring tab, click Save as Alert Rule.
In the Create/Modify Event-triggered Alert Rule panel, configure the following parameters: For more information about other parameters, see Manage system event-triggered alert rules.
Parameter Value Product Type ddosbgp Event Type DDoS Attacks Event Level CRITICAL Event Name ddosbgp_event_blackhole and ddosbgp_event_clean Resource Range All Resources Click OK.
The alert rule takes effect immediately. When the Anti-DDoS Origin instance of a paid edition detects a DDoS attack, all alert contacts in the alert contact group receive a notification.
Step 2: Enable traffic redirection when an attack occurs
When you receive a blackhole filtering or traffic scrubbing alert, call ConfigNetStatus to redirect traffic to the global anycast scrubbing centers of Alibaba Cloud. For more information, see ConfigNetStatus.
Request parameters:
| Parameter | Value | Description |
|---|---|---|
Action | ConfigNetStatus | The API operation name. |
Net | <yourNet> | The network segment to announce. |
Status | enable | Enables traffic redirection. |
SaleId | <yourInstanceId> | The ID of your Anti-DDoS Diversion instance. |
Step 3: Deactivate blackhole filtering (optional)
If blackhole filtering was not triggered, skip this step.
If blackhole filtering was triggered, call DeleteBlackhole 10 seconds after you enable traffic redirection. This wait makes sure that traffic redirection is active before blackhole filtering is removed. For more information, see DeleteBlackhole.
Request parameters:
| Parameter | Value | Description |
|---|---|---|
Action | DeleteBlackhole | The API operation name. |
InstanceId | <yourOnDemandInstanceId> | The ID of your Anti-DDoS Origin instance. |
Ip | <yourOnDemandInstanceIp> | The IP address under blackhole filtering. |
Step 4: Check whether the attack has stopped
Call DescribeTraffic to monitor traffic and determine whether the DDoS attack has stopped. For more information, see DescribeTraffic.
Request parameters:
| Parameter | Value | Description |
|---|---|---|
Action | DescribeTraffic | The API operation name. |
Ipnet | <onDemandInstanceIpnetToQuery> | The IP network segment to query. |
InstanceId | <yourInstanceId> | The ID of your Anti-DDoS Origin instance. |
StartTime | <startTimeToQuery> | The beginning of the query time range. |
EndTime | <endTimeToQuery> | The end of the query time range. |
Attack stopped criteria: The attack is considered stopped when the AttackBps response parameter remains below 300000 (Kbit/s) for more than 30 minutes. The AttackBps parameter indicates the volume of attack traffic in Kbit/s.
Step 5: Disable traffic redirection after the attack stops
After the DDoS attack stops, call ConfigNetStatus to disable traffic redirection in the Anti-DDoS Diversion instance. Perform this operation during off-peak hours to minimize service impact caused by traffic switching. For more information, see ConfigNetStatus.
Request parameters:
| Parameter | Value | Description |
|---|---|---|
Action | ConfigNetStatus | The API operation name. |
Net | <yourNet> | The network segment to stop announcing. |
Status | disable | Disables traffic redirection. |
SaleId | <yourInstanceId> | The ID of your Anti-DDoS Diversion instance. |
After you disable traffic redirection, traffic returns to the normal path through the local scrubbing center of your Anti-DDoS Origin instance of a paid edition.