The Hologres data synchronization solution provides a one-click feature to add or remove synchronization tables. This allows you to quickly add new tables to or remove existing tables from a running synchronization task.
Prerequisites
You must have a running synchronization task created with the Hologres data synchronization solution. For more information, see one-click real-time synchronization to Hologres.Add tables to a synchronization task
- On the Sync Tasks page, find the target synchronization task and choose to open the task configuration page.
- Add source tables and update the source-to-destination table mapping.
- On the Configure Source and Synchronization Rule page, in the Select Source Table for Synchronization area, select the Source Table that you want to add and click the
 icon to move it to the Selected Source Table list.
 - Click Next step.
- On the Configure Destination Table page, click Refresh source table and Hologres table mapping to update the table mappings.
- On the Configure Source and Synchronization Rule page, in the Select Source Table for Synchronization area, select the Source Table that you want to add and click the
- Click Next step.
- Configure the Set Processing Policy for DDL Messages.
Data sources, such as MySQL, can contain many Data Definition Language (DDL) operations. For real-time synchronization, use the Set Processing Policy for DDL Messages page to configure how different DDL message types are synchronized to the destination based on your business requirements.
- Click Complete configuration to return to the Solution task list page.
- In the Operation column of the task that you modified, choose . In the Submit and Run dialog box, click Determine to run the task.
When you submit the task, the system compares its tables with those from the last successful run. If it detects new tables, the system starts the process of adding them.
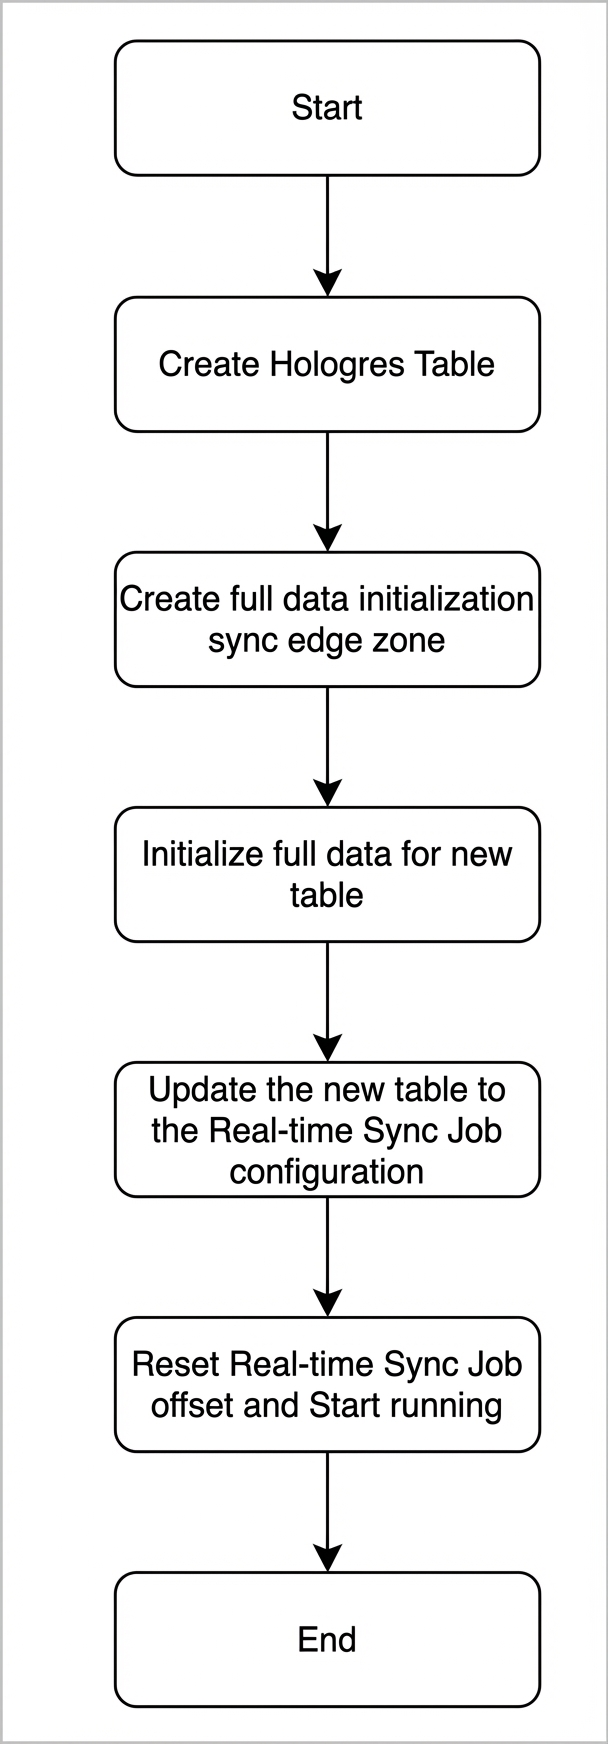 Note When the task checkpoint of a real-time synchronization task is reset and the task is restarted, the system appends the change data for the newly added tables. The task checkpoint is reset to the time when the full data initialization for the new tables started. For example, your synchronization task starts at 8:00 and is still running at 9:00. If you add a new table at 9:00, the full data initialization for the new table starts at 9:00 and takes one hour to complete, finishing at 10:00. In this case, the running real-time synchronization task stops, and its task checkpoint is reset to 9:00 to append the incremental data. The system then re-synchronizes all incremental data for the changed tables between 9:00 and 10:00 to the destination Hologres tables. The one-click table addition feature guarantees only eventual consistency.
 - View the details of the tables added to the synchronization task.
- Go to the Task List page. In the Operation column of the target task, click Details to open the task's execution details page.
- In the Steps area, click Details next to Show added/removed tables.
If the status of Show added/removed tables is Successful, the new tables were successfully added to the synchronization task.
- View the tables added to the synchronization task.
Remove tables from a synchronization task
- On the Sync Tasks page, find the target synchronization task and choose to open the task configuration page.
- Remove source tables and update the source-to-destination table mapping.
- On the Configure Source and Synchronization Rule page, in the Select Source Table for Synchronization area, select the table that you want to remove from the Selected Source Table list and click the
 icon to move it back to the Source Table list.
 - Click Next step.
- On the Configure Destination Table page, click Refresh source table and Hologres table mapping to update the table mappings.
- On the Configure Source and Synchronization Rule page, in the Select Source Table for Synchronization area, select the table that you want to remove from the Selected Source Table list and click the
- Click Next step.
- Configure the Set Processing Policy for DDL Messages.
Data sources, such as MySQL, can contain many Data Definition Language (DDL) operations. For real-time synchronization, use the Set Processing Policy for DDL Messages page to configure how different DDL message types are synchronized to the destination based on your business requirements.
- Click Complete configuration to return to the Solution task list page.
- In the Operation column of the task that you modified, choose . In the Submit and Run dialog box, click Determine to run the task.
When you remove a source table from a running synchronization task, the system removes the table from the real-time synchronization process. When you resubmit the task, data synchronization resumes from the restart time.
- View the details of the tables removed from the synchronization task.
- Go to the Task List page. In the Operation column of the target task, click Details to open the task's execution details page.
- In the Steps area, click Details next to Show added/removed tables.
If the status of Show added/removed tables is Successful, the specified source tables were successfully removed from the synchronization task.
- View the tables that were removed during this execution.