This tutorial demonstrates how to analyze data for an ordering business in Dataphin. It covers partitioning data into subject areas, defining business processes, and building logical models and statistical metrics, such as atomic and derived metrics.
Prerequisites
Purchase MaxCompute and Dataphin (Intelligent R&D Edition). When you purchase them, select the same region for both services.
Background information
Standardized definition is based on the theory of dimensional modeling. It involves partitioning and defining subject areas, business processes, dimensions, atomic metrics, statistical periods, and derived metrics.
In this tutorial, you will create different metrics based on business scenarios to analyze data from an e-commerce ordering process.
Scenario description
This tutorial uses the example of a transaction between a buyer and a seller to describe the complete lifecycle of an e-commerce ordering process.
1. The buyer selects product specifications and agrees with the seller on the price and payment method. The system then waits for the buyer to pay the deposit.
2. An order is created after the buyer pays the deposit.
3. The seller arranges for logistics to ship the products based on the buyer's order.
4. The buyer tracks the shipment. After receiving the products, the buyer confirms that the specifications and quantity are correct and then pays the remaining balance.
5. After both parties confirm that the products and price are correct, the order is closed. This completes the ordering process.

Based on this scenario, this tutorial shows you how to create a derived metric in Dataphin for the number of orders with a total single-transaction amount exceeding 500,000 in the last 7 days. The process is shown in the following figure.

Steps
Step 1: Prepare resources
Activate the Dataphin service. For more information, see or Activate Dataphin--Semi-managed.
Create a project in Dataphin. Projects are used for multi-user fencing and data access. For more information, see or Create a general-purpose project.
NoteSet the project name to dataphin_order. We recommend that the project name be the same as the compute engine name.
Create a MaxCompute project in the MaxCompute console. SQL nodes and logical table tasks use the MaxCompute compute engine for data processing. For more information, see or Create a MaxCompute project.
Step 2: Prepare physical tables and data
On the Dataphin home page, choose Development > Data Studio from the top menu bar and select the dataphin_order project in the development environment.
In the left navigation pane, choose Data Processing > Tables. On the Tables page, click the Create
 icon.
icon.In the Create Physical Table dialog box, configure the
s_userphysical table as shown in the following figure. Then, click OK.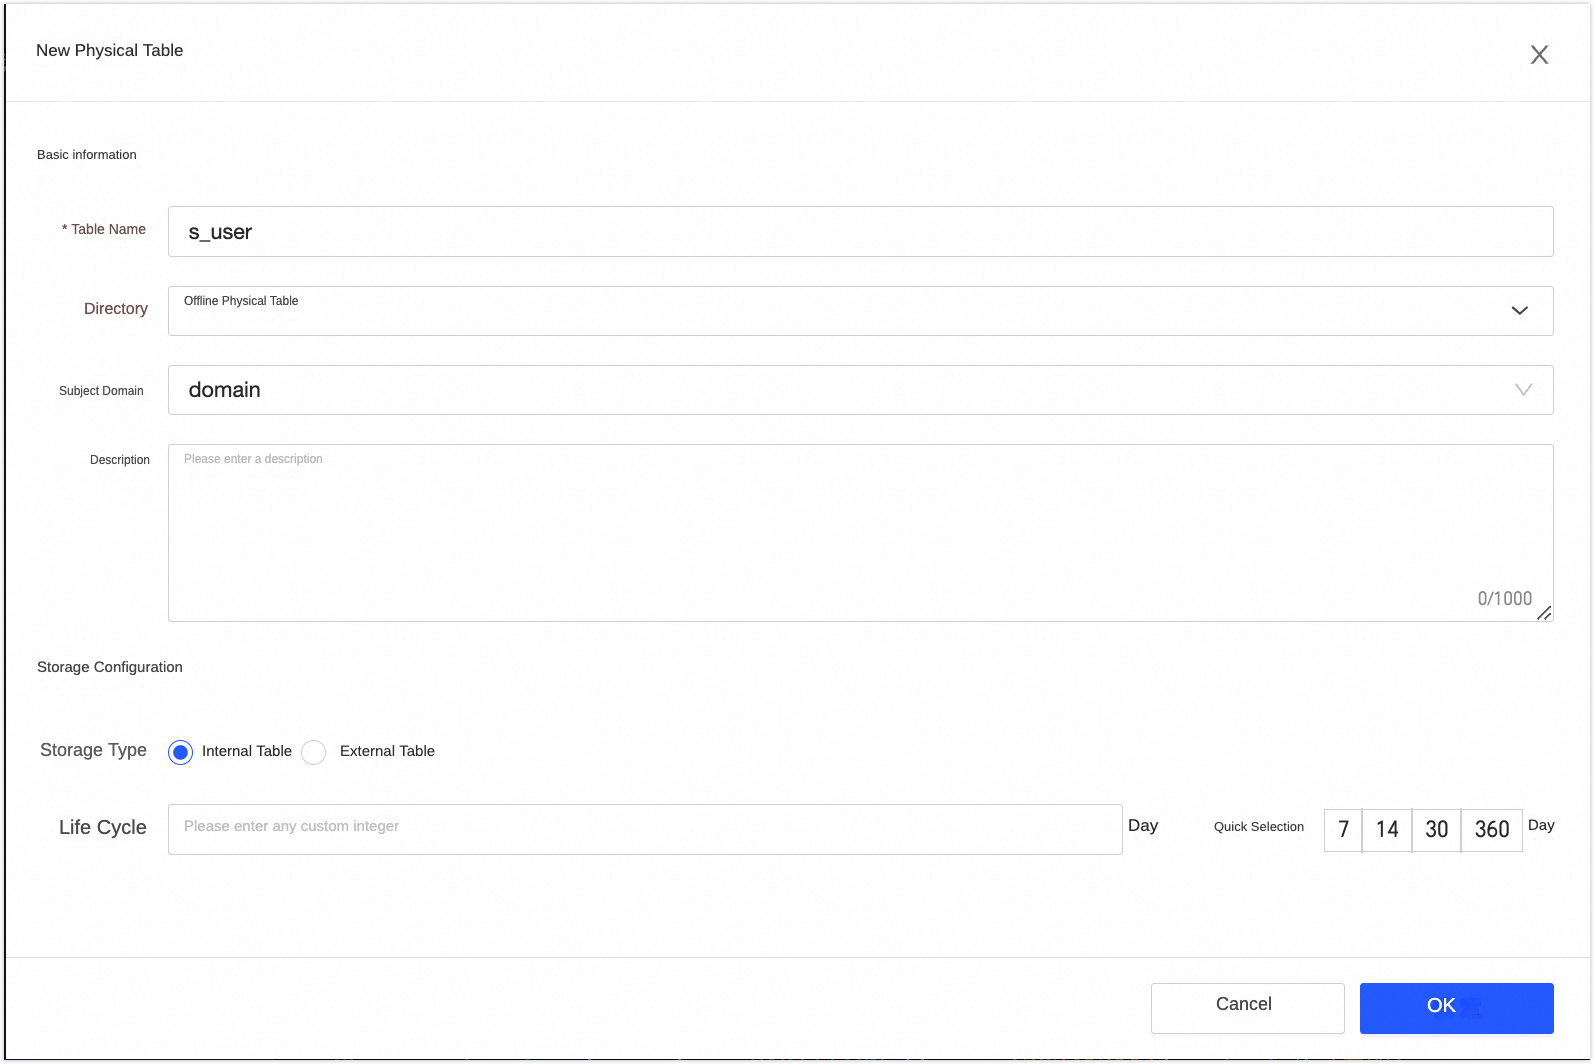
On the Physical Table Details page, click the Import from CREATE TABLE Statement button. Add the CREATE TABLE statements from the code blocks below to Dataphin. Click Submit, click OK and Submit, and then click Publish.
The CREATE TABLE statements are as follows:
CREATE TABLE IF NOT EXISTS s_user (
  id BIGINT COMMENT 'ID'
  ,gmt_create STRING COMMENT 'Creation time'
  ,gmt_modified STRING COMMENT 'Modification time'
  ,reg_date STRING COMMENT 'Registration date'
  ,user_name STRING COMMENT 'Nickname'
  ,certify_status BIGINT COMMENT 'Authentication status: 0: Not authenticated. 1: Level-1 authentication (real-name and identity verification). 2: Level-2 authentication (Level-1 plus bank account verification).'
  ,user_level BIGINT COMMENT 'User level: 1: 1-star. 2: 2-star. 3: 3-star. 4: 4-star. 5: 5-star.'
  ,tp_account STRING COMMENT 'Third-party source account'
  ,id_card_number STRING COMMENT 'ID card number'
  ,dob STRING COMMENT 'Date of birth'
  ,user_gender STRING COMMENT 'Gender: F for female, M for male'
  ,full_name STRING COMMENT 'Full name'
  ,address_id BIGINT COMMENT 'Address'
  ,mobile_phone STRING COMMENT 'Mobile phone number'
  ,email STRING COMMENT 'Email address'
) PARTITIONED BY (
  ds STRING
) STORED AS ALIORC TBLPROPERTIES (
  'columnar.nested.type' = 'true'
);
CREATE TABLE IF NOT EXISTS s_order ( id BIGINT COMMENT 'ID' ,gmt_create STRING COMMENT 'Creation time' ,gmt_modified STRING COMMENT 'Modification time' ,order_time STRING COMMENT 'Order time' ,pay_time STRING COMMENT 'Payment time' ,ship_time STRING COMMENT 'Shipping time' ,end_time STRING COMMENT 'Transaction completion/cancellation time' ,buyer_id BIGINT COMMENT 'Buyer ID' ,total_items_amount DOUBLE COMMENT 'Total item amount, sum of (unit price × quantity), in cents' ,discount_amount DOUBLE COMMENT 'Total discount amount, in cents' ,delivery_amount DOUBLE COMMENT 'Shipping fee, in cents' ,total_amount DOUBLE COMMENT 'Total amount paid, in cents' ,`status` BIGINT COMMENT 'Status: -1: Canceled. 1: Created. 2: Paid. 3: Shipped. 4: Delivery confirmed.' ,delivery_address_id BIGINT COMMENT 'Shipping address' ) PARTITIONED BY ( ds STRING ) STORED AS ALIORC TBLPROPERTIES ( 'columnar.nested.type' = 'true' );In the Objects To Publish list, publish the physical table to the production environment.
The
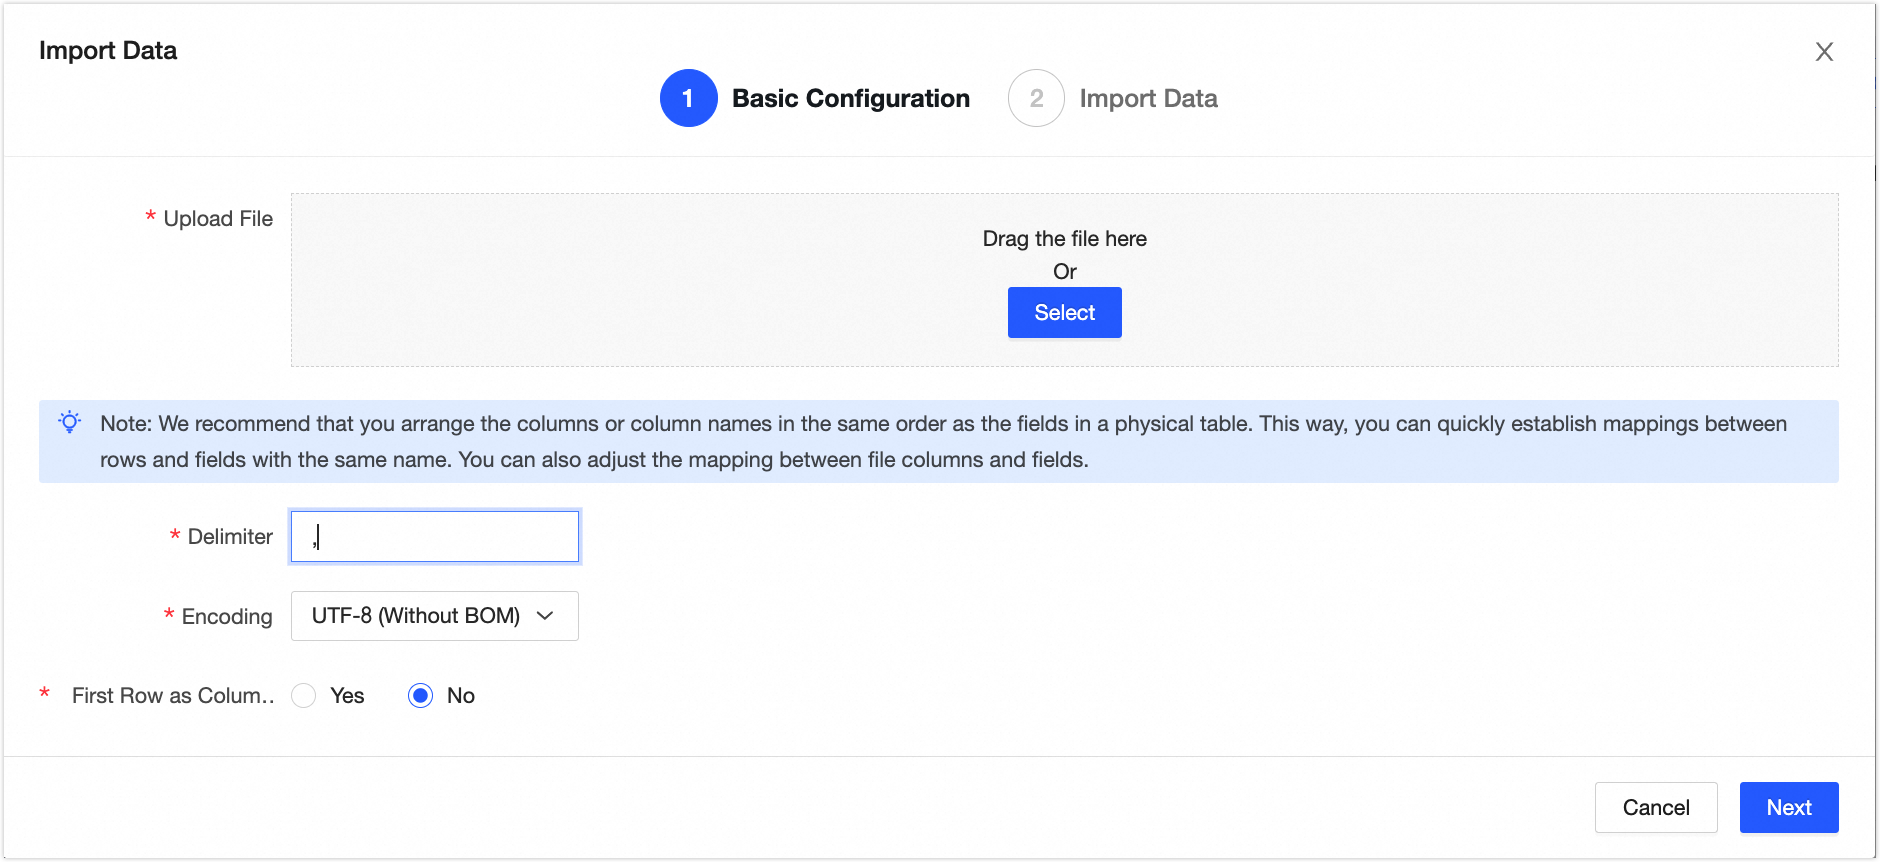
s_orderphysical table is created in the same way as thes_usertable.On the Data Development page, switch the environment to production. Click the
s_userphysical table to open the offline physical table details page. Click the Import Data button and configure the data import as shown in the following figure.Upload the data from the s_user.csv and s_order.csv files to Dataphin.
Click Next. In the Import Data dialog box, click Map by Name, and then click Start Import to synchronize the data to the
s_userands_ordertables in the production environment.
Step 3: Standardized modeling
Create a data mart
Log on to the Dataphin console, and click Enter Dataphin>> to open the Dataphin home page.
On the Dataphin home page, choose Planning > Data Architecture from the top menu bar. On the Business Unit page, click New Data Mart to open the New Data Mart dialog box.
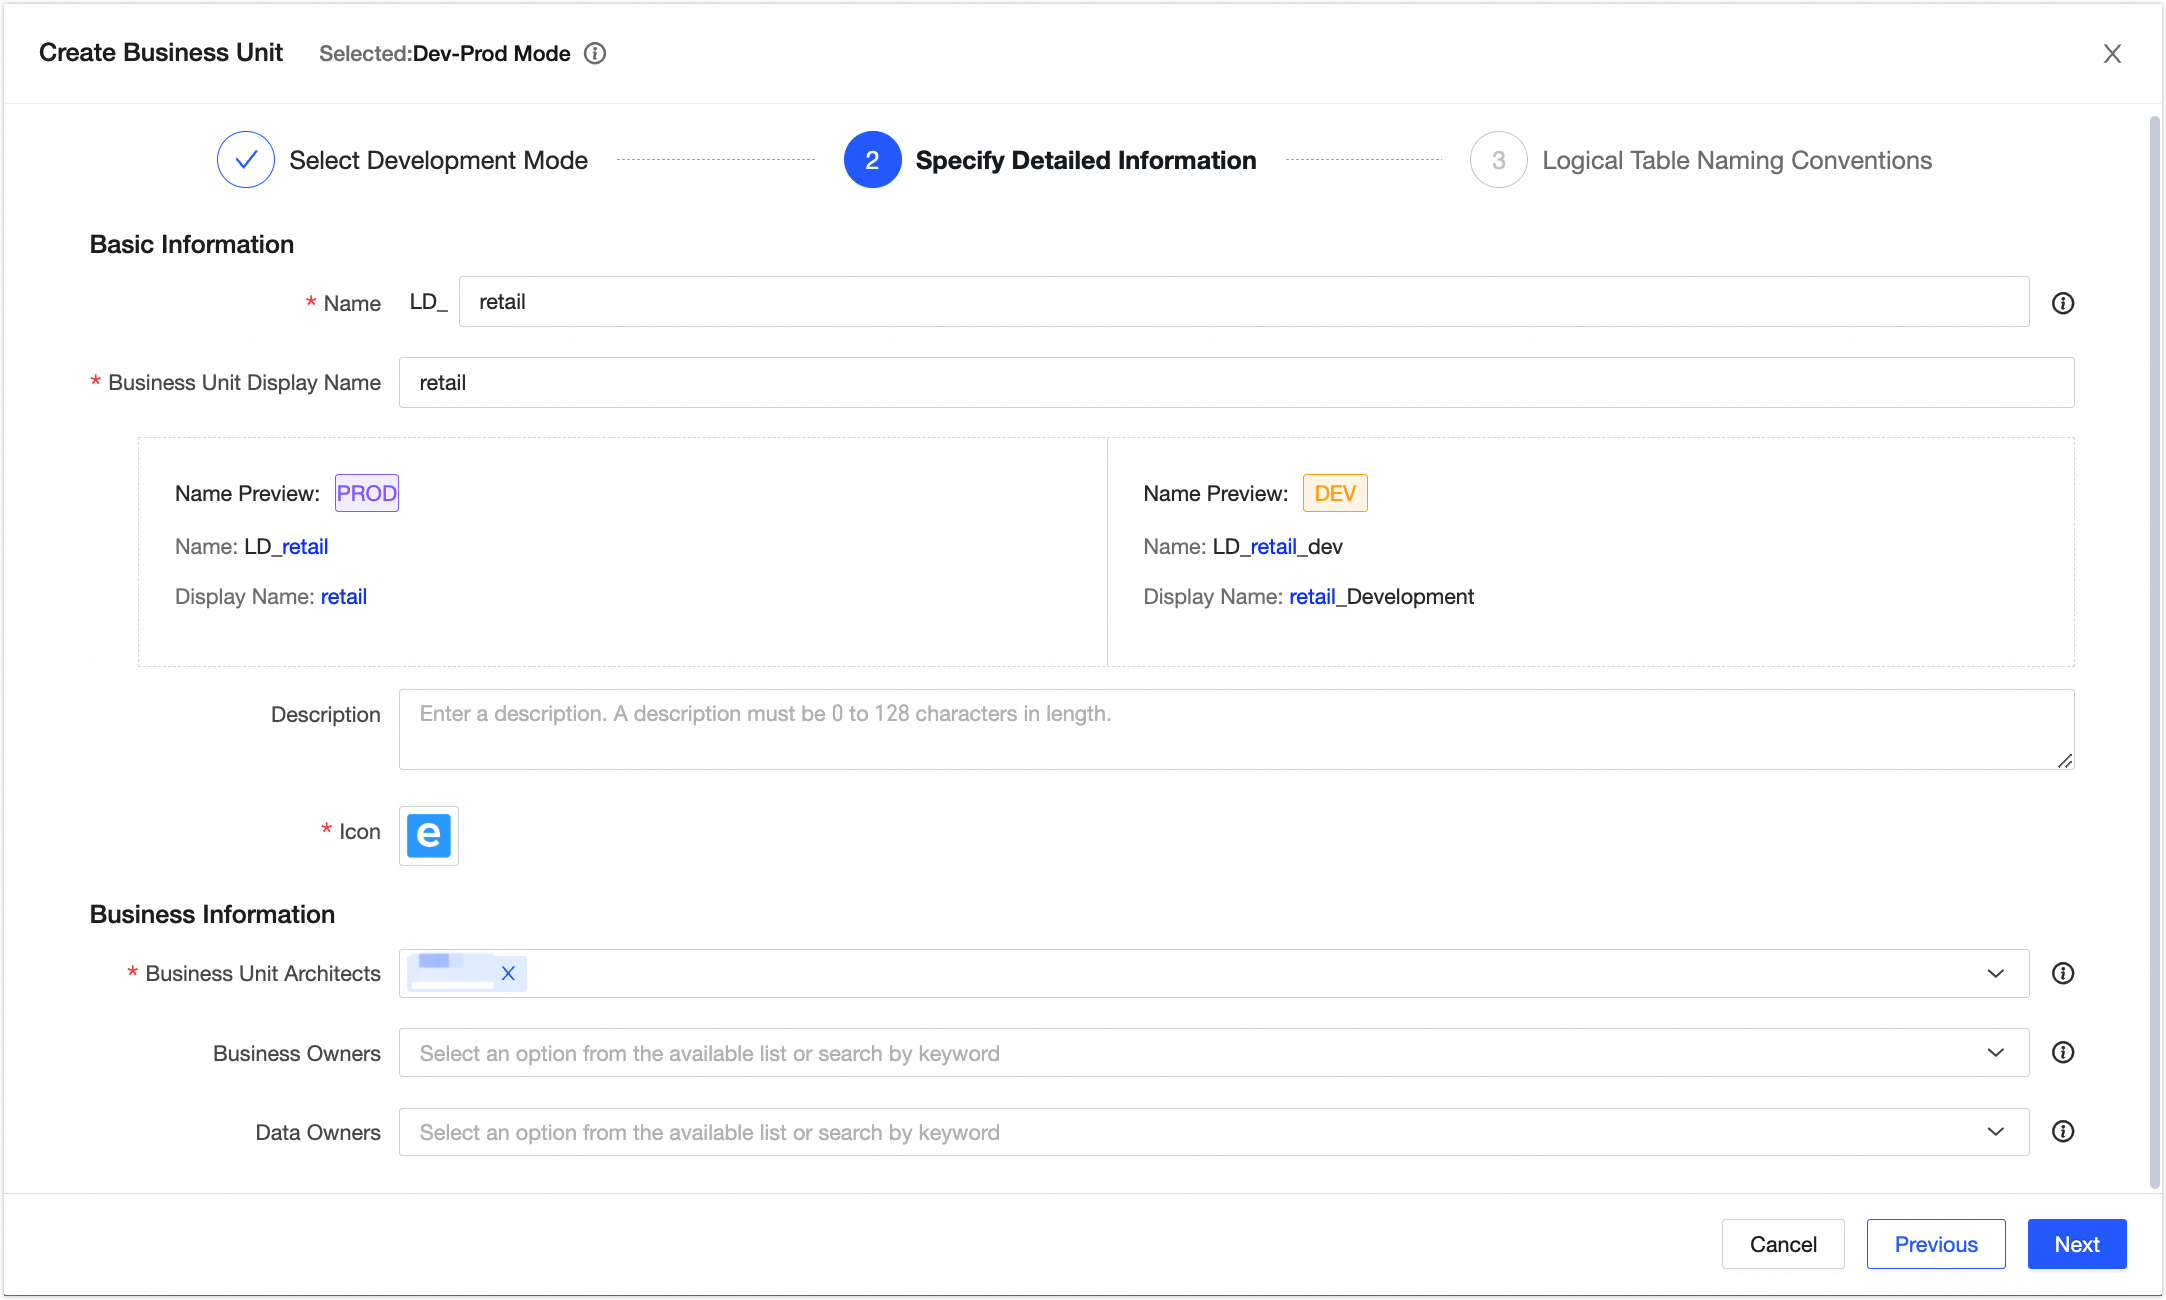
In the New Data Mart dialog box, select the Dev_Prod mode. Configure the LD_retail data mart as shown in the following figure. Click Next, and then click OK to create the LD_retail data mart.
Create a subject area
On the Dataphin home page, choose Planning > Data Architecture from the top menu bar.
On the Business Unit page, click the LD_retail data mart. On the Subject Area Management tab, click New Subject Area.
In the New Subject Area panel, create the Sales subject area with the parameters shown in the following figure. Then, click OK.

Create a business object
Click the Business Entity tab, and then click New Business Entity.
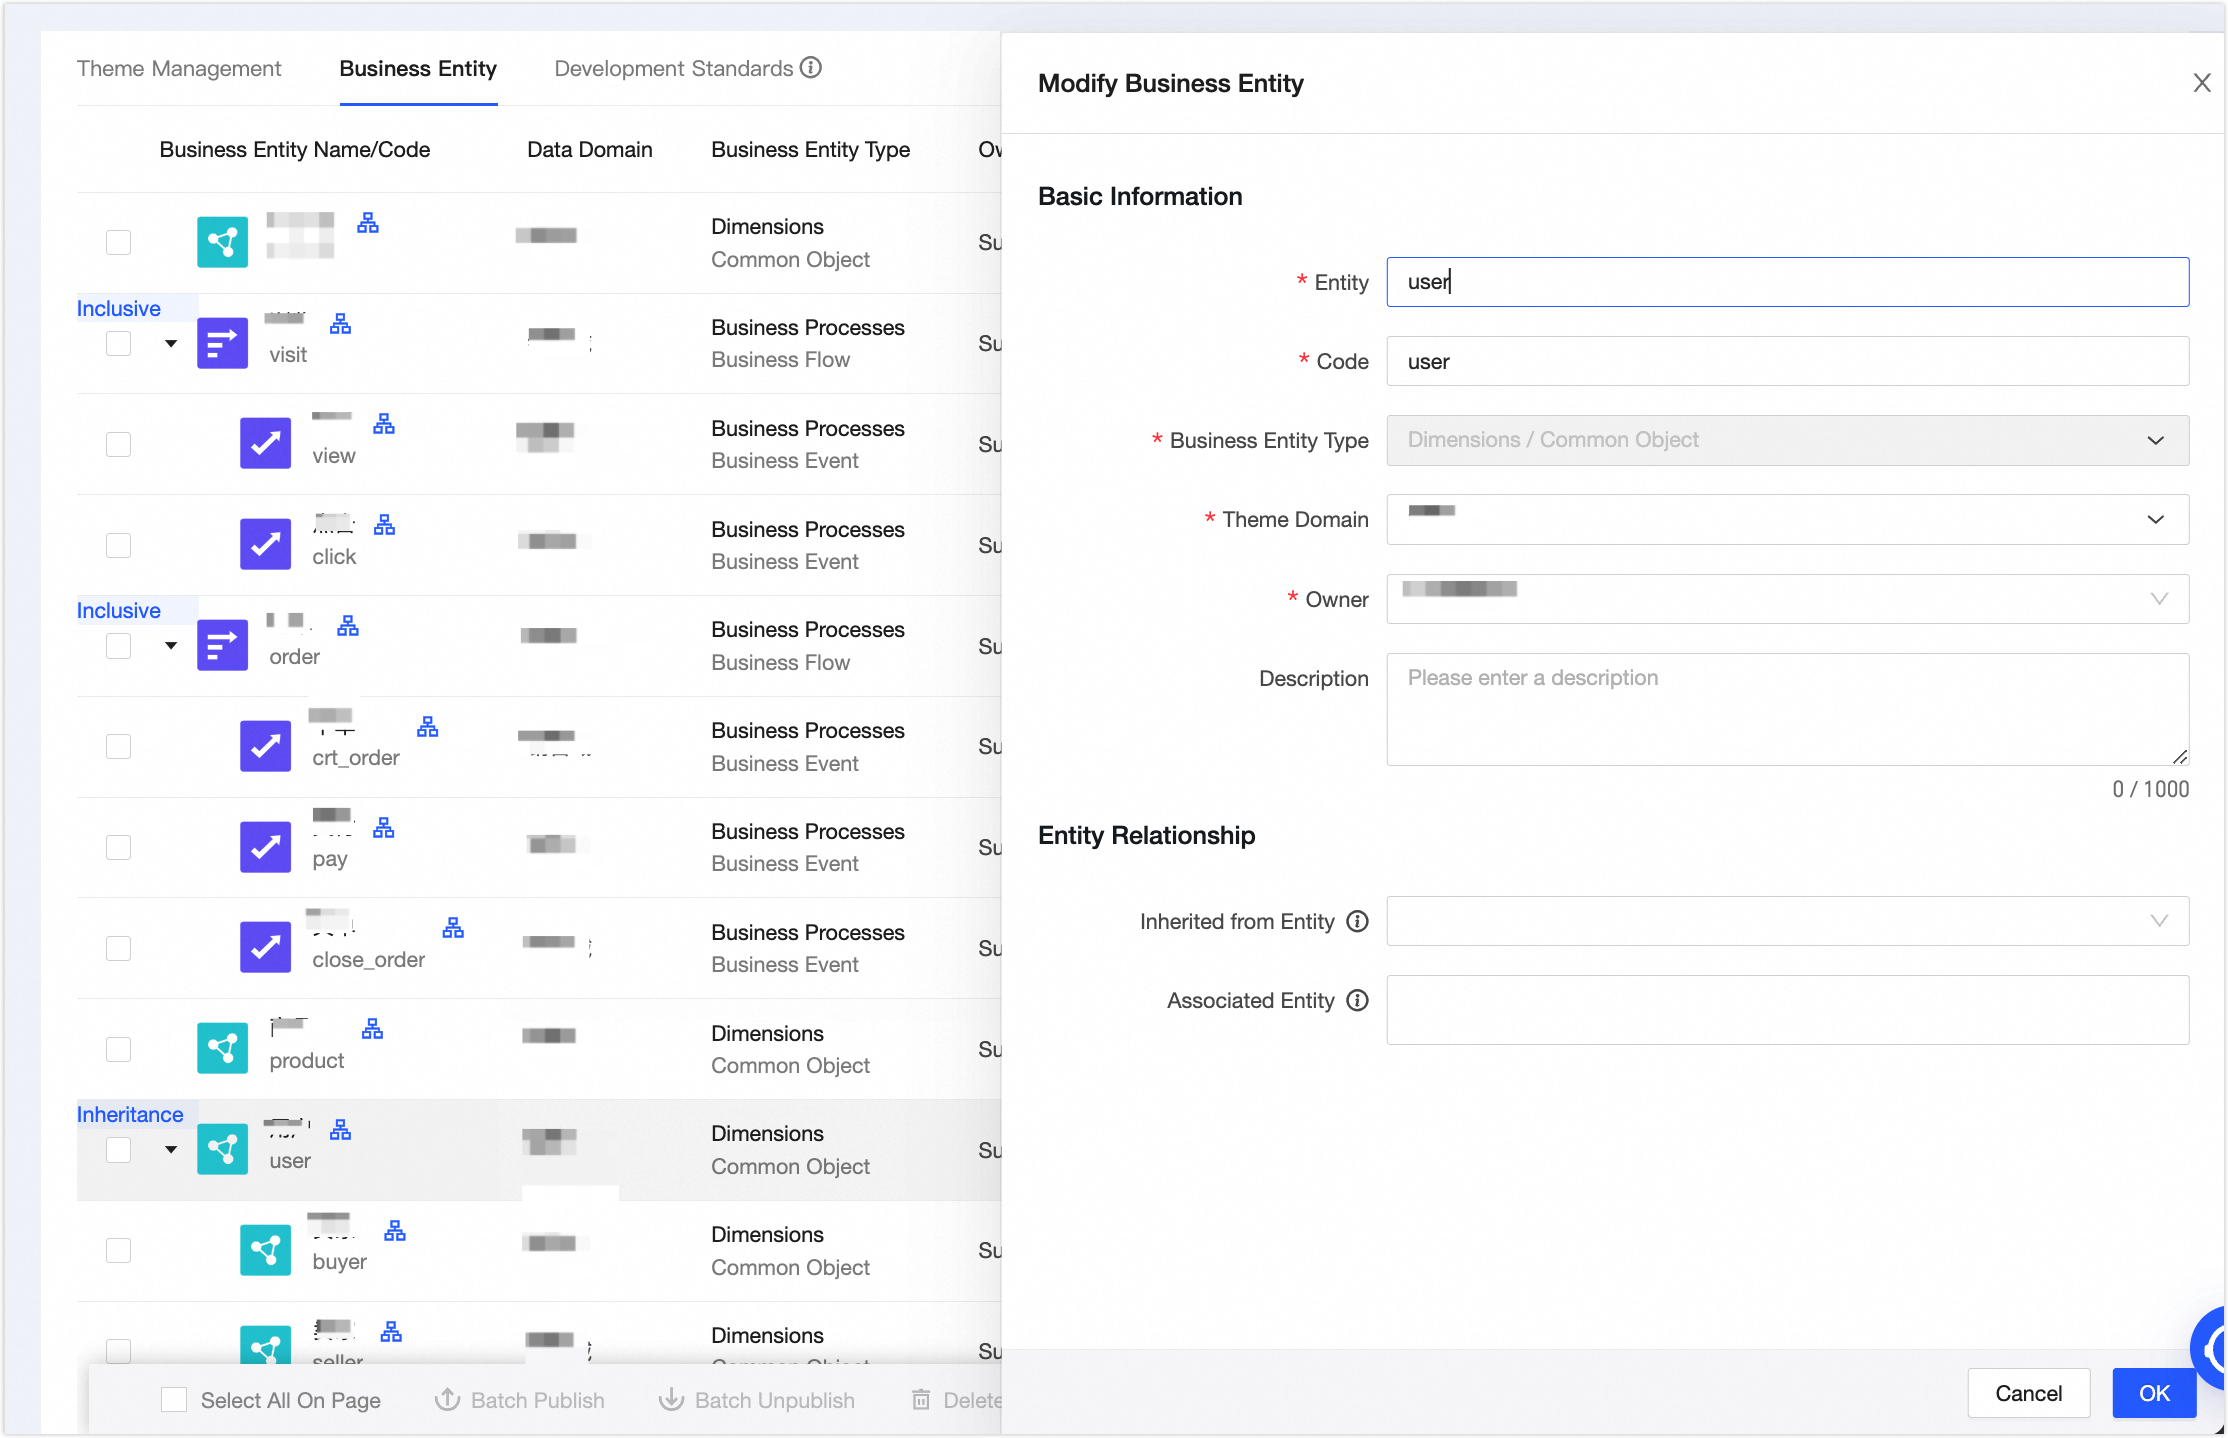
In the New Business Entity panel, create the User business object. Configure the parameters as shown in the following figure. Click OK, and then click Publish.
The Seller, Buyer, and Product business objects are configured in the same way as the User business object.
Create a business event
Click the Business Entity tab, and then click New Business Entity.
In the New Business Entity panel, create the Place Order business event. Configure the parameters as shown in the following figure. Click OK, and then click Publish.
The Pay, Close Order, View, and Click business events are configured in the same way as the Place Order business event.
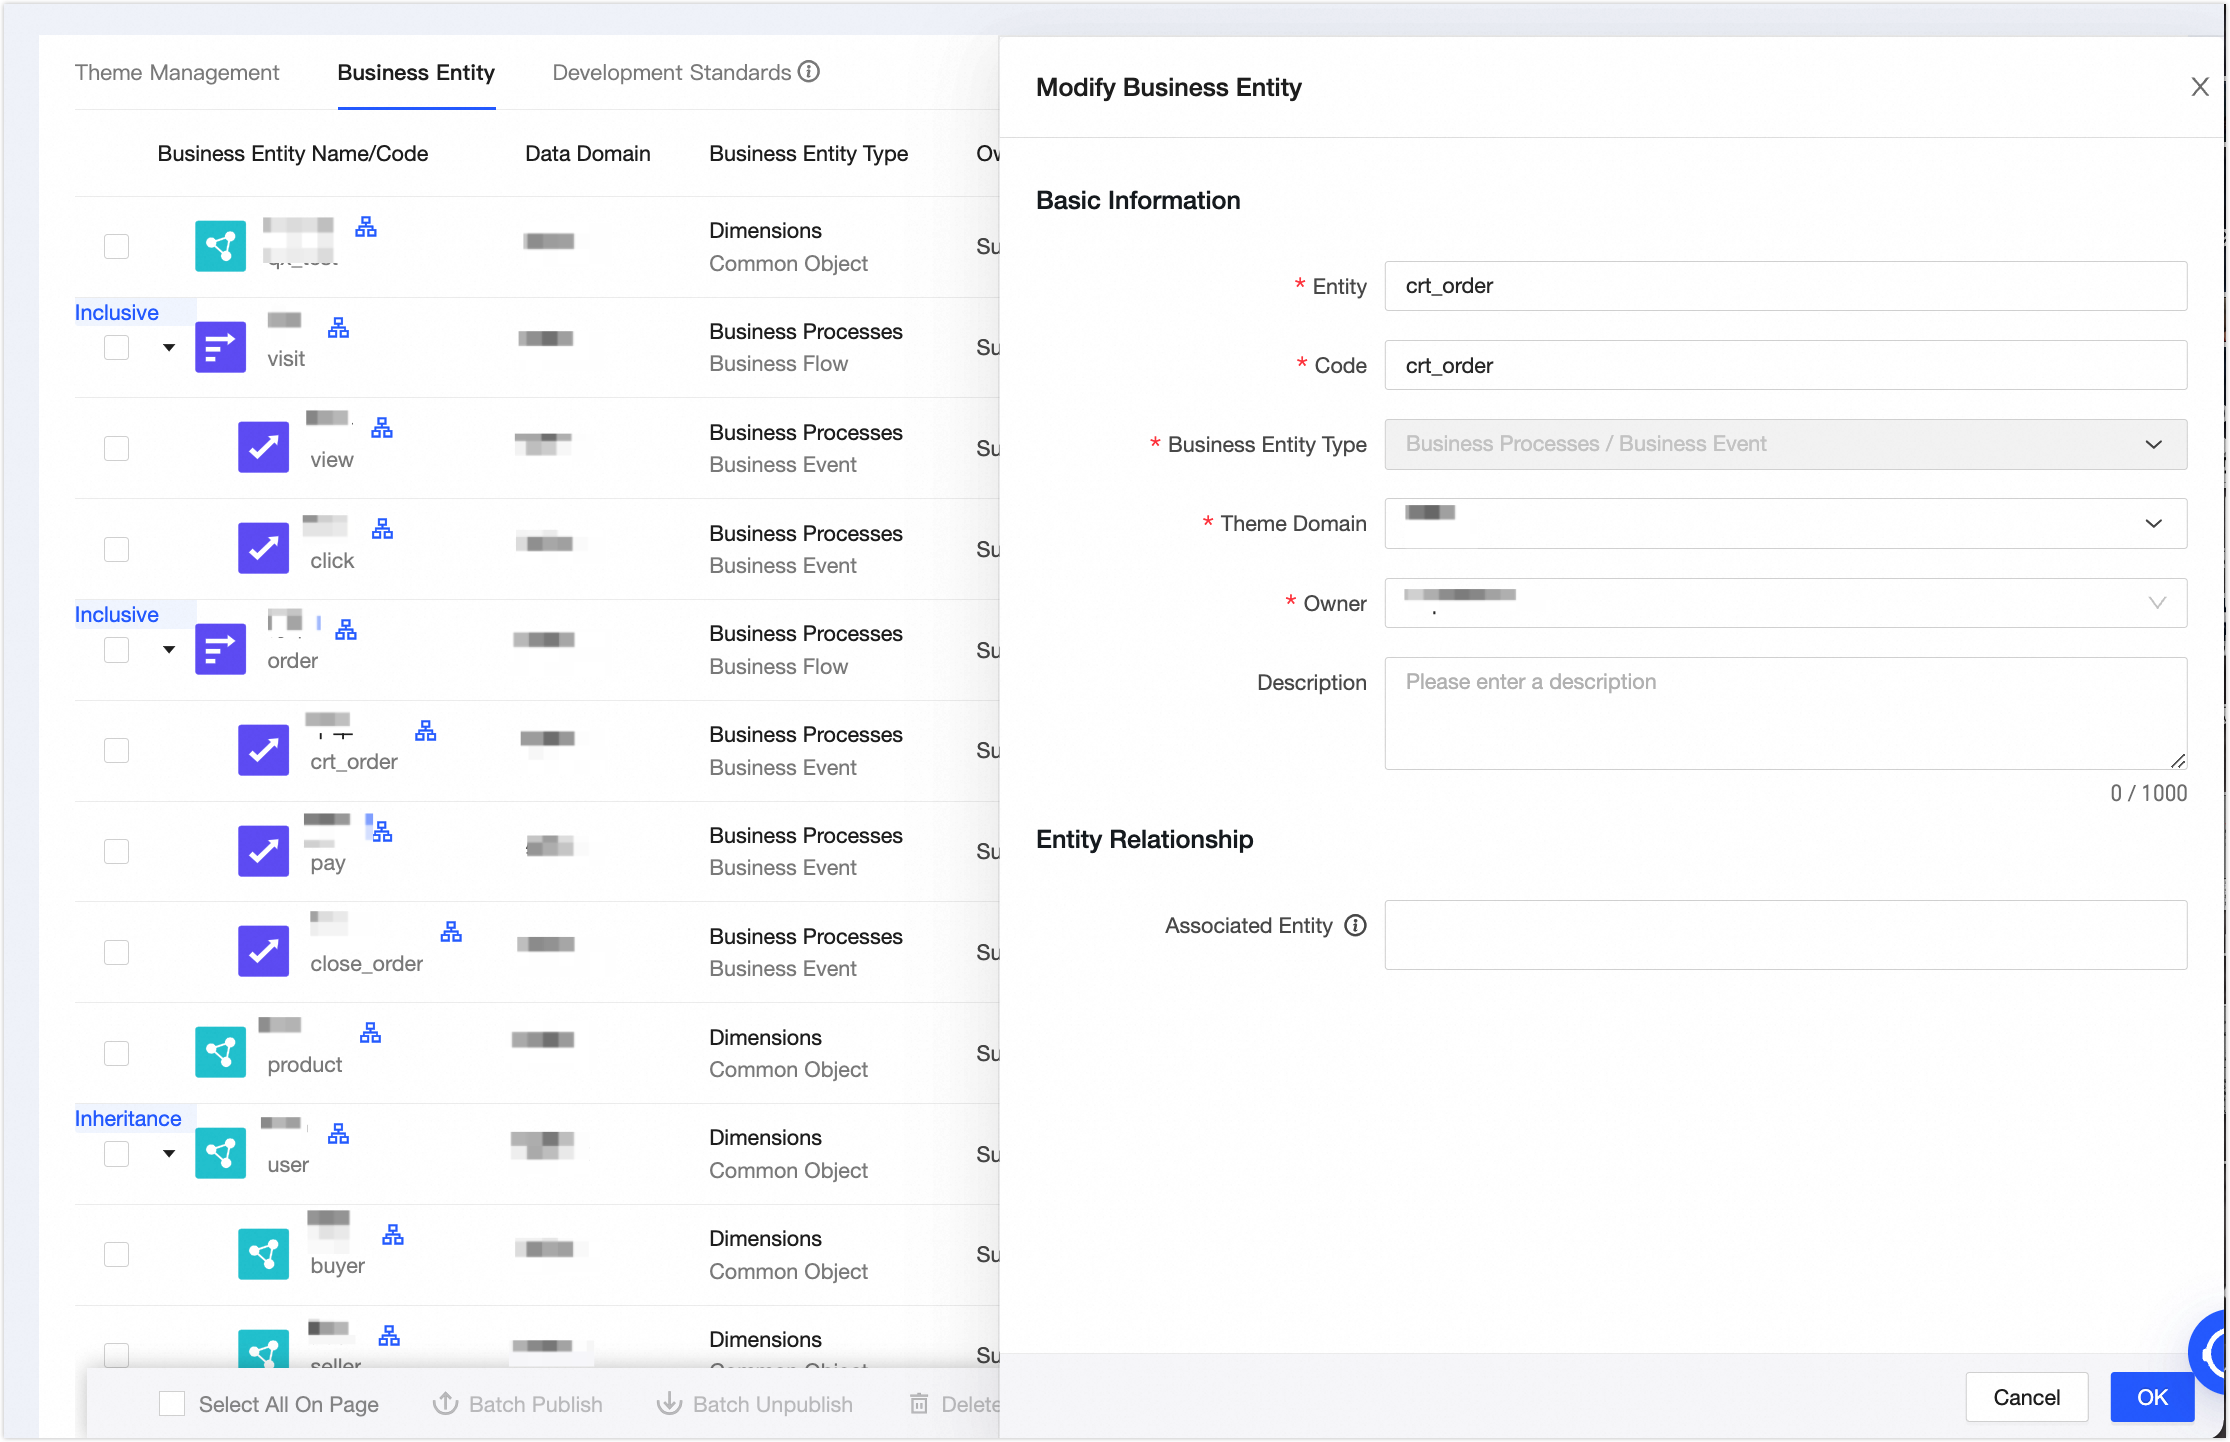
Create a business process
Click the Business Entity tab, and then click New Business Entity.
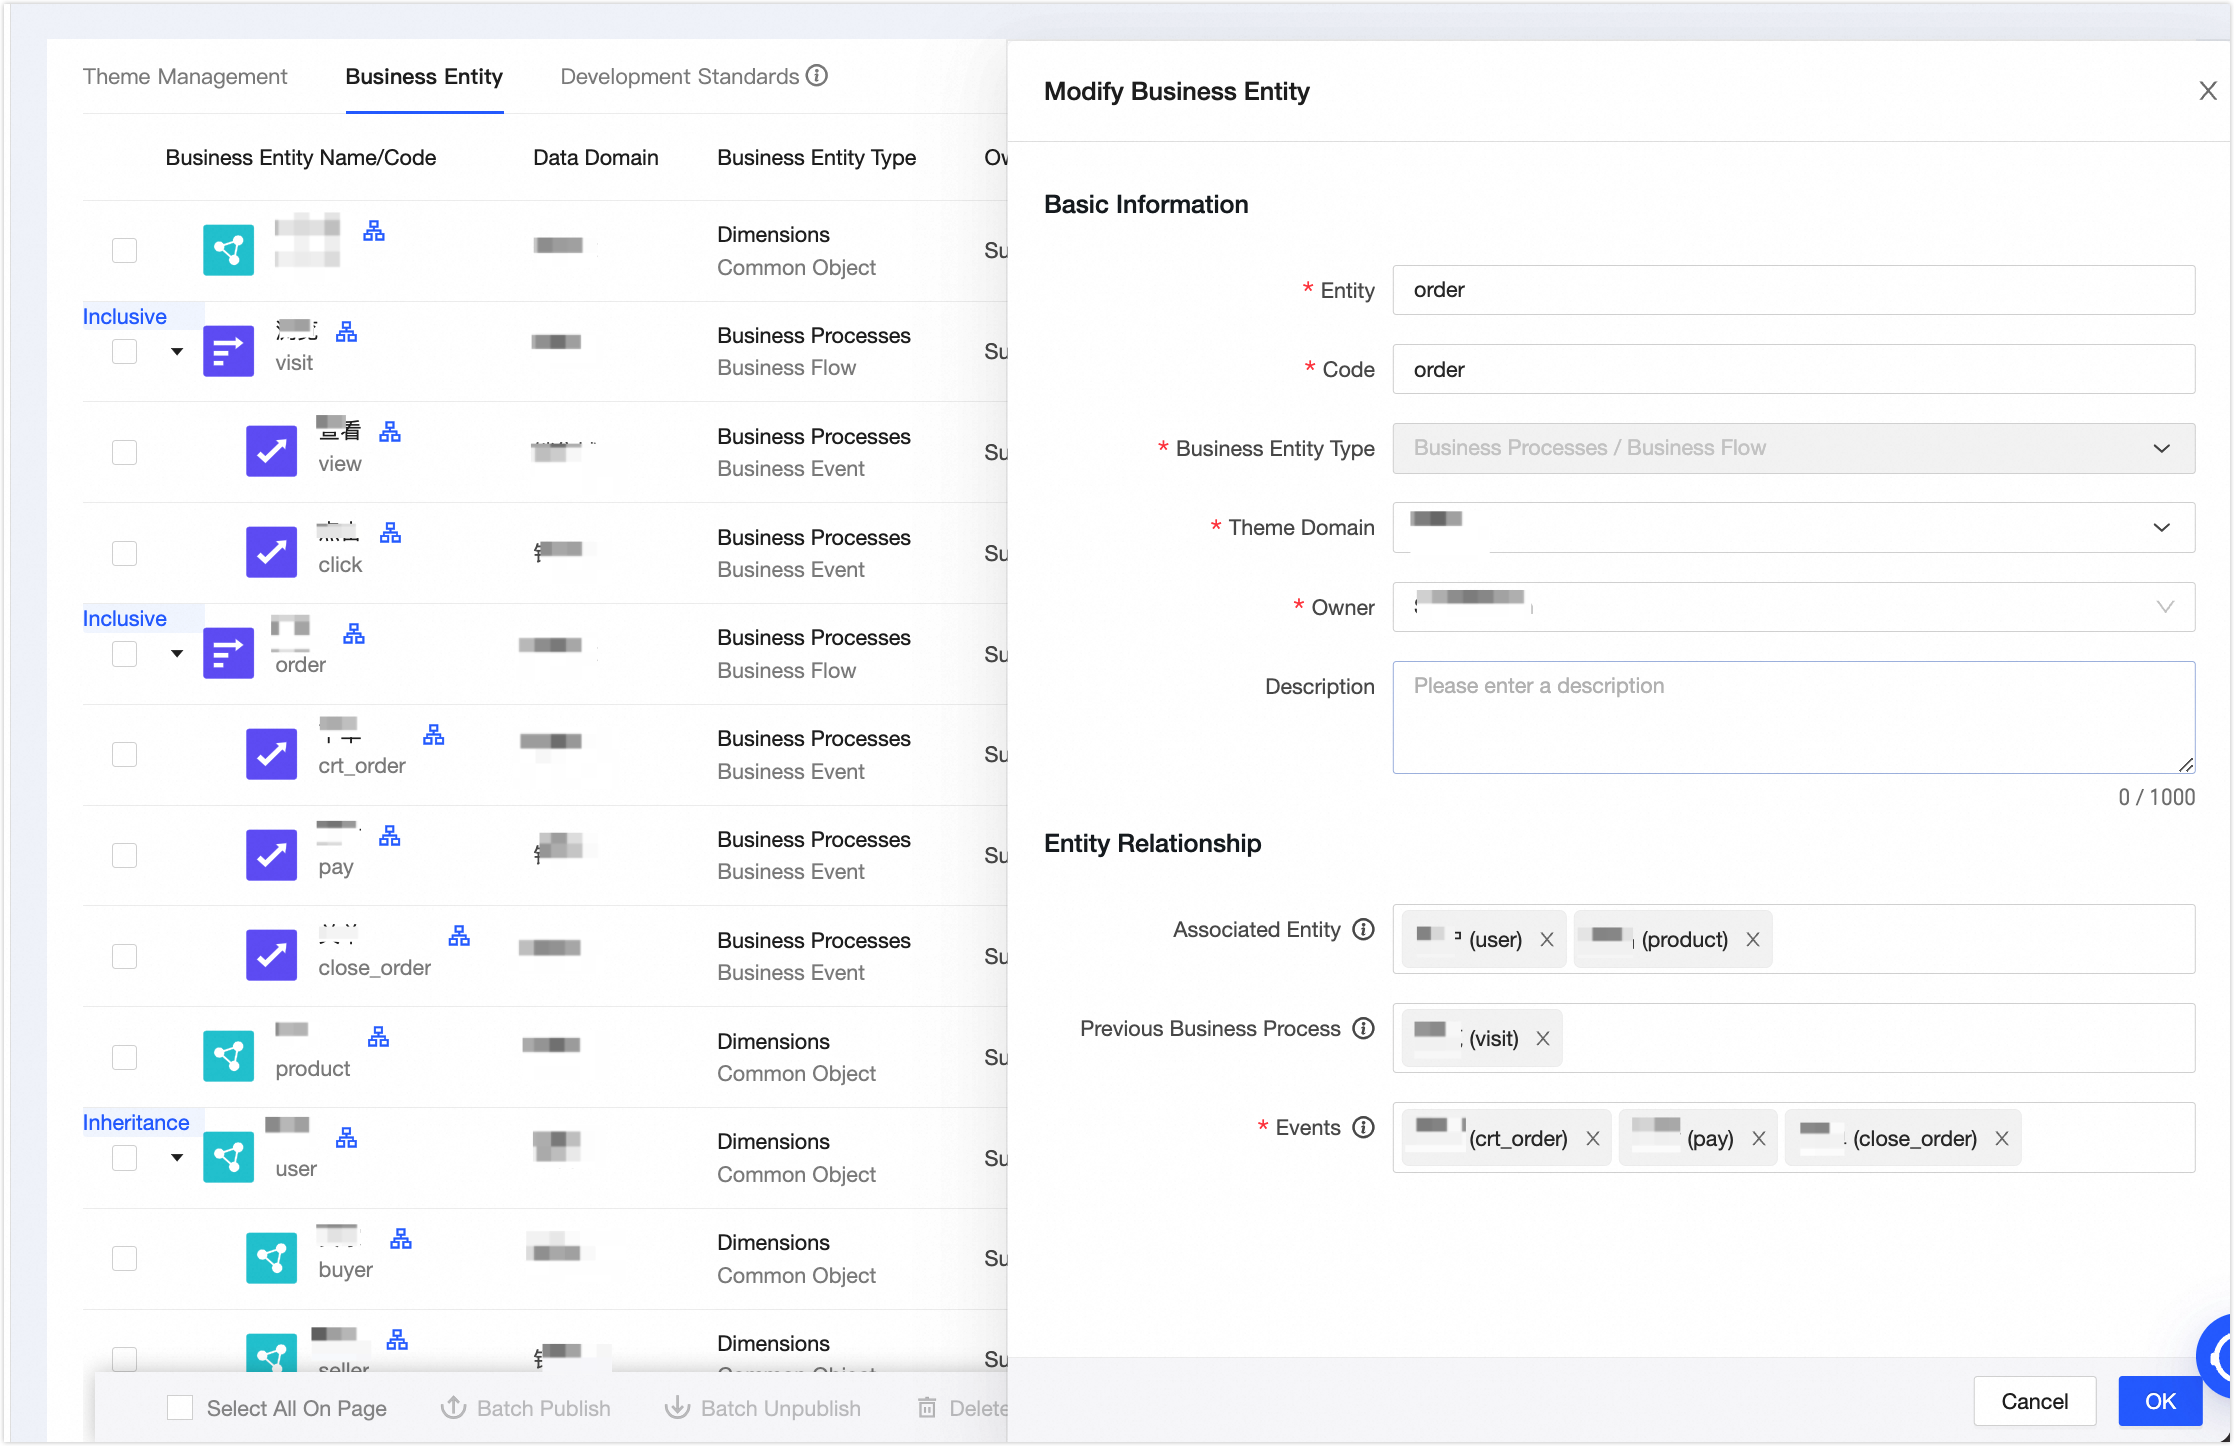
In the New Business Entity panel, create the Order business process. Configure the parameters as shown in the following figure. Click OK, and then click Publish.
The Browse business process is configured in the same way as the Order business process. The associated entities are the User and Product business objects, and the process events are the View and Click business events.
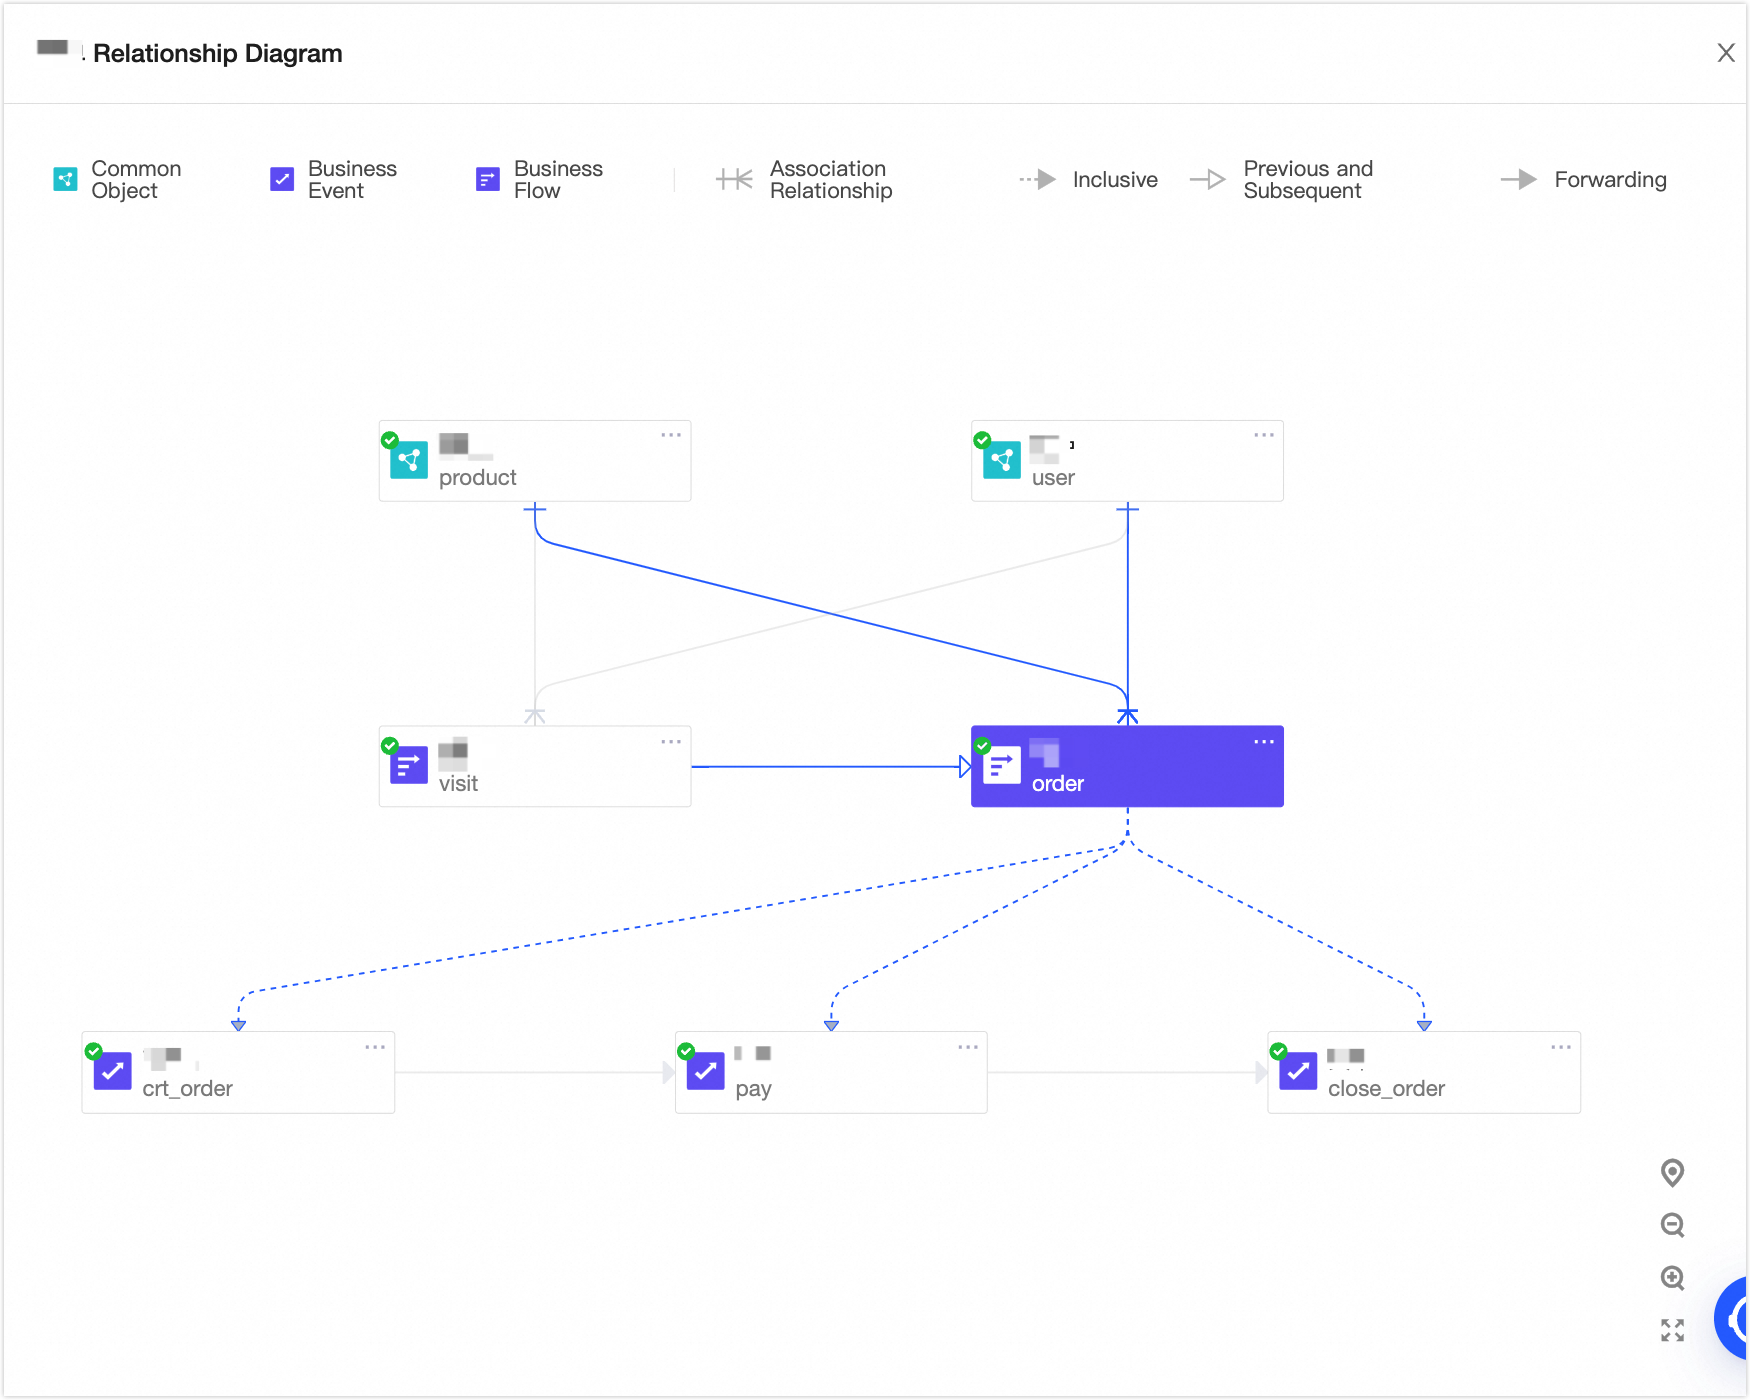
Once the order is created, the following sales order relationship graph is displayed.
Create a logical dimension table
On the Dataphin home page, choose Development > Data Studio from the top menu bar. Select the dataphin_order project in the development environment.
In the navigation pane on the left, choose Data Modeling > Logical Dimension Table. On the Logical Dimension Table page, click the Create
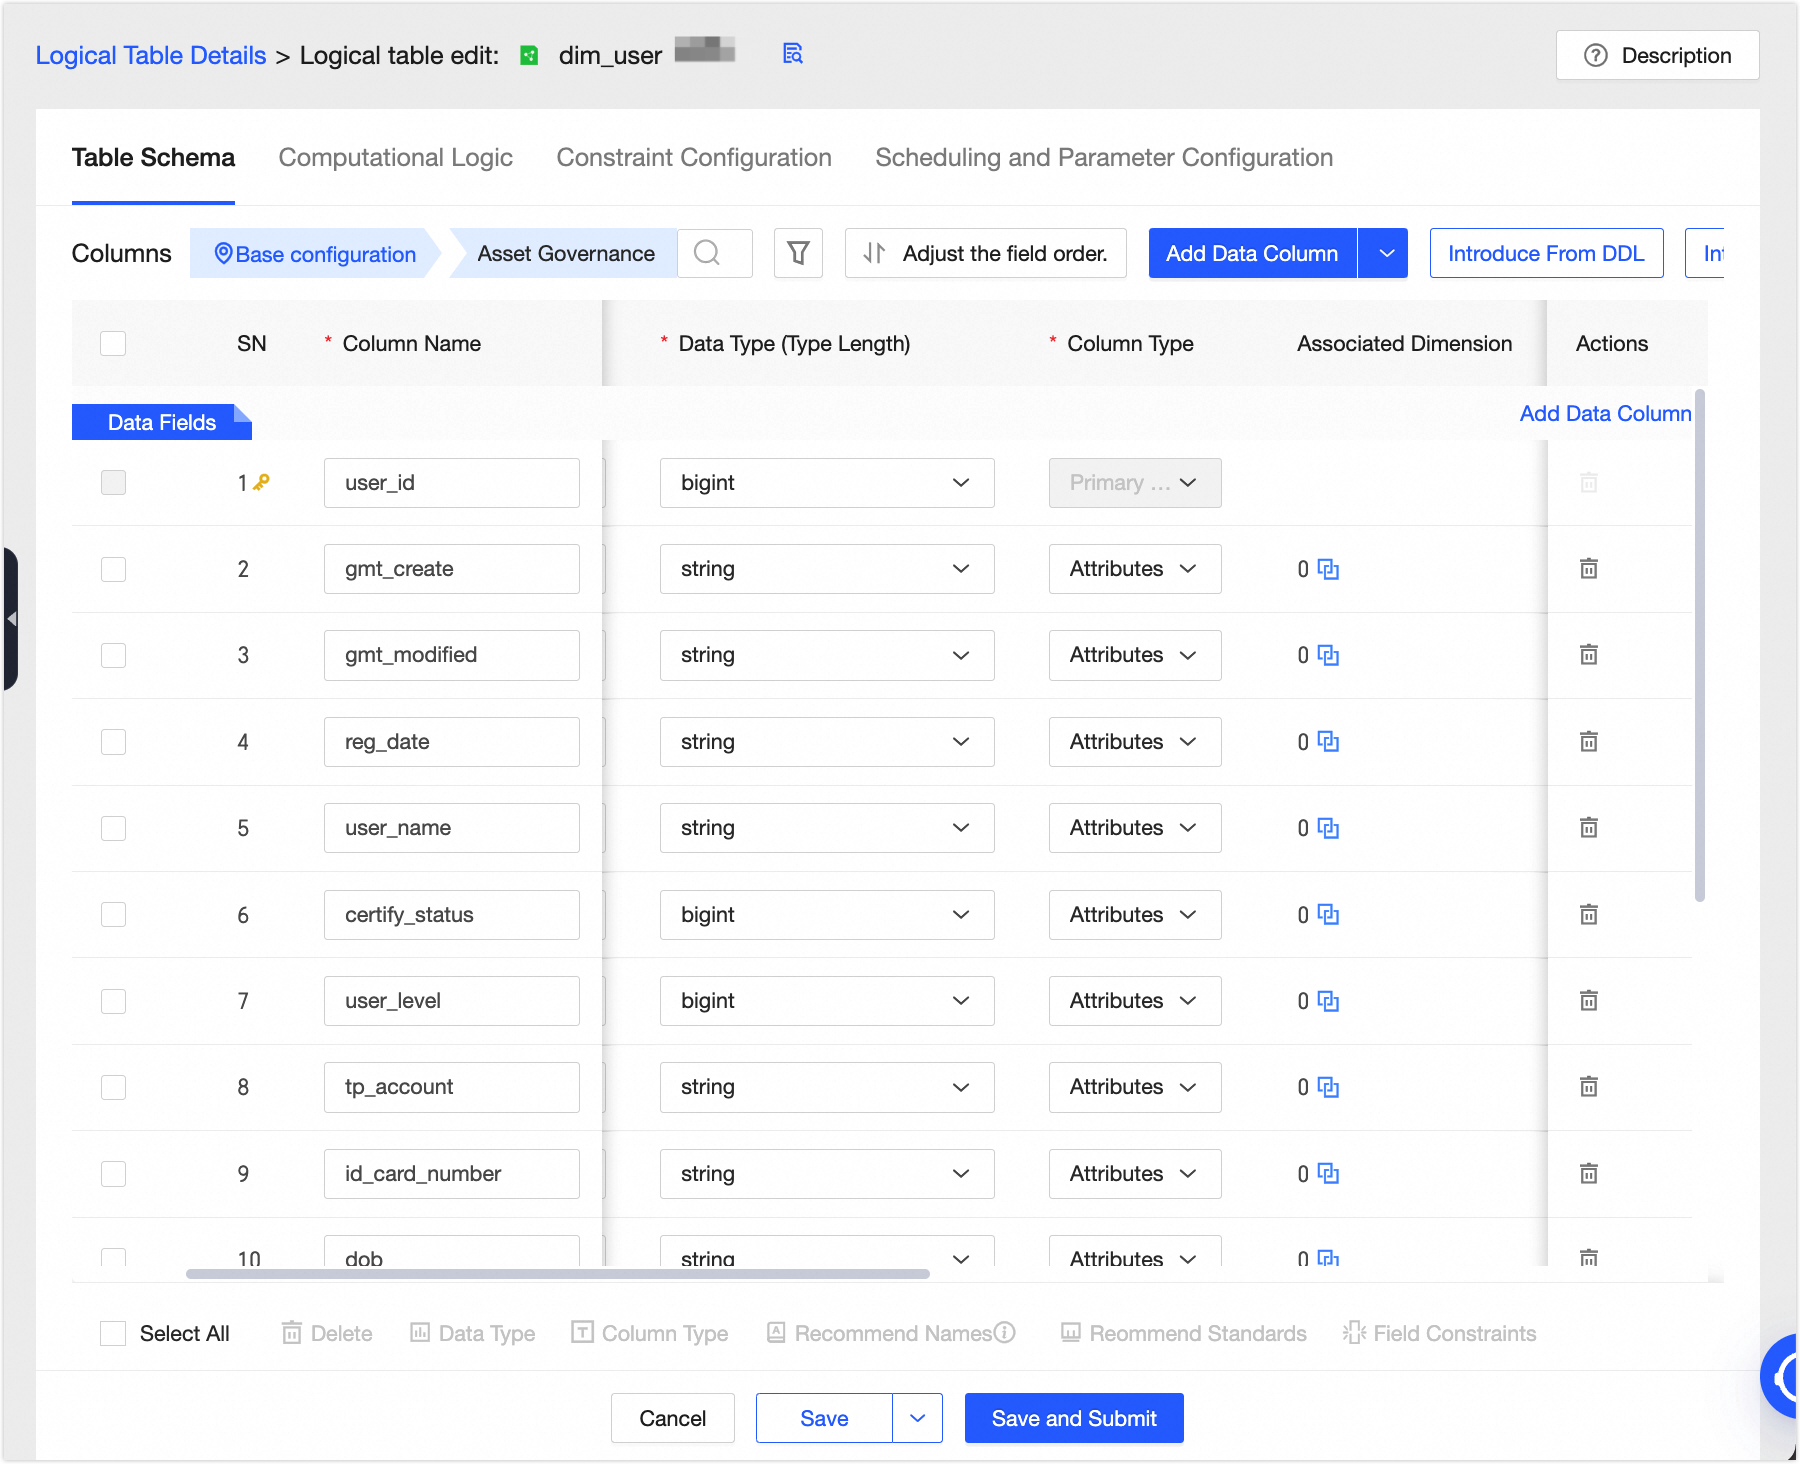
icon.In the New Logical Dimension Table dialog box, create the [User] logical dimension table.

Add fields to the logical dimension table. We recommend that you set a non-null and unique primary key to prevent duplicate or invalid data from flowing to downstream nodes, which can cause computation errors.
In the Computation Logic section, click Source Configuration. Select the
${dataphin_order}.s_userphysical table and associate theidprimary key. After you click OK, click Next. Use the default constraint configurations and click Next again.In Scheduling & Parameter Settings, click Auto Parse. Then, in the Node (Task) Name column, click Click to Add. In the Click to Add dialog box, select the
virtual_root_nodenode. Click Save and Submit, and then click Publish.
Create a logical fact table
In the navigation pane on the left, choose Data Modeling > Logical Fact Table. On the Logical Fact Table page, click the New
icon.In the New Logical Fact Table dialog box, create the [Order] logical fact table.
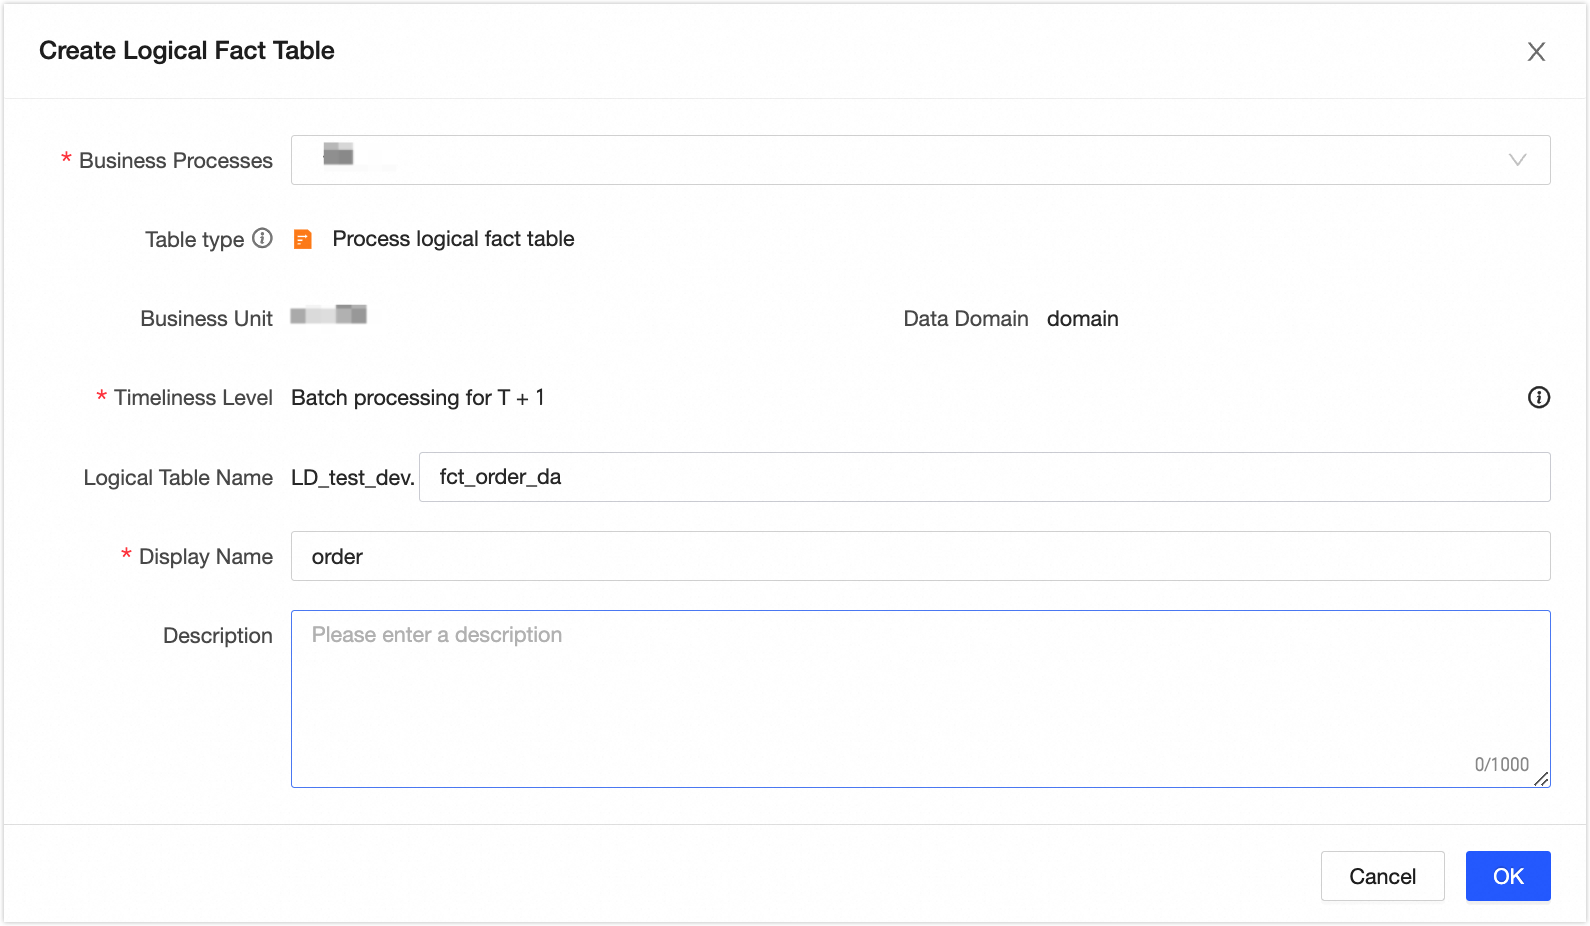
Add fields to the logical fact table. We recommend that you set a non-null and unique primary key to prevent duplicate or invalid data from flowing to downstream nodes, which can cause computation errors.
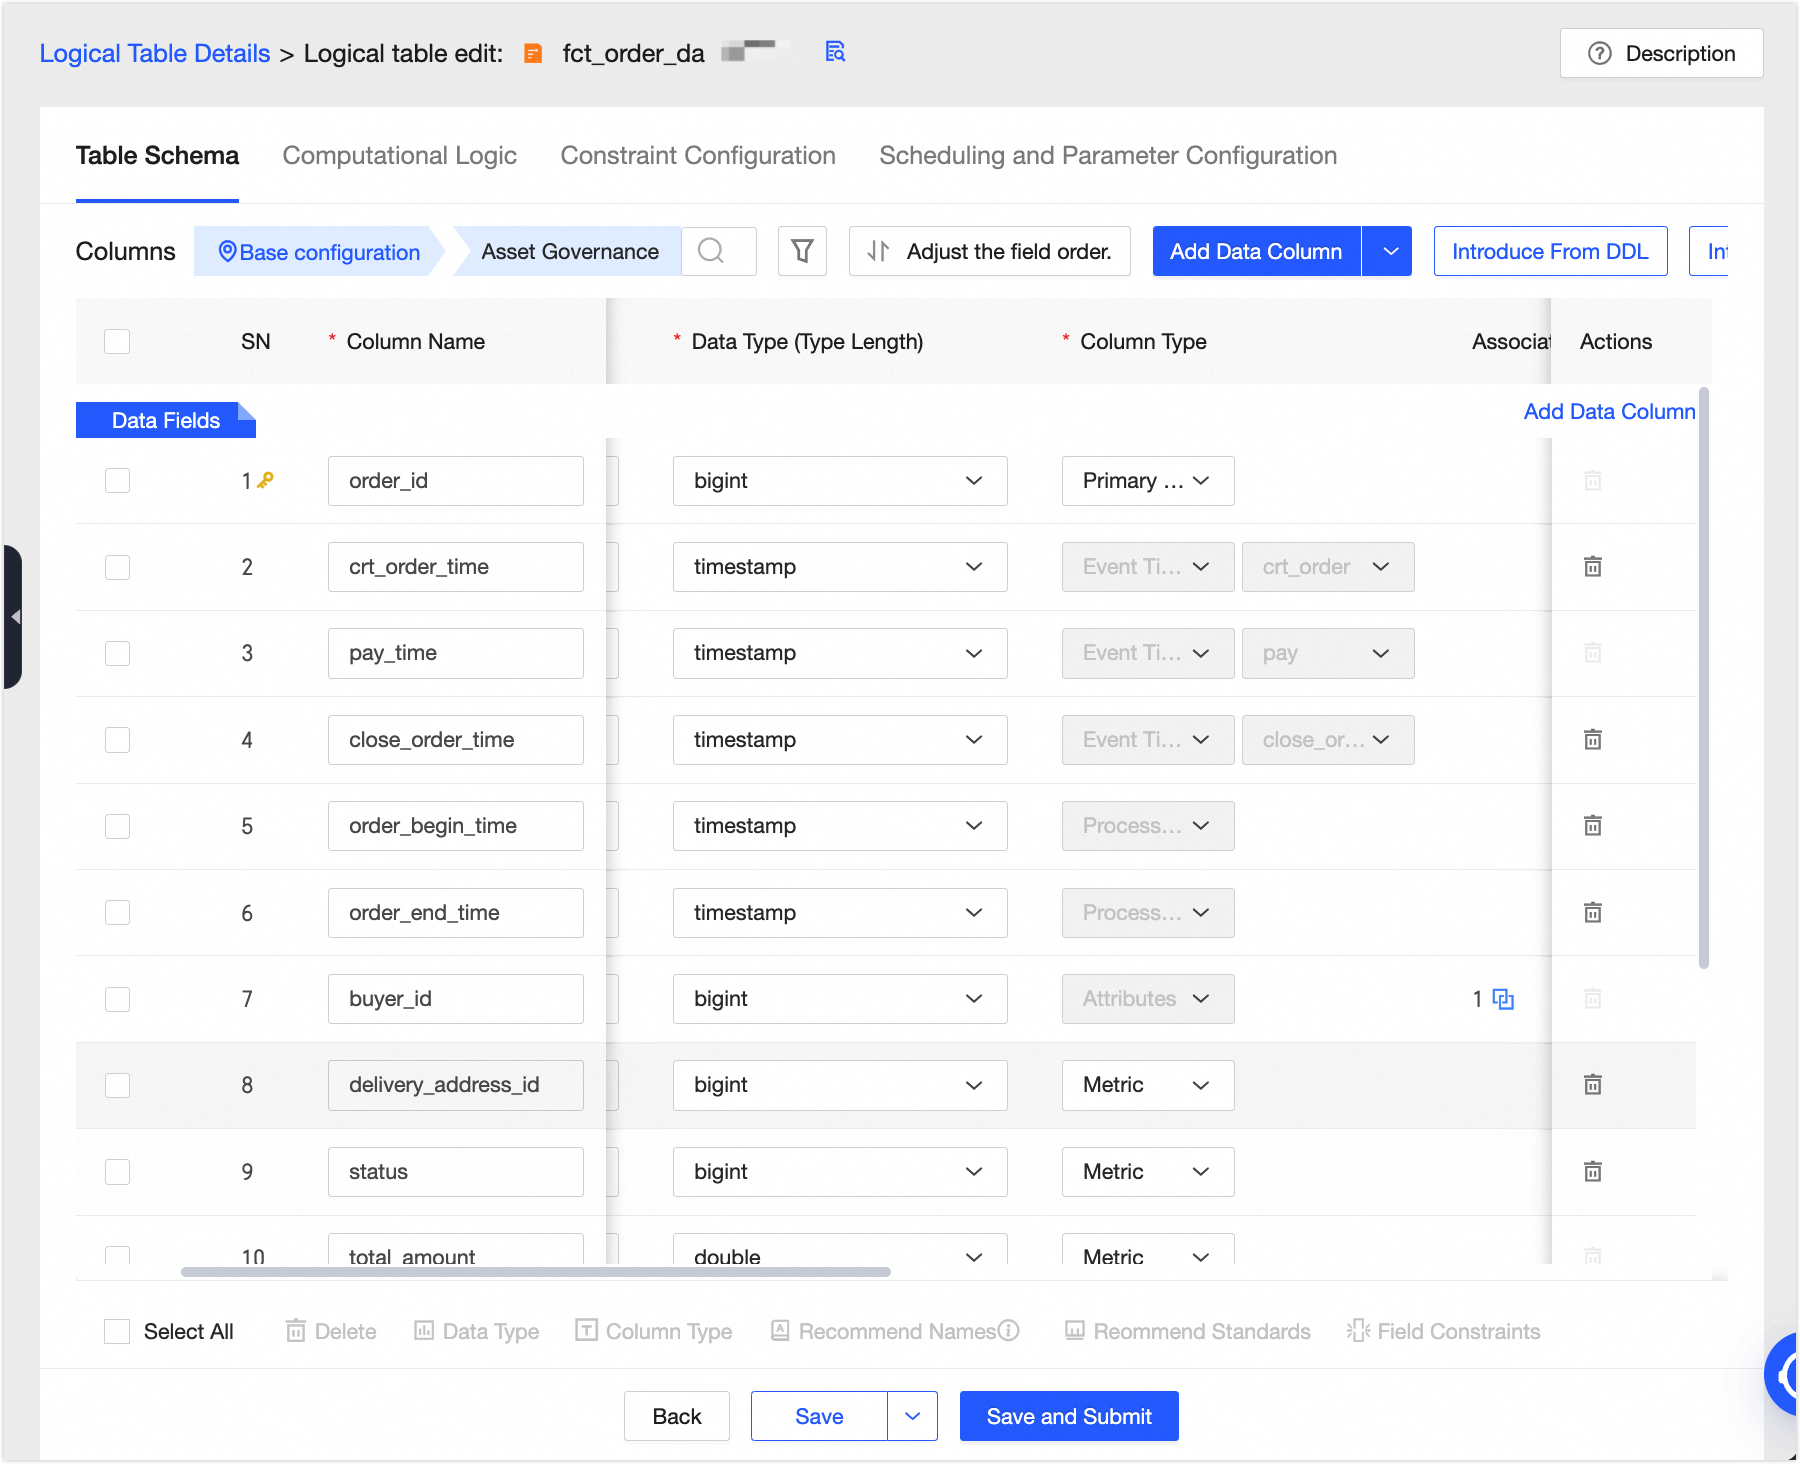
Click Associate Dimension to add a model relationship for the buyer_id field.
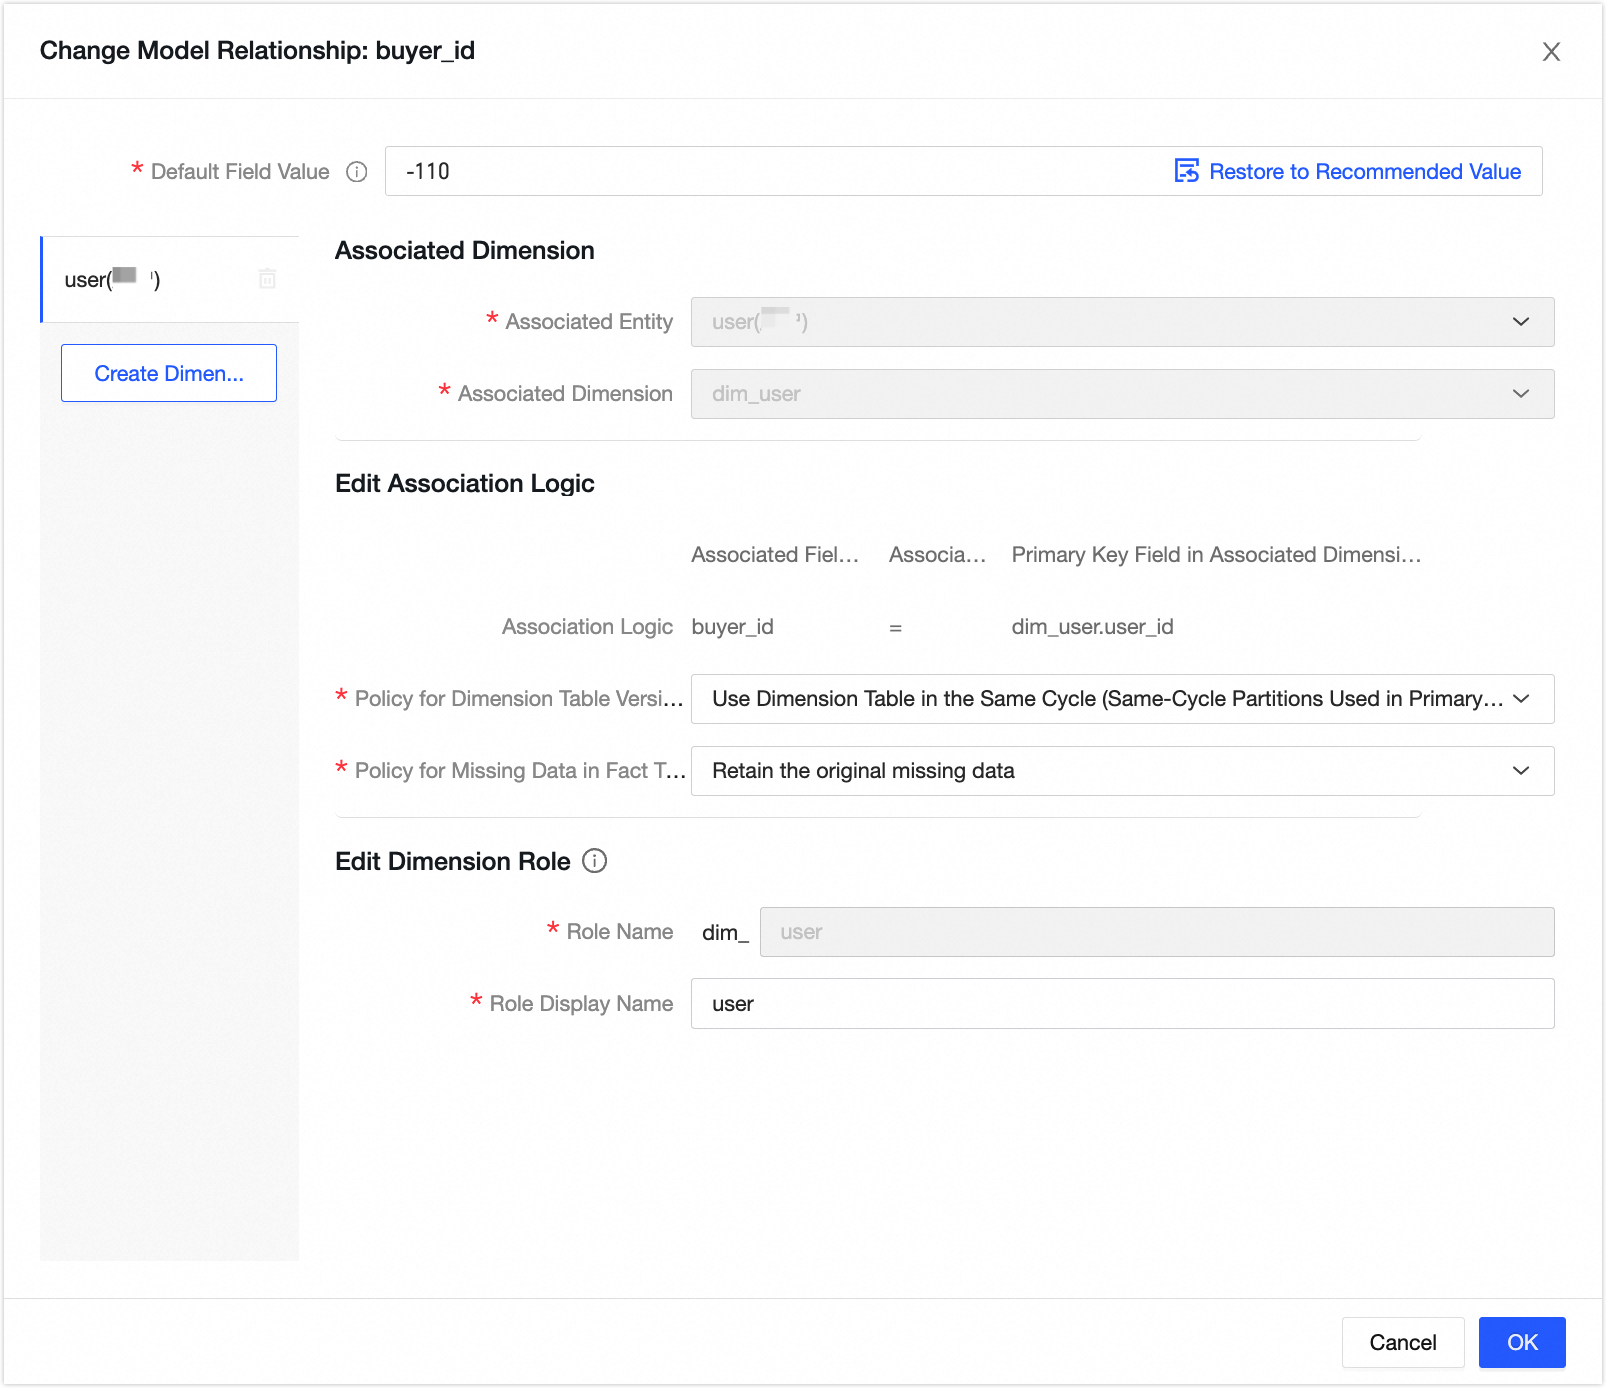
In the Computation Logic configuration, click Source Configuration. Select the buyer physical table
${dataphin_order}.s_user, set the primary key toid, and click OK. Click Next. Then, accept the default constraint configurations by clicking Next again.In Scheduling & Parameter Settings, click Auto Parse. Then, in the Node (Task) Name column, click Click to Add. In the Click to Add dialog box, select the
virtual_root_nodenode. Click Save and Submit, and then click Publish.
Create an atomic metric
In the navigation pane on the left, choose Standardized Modeling > Metric. On the Metric page, click the New
icon.In the New Atomic Metric dialog box, create the Number of Orders metric as shown in the following figure. The number of orders is summable. Click Save and Submit, and then click OK and Submit.

Create a business filter
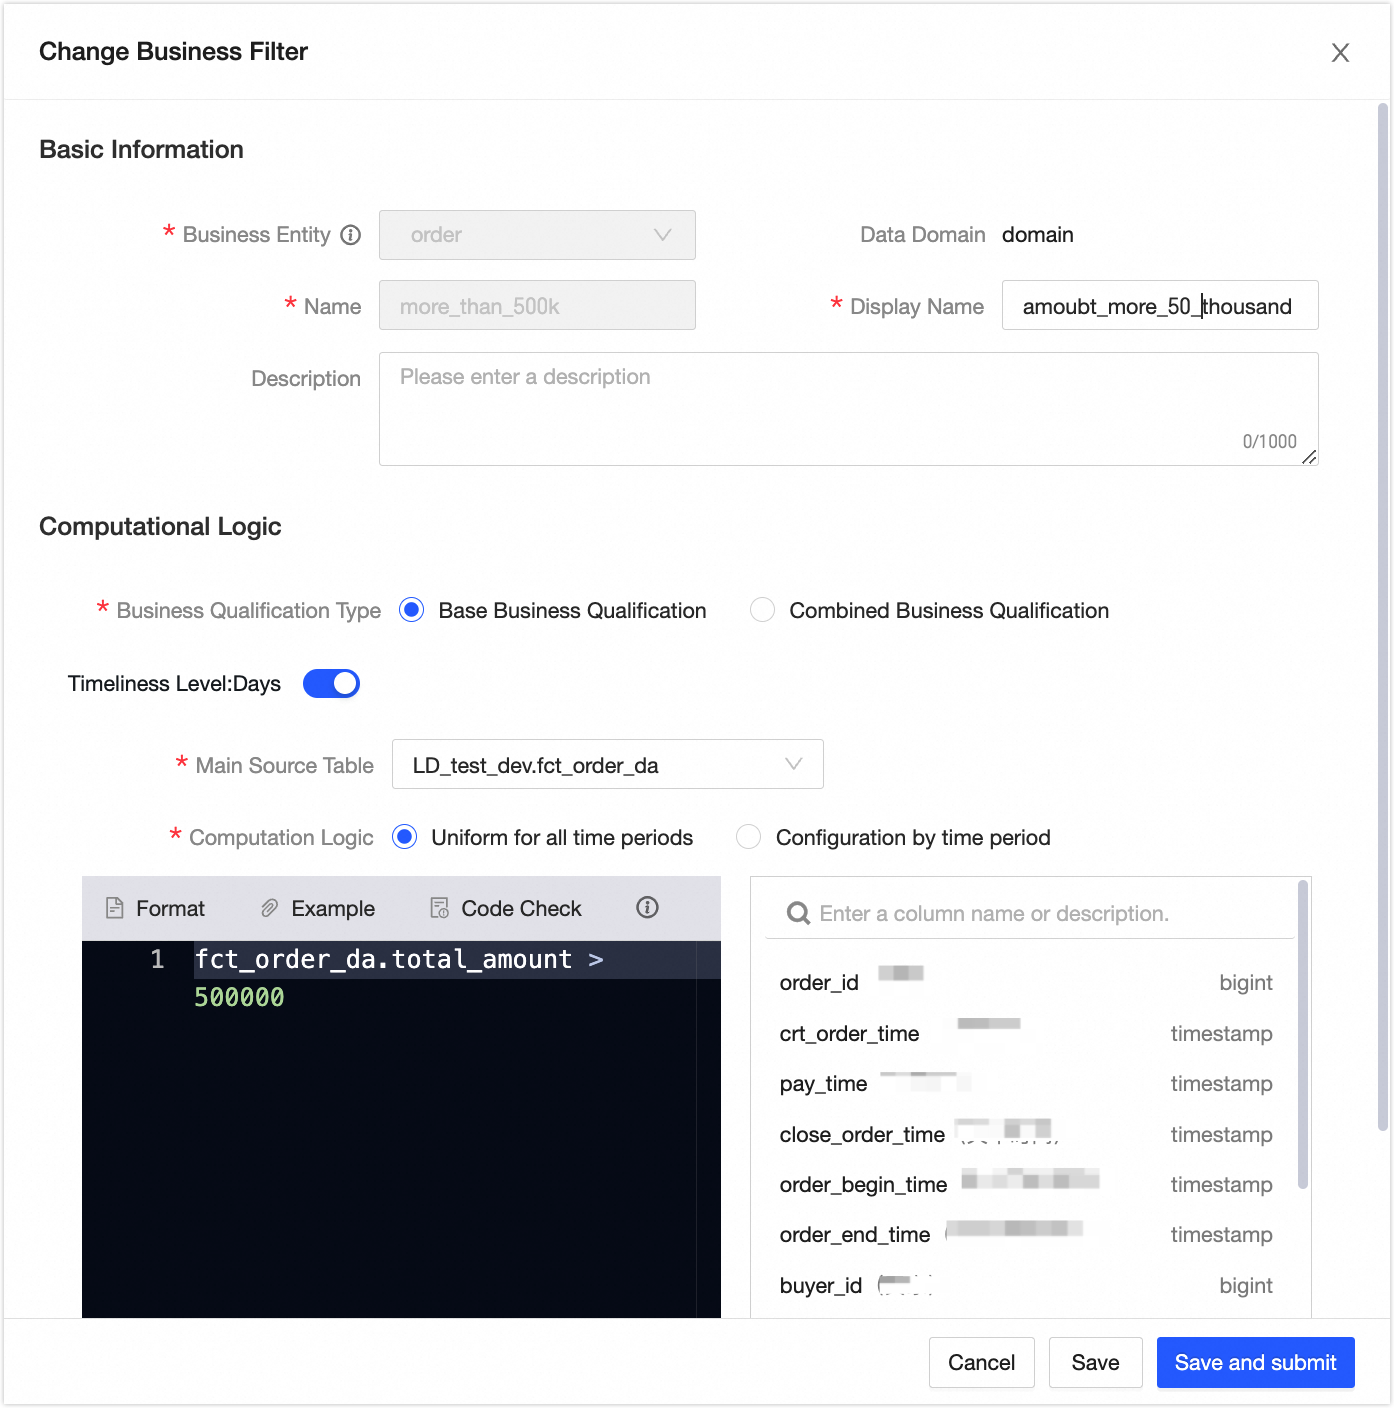
In the navigation pane on the left, choose Specification Modeling > Business Condition. On the Business Condition page, click the New
icon.In the New Business Filter dialog box, create the business filter for amounts exceeding 500,000 as shown in the following figure. Click Save and Submit, and then click OK and Submit.
Create a derived metric
In the navigation pane on the left, choose Standardized Modeling > Metrics. On the Metrics page, click the New
icon.On the New Derived Metric page, create the metric for the number of orders with a total single-transaction amount exceeding 500,000 in the last 7 days, as shown in the following figure. Click Next to accept the system configuration. Then, click Submit, and click OK and Submit.
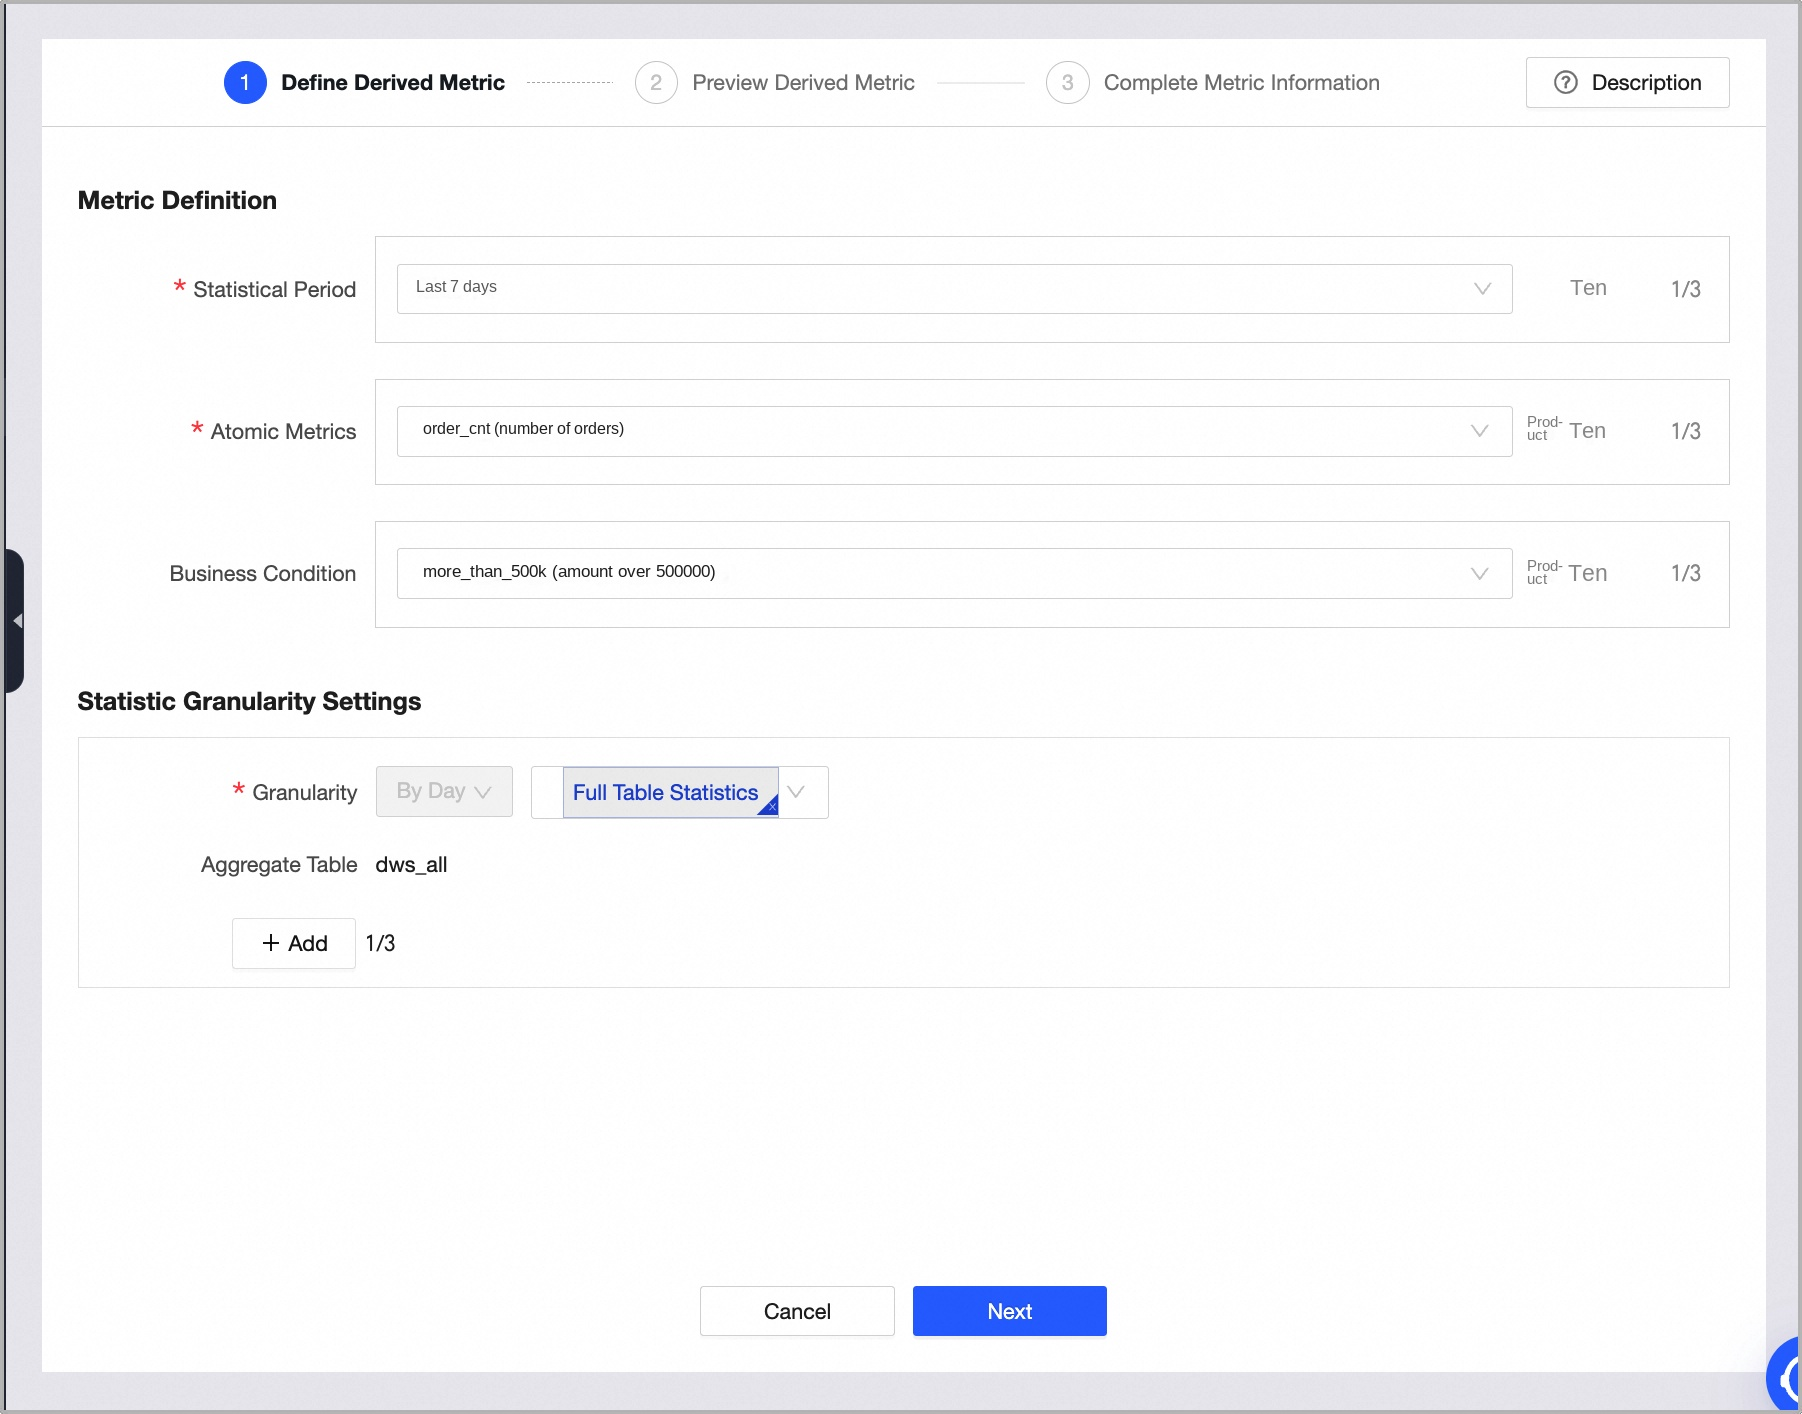
You can view the created derived metric in the dws_all table.
Step 4: Publish and backfill data
On the Dataphin home page, choose Development > Publish from the top menu bar. In the Objects To Publish list, publish the User logical dimension table, Order logical fact table, Number of Orders atomic metric, business filter for amounts exceeding 500,000, the derived metric for the number of orders with a total single-transaction amount exceeding 500,000 in the last 7 days, and the dws_all logical aggregate table to the production environment.
Click O&M in the top menu bar. In the left navigation pane, choose O&M > Recurring Task. Then, select the dataphin_order project in the production environment.
On the Recurring Task page, click the Detail and Aggregate Tables tab. In the Actions column for the real-time order logical table, choose More > Backfill Data > Backfill Current and Downstream Nodes to backfill data for the logical table task. For more information, see or Backfill data for the current node and its downstream nodes.
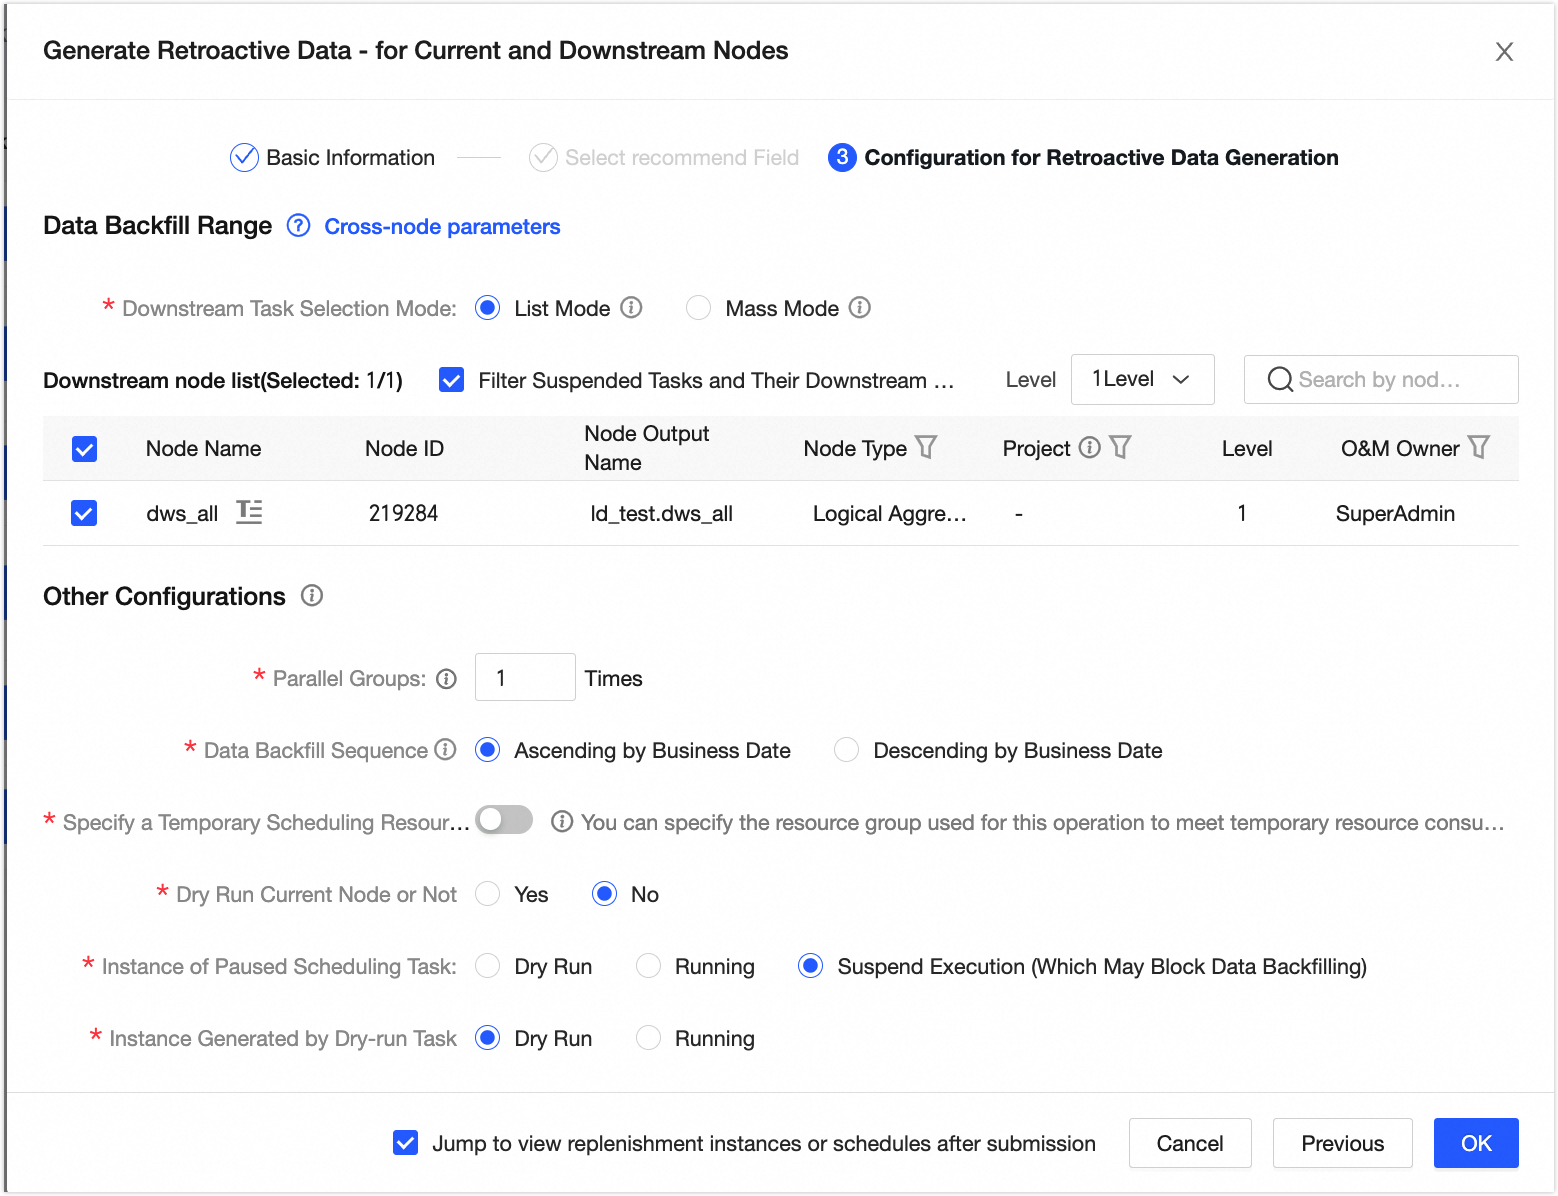
You can view the running results on the data backfill instance page.
Step 5: Validate data
On the Dataphin home page, choose Development > Data Studio from the top menu bar. Select the dataphin_order project in the development environment.
In the left navigation pane, click Ad Hoc Query. On the Ad Hoc Query page, click the New icon. In the New Ad Hoc Query dialog box, configure the parameters to create an ad hoc query task.
On the Code Editor page, write code and verify that the data meets your expectations.
For example, write the following command and click Run at the top of the page to validate the data in the logical aggregate table.
SELECT * FROM LD_retail.dws_all WHERE ds = '${bizdate}';