This topic describes how to create and run a task to migrate data from Hadoop Distributed File System (HDFS) to the network-attached storage (NAS) of a Data Transport device.
If the device experiences network interruptions or power failures during data migration, some data may not be migrated. Before running a migration job, make sure that your network and power supply are reliable.
Create a migration task
Check whether migration processes exist
Run the
ps -ef | grep jarcommand.Check whether the master.jar, worker.jar, and tracker.jar files exist. If they exist, run the kill -9 <PID> command to stop the master, worker, and tracker processes.
Run the
cd /mnt/cube1/software/ossimportcommand to go to the specified directory.
Configure the hdfs-oss.cfg files
You must specify the directories where the data for migration tasks is stored.
If you want to migrate all data of an HDFS file system, create one migration task.
If you want to migrate data in some directories of an HDFS file system, create one task for each directory.
Run the
cd /mnt/cube1/software/ossimport/confcommand to find the hdfs-oss.cfg files.Copy the hdfs-oss.cfg files based on the number of migration tasks and distinguish the files. For example, you can specify different file names, such as hdfs-oss1.cfg.
Run the command to open one of the configuration files, and specify the parameters described in the following table in the file.
Parameter
Description
jobName
The task name. Example: example_job.
srcType
The type of the data source. In this example, the value is set to hdfs.
srcAccessKey
The username of the super administrator. In this example, the value is set to hdfs.
srcSecretKey
The password of the super administrator. In this example, the value is set to hdfs.
srcDomain
The access path of the data source. In this example, the value of this parameter is in the hdfs://<IP address of the primary node for HDFS>:<HDFS service port> format. Example: hdfs://192.168.24.247:8020.
srcBucket
The bucket where the data source resides. In this example, the default value is hdfs.
srcPrefix
The source path. Note that a forward slash (/) must be added at the end of the path. Example: /mnt/nas/example_dir/.
destType
The destination to which data is migrated. In this example, data is migrated from an HDFS file system to the NAS of a Data Transport device. Set the value to local.
destPrefix
The destination path in which the data is stored in the Data Transport device. The path of storage pool 1 for the Data Transport device is /mnt/cube1/data/. The path of storage pool 2 for the Data Transport device is /mnt/cube2/data/.
auditMode
The verification mode. Set the value to simple.
Deploy and submit the task
The console.sh script exists in the HDFS directory. Perform the following operations in the HDFS directory.
Run the following command to deploy the built-in service of Data Transport:
bash console.sh deployRun the following command to start the service:
bash console.sh startRun the following command to check whether the processes are started:
ps -ef | grep jarIf the master.jar, worker.jar, and tracker.jar files exist, the processes are started.
Run the following command to submit the migration task:
bash console.sh submit conf/<Name of the configuration file>
(Optional) Configure incremental migration
If you want to configure incremental migration, you must modify the following parameters in the configuration file:
isIncremental: specifies the incremental migration mode. Set the value totrue.incrementalModeInterval: specifies the interval at which incremental migration is performed. Unit: seconds. The value cannot be less than 900.repeatCount: specifies the number of incremental migration times. We recommend that you set a value less than or equal to 30. The value you set must be the actual number of incremental migration times plus 1. For example, if you want to perform incremental migration twice, you must set the value ofrepeatCountto 3.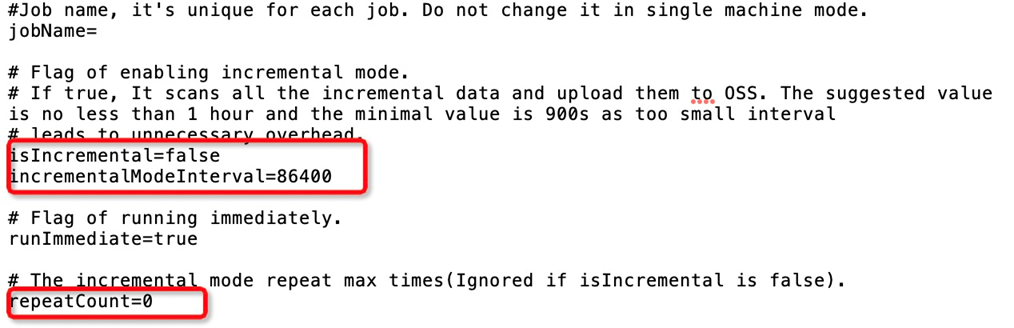
(Optional) Configure the sys.properties file
workerTaskThreadNum is used to adjust the number of threads that are processing tasks. If the number of small files is large, you can increase the number of threads to improve the migration speed.
jobNetFlowLimiter is used to throttle the bandwidth of your device. You can throttle the bandwidth of a device or a task.
To throttle the bandwidth of a device, set the parameter value in the
worker-level-netflow-policy,<Start time>:<End time>:<Maximum bandwidth>format. Unit: bytes. If you want to specify maximum bandwidth values for different time periods, separate the time periods with commas (,).Example:
jobNetFlowLimiter=worker-level-netflow-policy,080000:200000:52428800,200000:235959:104857600. This indicates that the maximum bandwidth from 08:00:00 to 20:00:00 is 50 MB/s, and that the maximum bandwidth from 20:00:00 to 23:59:59 is 100 MB/s. The bandwidth is not throttled from 24:00:00 to 07:59:59.To throttle the bandwidth of a task, set the parameter value in the
<Task name>,<Start time>:<End time>:<Maximum bandwidth>format. Unit: bytes. If you want to specify maximum bandwidth values for different time periods, separate the time periods with commas (,). If you want to throttle the bandwidth of multiple tasks, separate the tasks with semicolons (;).Example:
jobNetFlowLimiter=job1,080000:200000:41943040,200000:235959:62914560;job2,080000:180000:10485760,220000:235959:20971520. This indicates that the maximum bandwidth of the job1 task from 08:00:00 to 20:00:00 is 40 MB/s, and that the maximum bandwidth of the job1 task from 20:00:00 to 23:59:59 is 60 MB/s. The bandwidth of the job1 task is not throttled from 24:00:00 to 07:59:59. For the job2 task, the maximum bandwidth from 08:00:00 to 18:00:00 is 10 MB/s, and the maximum bandwidth from 22:00:00 to 23:59:59 is 20 MB/s. The bandwidth is not throttled during other time periods.
(Optional) Retry the migration task
If your task fails, you can run the bash console.sh retry [job_name] command to retry the task.
View logs
In the ossimport/workdir/logs/ directory, some logs are stored to record the upload status of files and the status of tasks.
Task progress logs
The
job_status.logfile is updated every 30 seconds and is used to record the status of the tasks. The following section describes the parameters in the file:jobname indicates the task name.
jobState indicates the task status. The running state indicates that the task is in progress. The succeed state indicates that the task succeeds. The failed state indicates that the task fails and the data of some files is not successfully migrated.
pending task count indicates the number of tasks waiting to be distributed.
dispatched task count indicates the number of distributed tasks.
succeed task count indicates the number of successful tasks.
failed task count indicates the number of failed tasks.
is scan Finished indicates whether the data scan is complete. The value true indicates that the scan is complete. The value false indicates that the scan is not complete. Note that the value is always false if you set isIncremental to true.
File uploading logs
The
fileStatusForSls_v1.logfile records the logs of file uploading. A log entry is generated each time a file is uploaded. Fields are separated with commas (,). The following section describes the corresponding location information of fields recorded in the file:Column 4: the file path name.
Column 6: the task name.
Column 12: the file migration state. Valid values: succeed and failed.
Column 13: the cause of failure.
Column 16: the object size.
Task status logs
The jobsForSls_v1.log file records the status of the tasks and is updated every minute until all tasks are complete. The following section describes the information recorded in the file:
Column 5: the task name.
Column 9: the task status.
Column 14: the total number of files.
Column 15: the total size of files.
Column 16: the number of files whose data is successfully migrated.
Column 17: the size of files whose data is successfully migrated.
Column 21: indicates whether the data scan is complete. The value 1 indicates that the scan is complete. The value 0 indicates that the scan is not complete.