You may need to change the character set of a table based on your business requirements. For example, you may need to change the character set from GBK to UTF8mb4. However, an ALTER statement that is used to change the character set of a large table will lock the table and cause negative impacts on your business.
This topic describes how to change the character set without affecting your business. You can create a table schema in the destination instance based on the new character set, and then use Data Transmission Service (DTS) to migrate table data to the destination instance. To further ensure service continuity, you can prepare a rollback solution or a dual-write solution.
Usage notes
Before you change the character set, make sure that your business system and SQL statements are compatible with the new character set and the features of the business system will not be affected.
During full data migration, DTS uses read/write resources of the source and destination instances. This may increase the database load. Before you migrate data, evaluate the performance of the source and destination instances. We recommend that you migrate data during off-peak hours.
The source instance must have PRIMARY KEY or UNIQUE constraints and all fields must be unique. Otherwise, duplicate data may exist in the destination instance.
Step 1: Import the table schema from the source instance to the destination instance
In this example, the management mode of the instances that you log on to by using Data Management (DMS) is Flexible Management.
Export the script of the source table schema from the source instance. The source table schema refers to the schema of the table whose character set you want to change.
Log on to the source instance by using DMS. For more information, see Use DMS to log on to an ApsaraDB RDS for MySQL instance.
In the top navigation bar, click Database Development. In the left-side navigation pane, choose .
NoteTo perform this operation, you must move your mouse over the
 icon in the upper-right corner, and turn on Drop-down Menus in Top Navigation Bar.
 On the Data Export tab, configure the parameters.
 Note
NoteThe configuration process and parameters for data export may vary based on the management mode of the instance. For more information, see Export databases.
Parameter
Description
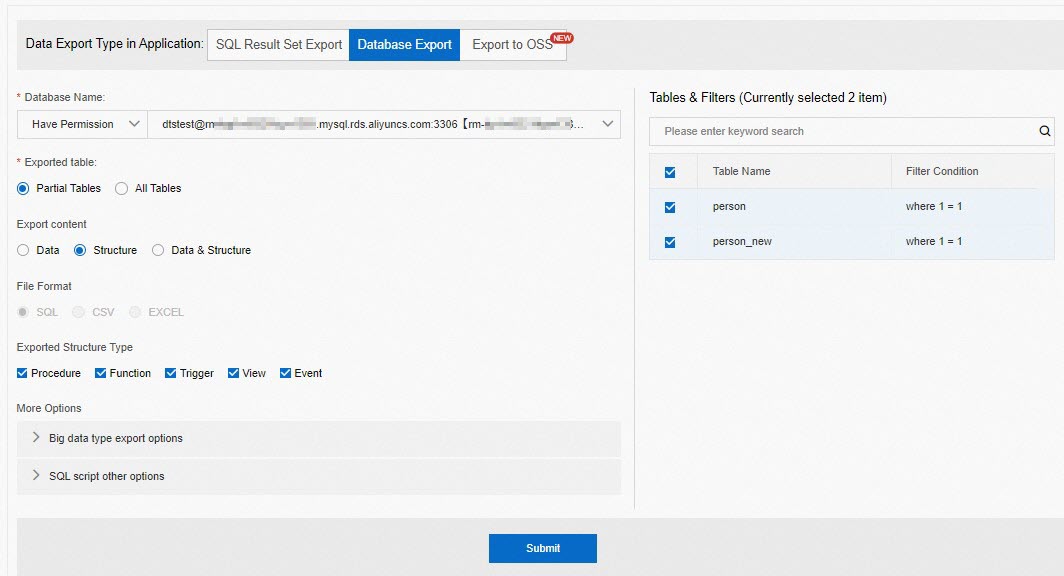
Data Export Type in Application
The type of data export that you want to perform. Select Database Export.
Database Name
The name of the database from which data is exported. Select the database that you want to export.
NoteYou must have the export permissions on this database. For more information, see View owned permissions.
Exported table
The tables to be exported. In this example, Partial Tables is selected. You can select Partial Tables or All Tables based on your business requirements.
NoteIf you set this parameter to Partial Tables, you must select one or more tables in the Tables & Filters section and configure the filter condition for each table.
Export content
The content that you want to export. Select Structure.
File Format
The format of the file to be exported. In this example, SQL is selected by default and cannot be changed.
Exported Structure Type
The type of schema that you want to export. Valid values:
Procedure
Function
Trigger
View
Event
NoteThe valid values vary based on the type of database that you want to export.
More Options
The other objects that you want to export. Click Big data type export options or SQL script other options and select the required options.
Click Submit and wait for the approval result.
After the ticket is approved, click Download Exported File in the Download step.

Decompress the exported file, and change the character set in the script of the table schema.

Create an ApsaraDB RDS for MySQL instance of the same type as the source instance. The new instance is the destination instance. For more information about how to create an ApsaraDB RDS for MySQL instance, see Create an ApsaraDB RDS for MySQL instance.
Import the edited script of the table schema to the new ApsaraDB RDS for MySQL instance.
Log on to the destination ApsaraDB RDS for MySQL instance by using DMS. For more information, see Use DMS to log on to an ApsaraDB RDS for MySQL instance.
In the top navigation bar, click Database Development. In the left-side navigation pane, choose .
On the Data Import tab, configure the parameters.
NoteThe configuration process and parameters for data import may vary based on the management mode of the instance. For more information, see Import data.
Parameter
Description
Data Change Type in Application
The type of data change that you want to perform. Select Large Data Import.
Database
The name of the database to which the file is imported.
NoteIf the destination database is managed in the Flexible Management or Stable Change mode, make sure that you have logged on to the database. Otherwise, the database is not displayed.
File Encoding
The encoding algorithm to be used by the destination database. Valid values:
UTF-8
GBK
ISO-8859-1
Automatic Identification
Import mode
The import mode. Valid values:
Speed Mode: If you use this mode, the SQL statements in the uploaded file are read and directly executed in the Execute step to import data to the specified destination database. The speed mode is less secure but faster than the security mode.
NoteBy default, the speed mode is disabled for a database instance that is managed in Security Collaboration mode. You can enable the speed mode by performing the following operations: Go to the page of the security rule set that is applied to the database instance and click the SQL Correct tab. In the list below the Basic Configuration Item checkpoint, modify the Whether data import supports selecting speed mode configuration.
Security mode: If you use this mode, the uploaded file is parsed, and the SQL statements or CSV file data in the uploaded file is cached in the Precheck step. In the Execute step, the cached SQL statements are read and executed to import data, or the cached CSV file data is read and imported to the specified destination database. The security mode is more secure but slower than the speed mode.
File type
The format of the file for data import. Valid values:
SQL Script: By default, you can use only the INSERT and REPLACE statements to import data to database instances that are managed in Security Collaboration mode. If you want to use other SQL statements to import data, modify the security rules for data import as a database administrator (DBA) or DMS administrator. You can modify the security rules by performing the following operations: Go to the Details page of the security rule set that is applied to the database instance and click the SQL Correct tab. In the list below the Batch Data import rules checkpoint, modify the security rules as needed.
CSV: The delimiters in the file must be commas (,).
Excel: The file can contain table headers and data, or contain only data.
Attachment
The file for data import. Click Upload a file to upload a file.
NoteSupported file types include SQL, CSV, TXT, XLSX, and ZIP.
The uploaded file can be up to 5 GB in size.
Other Options
Specifies whether to skip errors. This parameter is optional.
By default, the check box is cleared. If an error occurs, DMS stops executing SQL statements and sends an error message.
If you select the check box, DMS skips errors and continues to execute SQL statements.
Click Submit and wait until the precheck is complete. If the precheck fails, troubleshoot the issue and submit the ticket again.
NoteIf the uploaded file is an SQL script, DMS prechecks the SQL statements in the uploaded file. If the uploaded file is a CSV file, DMS generates
INSERTstatements based on the uploaded file.In the Execute step, click Execute Change.
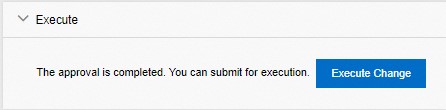
In the Task Settings dialog box, specify the time to run the task. You can set the Execution Strategy parameter to Running immediately. If you want to run the task later, set the Execution Strategy parameter to Schedule and specify a point in time for DMS to run the task. Then, click Confirm Execution.
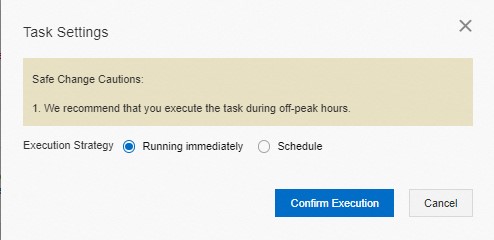
You can use one of the following methods to run the task:
Running immediately: By default, this option is selected. If you select this option, the task is immediately run after you click Confirm Execution.
Schedule: If you select this option, you must specify the start time for the task. After you click Confirm Execution, the task is run at the specified point in time.
NoteDuring the execution, DMS reads the SQL statements in streaming mode and executes the SQL statements in batches. Each batch of SQL statements is 1 MB in size.
In the Execute step, you can view the execution status, SQL check details, and scheduling logs of the task.
If you want to restart a task that is suspended, the task is run from the beginning or the offset of suspension based on the import mode.
Speed mode: If the task is suspended and restarted, the SQL script is executed, or the data files are imported from the beginning.
Security mode: If the task is suspended and restarted, the SQL script is executed, or the data files are imported from the offset of suspension.
After the table schema is imported, you can execute the
show create table <Table name>;statement to verify the new character set of the table.
Step 2: Migrate table data from the source instance to the destination instance
Log on to the DTS console.
NoteIf you are navigated to the DMS console, you can move your mouse over the
 icon in the lower-right corner and click the
  icon to go to the DTS console of the previous version.
 If you are navigated to the DTS console of the new version, you can click the
 icon in the lower-right corner to go to the DTS console of the previous version.
In the left-side navigation pane, click Data Migration.
At the top of the Migration Tasks page, select the region where the destination cluster resides.
In the upper-right corner of the page, click Create Migration Task.
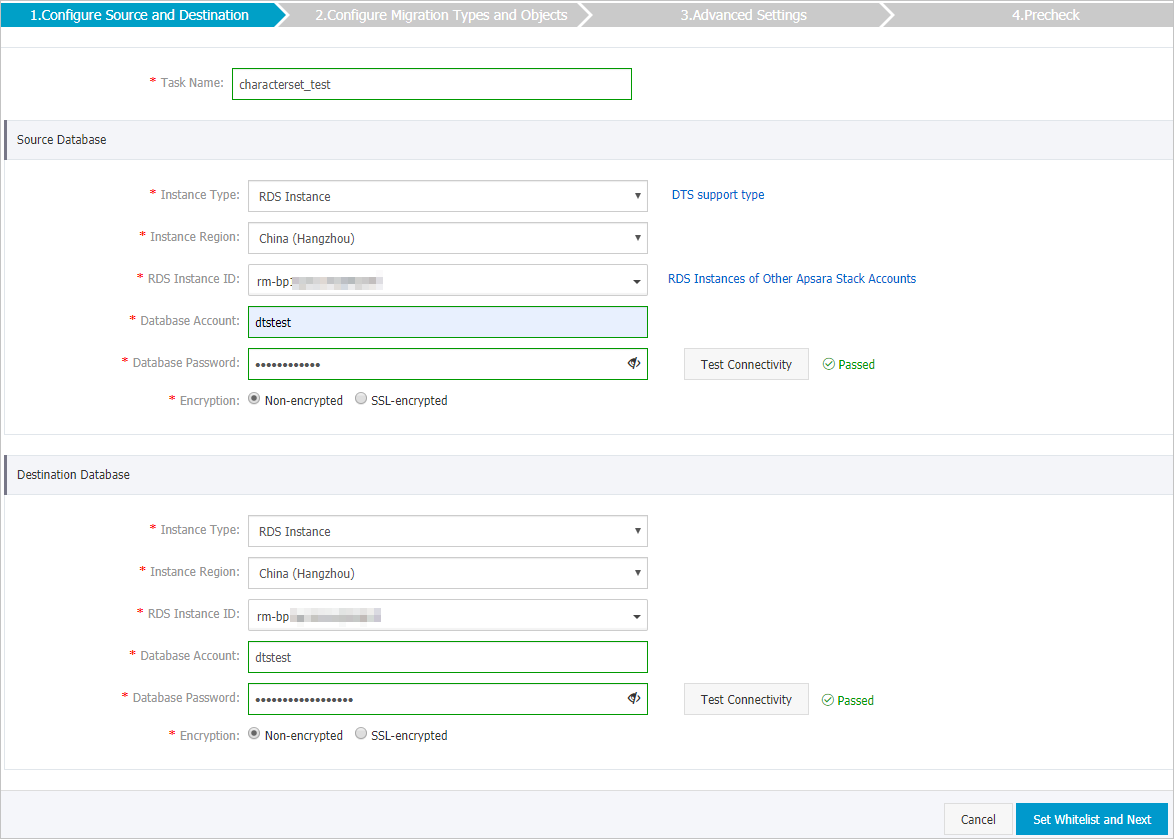
Configure the source and destination databases.
Section
Parameter
Description
Task Name
-
The task name that DTS automatically generates. We recommend that you specify a descriptive name that makes it easy to identify the task. You do not need to specify a unique task name.
Source Database
Instance Type
The type of the source database. Select RDS Instance.
Instance Region
The region in which the source instance resides.
RDS Instance ID
The ID of the source ApsaraDB RDS for MySQL instance.
Database Account
The database account of the source ApsaraDB RDS for MySQL instance. The account must have the read/write permissions on the database to be migrated.
Database Password
The password of the database account of the ApsaraDB RDS for MySQL instance.
NoteAfter you specify the information about the source database, you can click Test Connectivity next to Database Password to check whether the information is valid. If the information is valid, the Passed message appears. If the Failed message appears, click Check next to Failed. Then, modify the information based on the check results.
Encryption
Specifies whether to encrypt the connection to the source instance. Select Non-encrypted or SSL-encrypted. If you select SSL-encrypted, you must enable SSL encryption for the ApsaraDB RDS for MySQL instance before you configure the data migration task. For more information, see Configure SSL encryption for an ApsaraDB RDS for MySQL instance.
NoteThe Encryption parameter is available only for regions in the Chinese mainland.
Destination Database
Instance Type
The type of the destination database. Select RDS Instance.
Instance Region
The region in which the destination ApsaraDB RDS for MySQL instance resides.
RDS Instance ID
The ID of the destination ApsaraDB RDS for MySQL instance.
Database Account
The database account of the destination ApsaraDB RDS for MySQL instance. The account must have the read/write permissions on the destination database.
Database Password
The password of the database account of the ApsaraDB RDS for MySQL instance.
NoteAfter you specify the information about the RDS instance, you can click Test Connectivity next to Database Password to check whether the information is valid. If the information is valid, the Passed message appears. If the Failed message appears, click Check next to Failed. Then, modify the information based on the check results.
Encryption
Specifies whether to encrypt the connection to the destination instance. Select Non-encrypted or SSL-encrypted. If you select SSL-encrypted, you must enable SSL encryption for the ApsaraDB RDS for MySQL instance before you configure the data migration task. For more information, see Configure SSL encryption for an ApsaraDB RDS for MySQL instance.
NoteThe Encryption parameter is available only for regions in the Chinese mainland.
In the lower-right corner of the page, click Set Whitelist and Next.
NoteThe CIDR blocks of DTS servers are automatically added to the whitelist of the source and destination ApsaraDB RDS for MySQL instances. This ensures that DTS servers can connect to the source and destination ApsaraDB RDS for MySQL instances.
Select the migration types and objects to be migrated.

Parameter
Description
Migration Types
Schema migration is completed in Step 1. Therefore, you do not need to select Schema Migration in this step.
To perform only full data migration, select only Full Data Migration.
WarningTo ensure data consistency, we recommend that you do not write data to the source instance during full data migration.
To ensure service continuity during data migration, select Full Data Migration and Incremental Data Migration.
NoteThe following SQL operations can be migrated during incremental data migration: INSERT, UPDATE, DELETE, CREATE TABLE, ALTER TABLE, RENAME TABLE, TRUNCATE TABLE, and DROP TABLE.
Select the objects to be migrated
In the Available section, select the objects whose schema has been migrated in Step 1, and click the
 icon to add the objects to the Selected Objects section. Warning
We recommend that you do not use the object name mapping feature. Otherwise, the data migration task fails.
Start the migration task.
In the lower-right corner of the page, click Precheck.
NoteBefore you can start the data migration task, DTS performs a precheck. DTS can migrate data only if the precheck is passed.
If the task fails to pass the precheck, you can click the
 icon next to each failed item to view details. Troubleshoot the issues based on the causes and run the precheck again.
After the data migration task passes the precheck, click Next.
In the Confirm Settings dialog box, specify the Channel Specification parameter and select the check box to agree to Data Transmission Service (Pay-As-You-Go) Service Terms.
Click Buy and Start to start the data migration task.
Step 3: Switch your workloads
Switch your workloads by using one of the following solutions:
Rollback solution: You do not need to edit the code of your application. However, a rollback failure may occur.
After data migration is complete, verify the data in the destination ApsaraDB RDS for MySQL instance.
Prepare a rollback solution, and then switch your workloads to the destination instance. The rollback solution is based on a data migration task in the opposite direction. The task allows you to switch workloads back to the original source instance. For more information, see Switch workloads to the destination database.
Test the features of your business. If the features work as expected, delete the data migration task in the opposite direction.
Optional:If you no longer need the source ApsaraDB RDS for MySQL instance, release the instance.
Dual-write solution: This solution ensures a high success rate of rollback. However, great efforts are required to edit your application code.
Edit the application code to implement the dual-write solution. The dual-write solution writes data changes to both the source and destination instances.
Stop the data migration task.
- Full data migration
Do not manually stop a task during full data migration. Otherwise, the system may fail to migrate all data. Wait until the migration task automatically ends.
- Incremental data migration
The task does not automatically end during incremental data migration. You must manually stop the migration task.
- Wait until the task progress bar shows Incremental Data Migration and The migration task is not delayed. Then, stop writing data to the source database for a few minutes. In some cases, the progress bar shows the delay time of incremental data migration.
- After the status of incremental data migration changes to The migration task is not delayed, manually stop the migration task.

NoteMake sure that no sessions are performing write operations. To retrieve session information, you can log on to the source instance and execute the
show processlist;statement.- Full data migration
After data migration is complete, verify the data in the destination ApsaraDB RDS for MySQL instance.
Enable the dual-write solution for your application. Then, data changes will be written to both the source and destination instances.
Test the features of your business on the destination instance. If the features work as expected, disable the dual-write solution.
Optional:If you no longer need the source ApsaraDB RDS for MySQL instance, release the instance.