A POSIX client can connect to multiple data nodes simultaneously. It provides standard POSIX and MPI-IO interfaces for applications, which delivers optimal performance and application interface compatibility. This topic uses Alibaba Cloud Linux as an example to describe how to deploy a Cloud Parallel File Storage (CPFS) file system and access it using a CPFS-POSIX client.
The CPFS-POSIX client provides higher I/O performance than the CPFS-NFS client. When you create a POSIX mount target for a CPFS file system, three pay-as-you-go Elastic Compute Service (ECS) instances are automatically created in your Alibaba Cloud account to manage the CPFS-POSIX client cluster. The ECS instance type is ecs.g*.large (g6 or later instance types). You are charged for these instances based on the ECS pricing for the region. Ensure that your Alibaba Cloud account can be used to purchase this instance type in the specified zone. For more information, see Pricing of Elastic Compute Service.
If you do not have high performance requirements, you can enable the general-purpose protocol service in the console and use a CPFS-NFS client to access CPFS. If you use a CPFS-NFS client to access a CPFS file system, the three additional ECS instances are not required. For more information, see Overview.
Prerequisites
The CPFS service is activated.
When you log on to the CPFS console for the first time, follow the on-screen instructions to activate the CPFS service.
You have created an ECS instance. The instance must run an operating system that is supported by the CPFS-POSIX client. For more information, see Create an ECS instance.
Operating system
Distribution
Kernel version
Alibaba Cloud Linux
Alibaba Cloud Linux 2.1903 64-bit
4.19.91-27.4.al7.x86_64 and earlier versions
Red Hat Enterprise Linux (RHEL) or CentOS
8.4
4.18.0-305.19.1.el8_4
8.3
4.18.0-240.22.1.el8_3
8.2
4.18.0-193.28.1.el8_2
8.1
4.18.0-147.8.1.el8_1
8.0
4.18.0-80.11.2.el8_0
7.9
3.10.0-1160.42.2.el7
7.8
3.10.0-1127.19.1.el7
7.7
3.10.0-1062.18.1.el7
7.6
3.10.0-957.54.1.el7
7.5
3.10.0-862.14.4.el7
7.4
3.10.0-693.2.2.el7
7.3
3.10.0-514.26.2.el7
7.2
3.10.0-514.26.2.el7
Ubuntu
20.04.3 LTS
5.4.0-86-generic
NoteThe CPFS-POSIX client requires at least 2 CPU cores and 4 GiB of memory to properly run on a compute node.
We recommend that you use the CPFS-NFS client to access CPFS file systems if the kernel version of your operating system is not supported by the CPFS-POSIX client.
The CentOS project has announced that it was shifting focus from CentOS Linux to CentOS Stream. Alibaba Cloud CentOS public images are derived from CentOS. When the CentOS project ends support for CentOS, Alibaba Cloud also ends support for this Linux distribution. To prevent the impacts of the end of support for CentOS, we recommend that you replace your CentOS operating systems at the earliest opportunity. For more information, see Migrate the operating system of an ECS instance.
This topic uses an ECS instance with the following configurations:
Operating system: Alibaba Cloud Linux 2.1903 LTS 64-bit
Kernel version: 4.19.91-27.4.al7.x86_64
vCPU: 2 vCPU
Memory: 8 GiB
Region: China (Shanghai)
Zone: Shanghai Zone B
Internal IP address: 192.168.1.249
Procedure
Step 1: Create a file system
Log on to the NAS console.
On the Overview page, click Create CPFS File System.
In the Create CPFS File System panel, configure the following parameters. For the parameters that are not described in the following table, select values based on your business requirements or use the default values. For more information, see Create a file system.
Parameter
Description
Region
Select China (Hangzhou) from the drop-down list.
Zone
Select Hangzhou Zone K. The file system and the ECS instance must reside in the same zone.
Type
Select 100 MB/s/TiB Baseline.
Capacity of CPFS File System
Select the storage capacity of the file system. In this example, 3600 GiB is selected.
VPC
Select the virtual private cloud (VPC) in which you want to create the mount target.
vSwitch
Select a vSwitch that resides in the specified VPC.
Click Buy Now and follow the instructions to complete the payment.
Step 2: Add a POSIX mount target and add the ECS instance to the security group of the quorum nodes
In the navigation pane on the left, choose File System > File System List and click the name of the file system that you created.
On the details page of the file system, click the Mount Targets tab.
Add a POSIX client mount target.
Click Add Mount Target for POSIX Client and configure the required parameters. For other parameters, configure them as required or retain the default configurations.
vSwitch: Select the vSwitch that is in the same VPC as the ECS instance.
Click OK.
Obtain the security group information for the quorum nodes.
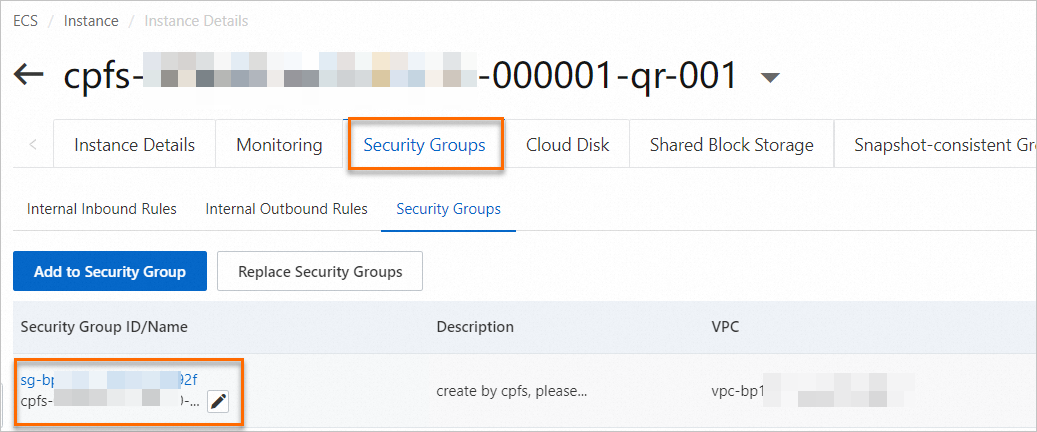
In the Client Management node area, click the first ECS instance in the list to go to its details page.
On the details page of the ECS instance, click the Security Group tab and record the security group information.
Add the destination ECS instance to the security group of the CPFS quorum nodes.
In the navigation pane on the left, choose Instances & Images > Instances.
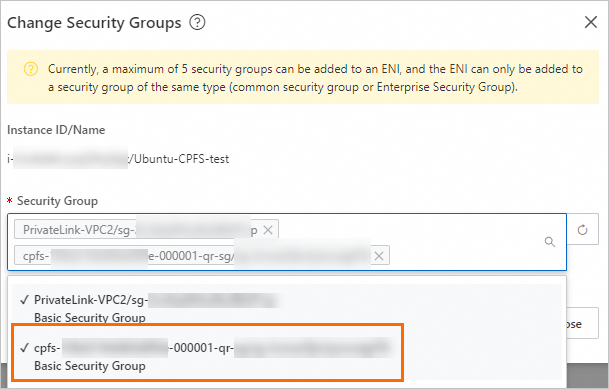
Click the ID of the ECS instance on which you want to mount the CPFS file system to go to its details page.
Click the Security Group tab, and then click Change Security Groups.
In the Change Security Group dialog box, select the security group of the quorum nodes that you recorded in the previous step (<FSID>-<GENID>-qr-sg) from the Security Group drop-down list, and then click Confirm.
Step 3: Install the CPFS-POSIX client
In the navigation pane on the left, choose Instances & Images > Instances.
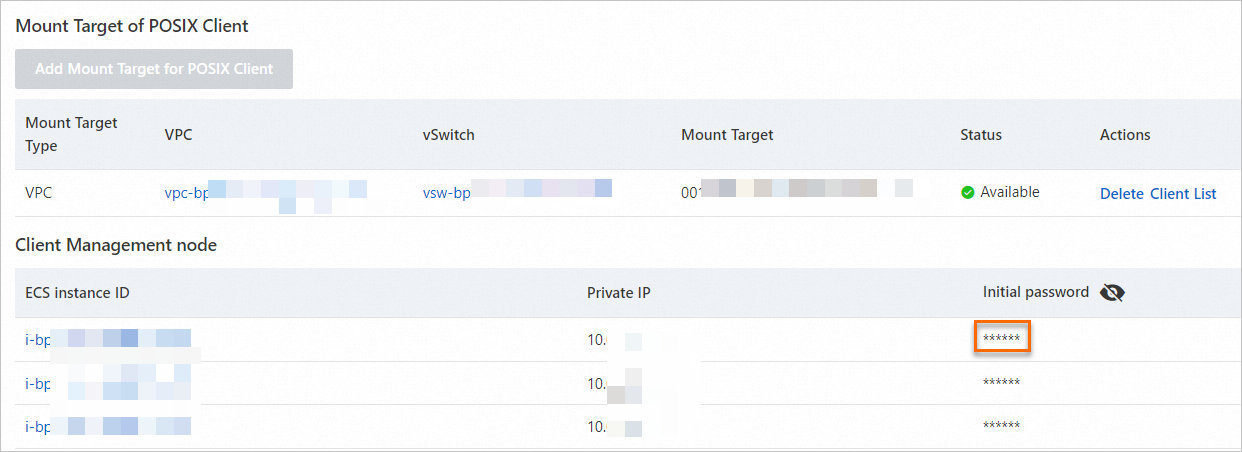
In the Actions column of the ECS instance for the CPFS-POSIX client installation (cpfs-****-000001-qr-001), click Connect. Log on to the instance. For more information about how to connect to an ECS instance, see Connect to an instance.
You can log on to the NAS console. On the Mount Target tab of the file system that you created, you can view the password of the first ECS instance in the Client Management Node area.
Enable password-free logon from the quorum nodes to the destination ECS instance.
NoteBefore you configure password-free logon between multiple ECS instances and the CPFS control plane nodes, we recommend setting the same logon password for all target ECS instances. Otherwise, you will need to create the client.list file and repeat the procedure from Step 6 to Step 8 multiple times.
Create a client.list file and add the internal IP address of the destination ECS instance to the file.
Create the client.list file.
touch client.listRun the
vi client.listcommand to open the client.list file and add the internal IP address of the target ECS instance.192.168.1.249NoteYou can add one or more ECS instances. If you add multiple instances, enter the internal IP address of each instance on a new line.
Save and close the file.
Create a qr.list file and add the IP addresses of the quorum nodes.
Create the qr.list file.
touch qr.listRun the
vi qr.listcommand to open the qr.list file and add the IP addresses of the control plane nodes. The following code is an example:192.168.*.*** 192.168.*.*** 192.168.*.***You can obtain the IP addresses of the CPFS-POSIX client quorum nodes from the Client Management Node area.
Save and close the file.
Create and configure the auto_ssh.sh script.
Create the auto_ssh.sh file.
touch auto_ssh.shRun the
vi auto_ssh.shcommand to open the auto_ssh.sh file and add the following content.#!/usr/bin/expect set timeout 10 set username [lindex $argv 0] set password [lindex $argv 1] set hostname [lindex $argv 2] spawn ssh-copy-id -i /root/.ssh/id_rsa.pub $username@$hostname expect { #first connect, no public key in ~/.ssh/known_hosts "Are you sure you want to continue connecting (yes/no)?" { send "yes\r" expect "password:" send "$password\r" } #already has public key in ~/.ssh/known_hosts "password:" { send "$password\r" } "Now try logging into the machine" { #it has authorized, do nothing! } "already exist on the remote" { #it has authorized, do nothing! } } expect eofSave and close the file.
Run the following command to grant the user execute permissions for the auto_ssh.sh file.
chmod +x auto_ssh.shRun the following command to record the password for the destination ECS instance to the client.list file.
PASSWD='yourpassword'Run the following command to configure password-free logon for the quorum nodes.
cat client.list | xargs -I {} ./auto_ssh.sh root $PASSWD {}Run the following command to remotely install the CPFS client on the ECS instance that is specified in the client.list file. The installation is successful if the output contains
Complete!.region_id=`curl http://100.100.100.200/latest/meta-data/region-id`; wget https://cpfs-${region_id}-pre.oss-${region_id}-internal.aliyuncs.com/cpfs/CPFS2.3.4-CentOS.tar.gz -O /root/CPFS2.3.4-CentOS.tar.gz; cat client.list | xargs -I {} scp /root/CPFS2.3.4-CentOS.tar.gz {}:/root/ pssh -ih client.list "tar xzvf /root/CPFS2.3.4-CentOS.tar.gz" pssh -ih client.list "cd /root/CPFS2.3.4-CentOS/CentOS7;yum install -y gpfs.adv-*.x86_64.rpm gpfs.base-*.x86_64.rpm gpfs.docs-*.noarch.rpm gpfs.gpl-*.noarch.rpm gpfs.gskit-*.x86_64.rpm gpfs.gss.pmsensors-*.x86_64.rpm gpfs.license.dm-*.x86_64.rpm gpfs.msg.en_US-*.noarch.rpm"Run the following command to remotely compile the kernel extension for the ECS instance that is specified in the client.list file.
pssh -ih client.list "/usr/bin/yum -y install cpp gcc-c++ elfutils-libelf-devel"
pssh -ih client.list "export LINUX_DISTRIBUTION=KERNEL_ORG_LINUX; /usr/lpp/mmfs/bin/mmbuildgpl"
After the configuration is complete, you can create an image of the environment. To add new ECS instances to access the CPFS file system, you can create the instances from the image without reconfiguring the environment. For more information about how to create an image, see Custom Image Overview.
Step 4: Mount the CPFS file system
Run the following commands to update the hosts file on the quorum nodes and destination ECS instances:
pssh -ih client.list "hostname;ifconfig eth0 | grep -v inet6 | grep inet | awk '{print \$2}'" | grep -v SUCC | sed 'N;s/\n/ /' > /tmp/ip-host-client.list
pssh -ih qr.list "hostname;ifconfig eth0 | grep -v inet6 | grep inet | awk '{print \$2}'" | grep -v SUCC | sed 'N;s/\n/ /' > /tmp/ip-host-qr.list
cat /tmp/ip-host-client.list | awk '{print $2,$1,$1"t_MAGICTAG"}' > /etc/client-hosts.append
cat /tmp/ip-host-qr.list | awk '{print $2,$1,$1"t_MAGICTAG"}' > /etc/qr-hosts.append
pssh -ih client.list "cp /etc/hosts hosts.bak"
pssh -ih qr.list "cp /etc/hosts hosts.bak"
cat client.list | xargs -I {} scp /etc/client-hosts.append {}:/etc/
cat client.list | xargs -I {} scp /etc/qr-hosts.append {}:/etc/
cat qr.list | xargs -I {} scp /etc/client-hosts.append {}:/etc/
pssh -ih client.list "cat /etc/client-hosts.append >> /etc/hosts"
pssh -ih client.list "cat /etc/qr-hosts.append >> /etc/hosts"
pssh -ih qr.list "cat /etc/client-hosts.append >> /etc/hosts"
Add the destination ECS instances to the CPFS cluster.
Commands
mmaddnode -N client.list
mmchlicense client --accept -N client.list
mmchnode --perfmon -N client.list
mmstartup -N client.list
mmgetstate -a
Sample response
If the state of a destination ECS instance changes to
active, the ECS instance is successfully added to the CPFS cluster.Node number Node name GPFS state --------------------------------------------------------------- 1 cpfs-2989198****323d3-000001-qr-001 active 2 cpfs-2989198****323d3-000001-qr-002 active 3 cpfs-2989198****323d3-000001-qr-003 active 4 iZ0jl91t3p5kehvr6i5**** active
Check whether the destination ECS instances are included in the node list.
Commands
mmlsclusterSample response
 Node  Daemon node name                     IP address    Admin node name                      Designation
-----------------------------------------------------------------------------------------------------------
   1   cpfs-2989198****323d3-000001-qr-001  192.168.3.57  cpfs-2989198****323d3-000001-qr-001  quorum-manager-perfmon
   2   cpfs-2989198****323d3-000001-qr-002  192.168.3.58  cpfs-2989198****323d3-000001-qr-002  quorum-manager-perfmon
   3   cpfs-2989198****323d3-000001-qr-003  192.168.3.56  cpfs-2989198****323d3-000001-qr-003  quorum-manager-perfmon
   4   iZ0jl91t3p5kehvr6i5****             192.168.3.59  iZ0jl91t3p5kehvr6i5****            perfmon
Step 5: Verify the mount
After the file system is mounted, you can access and use it as a regular directory on the ECS instance.
Connect to the destination ECS instance. For more information, see Connect to an ECS instance.
Run the following command to query the mount target.
df -hThe following output is a sample:
Filesystem               Size  Used Avail Use% Mounted on
devtmpfs                 7.6G     0  7.6G   0% /dev
tmpfs                    7.6G     0  7.6G   0% /dev/shm
tmpfs                    7.6G  512K  7.6G   1% /run
tmpfs                    7.6G     0  7.6G   0% /sys/fs/cgroup
/dev/vda1                 40G  3.4G   37G   9% /
tmpfs                    1.6G     0  1.6G   0% /run/user/0
01a392bac3****-000001    3.6T  432M  3.6T   1% /cpfs/01a392bac3****-000001
In the output, /cpfs/01a392bac3****-000001 is the mount target.
Run the following command to change the directory to the CPFS file system.
cd <mount_target>Now, you can access and use the CPFS file system as a regular directory.