This topic describes how to create a single-tenant fully managed service instance that supports the Virtual Private Cloud (VPC) peering connection feature by using a MySQL software package in Compute Nest. In this example, the MySQL software package is used to deploy MySQL on a single Elastic Compute Service (ECS) instance.
Overview
In this example, a MySQL database is deployed on a single ECS instance and the VPC peering connection feature is enabled by default. After a customer deploys a service instance, the customer can directly access the MySQL database that is deployed within the account of the service provider over an internal network. The GitHub repository of the sample service is mysql-managed-vpcpeering-demo.
In this example, the service is automatically created, which takes about 3 minutes. The service is created after it enters the Pending Submission state. The service is created in the following procedure:
Publish the MySQL software package stored in the GitHub repository as a file artifact.
Create a service and associate it with the file artifact.
The following table describes the plans provided by the service.
Plan | ECS instance type | vCPU and memory | System disk | Public bandwidth |
Basic Edition | ecs.c6.large | c6, compute-optimized instance family: 2 vCPUs and 4 GiB | Performance level 0 (PL0) Enterprise SSD (ESSD): 200 GiB | Fixed bandwidth: 1 Mbit/s |
Standard Edition | ecs.c6.xlarge | c6, compute-optimized instance family: 4 vCPUs and 8 GiB | PL0 ESSD: 200 GiB | Fixed bandwidth: 1 Mbit/s |
Advanced Edition | ecs.c6.2xlarge | c6, compute-optimized instance family: 4 vCPUs and 8 GiB | PL0 ESSD: 200 GiB | Fixed bandwidth: 1 Mbit/s |
Deployment architecture
Only one ECS instance is deployed for a service instance, and the security group to which the ECS instance belongs allows access to port 3306. A VPC and a vSwitch are created for each service instance.
Billing of service creation
You are not charged for creating the sample service for testing. For more information about fees of service instances, see the "Billing of service instances" section of this topic.
Policies required for RAM users
The service needs to access resources such as ECS instances and VPCs. Before you create a service instance as a Resource Access Management (RAM) user, you must grant the RAM user the permissions on related resources. For more information about how to grant permissions to a RAM user, see Grant permissions to a RAM user.
The following table describes the policies that are required for RAM users.
Policy | Description |
AliyunECSFullAccess | The full permissions on ECS. |
AliyunVPCFullAccess | The full permissions on VPC. |
AliyunROSFullAccess | The full permissions on Resource Orchestration Service (ROS). |
AliyunComputeNestUserFullAccess | The full permissions of a customer on Compute Nest. |
AliyunComputeNestSupplierFullAccess | The full permissions of a service provider on Compute Nest. |
AliyunCDTFullAccess | The full permissions on Cloud Data Transfer (CDT). |
Billing of service instances
You are charged for the following billable items for a service instance in Compute Nest:
Selected vCPU and memory specifications
System disk type and capacity
Public bandwidth
In this example, the following billing methods can be used:
Pay-as-you-go (by hour)
Subscription
The estimated cost of a service instance is displayed in real time when you create the service instance.
Deploy a service instance
Deployment parameters
Section | Parameter | Description |
Basic Configuration | root and admin Account Password | The password of the root or admin accounts that are used to log on to the database. The value must be 8 to 32 characters in length and can contain letters, digits, and the following special characters: ! @ # $ % ^ & * - + = _ |
Network Configuration | VSwitch Available Zone | The zone in which resources are created within the account of the service provider. |
Network Configuration | VPC CIDR IPv4 Block | The IPv4 CIDR block of the VPC to be created for the service instance. We recommend that you specify a private CIDR block defined in Request for Comments (RFC) as the IPv4 CIDR block of the VPC, such as 10.0.0.0/8, 172.16.0.0/12, or 192.168.0.0/16. |
Network Configuration | VSwitch CIDR Block | The CIDR block of the vSwitch to be created for the service instance. |
Procedure
Click the service instance deployment URL provided by the service provider. On the service instance deployment page, configure the parameters by following the on-screen instructions.
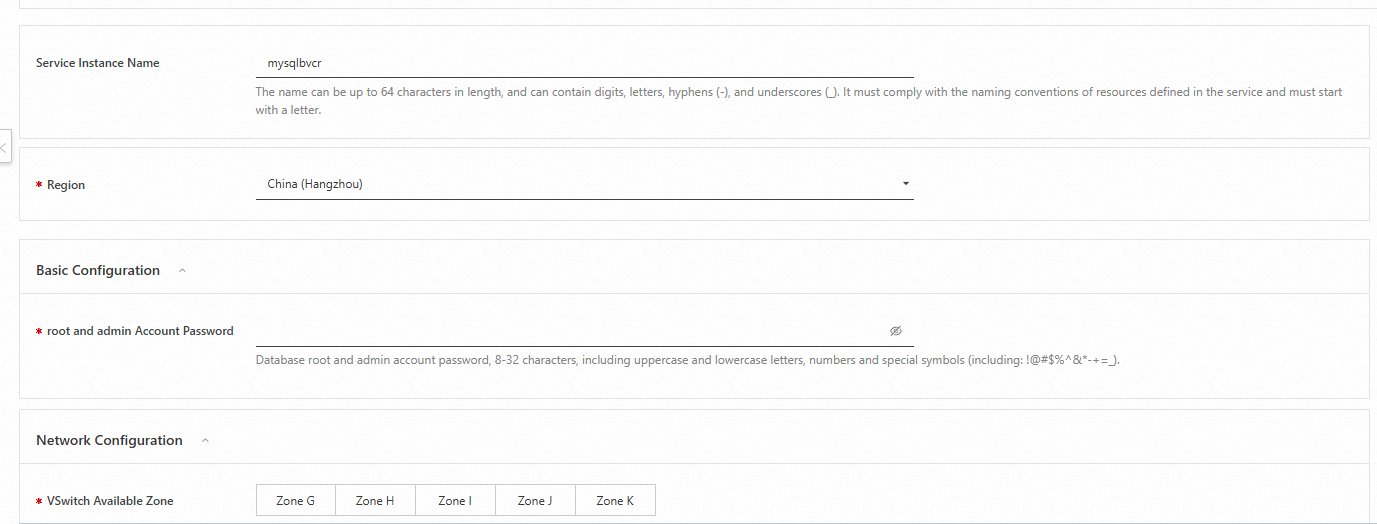
In the Network Configuration section, enter the IPv4 CIDR block of the VPC and the CIDR block of the vSwitch to be created. If you want to create a peering connection, select a VPC for the peering connection in the Network Configuration section. Take note that the CIDR block of the selected VPC cannot overlap with CIDR block of the VPC to be created for the service instance.
Go to the order confirmation page.
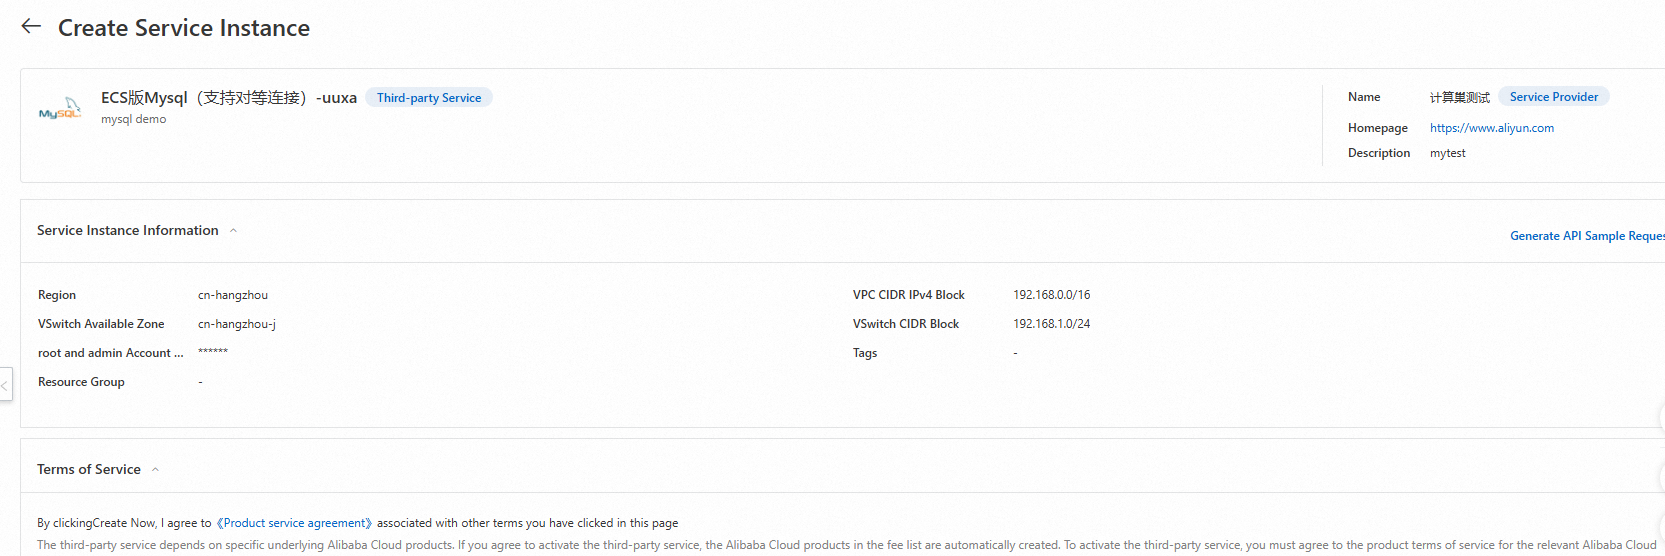
Confirm the order, read and agree to the service agreement, and then click Create Now.
Wait until the deployment is complete.
The Network Settings tab displays the information about the peering connection. A peer connection is created and displayed on this tab only if you turn on VPC Peering Connection on the Create Service Instance page.
Use the service instance. The service instance supports the VPC peering connection feature. You can access the service instance by using a VPC peering connection over an internal network. Perform the following steps to access the service instance over an internal network:
Go to the details page of the service instance. On the Overview tab, find VisitUrl in the Use Now section and obtain the private IP address of the MySQL database.
Create an ECS instance in the corresponding vSwitch. Then, install the MySQL client.
yum install mysql
or
apt install mysql-client
Use the MySQL client on the ECS instance to connect to the MySQL database by using the private IP address.
Service details
The installation package of MySQL Community Edition is stored in the GitHub repository. During service creation, the installation package is published as a Compute Nest artifact, and the installation command is written to an ROS template. The MySQL database is automatically installed when the ROS template is executed. Compute Nest replaces the {{ computenest::file::MySQL }} placeholder with the HTTP URL of the file artifact.
wget '{{ computenest::file::MySQL }}' -O mysql-community-release-el6-5.noarch.rpm
rpm -ivh mysql-community-release-el6-5.noarch.rpm
yum repolist all | grep mysql
yum install mysql-community-server -y
Files
File | Description |
config.yaml | The configuration file for service creation. The computenest-cli creates the service based on this configuration file. |
parameters.yaml | The file that specifies the network parameters to be configured by the service provider, such as VpcId and VSwitchId. In this example, the file specifies the parameters required to deploy a single-tenant fully managed service. |
artifact/mysql-community-release-el6-5.noarch.rpm | The installation package of MySQL Community Edition. During service creation, the installation package is published as a Compute Nest artifact. |
icons/service_logo.jpg | The default logo of the service. |
templates/parameters.yaml | The file that specifies the parameters to be configured by a customer. A customer needs to configure only a few parameters for a single-tenant fully managed service. |
templates/template.yaml | The ROS template file. ROS automatically creates all resources based on the template. |
The templates/template.yaml file contains the following sections:
Parameters: defines the parameters that a customer needs to configure, including the billing method, instance type, IPv4 CIDR block of the VPC, CIDR block of the vSwitch, instance password, and zone.ZoneId: Type: String AssociationProperty: ALIYUN::ECS::Instance:ZoneId Label: en: VSwitch Available Zone zh-cn: 可用区 # The password of the root account that is used to log on to the database. Password: # Only asterisks (*) are returned if you query this parameter. NoEcho: true Type: String Description: en: 'Database root account passwor, 8-32 characters, including uppercase and lowercase letters, numbers and special symbols (including: !@#$%^&*-+=_).' zh-cn: 数据库root账户密码,长度8-32个字符,可包含大小字母、数字及特殊符号(包含:!@#$%^&*-+=_)。 Label: en: Root Account Password zh-cn: 数据库root账户密码 ConstraintDescription: en: '8-32 characters, including uppercase and lowercase letters, numbers and special symbols (including: !@#$%^&*-+=_).' zh-cn: 8-32个字符,可包含大小字母、数字及特殊符号(包含:!@#$%^&*-+=_)。 MinLength: '8' MaxLength: '32' AssociationProperty: ALIYUN::ECS::Instance::Password # The IPv4 CIDR block of the VPC to be created. VpcCidrBlock: Type: String Label: en: VPC CIDR IPv4 Block zh-cn: 专有网络IPv4网段 Description: zh-cn: VPC的ip地址段范围,<br>您可以使用以下的ip地址段或其子网:<br><font color='green'>[10.0.0.0/8]</font><br><font color='green'>[172.16.0.0/12]</font><br><font color='green'>[192.168.0.0/16]</font> en: 'The ip address range of the VPC in the CidrBlock form; <br>You can use the following ip address ranges and their subnets: <br><font color=''green''>[10.0.0.0/8]</font><br><font color=''green''>[172.16.0.0/12]</font><br><font color=''green''>[192.168.0.0/16]</font>' AssociationProperty: ALIYUN::VPC::VPC::CidrBlock Default: 192.168.0.0/16 # The CIDR block of the vSwitch to be created. VSwitchCidrBlock: Type: String Label: en: VSwitch CIDR Block zh-cn: 交换机子网网段 Description: zh-cn: 必须属于VPC的子网段。 en: Must belong to the subnet segment of VPC. AssociationProperty: ALIYUN::VPC::VSwitch::CidrBlock AssociationPropertyMetadata: VpcCidrBlock: VpcCidrBlock Default: 192.168.1.0/24 # The instance type of the ECS instance. EcsInstanceType: Type: String Label: en: Instance Type zh-cn: Ecs实例类型 AssociationProperty: ALIYUN::ECS::Instance::InstanceType AllowedValues: - ecs.c6.large - ecs.c6.xlarge - ecs.c6.2xlarge - ecs.c6.4xlargeResources: defines the resources to be created, including the VPC, vSwitch, ECS instance, and Server Load Balancer (SLB) instance.# Vpc EcsVpc: Type: ALIYUN::ECS::VPC Properties: CidrBlock: Ref: VpcCidrBlock VpcName: Ref: ALIYUN::StackName # The vSwitch. EcsVSwitch: Type: ALIYUN::ECS::VSwitch Properties: ZoneId: Ref: ZoneId VpcId: Ref: EcsVpc CidrBlock: Ref: VSwitchCidrBlock EcsSecurityGroup: Type: 'ALIYUN::ECS::SecurityGroup' Properties: VpcId: Ref: VpcId SecurityGroupIngress: - Priority: 1 PortRange: 3306/3306 NicType: internet SourceCidrIp: 0.0.0.0/0 IpProtocol: tcp # The ECS instance. EcsInstanceGroup: Type: ALIYUN::ECS::InstanceGroup Properties: # The I/O optimized instance. IoOptimized: optimized ZoneId: Ref: ZoneId DiskMappings: - Category: cloud_essd Device: /dev/xvdb Size: 200 SystemDiskSize: 40 # The commands to be executed by cloud-init. # You can view the execution log in the following file: /var/log/cloud-init.log /var/log/cloud-init-output.log. # The script is /var/lib/cloud/instance/scripts/part-001. You can run the sh command for troubleshooting. UserData: Fn::Sub: - | #!/bin/sh # Sleep for a while to ensure that the network is ready. sleep 10 # Other commands are omitted. For more information, see templates/template.yaml. # The pay-as-you-go billing method is used. InstanceChargeType: PostPaid MaxAmount: 1 # The ESSD is used as the system disk. SystemDiskCategory: cloud_essd # The name of the instance. InstanceName: Ref: ALIYUN::StackName VpcId: Ref: VpcId SecurityGroupId: Ref: EcsSecurityGroup VSwitchId: Ref: VSwitchId # The CentOS 7.9 image is used. If you want to use another image, make sure that the script in the UserData section is modified accordingly. ImageId: "centos_7_9_x64_20G_alibase_20220727.vhd" InstanceType: Ref: EcsInstanceType # The hostname. HostName: Ref: ALIYUN::StackName # The password that is used to log on to the ECS instance. Password: Ref: Password # Specifies whether to assign a public IP address to the instance. AllocatePublicIP: true InternetMaxBandwidthOut: 1Outputs: defines the information displayed on the Overview tab of the Compute Nest console.Outputs: MysqlUserName: Label: The username that is used to log on to the MySQL database. Value: admin VisitUrl: Label: The private endpoint. Description: zh-cn: 私网访问地址 en: private Addresses Value: Fn::Sub: - mysql://${ServerAddress}:3306 - ServerAddress: Fn::Select: - 0 - Fn::GetAtt: - EcsInstanceGroup - PrivateIps
References
Service configurations
Change the specifications of a service instance
Service upgrade configurations