Synchronize users or groups from Okta to CloudSSO by using SCIM (System for Cross-domain Identity Management).
Prerequisites
CloudSSO is enabled for the enterprise account whose users you want to synchronize.
Scenario
An enterprise uses Okta as a local identity provider (IdP) and has built a multi-account structure in a resource directory. The enterprise wants to synchronize Okta users or groups to CloudSSO so that Okta users can access specific resources within specified members in the resource directory through username-password or SSO logon.
We recommend that you first configure SSO logon and use the CloudSSODemo application and SCIM to synchronize users or groups. Configure SSO logon from Okta to CloudSSO.
Features
-
Automatically creates users.
CloudSSO auto-creates users matching Okta application usernames. Existing users with the same username are skipped.
-
Pushes users by group.
Users and groups assigned to Okta applications are automatically pushed to CloudSSO. CloudSSO creates matching users and groups automatically.
-
Automatically updates user attributes.
Attribute changes to a user in an Okta application are automatically synced to CloudSSO.
-
Automatically disables users.
Disabling a user in Okta or deleting a user from an Okta application automatically disables the user in CloudSSO.
Step 1: Create SCIM credentials in the CloudSSO console
Log on to the Cloud SSO console.
In the left-side navigation pane, click Settings.
On the User Setting tab, in the SCIM user synchronization settings section, click Create New SCIM key.
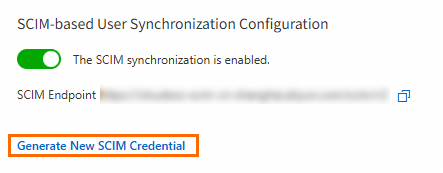
In the SCIM Credential Generated dialog box, copy the SCIM key, and then click OK.
Step 2: Enable SCIM synchronization in the CloudSSO console
Log on to the CloudSSO console.
In the left-side navigation pane, click Settings.
On the User Setting tab, in the SCIM User Synchronization Configuration section, turn on the SCIM synchronization switch.
Step 3: Configure SCIM synchronization in Okta
-
On the CloudSSODemo details page, click the Provisioning tab.
-
In the Integration section of the Settings page, click Configure API Integration.
-
Select Configure API Integration.
-
Configure SCIM synchronization.
-
In the Base URL section, enter the required URL.
Copy the SCIM Endpoint value from the CloudSSO console Settings page.
-
In the API Token section, enter the required SCIM credential.
Obtain the SCIM credential from Step 1: Create SCIM credentials in the CloudSSO console.
-
Click Test API Credentials.
-
If the test succeeds, click Save. If the test fails, modify the configuration or contact Okta support until it succeeds.
-
-
In the Provisioning to App section of the To App page, click Edit.
-
Select Enable for Create Users, Update User Attributes, and Deactivate Users. Then, click Save.
-
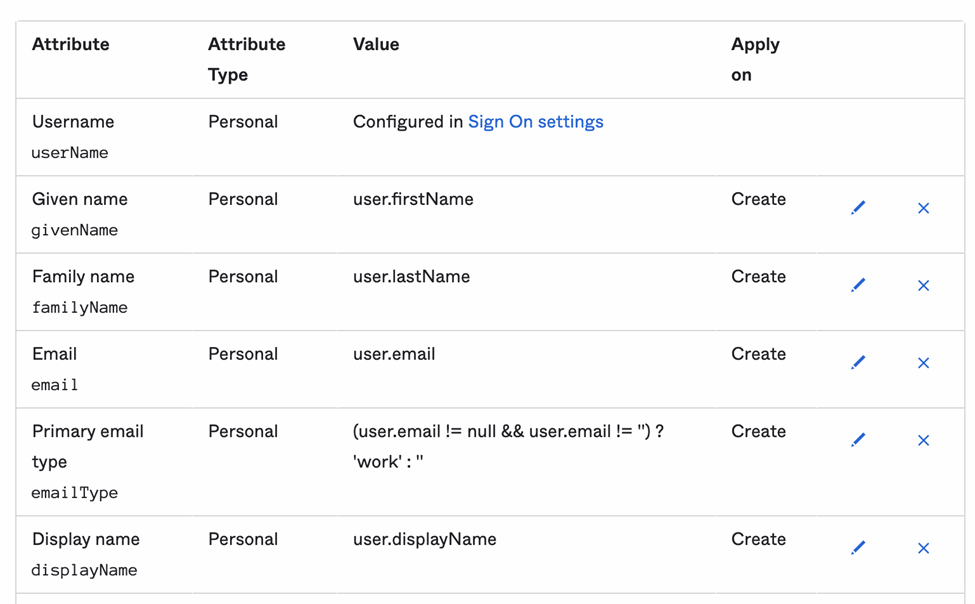
In the CloudSSOdemo Attribute Mappings section of the To App page, configure attribute mappings.
Keep only the attribute mappings shown below. Delete all others.
-
Optional. Click the Push Groups tab to synchronize groups.
After completing the preceding steps, Okta users are automatically synchronized to CloudSSO. To also synchronize groups assigned to the CloudSSODemo application:
-
In the Push Groups to CloudSSODemo section, click Push Groups and select the method to search for groups.
Options include Find groups by name and Find groups by rule. This example uses Find groups by name.
-
Enter the name of a group.
-
Click Save.
-
Wait until the synchronization is complete. Then, view the synchronization results.
The group is synchronized when Push Status changes from Pushing to Active.
NoteIf some users are not synchronized, select Push Now from the Push Status drop-down list to retry.
-
If an issue occurs during synchronization, click View Logs to troubleshoot.
Verify synchronization results
-
Log on to the CloudSSO console.
-
Go to the User or Group page to view the synchronized users or groups.
The Source field for synchronized users or groups is automatically displayed as SCIM Synchronization.
FAQ
How do I delete a synchronized user?
Deleting a user in Okta only disables the user in CloudSSO via SCIM. To fully delete the user from CloudSSO, temporarily disable SCIM synchronization, delete the user manually, then re-enable synchronization. Disable SCIM synchronization. Delete a user.