Background
Cloud Architect Design Tools (CADT) lets you adjust the architecture of a deployed application by adding or deleting resources as your business or technical requirements change. When you redeploy the adjusted application, CADT processes only the new or deleted resources and leaves existing resources unaffected.
Example
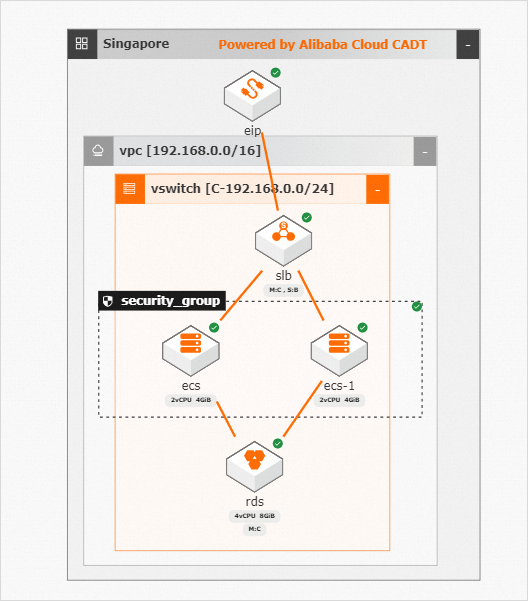
This example adds a Classic Load Balancer (CLB) instance and an Elastic Compute Service (ECS) instance to a simple monolithic website application, transforming it into a high-availability architecture, as shown in the following figure.
Procedure
-
Log on to the Cloud Architect Design Tools (CADT) console.
-
Navigate to Application > My Applications, find the application that you want to adjust, and then click View Architecture.
-
Add a CLB instance and an ECS instance to the application.
-
First, turn on Edit Mode. In the search box in the Product List on the left, enter
clb. From the search results, select an internal-facing Classic Load Balancer (CLB) and drag it to the canvas on the right. -
Right-click the existing ECS instance and click Copy to quickly create another instance with the same configuration.
-
-
Delete the connection between the existing ECS instance and the elastic IP address (EIP). Select the connection line, right-click it, and then click Delete.
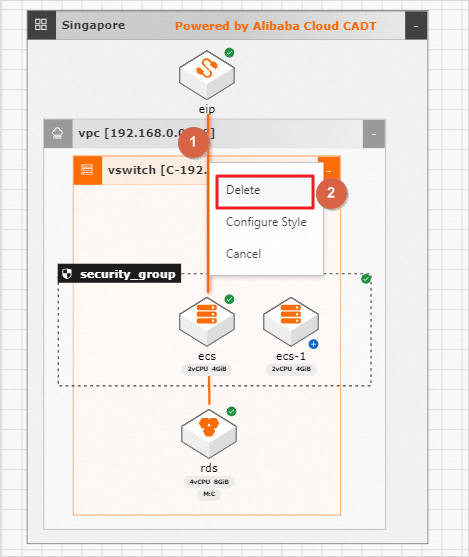 A confirmation dialog box appears, explaining that after a running resource is marked for deletion, you must deploy the solution to release or remove the resource. It also states that to keep the resource's configuration, you can copy it and set it to be skipped during deployment. Click Confirm. After you confirm, a delete marker is added to the connection line. This marker indicates that the connection will be removed during the next deployment.
 -
Click Create Connection to draw connections: from the EIP to the CLB, from the CLB to both ECS instances, and from the new ECS instance to the ApsaraDB RDS instance.
NoteA blue plus sign (+) indicates a new resource that will be created during the next deployment.

-
Switch back to Default Mode to configure the new resources and their connections. After the connections are created, click the line between the CLB and an ECS instance. In the SLB_ECS Details panel on the right, configure the listener rules: set Load Balancing Protocol to TCP, Listener Port to
80, scheduling algorithm to round-robin (RR), Backend Port to80, and Weight to100. -
After you configure all new resources, click Save in the upper-right corner. A Saved successfully! message appears at the top of the page.
-
After the architecture is adjusted, click Deploy Application in the upper-right corner.
-
The system starts to validate the resources. On the Resource Validation page, the system displays a list of all resources, including the vSwitch, security group, EIP, ApsaraDB RDS, and ECS instances. After all resources pass validation, the status changes to Resource validation successful (architecture adjusted). Click Next Step: Price List.
-
On the Price List page, review the pricing information for the new resources. If everything is correct, click Next Step: Confirm Order.
-
On the Confirm Order page, verify the resource configurations and pricing. Read and select the Cloud Architect Design Tools (CADT) Service Terms checkbox, and then click Next Step: Pay and Create.
-
Deployment of the new resources begins.
The Resource Deployment Status page shows the deployment progress with the message: Deployment in progress. Do not perform any operations. Please wait. The resource list includes Virtual Private Cloud (VPC), vSwitch, security group, Elastic Compute Service (ECS), and an elastic IP address (EIP). The deployment is complete when the status of all resources changes to Running.
-
Wait for the application deployment to complete. After deployment, the Resource Deployment Status dialog box shows a status of Deployment successful. All new resources, including the Virtual Private Cloud (VPC), vSwitch, security group, Elastic Compute Service (ECS) instance, and elastic IP address (EIP), are created and enter the Running state.
-
After the application architecture is successfully adjusted and deployed, the canvas is updated as shown in the following figure.
Manage application versions
CADT provides version management for applications, allowing you to view the architecture evolution history and redeploy previous versions.
-
On the CADT canvas, open the Resource List pane and click Earlier Versions.
-
A version timeline appears at the bottom of the canvas, showing the version number and Creation Time for each historical version.
-
Click a version number to view the application architecture for that version. Click version number:1 on the version timeline at the bottom. The left side of the canvas displays a thumbnail of the Version 1 architecture (VPC, vSwitch, ECS), while the right side displays the Version 2 architecture (with added EIP, SLB, and other components), allowing you to visually compare the differences between the two versions.
-
To revert to a previous version, click its version number on the timeline, and then click Create Based on This Version. The selected version's architecture then opens on the canvas.
-
Save the historical version as a new application. Click Save in the upper-right corner. In the Save Application dialog box, enter a name in the Application Name field (for example, "Historical version of my custom application") and click Confirm. Once saved, you can click Deploy Application to deploy it.