When you use Service Mesh (ASM) to manage multiple clusters, you can deploy a service's workloads across these clusters. By default, ASM load-balances traffic to the service across all clusters. To keep traffic within the originating cluster, use the keeping traffic in-cluster feature. This topic uses the Bookinfo application to demonstrate how to enable this feature in a multi-cluster environment.
Prerequisites
-
Two ACK clusters are created in the same VPC. In this topic, the clusters are named m1c1 and m1c2. For more information, see Create an ACK dedicated cluster (discontinued).
-
An ASM instance of version 1.15.3.101 or later is created. In this topic, the instance is named mesh1. For more information, see Create an ASM instance.
Preparations
Step 1: Configure cross-cluster connectivity
(Optional) Rename the security groups
Rename the security groups for both clusters for easier identification. In this example, the Security Group Name are set to m1c1-sg and m1c2-sg.
-
Log on to the ECS console. In the navigation pane on the left, choose .
-
In the top navigation bar, select the region where the target ECS instance is located.
-
On the Security Groups page, hover over the name of the target security group, click the
 icon, enter a new name, and then click OK.
Add a security group rule
Add security group rules that allow the clusters to access each other. In the m1c1-sg security group settings, add a rule to authorize access from m1c2-sg. Similarly, for the m1c2-sg security group, add a rule to authorize access from m1c1-sg. For more information, see Add a security group rule.
Add a rule in the inbound direction: set Authorization Policy to Allow, Protocol Type to All, Port Range to -1/-1, Authorization Type to Security Group Access, and Priority to 1.
Step 2: Add clusters and deploy an ingress gateway
After you add both clusters to the ASM instance, they gain mutual access. Therefore, you only need to deploy an ingress gateway for one of them.
-
Add the two clusters to the ASM instance. For more information, see Add a cluster to an ASM instance.
-
Deploy an ingress gateway for the m1c1 cluster. For more information, see Create an ingress gateway.
Step 3: Deploy Bookinfo in each cluster
To verify the keeping traffic in-cluster feature, this topic uses two slightly different Bookinfo applications. The only difference is the Reviews service version: m1c1 runs v1, and m1c2 runs v2.
-
Use the following YAML file to deploy the Bookinfo application with the v1 Reviews deployment in the m1c1 cluster. For more information, see Deploy an application in a cluster associated with an ASM instance.
The v1 deployment of the Reviews service does not display star ratings in the book review section.
-
Use the following YAML file to deploy the Bookinfo application with the v2 Reviews deployment in the m1c2 cluster.
The v2 deployment of the Reviews service displays ratings as black stars in the book review section.
Step 4: Create a gateway, virtual service, and destination rule
-
Use the following YAML file to create a gateway in the default namespace of the ASM instance. For more information, see Manage gateways.
-
Use the following YAML file to create a virtual service in the default namespace of the ASM instance. For more information, see Manage virtual services.
-
Use the following YAML file to create a destination rule in the default namespace of the ASM instance. For more information, see Manage destination rules.
-
In your browser, access http://{IP address of the ingress gateway}/productpage1 or http://{IP address of the ingress gateway}/productpage2 and refresh the page.
To find the IP address of the ingress gateway, see Create an ingress gateway.
If star ratings alternately appear in the book review section, the Bookinfo application is successfully deployed. The page displays the productpage of the BookInfo Sample application, which contains information about the book The Comedy of Errors. The Book Reviews section on the right shows reviews from Reviewer1 (5 stars) and Reviewer2 (4 stars).
Procedure
The following steps describe how to enable the keeping traffic in-cluster feature for a specific service, in this case, the Reviews service. For information about how to enable the feature globally or at the namespace level, see Related operations.
-
Log on to the ASM console. In the left-side navigation pane, choose .
-
On the Mesh Management page, click the name of the ASM instance. In the left-side navigation pane, choose .
-
On the Base Information page, in the Config Info section, click Keep traffic in cluster to the right of edit.
-
In the Configure services that keep traffic in cluster dialog box, turn on the Enable Keep traffic in cluster switch, select Select Service, and then click Select services.
-
In the Add services dialog box, select Service, select Namespace from the Namespace drop-down list, select Select services in the Select a service section, click the
 icon, and then click OK.
 -
After the configuration is complete, click Configure services that keep traffic in cluster in the OK dialog box.
In the Config Info section, Configured is displayed to the right of Keep traffic in cluster, which indicates that the Keep traffic in cluster feature is enabled.
-
Verify that the keeping traffic in-cluster feature is working.
-
In your browser, access http://{IP address of the ingress gateway}/productpage1 and refresh the page.
The book review section consistently shows no ratings, which confirms that the keeping traffic in-cluster feature is working as expected.
-
In your browser, access http://{IP address of the ingress gateway}/productpage2 and refresh the page.
The book review section consistently displays reviews with black star ratings. The page correctly displays details for the book The Comedy of Errors and the review content in the Book Reviews section, which confirms that traffic is correctly routed to the local service in the m1c2 cluster.
-
Result analysis
The following diagram shows the traffic flow in the mesh before and after the keeping traffic in-cluster feature is enabled.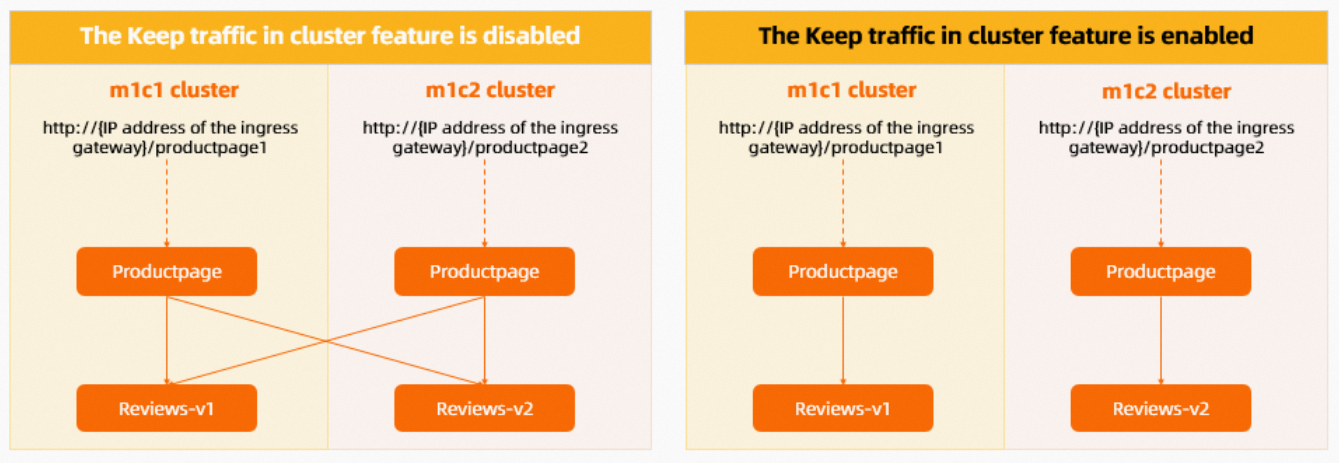
|
Status |
Description |
|
Disabled |
In the Bookinfo application, the Productpage service calls the Reviews service to get book reviews. When you access http://{IP address of the ingress gateway}/productpage1 in a browser, you access the Productpage service in the m1c1 cluster. When you access http://{IP address of the ingress gateway}/productpage2, you access the Productpage service in the m1c2 cluster. Workloads for the Reviews service exist in both the m1c1 and m1c2 clusters. By default, Service Mesh load-balances requests to the Reviews service across both clusters, even when the traffic originates from a service within one of those clusters (for example, from the Productpage service in m1c1). As a result, you see star ratings appearing and disappearing alternately in the book review section. |
|
Enabled |
When you access the Productpage service in a specific cluster, such as m1c1, Service Mesh no longer load-balances requests across clusters. Instead, it routes all requests to the local Reviews service. As a result, the book review section consistently shows no star ratings. Important
After this feature is enabled, if the reviews-v1 service in the m1c1 cluster fails, the Productpage service cannot fail over to the reviews-v2 service in the m1c2 cluster. |
If you enable the keeping traffic in-cluster feature for a service, callers can only access the service's endpoints within the same cluster. Even if the in-cluster endpoints are unavailable, the mesh will not shift traffic to its endpoints in other clusters.
To keep traffic in-cluster for a service while also enabling failover, you can use traffic rules to create traffic lanes and enable traffic shifting. For more information, see Use traffic rules to configure traffic lanes and traffic shifting.
Related operations
Enable global in-cluster traffic
-
On the Base Information page, in the Config Info section, click Keep traffic in cluster to the right of edit.
-
In the Configure services that keep traffic in cluster dialog box, turn on the Enable Keep traffic in cluster switch, select All Services, and then click OK.
After you enable this option, Service Mesh keeps all traffic within its originating cluster.
Enable in-cluster traffic for a namespace
-
On the Base Information page, in the Config Info section, click Keep traffic in cluster to the right of edit.
-
In the Configure services that keep traffic in cluster dialog box, turn on the Enable Keep traffic in cluster switch, select Select Service, and then click Select services.
-
In the Add services dialog box, select Namespace, select the target namespace in the Select services section, click the
icon, and then click OK. -
In the Configure services that keep traffic in cluster dialog box, click OK.
After you enable this option, Service Mesh keeps traffic to services in the target namespace within the originating cluster.