The Real User Monitoring (RUM) sub-service of Application Real-Time Monitoring Service (ARMS) provides comprehensive monitoring capabilities for iOS apps and Android apps. This topic describes how to integrate an Android app into RUM through Android Studio.
Prerequisites
The Gradle version is later than 3.0.
Step 1: Add the app and configure the OpenRUM agent
Log on to the ARMS console.
In the left-side navigation pane, choose . In the top navigation bar, select a region.
On the Applications page, click Add Application.
In the Create Application panel, click Android.
In the Android panel, enter the app name and description, and click Create.
NoteThe name must be unique.
Then, an address to which monitoring data is reported (ConfigAddress) and an app ID (AppID) are automatically generated for the app.
Preset the environment for the OpenRum SDK.
Download the installation package of the OpenRUM SDK and decompress the package.
Compress the contents in the jniLibs directory, copy the compressed file, and paste the file to the module-level jniLibs directory that stores the .so libraries. If no jniLibs directory exists, create one.
Copy the repo folder and paste it to the root directory of the project at the same level as the module-level jniLibs directory.
Copy the co.openrum.skd.jar file and paste it to the module-level libs directory.
Configure Gradle.
Open the build.gradle file in the root directory of the project.
Add the following content to the buildscript block.
NoteIf no buildscript block exists, create one.
ext.openrumsdk_version = "7.7.0" // Specify the OpenRUM SDK version.Add the following content to the repositories block under the buildscript block.
NoteIf no repositories block exists, create one.
maven {
  url uri("./repo")
}
Add the following content to the dependencies block under the buildscript block.
NoteIf no dependencies block exists, create one.
classpath "com.openrum.agent.android:openrum:$openrumsdk_version"Click Sync Now.
Open the build.gradle file in all module-level directories.
Introduce the OpenRUM plug-in in the header.
apply plugin: 'openrum'Add the OpenRUM plug-in to the plugin block if the method for introducing the plug-in has been changed.
id: "openrum"Add the following content to the Dependencies section.
implementation files('libs/com.openrum.sdk.jar')Click Sync Now.
Rebuild and clean the project to ensure that the OpenRUM configuration takes effect.
Step 2: Configure the app
Grant the permissions.
Check the AndroidManifest.xml file and grant the following permissions.
<!-- Access the network -->
<uses-permission android:name="android.permission.INTERNET"/>
<!-- Obtain network status -->
<uses-permission android:name="android.permission.ACCESS_NETWORK_STATE"/>
<!-- Obtain device information and phone number -->
<uses-permission android:name="android.permission.READ_PHONE_STATE"/>
<!-- Read and write data through public storage -->
<uses-permission android:name="android.permission.WRITE_EXTERNAL_STORAGE"/>
<uses-permission android:name="android.permission.READ_EXTERNAL_STORAGE"/>
Add obfuscation.
Add the following configurations to the proguard-rules.pro file under the Gradle Scripts folder.
#ProGuard configurations for OpenRum-Agent
-keep public class com.openrum.**{*;}
-keep public class openrum.**{*;}
-dontwarn com.openrum.**
-dontwarn openrum.**
#End OpenRum-Agent

-optimizations !code/simplification/*,!field/*,!class/merging/*,!method/propagation/*,!class/unboxing/enum,!code/allocation/variable
Step 3: Initialize the OpenRUM SDK
Add the following code to the onCreate function of the app:
Replace the appKey and configUrl parameters in the following code with the app ID and address obtained in the ARMS console.
// Optional. Specify the user ID in a string.
OpenRum.setUserID("userID");
// Specify the app ID and address.
OpenRum.withAppID("appKey")
.withConfigAddress("configUrl")
.start(getApplicationContext());
(Optional) Step 4: Collect WebView data
You can use WebViewClient and WebChromeClient to collect WebView data.
Scenario 1: If you do not need custom clients, you do not need to call the setWebViewClient() or setWebChromeClient() method.
Scenario 2: If you need custom clients, rewrite the structure to prevent from affecting WebView data collection.
webView.setWebChromeClient(new WebChromeClient(){});
webView.setWebViewClient(new WebViewClient(){});
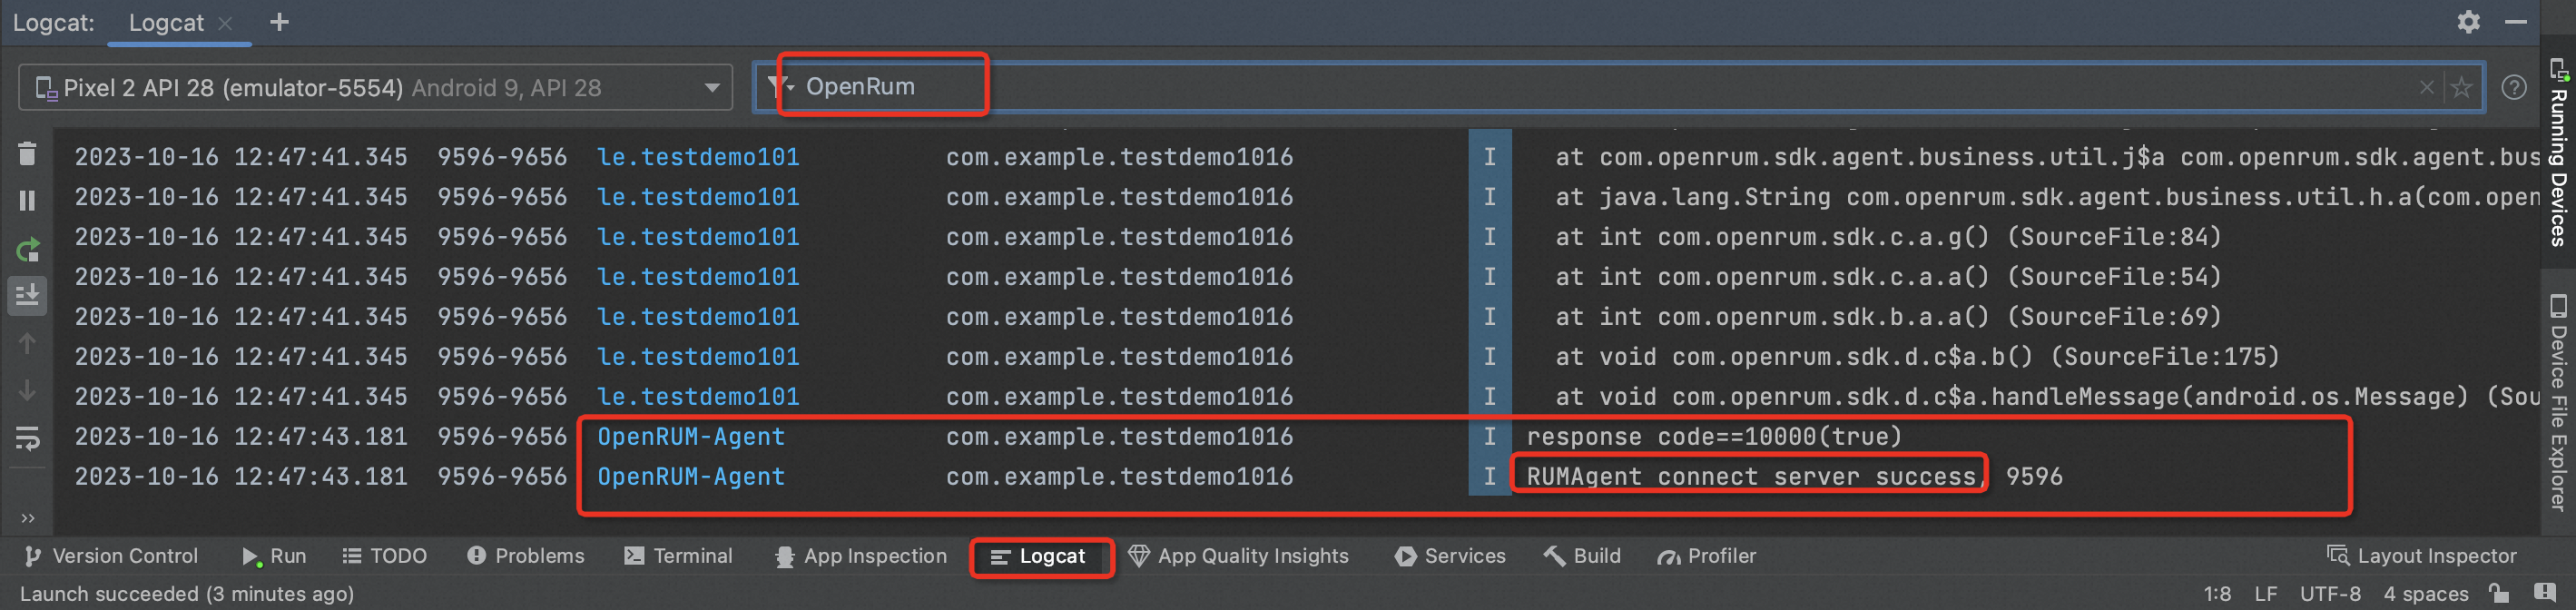
Step 5: Verify the result
Start the APK. In the Logcat window, view the logs, and search for the OpenRUM agent by keyword (openrum) or tag. If the following log entries appear, the embedding is successful and data is being collected.