Application Real-Time Monitoring Service (ARMS) Real User Monitoring (RUM) captures performance metrics, crashes, and UI stuttering from your iOS application in real time. This guide walks you through adding the ARMS RUM SDK to an iOS project and verifying that monitoring data flows to the ARMS console.
The integration takes four steps:
-
Add the SDK to your project
-
Import the SDK module
-
Initialize the SDK
-
Verify the integration
Prerequisites
Before you begin, ensure that you have:
-
Xcode installed on your machine
-
An ARMS RUM application created in the ARMS console. During creation, note the following values -- they are required for SDK initialization:
-
Endpoint -- the data collection endpoint
-
Workspace -- the workspace identifier
-
ServiceId -- the service identifier
-
SDK 2.0.0 introduced breaking changes to initialization parameters. If you are upgrading from a version earlier than 2.0.0, follow this guide to re-integrate. The previous initialization code is not compatible with 2.0.0 or later.
Step 1: Add the SDK
Add the ARMS RUM SDK to your project using one of the following methods.
CocoaPods (recommended)
-
Add the SDK to the Podfile of your Xcode project:
source 'https://github.com/CocoaPods/Specs.git'

target 'iOSDemo' do
  # Comment the next line if you're not using Swift and don't want to use dynamic frameworks
  use_frameworks!

  # ARMS RUM SDK
  pod 'AlibabaCloudRUM', '2.0.2'
end
Replace
iOSDemowith your actual target name. -
From the directory that contains the Podfile, run:
pod install --repo-update
Manual integration
-
Download the SDK and decompress the .zip file. It contains two frameworks:
-
AlibabaCloudRUM.xcframework -
AlibabaCloudRUMSDK.xcframework
-
-
Add the frameworks to your Xcode project:
-
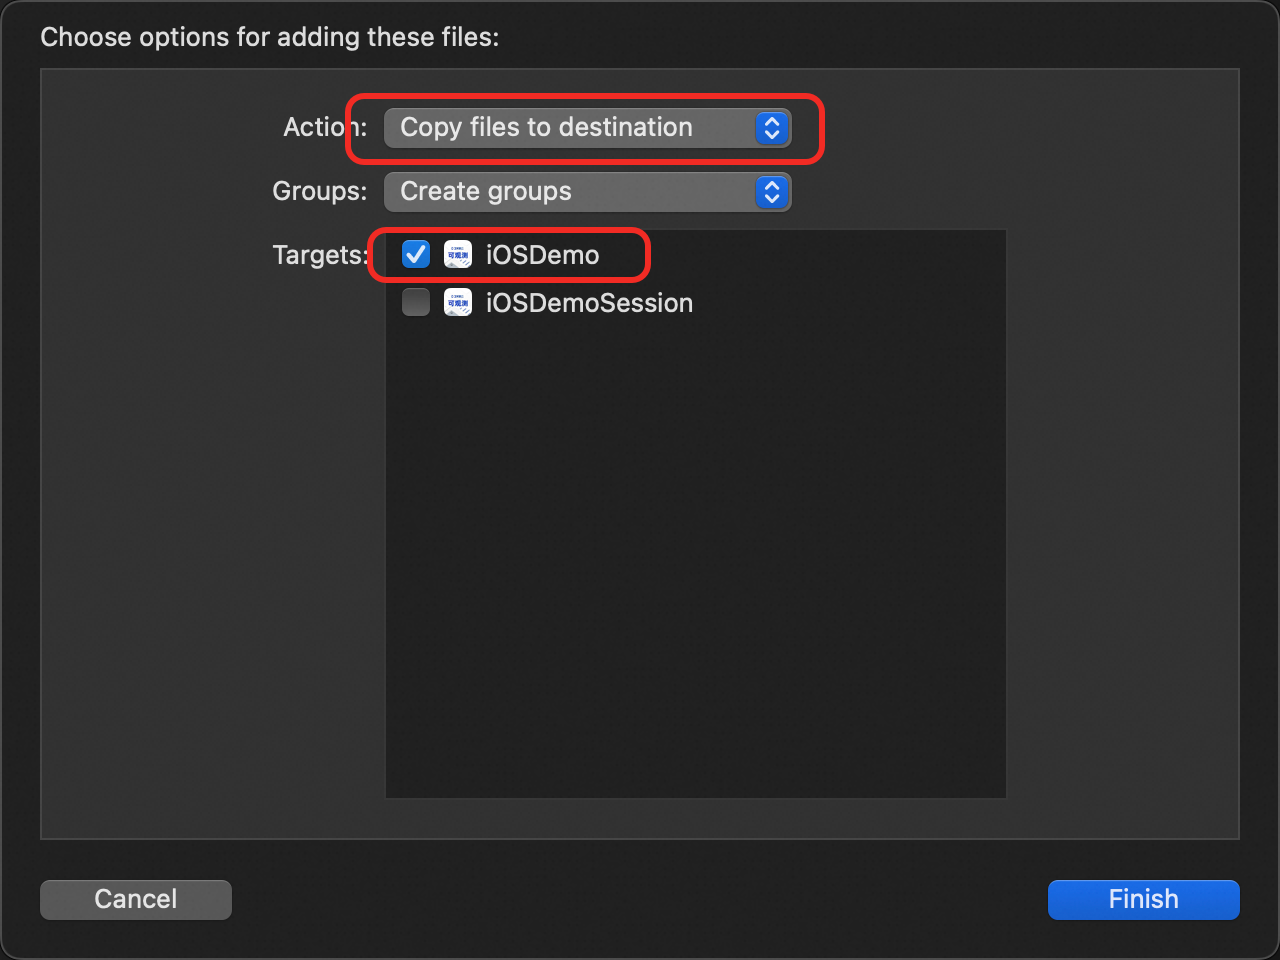
In Xcode, choose , select both frameworks, enable Copy files to destination, and click Add.
NoteThe exact menu path may vary depending on your Xcode version.
-
Go to target > Build Phases > Link Binary With Libraries and add the following dependency libraries:
-
libc++.tbd (required)
-
libresolv.tbd (required)

-
-
Go to target > Build Settings, search for Other Linker Flags, and add the
-ObjCflag.ImportantThis flag is case-sensitive. Type
-ObjCexactly as shown.
-
Step 2: Import the SDK module
Import the AlibabaCloudRUM module at the top of your main.m or AppDelegate.m file.
Objective-C
@import AlibabaCloudRUM;Swift
import AlibabaCloudRUMStep 3: Initialize the SDK
Initialize the SDK in the main function or the - application:didFinishLaunchingWithOptions: method.
Objective-C
// Set the data collection endpoint (from the ARMS console RUM application page)
[AlibabaCloudRUM setEndpoint:@"<your-endpoint>"];

// Set the workspace identifier (from the ARMS console RUM application page)
[AlibabaCloudRUM setWorkspace:@"<your-workspace>"];

// Start the SDK with your service ID (from the ARMS console RUM application page)
[AlibabaCloudRUM start:@"<your-service-id>"];
Swift
// Set the data collection endpoint (from the ARMS console RUM application page)
AlibabaCloudRUM.setEndpoint("<your-endpoint>")

// Set the workspace identifier (from the ARMS console RUM application page)
AlibabaCloudRUM.setWorkspace("<your-workspace>")

// Start the SDK with your service ID (from the ARMS console RUM application page)
AlibabaCloudRUM.start("<your-service-id>")
Replace the placeholders with values from your ARMS RUM application page in the ARMS console:
| Placeholder | Description |
|---|---|
<your-endpoint> |
Data collection endpoint. Found on the RUM application page in the ARMS console. |
<your-workspace> |
Workspace identifier. Found on the RUM application page in the ARMS console. |
<your-service-id> |
Service ID. Found on the RUM application page in the ARMS console. |
Step 4: Verify the integration
Build and run the application. A successful initialization produces the following message in the Xcode console:
[AlibabaCloudRUM] [INFO ] [RUM] <start> AlibabaCloud RUM init success