The short video app server is used to exchange data between the short video application and ApsaraVideo VOD, process business logic, and manage operations data. This topic describes how to build the short video app server.
Prerequisites
An Alibaba Cloud account is created and real-name verification is complete. To create an Alibaba Cloud account, visit the Alibaba Cloud official website. For more information, see Create an Alibaba Cloud account.
Elastic Compute Service (ECS) is activated. An ECS instance is configured. For more information, see Activate and configure ECS.
Java Development Kit (JDK) 8 is installed on the ECS instance.
MySQL 5.7 is installed on the ECS instance. For more information, see Install and configure a MySQL database. When you publish your short video service to the production environment, we recommend that you use ApsaraDB RDS. For more information, visit the buy page of ApsaraDB RDS.
ApsaraVideo VOD is activated and transcoding templates are configured. For more information, see Configure settings in the ApsaraVideo VOD console.
Procedure
Upload the source code
Download the short video AppServer and the source code of the console. For more information, see SDK download.
Run the following command on the server where the SDK package is saved to upload the source code package to the ECS instance:
scp <source_code_file> user@<IP_address_of_the_ECS_server>:<upload_path>
scp ApsaraVideo_QuVideo_v1.4.0_Server_20191226.zip user@10.0.0.0:/home/user/workspace/
ApsaraVideo_QuVideo_v1.4.0_Server_20191226.zip is the source code file. user is the username for the ECS server. 10.0.0.0 is the IP address of the ECS server. /home/user/workspace/ is the upload path.
NoteThe preceding sample information, including the source code package, the username, the IP address of the ECS instance, and the upload path, is used as examples in the following steps. Set these parameters based on your actual values.
Log on to the ECS server and decompress the source code file.
cd /home/user/workspace
unzip ApsaraVideo_QuVideo_v1.4.0_Server_20191226.zip
NoteIf the unzip tool is not installed, run the sudo apt install unzip command to install the unzip tool.
Initialize and configure the database
You can create a self-managed database for your music files.
Make sure that the query results returned by the database use the data structure defined by ApsaraVideo VOD. Otherwise, ApsaraVideo VOD cannot obtain music data from the database.
If you use a custom data structure, you must adjust the code logic at the demo layer.
Create a database named voddemo.
cd /home/user/workspace/ApsaraVideo_QuVideo_v1.4.0_Server_20191226/sql
mysqladmin -u root -p create voddemo
Create a table and an administrator account.
mysql -u root -p voddemo < ./appserver_create_table.sql
NoteThe appserver_create_table.sql script creates a table and uses an INSERT statement to create a console administrator account. The username of the account is admin, and the password is 123456. After you build the short video console, you can use the administrator account to log on to the short video console.
Modify the case sensitivity rule of the database.
Edit the configuration file of the database.
sudo vim /etc/mysql/mysql.conf.d/mysqld.cnf
Press the I key and add
lower_case_table_names=1to the end of the file.Press the Esc key and enter :wq! to save the file and exit.
Restart the database to complete the configuration.
sudo service mysql restart
Configure the database address.
Edit the configuration file of the source code.
vim /home/user/workspace/ApsaraVideo_QuVideo_v1.4.0_Server_20191226/src/main/resources/application.properties
Press the I key and modify the file as follows.
spring.datasource.url = jdbc:mysql://Database IP address (127.0.0.1):3306/Database name (voddemo)?useSSL=false&useUnicode=true&characterEncoding=UTF-8 spring.datasource.username = Logon username of the database, for example, admin spring.datasource.password = Logon password of the databaseNoteIf the database and the server both run on the ECS instance, you can set the database IP address to 127.0.0.1. Otherwise, use the IP address of the machine where the database is located.
The database that you created during initialization is named voddemo.
Press the Esc key and enter :wq! to save the file and exit.
Configure a RAM role
Follow the procedure described in Create a role to create a RAM role. After you select a policy for the RAM role, perform the following steps to configure the RAM role. You can set the name of the RAM role as needed. In this example, the name of the RAM role is alivc-demo-role.
On the Roles page, click the name of the created RAM role alivc-demo-role to view the Alibaba Cloud Resource Name (ARN) of the RAM role. We recommend that you save the name and ARN of the RAM role in a file on your PC for subsequent use.
On the Roles page, click the name of the created RAM role alivc-demo-role. On the details page of the RAM role, click the Trust Policy tab, then click Edit Trust Policy. Modify the trust policy:
{
    "Statement": [
        {
            "Action": "sts:AssumeRole",
            "Effect": "Allow",
            "Principal": {
                "Service": [
                    "ecs.aliyuncs.com"
                ]
            }
        }
    ],
    "Version": "1"
}
This indicates that the role is a service role and can be assumed by the trusted Alibaba Cloud service (ECS). If you do not modify the trust policy, the RAM role cannot be attached to the ECS instance.
The ID of the ECS instance must be specified in the
["Instance ID"]format.Attach the RAM role to the ECS instance.
Call the AttachInstanceRamRole API operation of ECS in OpenAPI Explorer. For more information, see OpenAPI Explorer.
NoteRegionId: the ID of the region in which the ECS instance resides, such as China (Shanghai). You can go to the ECS console to obtain the region ID of the instance.
RamRoleName: The name of the RAM role. In this example, the name is alivc-demo-role.
InstanceIds: the ID of the ECS instance. Go to the ECS console to view the ID of the instance. You must enter the instance ID in the format of an array. Example: ["i-bp135jrddxxf9tgo****"].
Click Initiate Call. After the call succeeds, a success response is displayed on the Response tab on the right part of the page.
Run the following command on the ECS instance to check whether the RAM role is assigned to the ECS instance:
curl http://100.100.100.200/latest/meta-data/ram/security-credentials/alivc-demo-role
If the output contains the following Security Token Service (STS) authorization information, the RAM role is assigned to the ECS instance:
{ "AccessKeyId" : "STS.XXXXXXXXXXXX", "AccessKeySecret" : "XXXXXXXXXXXXXXXX", "Expiration" : "2020-11-20T14:33:31Z", "SecurityToken" : "XXXXXXXXXXXXXXXXXXXXXX", "LastUpdated" : "2020-11-20T08:33:31Z", "Code" : "Success" }NoteYou can assign only one RAM role to an ECS instance. To change the RAM role, call the DetachInstanceRamRole operation in OpenAPI Explorer to remove the RAM role from the ECS instance. Then, call the AttachInstanceRamRole operation to assign another RAM role to the ECS instance.
Configure RAM information.
Edit the configuration file of the source code.
vim /home/user/workspace/ApsaraVideo_QuVideo_v1.4.0_Server_20191226/src/main/resources/application.properties
Press the I key and modify the file as shown in the following example.
roleArn = XXXXXXX:role/alivc-demo-role
roleSessionName = vod-role
roleName = alivc-demo-role
Note
NoteREGION_CN_HANGZHOU indicates the region where the ApsaraVideo VOD service is located, such as cn-shanghai for China (Shanghai).
roleArn indicates the ARN retrieved from the RAM console.
roleSessionName indicates the session name of the temporary token. You can specify a custom name.
roleName indicates the name of the RAM role retrieved from the RAM console. In this example, the name is alivc-demo-role.
Press the Esc key and enter :wq! to save the file and exit.
Configure ApsaraVideo VOD.
Edit the configuration file of the source code.
vim /home/user/workspace/ApsaraVideo_QuVideo_v1.4.0_Server_20191226/src/main/resources/application.properties
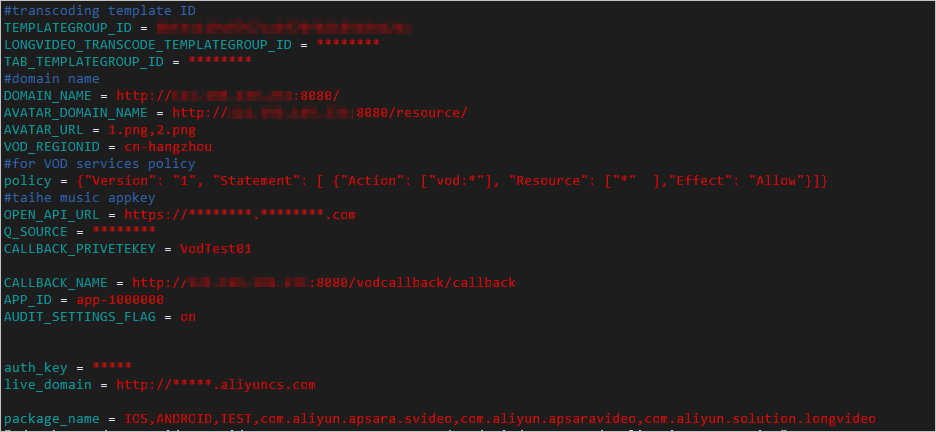
Press the I key and modify the file as follows.
Parameter name
Required
Description
TEMPLATEGROUP_ID
Yes
The ID of the transcoding template group. For more information, see Transcoding template groups.
LONGVIDEO_TRANSCODE_TEMPLATEGROUP_ID
No
The ID of the transcoding template group that is used to review long videos after they are released.
TAB_TEMPLATEGROUP_ID
No
The ID of the Narrowband HD transcoding template group. To recommend Narrowband HD-transcoded videos in your short video console, you must set this parameter. Otherwise, an error occurs when you recommend Narrowband HD-transcoded videos.
DOMAIN_NAME
Yes
The address of the ECS server. In this example, the address is http://10.10.10.101:8080/.
AVATAR_DOMAIN_NAME
No
The address of profile picture resources, which is the static resource address of the ECS server. In this example, the address is http://10.10.10.101:8080/resource/.
AVATAR_URL
No
A list of profile picture filenames, such as 1.png,2.png.
NotePlace the corresponding profile picture files 1.png and 2.png in the /home/user/workspace/ApsaraVideo_QuVideo_v1.4.0_Server_20191226/src/main/webapp/resource directory. If the profile picture service is not configured, mobile client users will not have profile pictures. This does not affect other features.
VOD_REGIONID
Yes
The region where the VOD service is located. In this example, the region is cn-shanghai.
policy
Yes
An extra permission restriction to add when a role is assumed. For more information, see Use RAM policies for custom authorization.
CALLBACK_PRIVETEKEY
Yes
The authentication key in the callback authentication configuration. For more information, see Callback Settings.
CALLBACK_NAME
Yes
The callback URL, which is http://<Public IP address of the ECS instance>:8080/vodcallback/callback. In this example, the URL is http://10.10.10.101:8080/vodcallback/callback.
AUDIT_SETTINGS_FLAG
Yes
The review setting. The default value is on. Valid values:
on: review-before-publish.
off: publish-before-review.
package_name
Yes
The valid package names in the interceptor. Separate multiple package names with commas. The default value is IOS,ANDROID,TEST,com.aliyun.apsara.svideo,com.aliyun.apsaravideo,com.aliyun.solution.longvideo.
Notecom.aliyun.apsara.svideo is the package name of the Android client in this example.
If the Bundle Identifier for the iOS client is already registered, the client fails to run. You must customize a Bundle Identifier, such as com.<Company name>.<Project name>, use it to sign the iOS client, and add it to the package_name parameter to ensure valid access.
The interceptor allows only mobile apps with valid package names to access the server. Otherwise, requests from the mobile client fail. For example, the error message "Request failed: forbidden (403)" is returned.
Press the Esc key, enter :wq!, and press Enter to save your changes and exit.
Run the service.
Compile and package.
cd /home/user/workspace/ApsaraVideo_QuVideo_v1.4.0_Server_20191226
mvn clean package -Dmaven.test.skip=true
NoteIf Maven is not installed, run apt install maven to install it.
The time required for packaging depends on the server bandwidth and performance. In this example, the first packaging takes about 30 minutes.
After packaging is complete, the sdk-api-0.0.1-SNAPSHOT.jar file is generated in the /home/user/workspace/ApsaraVideo_QuVideo_v1.4.0_Server_20191226/target/ directory.
Deploy the JAR package and start the service.
cd /home/user/workspace/ApsaraVideo_QuVideo_v1.4.0_Server_20191226/target
nohup java -jar sdk-api-0.0.1-SNAPSHOT.jar &
NoteWhen the command runs, a nohup prompt appears. Press Enter to run the program in the background.
After the command runs, the nohup.out log file is generated in the current directory. Run the cat nohup.out command to view the log. If the log contains
start success, the service has started successfully.The ECS instance that you purchase may have limited idle memory. If you want to repackage and deploy the source code, run the jps command to query the process ID (PID) of the current JAR program. Then, run the kill -9 JAR program PID command to stop the program. After that, you can repackage and deploy the source code. Otherwise, the packaging may fail due to insufficient memory.