Background
OceanBase Developer Center (ODC) allows system administrators to define automatic authorization rules. System administrators can create, modify, view, and disable automatic authorization rules in the public resource console.
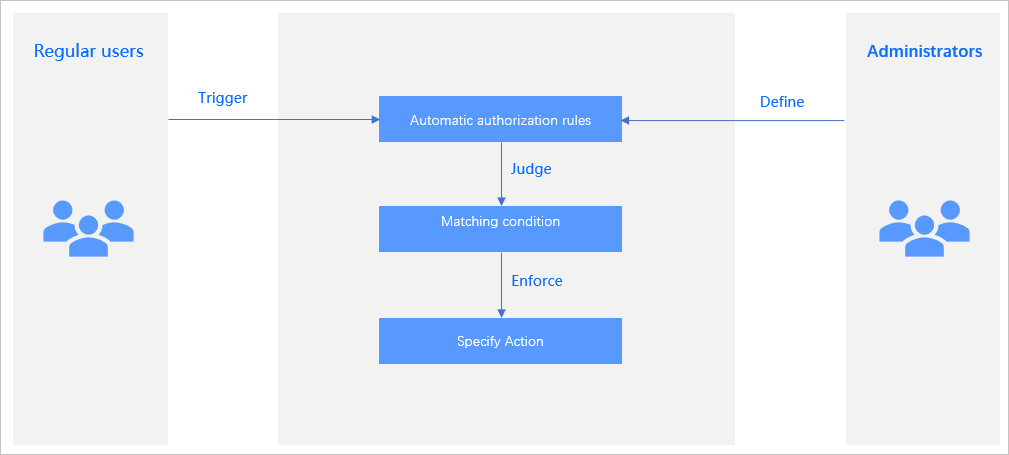
The automatic authorization feature automatically grants roles or permissions to users whose names, departments, or logon methods meet specific conditions when they are being created or log on for the first time, to avoid redundant authorization operations.
This topic describes how to create and manage automatic authorization rules in the public resource console.
Create an automatic authorization rule
Procedure
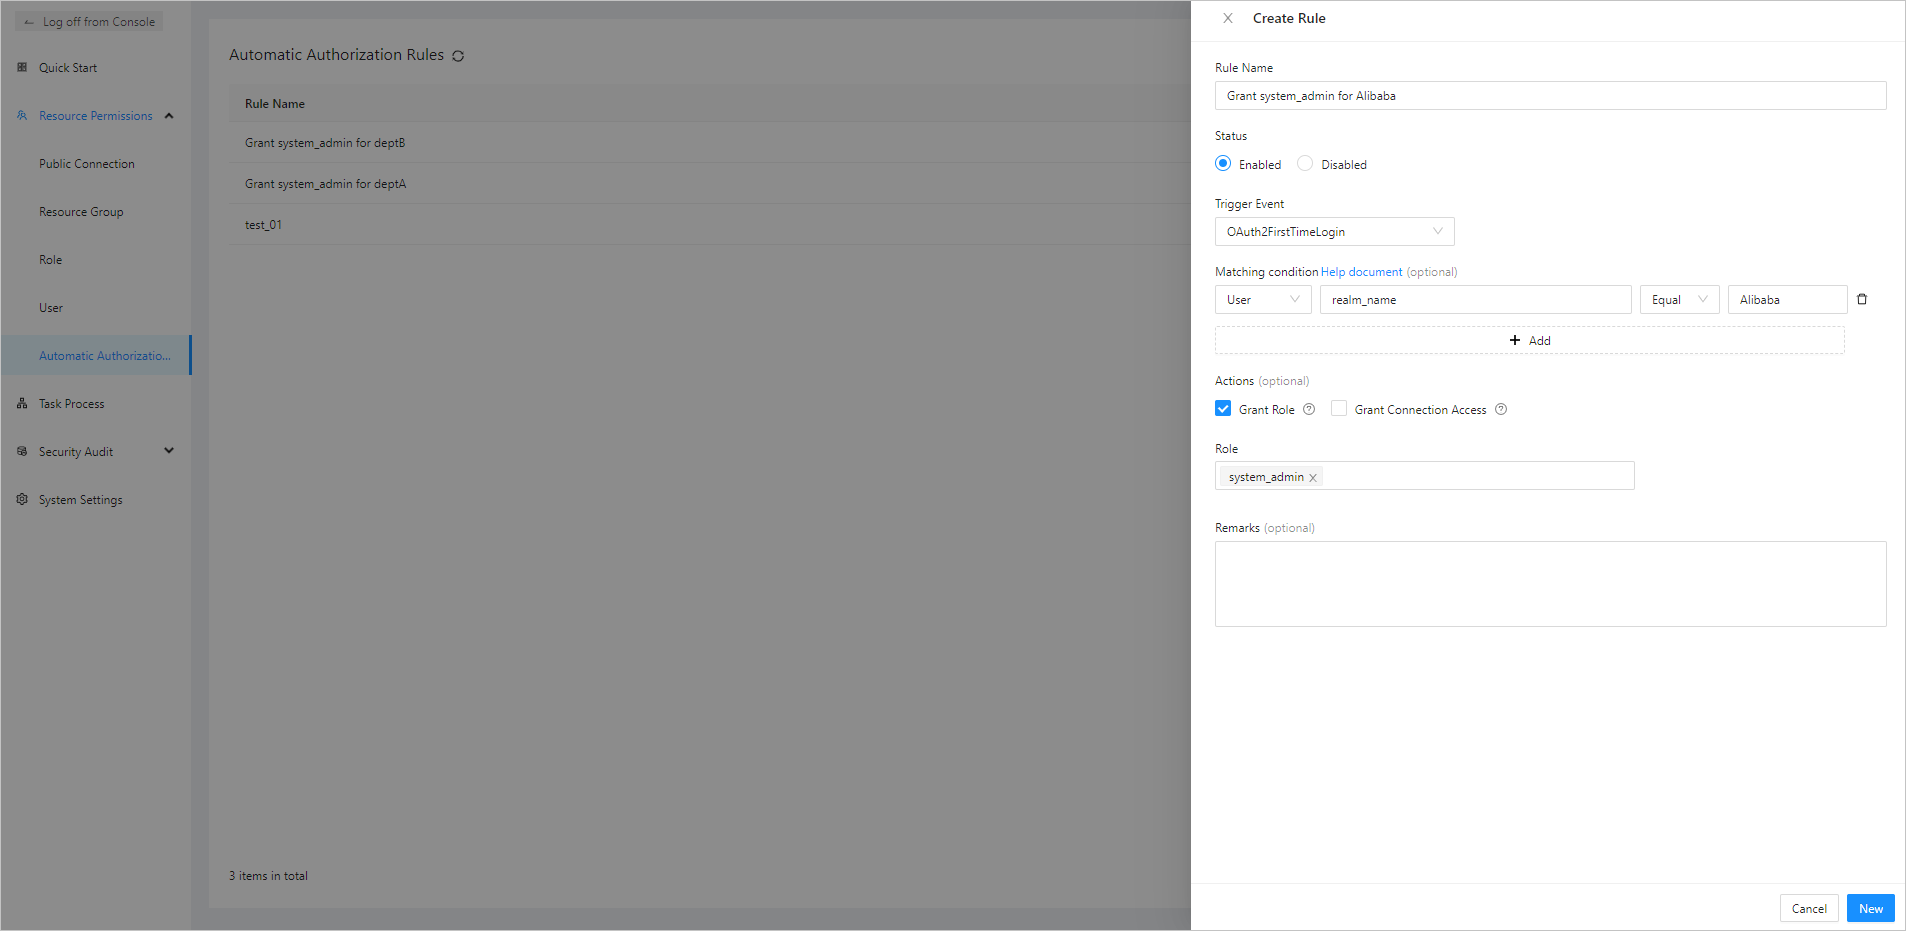
In the upper-right corner of the Automatic Authorization Rules page, click Create Rule. The Create Rule panel appears.
Specify the following parameters in the Create Rule panel.
Parameter
Description
Rule Name
The name of the rule, which must be unique.
Status
Select Enabled or Disabled.
By default, the status of the rule is Enabled. You can set it to Disabled as needed. A disabled rule cannot be accessed.
Trigger Event
Select a trigger event. Only built-in events are available. Different events correspond to different trigger occasions.
Matching Condition (Optional)
Click Add Condition and specify the following four fields:
Object: stores the trigger condition and the information required for executing the action. It can be a complex nested object such as an array, a list, or a map, or a simple object such as a string or a number.
Expression: the index of the target in the object. Different types of objects use different indexing methods.
Operation: the supported operation, for example, "Contain", "Match", or "Equal".
Value: the target value.
NoteIf you do not specify the matching condition, the action is unconditionally executed when the selected event is triggered.
Actions (Optional)
Select Grant Role and/or Grant Connection Access and specify the role name and/or public connection name.
NoteIf you do not specify the action, no action is executed regardless of whether the matching condition is met.
Remarks (Optional)
The description of the rule.
After you specify the preceding parameters, click Create in the lower-right corner of the panel.
Example
After you integrate ODC in OAuth 2.0 and log on to ODC, assume that the OAuth 2.0 system returns the following data structure:
{
  "id": 1,
  "name": "username",
  "mail": "example@email.com",
  "memberOf": {
    "department": [
      {
        "name": "deptA",
        "description": "this is a department"
      },
      {
        "name": "deptB",
        "description": "this is a department"
      }
    ],
    "extra": "some other info"
  }
}
You can use different expressions to obtain corresponding values from the data structure. Example:
Expression | Result |
id | 1 |
memberOf.department[0].name | deptA |
memberOf.department[*].name | ["deptA", "deptB"] |
The administrator can configure an automatic authorization rule for a user when the user logs on to ODC from OAuth 2.0 for the first time. The example in the following figure shows how to create an authorization rule named Grant system_admin for deptB. If memberOf.department contains any element named deptB, the user is granted the system_admin role.

Manage automatic authorization rules

On the Automatic Authorization Rules page, information is displayed in a list, and you can perform the following operations:
Click the refresh icon to manually refresh the list.
Search for rules by using the search box in the upper-right corner of the list.
Adjust the column width of the rule list.
Rule list
The information of rules is provided by columns, which are described in the following table. A filter is provided in the Status column for you to filter rules by status.
Parameter | Description |
Rule Name | The name of the rule. |
Created By | The name of the user who created the rule. You can click the search icon |
Status | The current status of the rule. Valid values: Enabled and Disabled. You can click the filter icon |
Created At | The last time when the rule was edited. You can sort rules in ascending or descending order of creation time. |
Actions | The actions you can take. Valid values: View, Edit, Disable/Enable, and Delete. |
View a rule
Click View in the Actions column of a rule to go to the Rule Information panel. The following information is displayed in the panel.
Information | Description |
Rule information | Displays the information you specified when you created the rule, such as Rule Name, Trigger Event, Matching Condition, Actions, Role, and Remarks. |
Operation information | Displays fields such as Created By and Created At. |
Edit a rule
Click Edit in the Actions column of a rule to go to the Edit Rule panel.
The Edit Rule panel displays all the fields you specified when you created the rule. You can modify the fields as needed.