After you add a Kubernetes cluster to a Service Mesh (ASM) instance, Envoy proxies that are deployed on the data plane of the ASM instance can print all access logs of the cluster. ASM allows you to customize the fields of access logs printed by Envoy proxies. This topic describes how to customize the fields of access logs.
Prerequisites
Step 1: Enable access logging
For ASM instances of versions earlier than 1.17.2.35
Log on to the ASM console. In the left-side navigation pane, choose .
On the Mesh Management page, click the name of the ASM instance. In the left-side navigation pane, choose .
In the upper-right corner of the page that appears, click Settings.
In the Settings Update panel, select Enable access logging and print it to container stdout and click OK.
By default, the istio-proxy container prints logs that contain the following fields. If access logging is disabled, the istio-proxy container does not print access logs in the JSON format.
For ASM instances of version 1.17.2.35 or later
Log on to the ASM console. In the left-side navigation pane, choose .
On the Mesh Management page, click the name of the ASM instance. In the left-side navigation pane, choose .
On the Observability Settings page, click the Global, Namespace, or Custom tab.
If you select the Namespace tab, click Create and select a namespace from the Namespace drop-down list.
If you select the Custom tab, click Create, select a namespace from the Namespace drop-down list, and then set Name and Matching Label.
In the Log Settings section, turn on the Enable Log Output switch and click submit.
After you turn on the switch, the sidecar proxies or gateways on the data plane of the ASM instance print access logs to the standard output of the containers. ASM also supports the log filter feature. For more information, see Filter logs in the "Configure Observability Settings" topic.
View logs in the standard output streams of sidecar containers on the data plane.
The following example shows how to use kubectl to view access logs.
Run the following command to view the logs of a sidecar proxy:
kubectl logs httpbin-5c5944c58c-w**** -c istio-proxy --tail 1Run the following command to view the logs of an ingress gateway:
kubectl -n istio-system logs istio-ingressgateway-6cff9b6b58-r**** --tail 1
(Optional) View access logs in the ACK console.
If you use a Container Service for Kubernetes (ACK) cluster of Alibaba Cloud, you can also view access logs in the ACK console.
Log on to the ACK console. In the left-side navigation pane, click Clusters.
On the Clusters page, click the name of the cluster that you want to manage and choose in the left-side navigation pane.
On the Pods page, click the name of the desired pod and click the Logs tab to view access logs.
For more information about logs, see Configure Observability Settings and Enable control-plane log collection and log-based alerting in an ASM instance of version 1.17.2.35 or later.
Step 2: Customize the fields of access logs
For ASM instances of versions earlier than 1.17.2.35
Log on to the ASM console. In the left-side navigation pane, choose .
On the Mesh Management page, click the name of the ASM instance. In the left-side navigation pane, choose .
In the Config Info section of the page that appears, click Update Access Log Format next to Enable access logging and print it to container stdout.
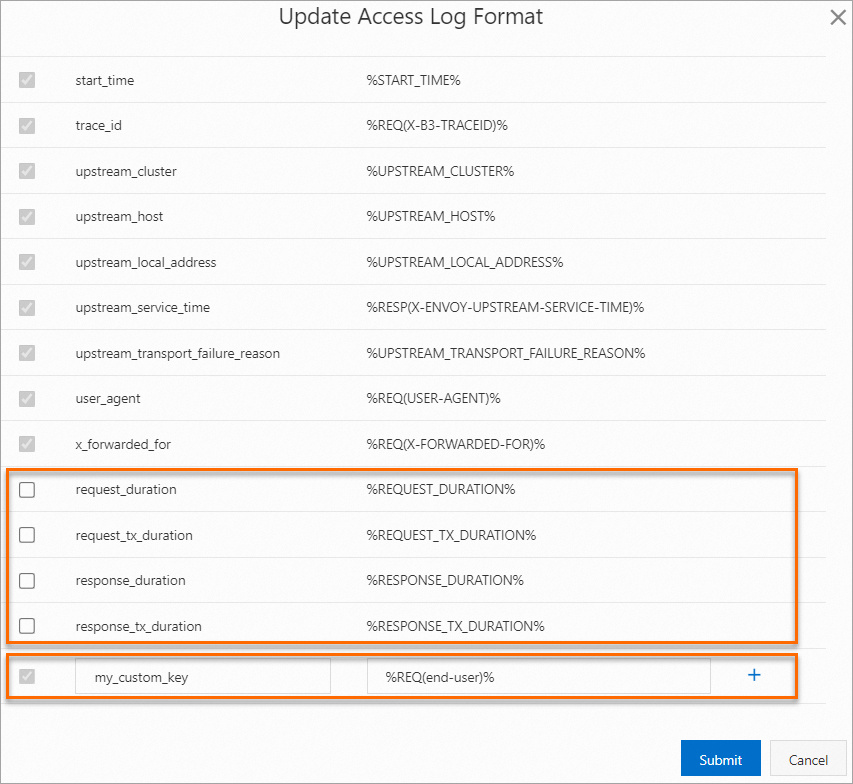
In the Update Access Log Format dialog box, add a field by setting the accessLogFormat key parameter to my_custom_key and the accessLogFormat value parameter to %REQ(end-user)%. Then, click OK.
In this example, my_custom_key is used to extract the value of the end-user header field in HTTP requests for the Bookinfo sample application and then insert the value into access logs. You can select optional fields provided by ASM or add custom fields. The following figure shows the optional fields and a sample custom field. Then, access logs will be printed in the custom format.
For ASM instances of version 1.17.2.35 or later
Log on to the ASM console. In the left-side navigation pane, choose .
On the Mesh Management page, click the name of the ASM instance. In the left-side navigation pane, choose .
On the Observability Settings page, click the Global, Namespace, or Custom tab.
If you select the Namespace tab, click Create and select a namespace from the Namespace drop-down list.
If you select the Custom tab, click Create, select a namespace from the Namespace drop-down list, and then set Name and Matching Label.
In the Log Settings section, select the desired fields or modify the information of custom fields. You can also click the
 icon to the right of log metrics in the lower part to add log fields. Then, click submit.
 You can customize the fields of access logs only if you turn on Enable Log Output. In the Log Format section, the log fields that are selected by default are mandatory and cannot be modified. You can choose to obtain the value of a log field from the request header, response header, or Envoy built-in value.
The following example sets accessLogFormat key to accept-encoding, Type to Request Properties, and accessLogFormat value to Accept-Encoding to print the accept-encoding header in requests.

Run the following command to view the logs of the components on the data plane of an ASM instance:
kubectl logs httpbin-5c5944c58c-w**** -c istio-proxy --tail 1|grep accept-encoding --color=autoThe value of the accept-encoding header that is added in substep 4 is printed in the access log. For more information about logs, see Configure Observability Settings and Enable control-plane log collection and log-based alerting in an ASM instance of version 1.17.2.35 or later.
Step 3: View access logs
After you enable access logging and customize the fields of access logs, the sidecar container that initiates a request prints access logs in the custom format.
Enter IP address of the ingress gateway:productpage in the address bar of your browser to access the Productpage application.
Log on to the ACK console. In the left-side navigation pane, click Clusters.
On the Clusters page, click the name of the cluster that you want to manage and choose in the left-side navigation pane.
In the upper part of the Deployments page, select default from the Namespace drop-down list and click Details in the Actions column of the productpage-v1 application.
On the details page of the application, click the Logs tab and set the Container parameter to istio-proxy.
The following log is displayed in the log output box. The log contains a field that specifies an end user named jason. This indicates that the custom configuration takes effect.

Duration fields
In Service Mesh, "upstream" indicates the receiver of a request, and "downstream" indicates the initiator of the request. For example, when service A initiates a request to service B, service A is the downstream service, and service B is the upstream service.
Field | Value | Description |
duration | $DURATION% |
|
request_duration | %REQUEST_DURATION% |
|
request_tx_duration | %REQUEST_TX_DURATION% |
|
response_duration | %RESPONSE_DURATION% |
|
response_tx_duration | %RESPONSE_TX_DURATION% |
|
upstream_service_time (for a sidecar proxy) | %RESP(X-ENVOY-UPSTREAM-SERVICE-TIME)% | In the access logs of sidecar proxies or gateways, this field indicates the processing time of the upstream service and the time consumed in communication with the upstream service. If the value of this field is larger than expected, check the following items:
|
upstream_response_time (for a gateway) |
For an HTTP request with a body whose Content-Length is larger than 0, the request is simultaneously read and sent to the upstream service instead of being sent after it is read. In this case, if the current node reads the request slowly from the downstream service, the upstream service of the current node takes more time to read the request.
Related operations
You can also use Simple Log Service to collect access logs on the data plane. For more information, see Configure the features of generating and collecting the access logs of an ASM gateway.