In Service Mesh (ASM), you can configure JWT-based authentication to authenticate the source of HTTP requests for authorization. JWT is short for JSON Web Token. The JWT-based authentication feature can accurately verify the validity of the access token in a request header and allow only requests from trusted sources to access services. This improves service security and simplifies inter-service authentication.
Prerequisites
A Container Service for Kubernetes (ACK) cluster is added to an ASM instance and the version of the ASM instance is 1.6 or later.
Background information
Service Mesh supports the following authentication methods:
Transmission authentication: This method is based on Mutual Transport Layer Security (mTLS) and used to authenticate communications among services.
Source authentication: This method is based on JWT and used to authenticate requests from the client to the server.
JWT is a standard that uses representative claims to secure information transmission between two parties. For more information about JWT, see JWT documentation.
Step 1: Create a namespace and deploy sample services
Create a namespace named foo and set the label name to istio-injection and the value to enabled. For more information, see Manage global namespaces.
Create httpbin.yaml and sleep.yaml files with the following content:
Use kubectl to connect to the cluster and run the following commands to deploy the httpbin and sleep services in the foo namespace.
For more information about how to use kubectl to connect to the cluster, see Obtain the kubeconfig file of a cluster and use kubectl to connect to the cluster.
kubectl apply -f httpbin.yaml -n foo
kubectl apply -f sleep.yaml -n foo
Use the sleep service to access the httpbin service.
Run the following command to enable bash for the sleep service:
kubectl exec -it deploy/sleep -- shRun the following command to send a request to the httpbin service:
curl -I httpbin.foo.svc.cluster.local:8000Expected output:
HTTP/1.1 200 OK
server: envoy
date: Thu, 21 Dec 2023 07:39:55 GMT
content-type: text/html; charset=utf-8
content-length: 9593
access-control-allow-origin: *
access-control-allow-credentials: true
x-envoy-upstream-service-time: 14
200 OKis returned, indicating that the request is successful.
Step 2: Create a request authentication policy
Log on to the ASM console. In the left-side navigation pane, choose .
On the Mesh Management page, click the name of the ASM instance. In the left-side navigation pane, choose . On the page that appears, click Create from YAML.
On the Create page, select foo from the Namespace drop-down list, enter the following content in the code editor to edit a YAML file for request authentication, and then click Create.
The
jwtRulesfield in the following YAML code specifies a rule for the requests of thehttpbinservice. If a request header contains an access token, the decoded value of theissfield must betesting@secure.istio.io. Thejwksfield specifies how to generate the access token. For more information, see JSON Web Key (JWK).apiVersion: "security.istio.io/v1beta1" kind: "RequestAuthentication" metadata: name: "jwt-example" namespace: foo spec: selector: matchLabels: app: httpbin jwtRules: - issuer: "testing@secure.istio.io" jwks: '{ "keys":[ {"e":"AQAB","kid":"DHFbpoIUqrY8t2zpA2qXfCmr5VO5ZEr4RzHU_-envvQ","kty":"RSA","n":"xAE7eB6qugXyCAG3yhh7pkDkT65pHymX-P7KfIupjf59vsdo91bSP9C8H07pSAGQO1MV_xFj9VswgsCg4R6otmg5PV2He95lZdHtOcU5DXIg_pbhLdKXbi66GlVeK6ABZOUW3WYtnNHD-91gVuoeJT_DwtGGcp4ignkgXfkiEm4sw-4sfb4qdt5oLbyVpmW6x9cfa7vs2WTfURiCrBoUqgBo_-4WTiULmmHSGZHOjzwa8WtrtOQGsAFjIbno85jp6MnGGGZPYZbDAa_b3y5u-YpW7ypZrvD8BgtKVjgtQgZhLAGezMt0ua3DRrWnKqTZ0BJ_EyxOGuHJrLsn00fnMQ"}]}'Decode the token.
The following code provides an example of the access token:
TOKEN='eyJhbGciOiJSUzI1NiIsImtpZCI6IkRIRmJwb0lVcXJZOHQyenBBMnFYZkNtcjVWTzVaRXI0UnpIVV8tZW52dlEiLCJ0eXAiOiJKV1QifQ.eyJleHAiOjQ2ODU5ODk3MDAsImZvbyI6ImJhciIsImlhdCI6MTUzMjM4OTcwMCwiaXNzIjoidGVzdGluZ0BzZWN1cmUuaXN0aW8uaW8iLCJzdWIiOiJ0ZXN0aW5nQHNlY3VyZS5pc3Rpby5pbyJ9.CfNnxWP2tcnR9q0vxyxweaF3ovQYHYZl82hAUsn21bwQd9zP7c-LS9qd_vpdLG4Tn1A15NxfCjp5f7QNBUo-KC9PJqYpgGbaXhaGx7bEdFWjcwv3nZzvc7M__ZpaCERdwU7igUmJqYGBYQ51vr2njU9ZimyKkfDe3axcyiBZde7G6dabliUosJvvKOPcKIWPccCgefSj_GNfwIip3-SsFdlR7BtbVUcqR-yv-XOxJ3Uc1MI0tz3uMiiZcyPV7sNCU4KRnemRIMHVOfuvHsU60_GhGbiSFzgPTAa9WTltbnarTbxudb_YEOx12JiwYToeX0DCPb43W1tzIBxgm8NxUg'Run the following command to decode the token:
echo $TOKEN | cut -d '.' -f2 - | base64 --decode -Expected output:
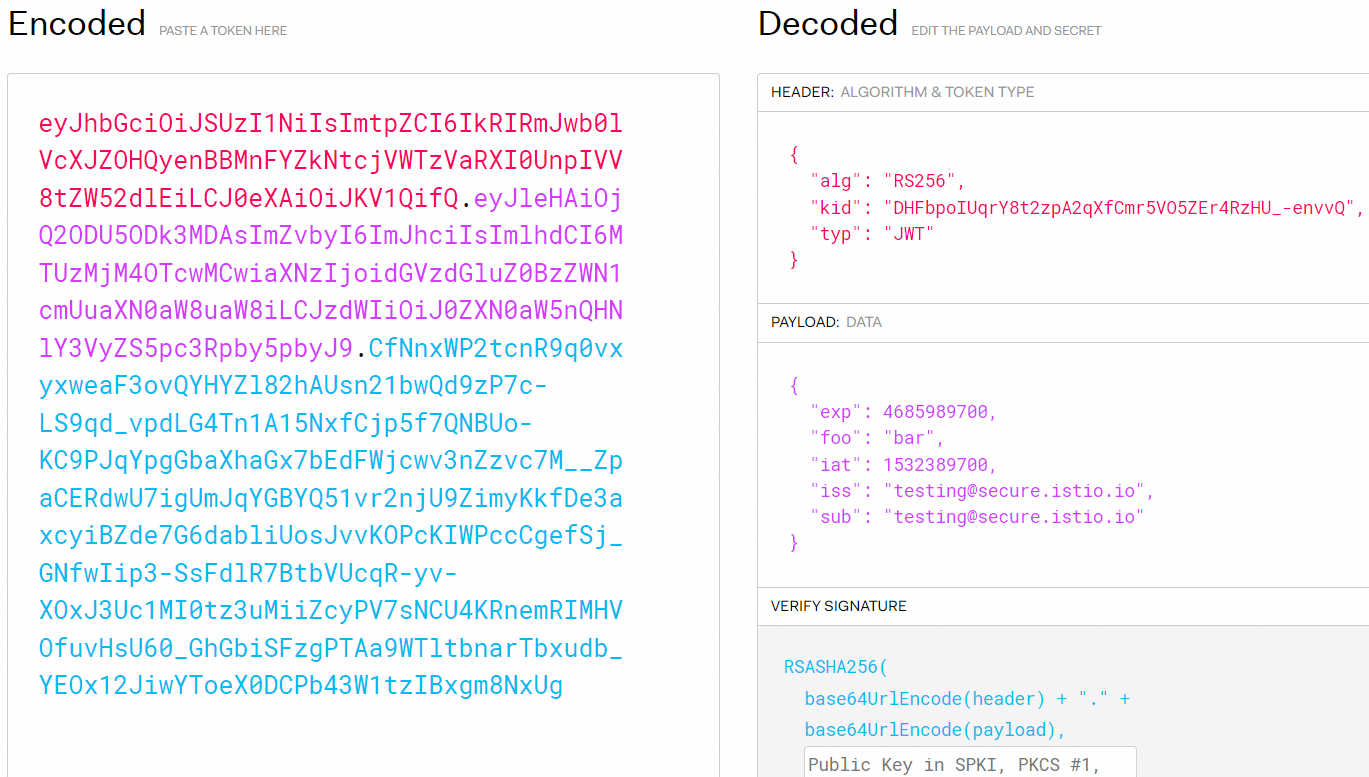
{"exp":4685989700,"foo":"bar","iat":1532389700,"iss":"testing@secure.istio.io","sub":"testing@secure.istio.io"}The JWT official website also provides a GUI for you to decode access tokens, as shown in the following figure.
Use the sleep service to access the httpbin service.
Run the following command to enable bash for the sleep service:
kubectl exec -it deploy/sleep -- shRun the following command to send a request to the httpbin service. The request header contains a valid access token.
Replace
your_valid_access_token_herewith the actual valid access token.TOKEN=your_valid_access_token_here curl -I -H "Authorization: Bearer $TOKEN" httpbin.foo.svc.cluster.local:8000Expected output:
HTTP/1.1 200 OKRun the following command to send a request to the httpbin service. The request header contains an invalid access token.
Replace
your_invalid_access_token_herewith an invalid access token.INVALID_TOKEN=your_invalid_access_token_here curl -I -H "Authorization: Bearer $INVALID_TOKEN" httpbin.foo.svc.cluster.local:8000401 Unauthorizedis returned, indicating that the request is denied by identity authentication and the access fails.
Step 3: Create a JWT authorization policy
Log on to the ASM console. In the left-side navigation pane, choose .
On the Mesh Management page, click the name of the ASM instance. In the left-side navigation pane, choose . On the page that appears, click Create from YAML.
On the Create page, select foo from the Namespace drop-down list, enter the following content in the code editor to edit a YAML file for a JWT authorization policy, and then click Create.
The authorization policy implements the following logic: When a request is sent to the
httpbinservice, the system checks the decoded access token in the request header. The request is allowed only if the values of theissandsubfields in the decoded access token are the same as those specified by thesource.requestPrincipalsfield. The source.requestPrincipals field is in the format ofiss/sub. In this example, the value of thesource.requestPrincipalsfield istesting@secure.istio.io/testing@secure.istio.io.apiVersion: security.istio.io/v1beta1 kind: AuthorizationPolicy metadata: name: require-jwt namespace: foo spec: selector: matchLabels: app: httpbin action: ALLOW rules: - from: - source: requestPrincipals: ["testing@secure.istio.io/testing@secure.istio.io"]Decode the token.
The following code provides an example of the access token:
TOKEN='eyJhbGciOiJSUzI1NiIsImtpZCI6IkRIRmJwb0lVcXJZOHQyenBBMnFYZkNtcjVWTzVaRXI0UnpIVV8tZW52dlEiLCJ0eXAiOiJKV1QifQ.eyJleHAiOjQ2ODU5ODk3MDAsImZvbyI6ImJhciIsImlhdCI6MTUzMjM4OTcwMCwiaXNzIjoidGVzdGluZ0BzZWN1cmUuaXN0aW8uaW8iLCJzdWIiOiJ0ZXN0aW5nQHNlY3VyZS5pc3Rpby5pbyJ9.CfNnxWP2tcnR9q0vxyxweaF3ovQYHYZl82hAUsn21bwQd9zP7c-LS9qd_vpdLG4Tn1A15NxfCjp5f7QNBUo-KC9PJqYpgGbaXhaGx7bEdFWjcwv3nZzvc7M__ZpaCERdwU7igUmJqYGBYQ51vr2njU9ZimyKkfDe3axcyiBZde7G6dabliUosJvvKOPcKIWPccCgefSj_GNfwIip3-SsFdlR7BtbVUcqR-yv-XOxJ3Uc1MI0tz3uMiiZcyPV7sNCU4KRnemRIMHVOfuvHsU60_GhGbiSFzgPTAa9WTltbnarTbxudb_YEOx12JiwYToeX0DCPb43W1tzIBxgm8NxUg'Run the following command to decode the token:
echo $TOKEN | cut -d '.' -f2 - | base64 --decode -Expected output:
{"exp":4685989700,"foo":"bar","iat":1532389700,"iss":"testing@secure.istio.io","sub":"testing@secure.istio.io"}Use the sleep service to access the httpbin service.
Run the following command to enable bash for the sleep service:
kubectl exec -it deploy/sleep -- shRun the following command to send a request to the httpbin service. The request header contains a valid access token.
Replace
your_valid_access_token_herewith the actual valid access token.TOKEN=your_valid_access_token_here curl -I -H "Authorization: Bearer $TOKEN" httpbin.foo.svc.cluster.local:8000Expected output:
HTTP/1.1 200 OKRun the following command to send a request to the httpbin service. The request header contains an invalid access token.
Replace
your_invalid_access_token_herewith an invalid access token.INVALID_TOKEN=your_invalid_access_token_here curl -I -H "Authorization: Bearer $INVALID_TOKEN" httpbin.foo.svc.cluster.local:8000403 Forbiddenis returned, indicating that the request is denied by the authorization policy and the access fails.
Step 4: Update the JWT authorization policy
Log on to the ASM console. In the left-side navigation pane, choose .
On the Mesh Management page, click the name of the ASM instance. In the left-side navigation pane, choose .
On the AuthorizationPolicy page, find the require-jwt policy and click YAML in the Actions column.
In the Edit dialog box, add the following content and click OK.
    when:
    - key: request.auth.claims[groups]
      values: ["group1"]
The following code provides an example of a complete YAML file. When a request is sent to the
httpbinservice, the system checks the decoded access token in the request header. Then, the system applies the updated authorization policy to the request. The request is allowed only if the decoded access token meets the following conditions: The value of the iss field is testing@secure.istio.io, the value of the sub field is testing@secure.istio.io, and thegroupsfield containsgroup1.apiVersion: security.istio.io/v1beta1 kind: AuthorizationPolicy metadata: name: require-jwt namespace: foo spec: selector: matchLabels: app: httpbin action: ALLOW rules: - from: - source: requestPrincipals: ["testing@secure.istio.io/testing@secure.istio.io"] when: - key: request.auth.claims[groups] values: ["group1"]Decode the token.
The following code provides an example of the access token:
TOKEN_GROUP='eyJhbGciOiJSUzI1NiIsImtpZCI6IkRIRmJwb0lVcXJZOHQyenBBMnFYZkNtcjVWTzVaRXI0UnpIVV8tZW52dlEiLCJ0eXAiOiJKV1QifQ.eyJleHAiOjM1MzczOTExMDQsImdyb3VwcyI6WyJncm91cDEiLCJncm91cDIiXSwiaWF0IjoxNTM3MzkxMTA0LCJpc3MiOiJ0ZXN0aW5nQHNlY3VyZS5pc3Rpby5pbyIsInNjb3BlIjpbInNjb3BlMSIsInNjb3BlMiJdLCJzdWIiOiJ0ZXN0aW5nQHNlY3VyZS5pc3Rpby5pbyJ9.EdJnEZSH6X8hcyEii7c8H5lnhgjB5dwo07M5oheC8Xz8mOllyg--AHCFWHybM48reunF--oGaG6IXVngCEpVF0_P5DwsUoBgpPmK1JOaKN6_pe9sh0ZwTtdgK_RP01PuI7kUdbOTlkuUi2AO-qUyOm7Art2POzo36DLQlUXv8Ad7NBOqfQaKjE9ndaPWT7aexUsBHxmgiGbz1SyLH879f7uHYPbPKlpHU6P9S-DaKnGLaEchnoKnov7ajhrEhGXAQRukhDPKUHO9L30oPIr5IJllEQfHYtt6IZvlNUGeLUcif3wpry1R5tBXRicx2sXMQ7LyuDremDbcNy_iE76Upg'Run the following command to decode the token:
echo "$TOKEN_GROUP" | cut -d '.' -f2 - | base64 --decode - | jqExpected output:
{
  "exp": 3537391104,
  "groups": [
    "group1",
    "group2"
  ],
  "iat": 1537391104,
  "iss": "testing@secure.istio.io",
  "scope": [
    "scope1",
    "scope2"
  ],
  "sub": "testing@secure.istio.io"
}
Use the sleep service to access the httpbin service.
Run the following command to enable bash for the sleep service:
kubectl exec -it deploy/sleep -- shRun the following command to send a request to the httpbin service. The request header contains a valid access token.
Replace
your_valid_access_token_herewith the actual valid access token.TOKEN=your_valid_access_token_here curl -I -H "Authorization: Bearer $TOKEN" httpbin.foo.svc.cluster.local:8000200 OKis returned, indicating that the request passes the authentication required by the authorization policy and the access is successful.Run the following command to send a request to the httpbin service. The request header contains an invalid access token.
Replace
your_invalid_access_token_herewith an invalid access token.INVALID_TOKEN=your_invalid_access_token_here curl -I -H "Authorization: Bearer $INVALID_TOKEN" httpbin.foo.svc.cluster.local:8000403 Forbiddenis returned, indicating that the request is denied by the authorization policy and the access fails.
References
For more information about the JWT algorithms supported by ASM, how to use JwksUri, and how to configure specific paths to bypass JWT authentication, see FAQ about JWT.