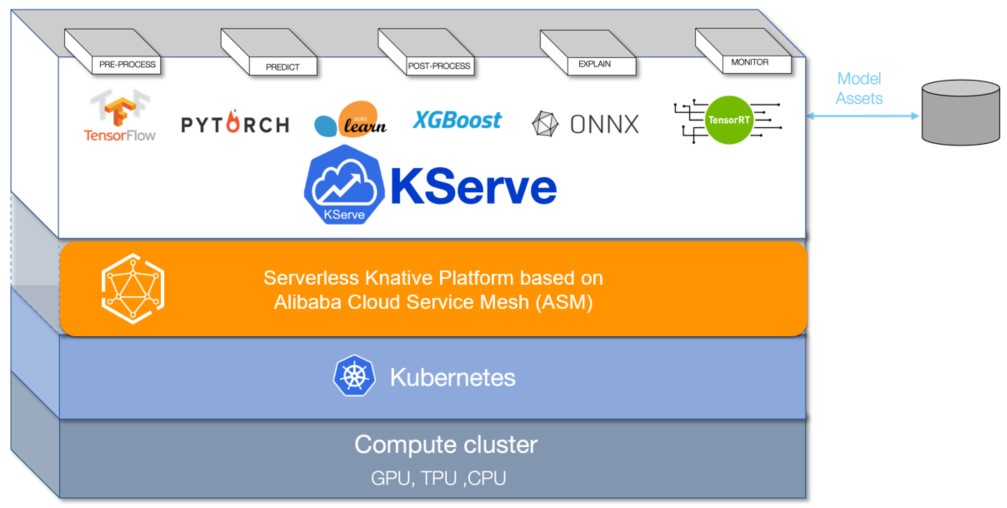
KServe (formerly KFServing) is a model server and inference engine in cloud-native environments. It supports features such as automatic scaling, scale-to-zero, and canary deployment. By integrating KServe with Service Mesh (ASM), developers can quickly deploy and manage inference services based on machine learning models in cloud-native applications. This reduces the workload of manual configuration and maintenance and improves development efficiency.
Prerequisites
A Container Service for Kubernetes (ACK) cluster is added to an ASM instance of v1.17.2.7 or later. For more information, see Add a cluster to an ASM instance.
The feature that allows Istio resources to be accessed by using the Kubernetes API of clusters is enabled. For more information, see Enable the feature that allows Istio resources to be accessed by using the Kubernetes API of clusters.
Knative components are deployed in the ACK cluster and the Knative on ASM feature is enabled. For more information, see Step 1 in Use Knative on ASM to deploy a serverless application.
Introduction to KServe
As a model server, KServe supports the deployment of machine learning and deep learning models at scale. KServe can be deployed to work in traditional Kubernetes Deployment mode or in serverless mode with the support for scale-to-zero. It provides automatic traffic-based scaling and blue-green or canary deployment for models. For more information, see KServe.
Step 1: Install the KServe component cert-manager
Log on to the ASM console. In the left-side navigation pane, choose .
On the Mesh Management page, click the name of the ASM instance. In the left-side navigation pane, choose .
On the KServe on ASM page, click Enable KServe on ASM.
KServe depends on the cert-manager component. When you install KServe, the cert-manager component is automatically installed. If you want to use your own cert-manager component, turn off Automatically install the CertManager component in the cluster.
Step 2: Obtain the IP address of the ASM ingress gateway
Log on to the ASM console. In the left-side navigation pane, choose .
On the Mesh Management page, click the name of the ASM instance. In the left-side navigation pane, choose .
On the Ingress Gateway page, view and record the Service address of the ASM ingress gateway.
Step 3: Create an inference service
In this example, the scikit-learn training model is used for testing.
Use kubectl to connect to the ACK cluster on the data plane. Then, run the following command to create a namespace for deploying KServe resources:
kubectl create namespace kserve-testCreate an inference service.
Use the following content to create an isvc.yaml file:
apiVersion: "serving.kserve.io/v1beta1"
kind: "InferenceService"
metadata:
  name: "sklearn-iris"
spec:
  predictor:
    model:
      modelFormat:
        name: sklearn
      storageUri: "gs://kfserving-examples/models/sklearn/1.0/model"
Run the following command to create the sklearn-iris service in the kserve-test namespace:
kubectl apply -f isvc.yaml -n kserve-test
Run the following command to query whether the sklearn-iris service is successfully created:
kubectl get inferenceservices sklearn-iris -n kserve-testExpected output:
NAME           URL                                           READY   PREV   LATEST   PREVROLLEDOUTREVISION   LATESTREADYREVISION            AGE
sklearn-iris   http://sklearn-iris.kserve-test.example.com   True           100                              sklearn-iris-predictor-00001   3h26m
The value of
READYisTrue, which indicates that the sklearn-iris service is successfully created.(Optional) View the virtual service and Istio gateway.
After the sklearn-iris service is created, a virtual service and an Istio gateway are automatically created for the scikit-learn model. To view the virtual service and Istio gateway, perform the following steps:
Log on to the ASM console. In the left-side navigation pane, choose .
On the Mesh Management page, click the name of the ASM instance. In the left-side navigation pane, choose .
On the VirtualService page, click the
 icon next to Namespace and select kserve-test from the Namespace drop-down list to view the created virtual service.
 In the left-side navigation pane, choose .
In the upper part of the Gateway page, select knative-serving from the Namespace drop-down list to view the created Istio gateway.
Step 4: Access the service provided by the scikit-learn model
The following section describes the steps for accessing the service provided by the scikit-learn model in the Linux and Mac operating systems.
Run the following command to create an input file for the scikit-learn model:
cat <<EOF > "./iris-input.json"
{
  "instances": [
    [6.8,  2.8,  4.8,  1.4],
    [6.0,  3.4,  4.5,  1.6]
  ]
}
EOF
Test access to the service provided by the scikit-learn model through the ingress gateway.
Run the following commands to obtain the value of SERVICE_HOSTNAME:
SERVICE_HOSTNAME=$(kubectl get inferenceservice sklearn-iris -n kserve-test -o jsonpath='{.status.url}' | cut -d "/" -f 3)
echo $SERVICE_HOSTNAME
Expected output:
sklearn-iris.kserve-test.example.comRun the following commands to access the service. In this step, set ASM_GATEWAY to the IP address of the ingress gateway obtained in Step 2.
ASM_GATEWAY="XXXX" # Replace XXXX with the IP address of the ASM ingress gateway.
curl  -H "Host: ${SERVICE_HOSTNAME}" http://${ASM_GATEWAY}:80/v1/models/sklearn-iris:predict -d @./iris-input.json
Expected output:
{"predictions": [1, 1]}
Test the performance of the service provided by the scikit-learn model.
Run the following command to deploy an application for stress testing:
kubectl create -f https://alibabacloudservicemesh.oss-cn-beijing.aliyuncs.com/kserve/v0.7/loadtest.yamlRun the following command to query the names of pods:
kubectl get podExpected output:
NAME                                                       READY   STATUS      RESTARTS   AGE
load-testxhwtq-pj9fq                                       0/1     Completed   0          3m24s
sklearn-iris-predictor-00001-deployment-857f9bb56c-vg8tf   2/2     Running     0          51m
Run the following command to view the test result logs:
kubectl logs load-testxhwtq-pj9fq # Replace the pod name with the name of the pod on which the application that you deploy for stress testing runs.Expected output:
Requests      [total, rate, throughput]         30000, 500.02, 500.01
Duration      [total, attack, wait]             59.999s, 59.998s, 1.352ms
Latencies     [min, mean, 50, 90, 95, 99, max]  1.196ms, 1.463ms, 1.378ms, 1.588ms, 1.746ms, 2.99ms, 18.873ms
Bytes In      [total, mean]                     690000, 23.00
Bytes Out     [total, mean]                     2460000, 82.00
Success       [ratio]                           100.00%
Status Codes  [code:count]                      200:30000
Error Set:
References
If you need to accelerate model loading of data-intensive applications, such as big data applications and AI applications, in cloud-native scenarios, see Integrate the KServe on ASM feature with Fluid to implement AI Serving that accelerates data access.
If you need to transform the raw input data into the format required by the model server, see Use InferenceService to deploy a transformer.
If you deploy model services for large-capacity, high-density, and frequently changing use cases, you can use Model Service Mesh to manage, deploy, and schedule multiple model services. For more information, see Model Service Mesh.