Description
Feature consistency is a common engineering challenge in algorithm projects, which indicates that the features used during model training must be consistent with those used during online scoring. Inconsistencies in features can lead to discrepancies in scoring and poor performance when a model is used in services or applications. Therefore, we recommend that you perform feature consistency checks on a regular basis to prevent performance degradation due to feature inconsistency.
Feature consistency checks are conducted to automatically identify the following inconsistency issues between online features and offline features:
The names of online features are inconsistent with those of offline features.
The types are inconsistent between online and offline features with the same name.
Online features are missing or are not generated. The context features are missing when requests are sent to the recommendation engine, or the recommendation engine fails to generate the relevant context features.
The feature values are inconsistent. The processing logic or methods for online feature values do not match those used for offline feature values.
The feature processing logic of the model is incorrect. Before scoring, a processor, such as the EasyRec processor that is deployed as a scoring service, needs to handle features. The feature processing involves feature loading, default feature value generation, and feature derivation implemented by using the feature generator (FG) module. You can enable the debug mode for the EasyRec processor to obtain the generated features for further feature comparison.
Feature comparison process
Flowchart
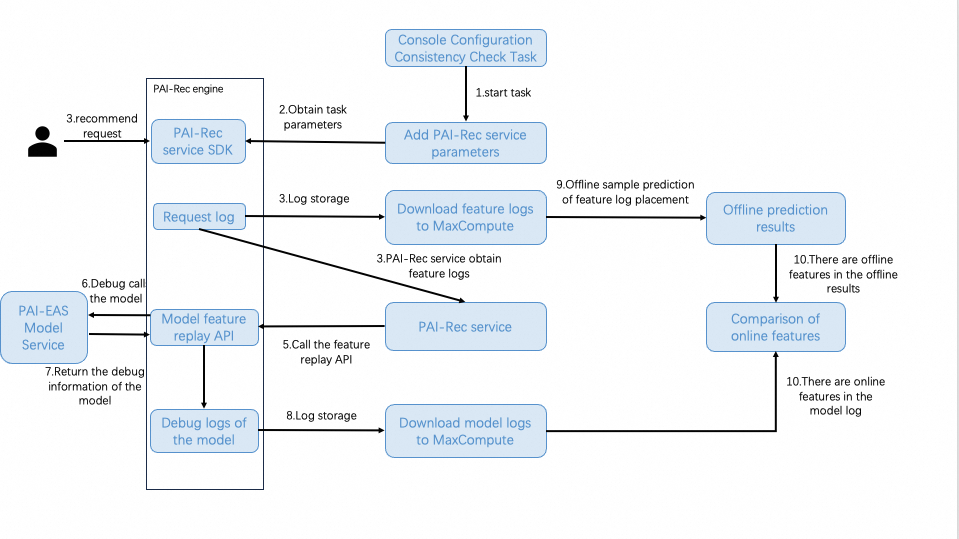
Process
Step 1: You create and start a feature consistency check task in the console
Log on to the PAI-Rec console. In the left-side navigation pane, choose Troubleshooting Tool > Consistency Check. Then, create and start a feature consistency check task.
When you start the task, PAI-Rec checks and creates the resources required to run the task based on the task configurations. The resources are used to process feature logs and model logs. After the resources are created, the service parameters are added on the Parameter Management page in the PAI-Rec console. The task is started.
Step 2: The PAI-Rec engine obtains the task parameters
The PAI-Rec engine retrieves the latest service parameters by using the PAI-Rec SDK to obtain the parameters of the task that is started.
Step 3: The PAI-Rec engine saves the feature logs to MaxCompute and PAI-Rec obtains the feature logs.
After the PAI-Rec engine retrieves the task parameters, the PAI-Rec engine saves the feature logs generated during the service process to MaxCompute.
At the same time, PAI-Rec obtains the feature logs.
Step 4: PAI-Rec calls the feature replay interface of the PAI-Rec engine
When PAI-Rec obtains the feature logs, PAI-Rec calls the feature replay interface of the PAI-Rec engine in batches according to the obtained feature logs and the sampling proportion specified for the task. Feature replay refers to calling the interface of the PAI-Rec engine that is used to enable the debug mode of the model service with the obtained feature logs.
Step 5: The PAI-Rec engine calls the model service deployed on EAS
After a request is received, the PAI-Rec engine calls the model service deployed on Elastic Algorithm Service (EAS) in debug mode. In this process, the debug information about the model is generated, which contains all the feature information before and after the feature generation phase.
Step 6: The debug information about the model is returned
The debug information about the model service deployed on EAS is returned to the PAI-Rec engine to generate the model debug logs.
Step 7: The debug logs are stored
The model debug logs generated by the PAI-Rec engine are stored in MaxCompute.
Step 8: Prediction is performed based on the feature logs
The feature logs from MaxCompute are used as offline sample data for prediction.
Step 9: Online features are compared with offline features
After the model logs in MaxCompute are retrieved, the online features in the model logs and the offline features in the offline prediction result are compared to generate the task result.
Usage notes
1. Configure a feature consistency check task
Prerequisites
Before you configure a feature consistency check task, you must add the required data sources, including MaxCompute and EAS where the model service is deployed. If you want to export results to Object Storage Service (OSS), you must add an OSS data source.
For more information about how to add data sources, see Manage metadata.
Procedure
In the left-side navigation pane, click Consistency Check. On the page that appears, create a task or modify an existing task.
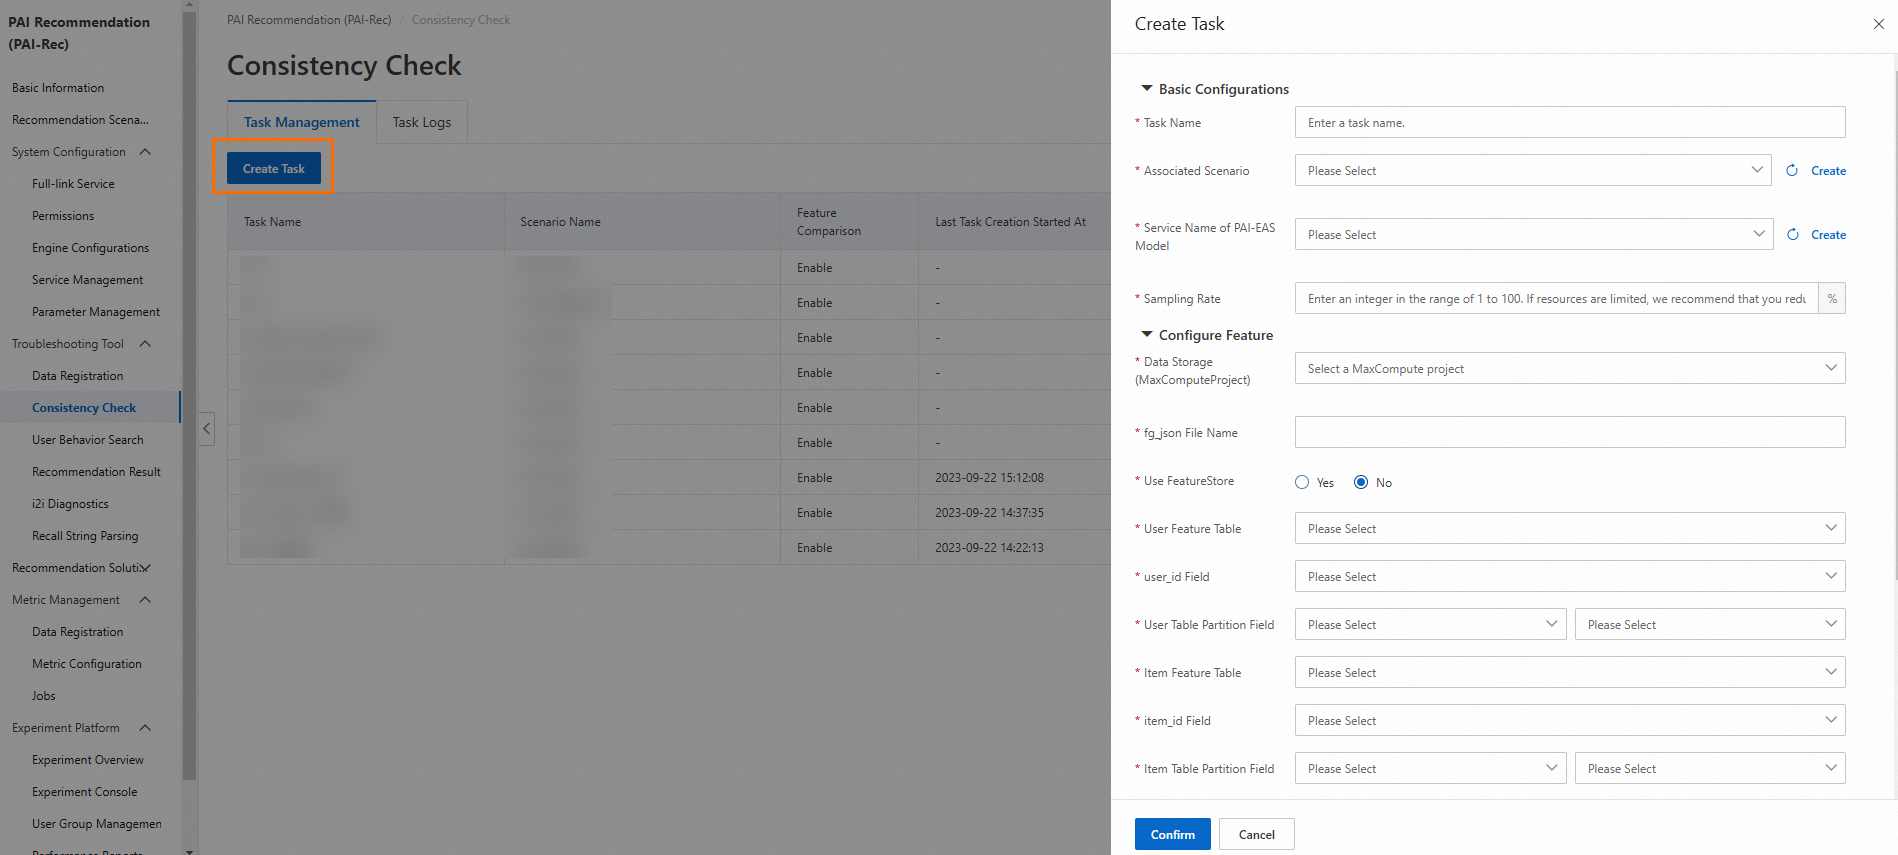
The following section describes the parameters of a feature consistency check task:
Task Name: Enter a custom task name.
Associated Scenario: Select a recommendation scenario that you want to associate with the task from the drop-down list. The selected scenario must be the same as the scenario specified in the engine configurations and the scenario specified in the request parameters.
Sampling Rate: Specify the proportion of data that you want to sample. Maximum value: 100%. A small sampling rate can reduce the queries per second (QPS) sent to the engine. For example, if you set Sampling Rate to 10%, the QPS is 10 and only one recommendation request log is sampled per second.
Data Storage (MaxComputeProject): Select a MaxCompute project from the drop-down list to store data.
Service Name of PAI-EAS Model: The name of the model service deployed on EAS. You need to obtain some parameters from the model, such as the OSS path in which the model-related data and logs are stored and the algorithm name.
fg_json File Name: The name of the fg_json file used for model training in the MaxCompute project.
User Feature Table: Select the table that stores the required user features.
user_id Field: The user_id field of the table specified by the User Feature Table parameter, which is also the primary key of the table.
User Table Partition Field: Select a date (string) field. The field can be displayed in the following formats: yyyymmdd and yyyy-mm-dd. Select one from the drop-down list.
Item Feature Table: Select the table that stores the required item features.
item_id Field: The item_id field of the table specified by the Item Feature Table parameter, which is also the primary key of the table.
Item Table Partition Field: Select a date (string) field. The field can be displayed in the following formats: yyyymmdd and yyyy-mm-dd. Select one from the drop-down list.
Feature Comparison: By default, Yes is selected. If you select No, the detailed features of the model are not displayed.
Recommendation Service Name: Select the name of the recommendation service used for log replay. You can view the name on the Service Management page.
Zip Package: By default, No is selected. This indicates that a ZIP package is not generated. If you want to generate a ZIP package, select Yes and configure the required parameters, including OSS Bucket, Workflow Name, Custom EasyRec Version, Custom EasyRec Package Path, Custom fg_jar Package Name, Feature Priority, and Feature Display Filtering. Then, click Confirm.
Note: Before you create a feature consistency check task, make sure that the user table and the item table store the data of the current day.
2. Run the task and view the results
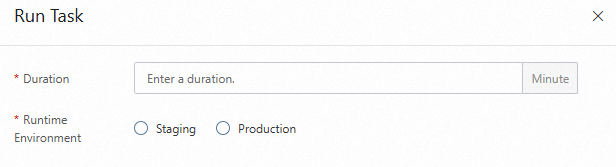
Run the task
On the Consistency Check page, click Run Task in the Actions column of the task. In the panel that appears, configure the Duration and Runtime Environment parameters and click Confirm. Valid values of the Runtime Environment parameter are Staging and Production. Then, you can wait for the task to complete or cancel the task.

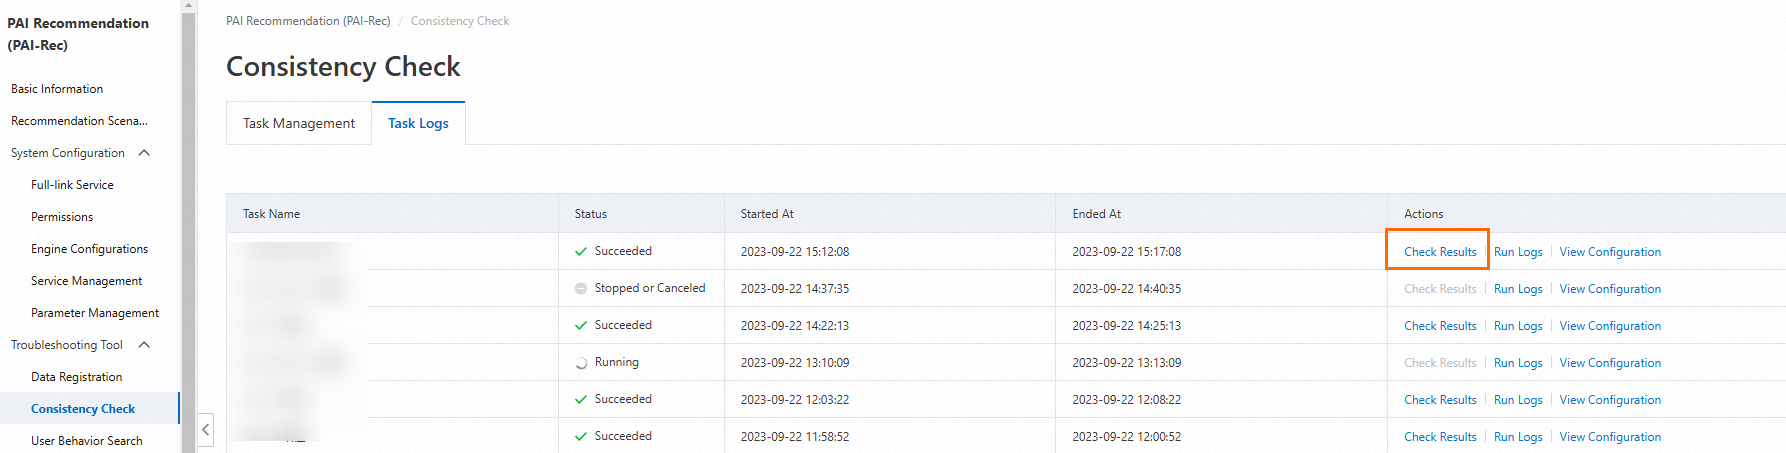
View the results
On the Task Logs tab, view the task running status. In most cases, the actual task execution duration is longer than the specified duration. This occurs because additional time is required for data synchronization and final data analysis.
After the task is executed, click Check Results in the Actions column to view the task results.
The results include the following information: UserId, ItemId, RequestId, and ScoreDiff (sorted in descending order by difference). You can click Feature Comparison in the Actions column to view the differences in features.

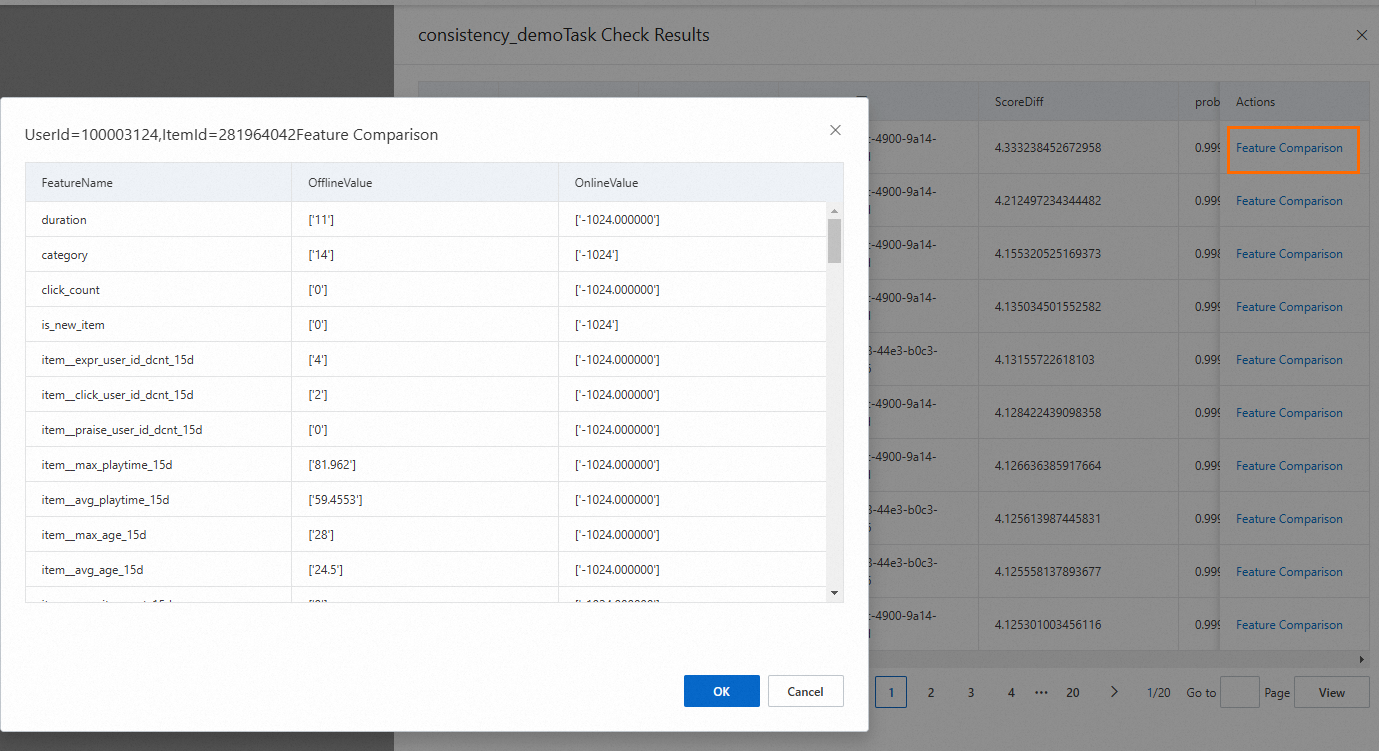
Note: For the item_id filed, if the value in the OnlineValue column is '-1024', it indicates that the valid item ID is not obtained. For fields such as title and author, the values in the OnlineValue column are the default values.
If you confirm that the results of a request ID are normal, you can click the filter icon next to RequestId, select the request ID, and then click OK to filter out the results of the request ID.

3. Import the results
If you configure the parameters in the Advanced Settings section when you create the task, the generated task files are stored in the specified OSS bucket as a ZIP package.
The following section describes how to upload the compressed ZIP package to DataWorks to manually run the task:
Download the compressed ZIP package stored in OSS to your local computer.
Log on to the DataWorks console and click the buttons in sequence as shown in the following figure.
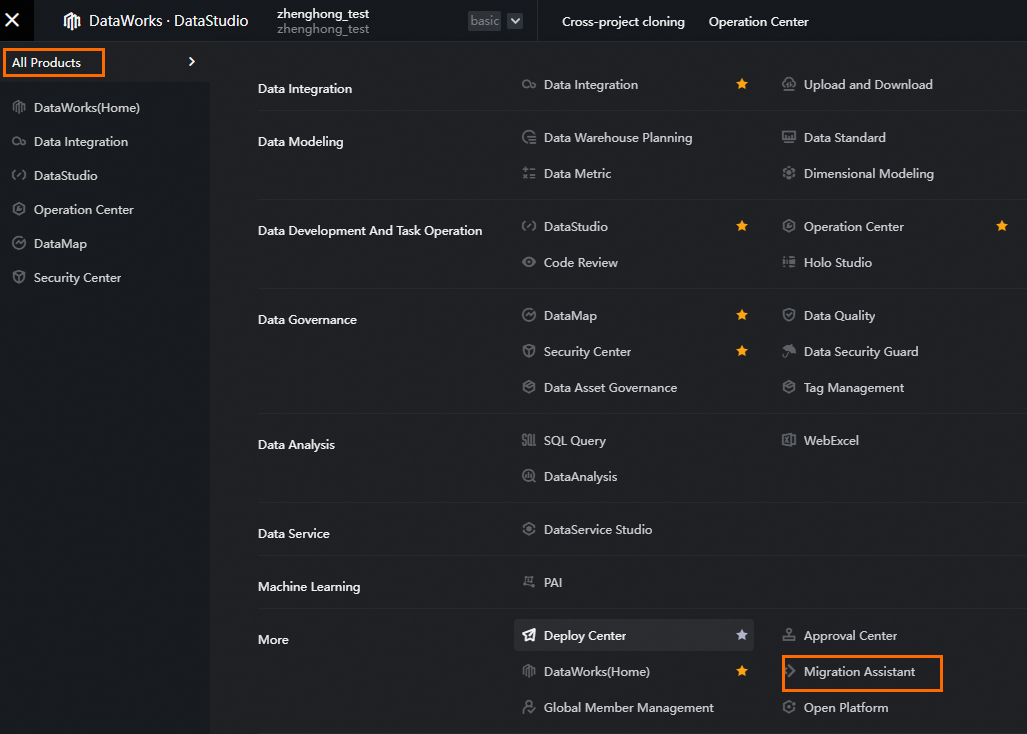
Choose Migration Within DataWorks > DataWorks import.

In the upper-right corner of the page, click Create Import Task.
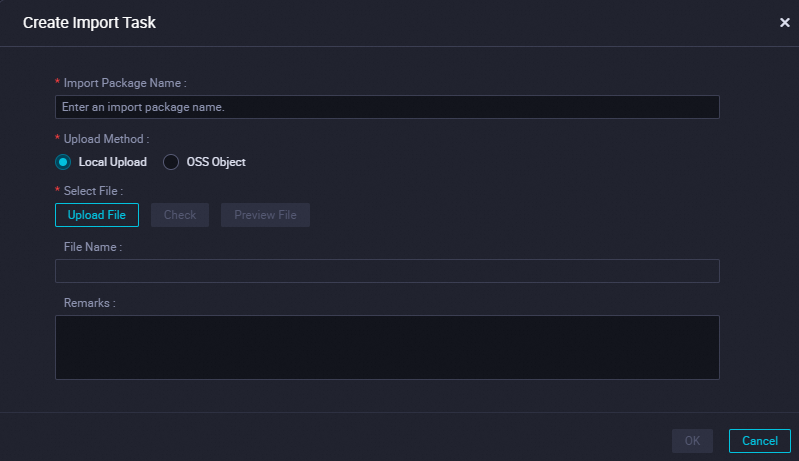
Enter a custom name, click Upload File, upload the ZIP package, and then click OK.
The folder where the task files reside is in the workflow specified by the Workflow Name parameter.