Scenario
MaxCompute is activated, and you are familiar with related operations.
Flowchart
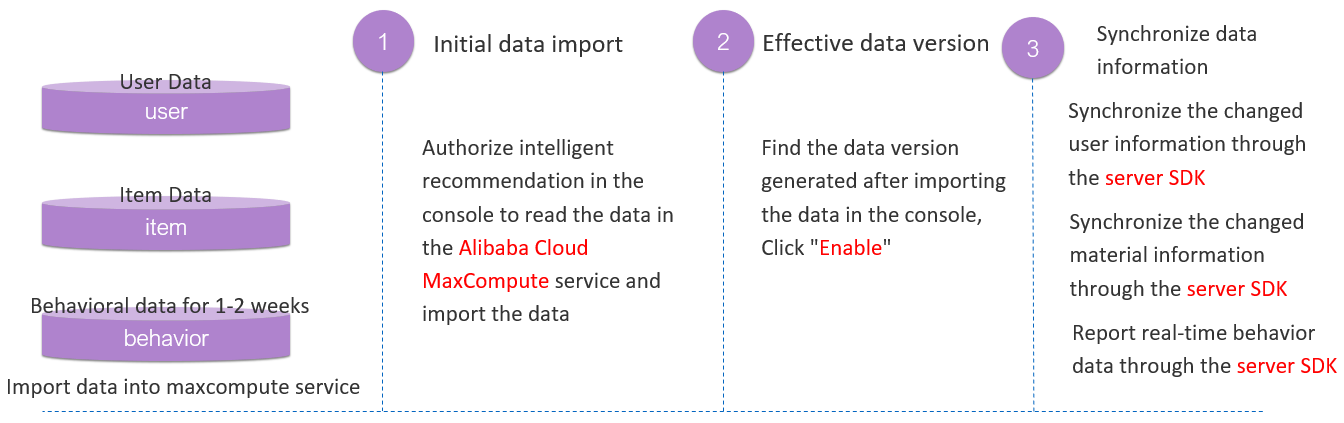
Upload user data, item data, and behavior data
Existing data
Import existing user data and item data into MaxCompute. Import behavior data that was generated within the last one to two weeks into MaxCompute.
When you create a MaxCompute table to store historical data, the values of optional fields can be left empty, but table fields are required. The table needs to contain all fields. For more information about statements used to create a table, see Data specifications.
Incremental data
Use server SDKs to upload incremental user data and item data. Use server SDKs to upload incremental behavior data that is generated in real time.
Use server SDKs
If you use Artificial Intelligence Recommendation (AIRec) SDK for Java, perform the following operations to use server SDKs:
Configure the environment before you use AIRec SDK for Java. For more information, see SDK for Java.
Use AIRec SDK for Java to push data. For more information, see Push data.
Obtain recommendation results. For more information, see Obtain recommendation results.
For more information about how to use server SDKs for other programming languages, see the related topics that are under the node of the same level as the "SDK for Java" topic.
Parameters of tables pushed by server SDKs
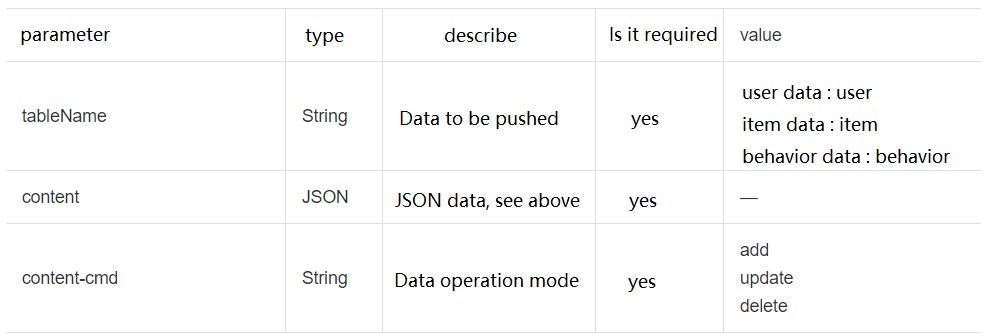
Details about data pushing
Procedure
Import historical data into MaxCompute
This topic takes historical data in the CSV format as an example to describe how to import historical data into MaxCompute. For more information about methods to import historical data into MaxCompute, see MaxCompute documentation.
Use MaxCompute to upload historical data stored in a CSV file
If you need to import historical data in the CSV format, perform the following operations:
Create a MaxCompute project.
You can use MaxCompute to upload historical data stored in a CSV file to start an instance. After you create a project based on MaxCompute documentation, choose + Create > Create Table, and then click Table below MaxCompute.
Enter a name for the table and select the corresponding engine instance if multiple engine instances exist.
After the table is created, select DDL Mode to create the table schema. Note that the table name in the statements must be the same as the table name that you entered in the previous step.
For more information about statements used to create a table, see Data specifications. In this example, the content industry template is used.
Create a table as prompted, right-click the table name, and then click Import Data.
After you import the data in the corresponding dt partition, the historical data that is imported can be used to start an instance.
Use historical data to start an AIRec instance
Select an industry template
Note: After you start an instance, you cannot change the selected industry template.
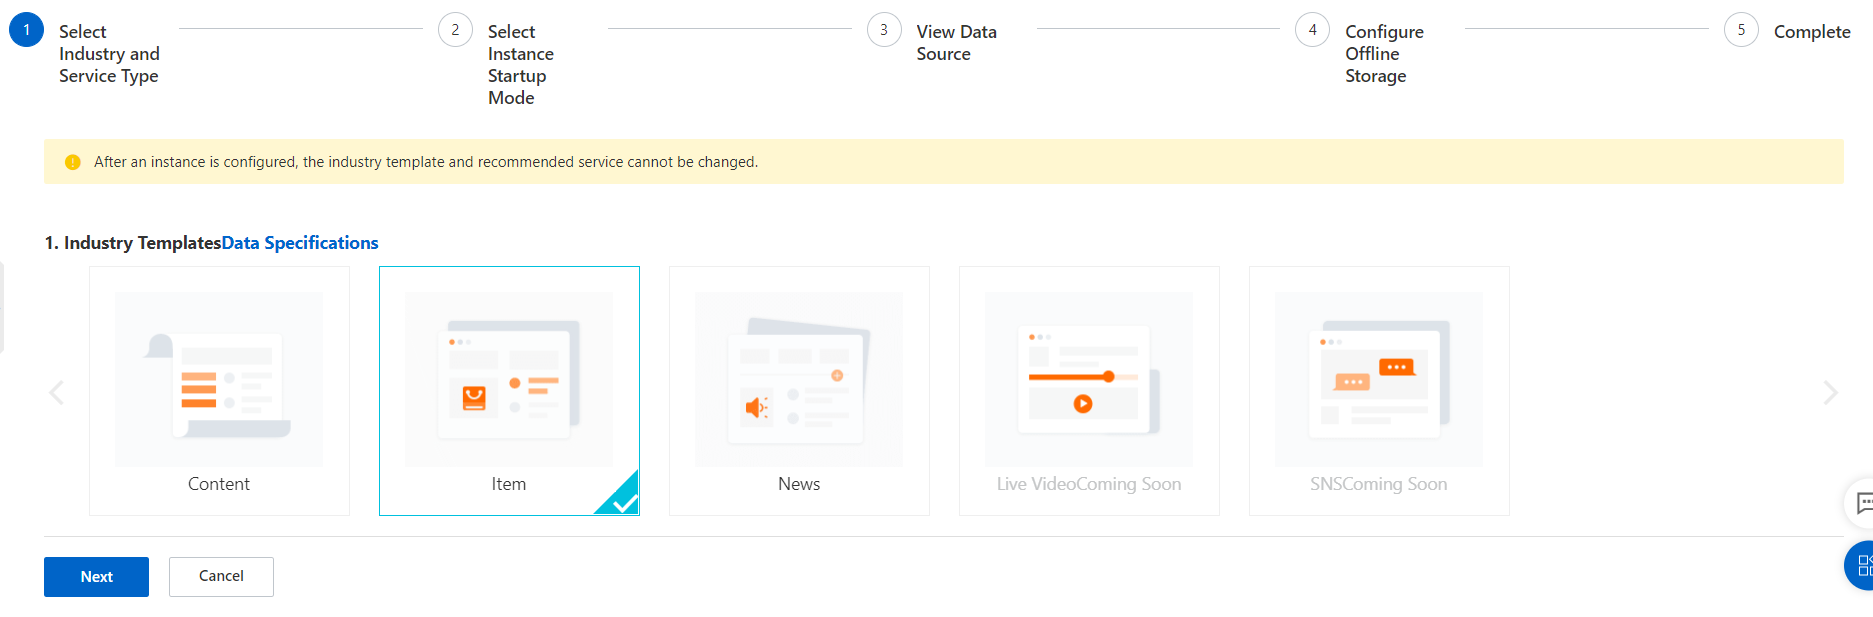
Select a method to start an AIRec instance
In this example, historical data is used to start an AIRec instance. Therefore, select Historical Data-Based Start.
Note: If you use existing data in MaxCompute to start an AIRec instance, you no longer need to maintain data in MaxCompute. You can use server SDKs to upload incremental data.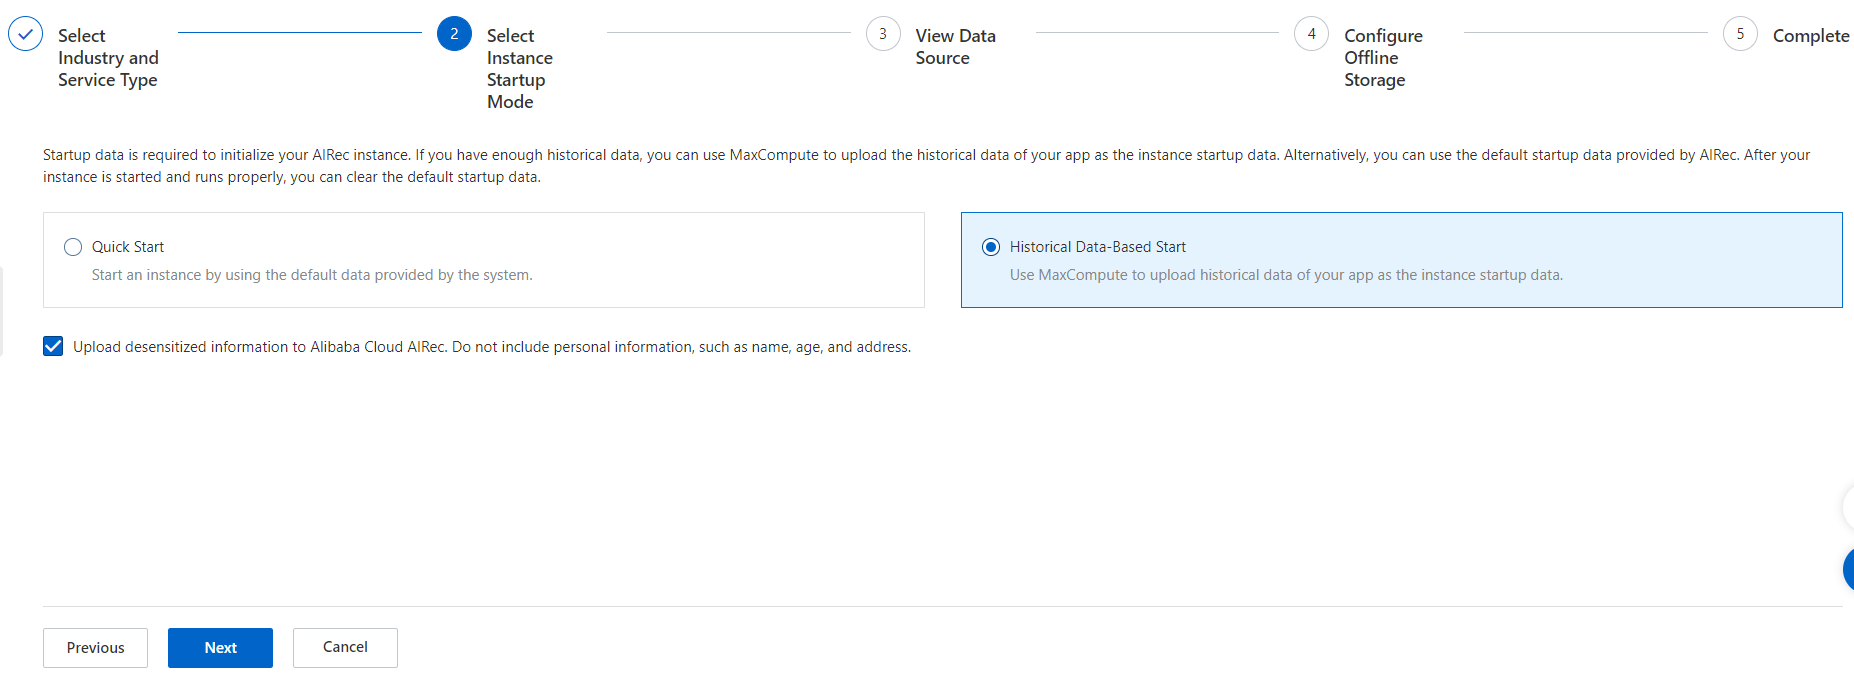
The Experience Startup method shown in the preceding figure is used to test and learn features in the AIRec console. You can directly start an AIRec instance without existing data or without uploading data. If you select Experience Startup, a number of test data records are provided to allow you to view various data metrics directly. However, if you select Historical Data-Based Start, you need to store data in MaxCompute first. Incremental data is uploaded by using server SDKs.
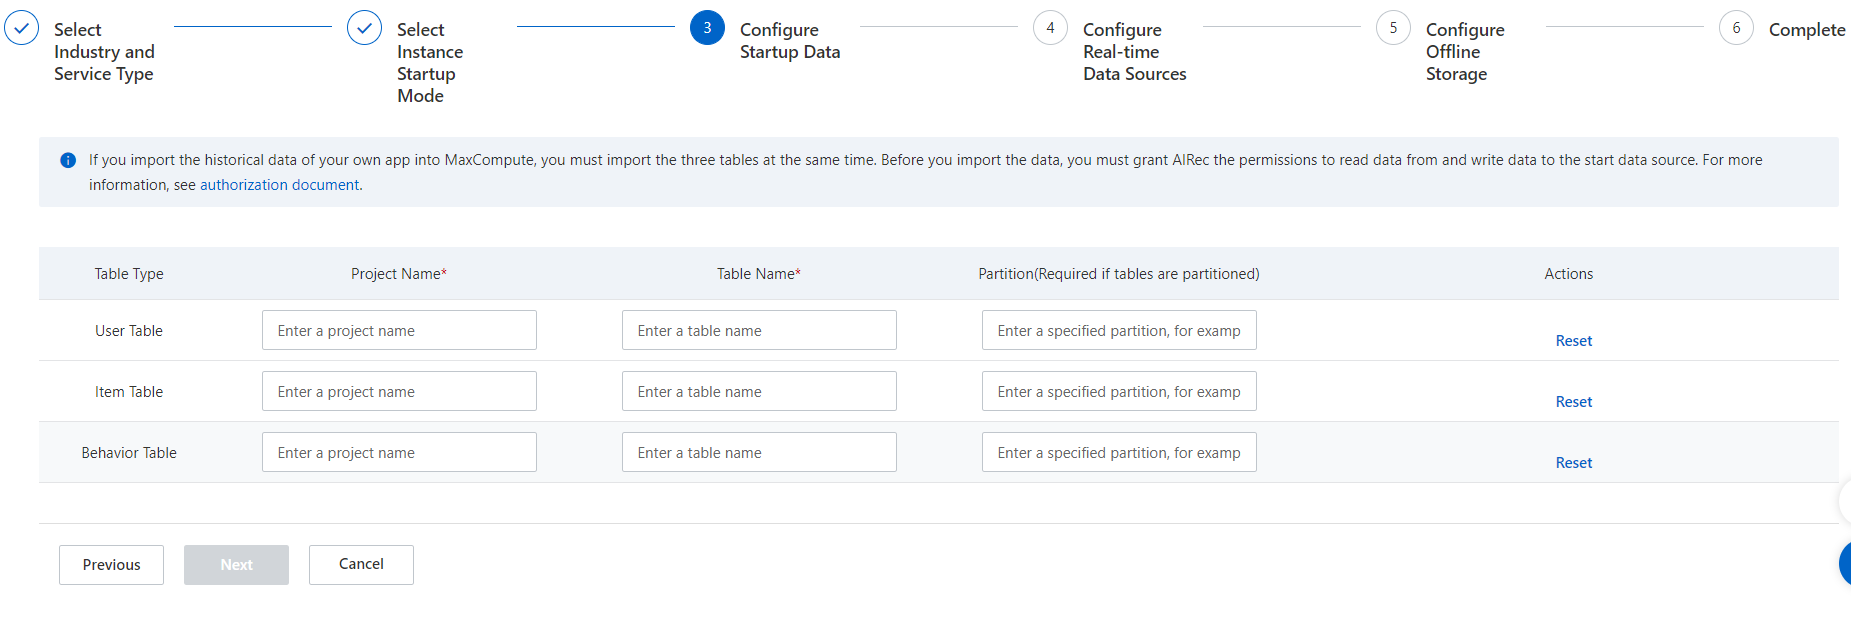
Configure data sources to start an AIRec instance
Note:
1. Before you configure data sources, you must grant read permissions to AIRec in MaxCompute. For more information, see Grant permissions on offline storage to AIRec.
2. You need to mask the information provided to Alibaba Cloud. Do not include personal information, such as your name, age, and address.
3. If you use MaxCompute to upload historical data, you need to import the three tables at the same time. You are not allowed to separately update one of the three tables.
Configure real-time data sources
If you start an AIRec instance by using data in MaxCompute, you can use server SDKs to push the incremental behavior data, item data, and user data. For more information, see Push data.
Click Next.
Configure offline storage
If you enable offline storage, the offline data required for training the AIRec model is stored in MaxCompute that is within your enterprise account. In this case, make sure that the offline data is stable and that you can manage the data.
After you start an instance, you can view the partition information about offline storage tables on the Offline Data Configuration page in the AIRec console.
The name of the offline storage project must be different from the name of the project whose data you used to start the instance.
Before you configure offline data sources, you must grant read and write permissions to AIRec in MaxCompute. For more information, see Grant permissions on offline storage to AIRec.
We recommend that you do not modify or delete the offline storage project, and that you enable auto-renewal for the project to prevent overdue payments.
After you start an instance, you can view the partition information about offline storage tables on the Offline Data Configuration page in the AIRec console.
The current version of AIRec allows you to manage offline data by using the MaxCompute client.
The current version of AIRec supports all the operations in MaxCompute. Proceed with caution if you need to perform high-risk operations. For more information, see MaxCompute documentation.
Note: Do not perform high-risk operations on offline data, for example, add, delete, and rewrite the data. Otherwise, offline data computing performed by AIRec is affected.

After you start an instance, you can view the partition information of offline storage tables on the Offline Data Configuration page in the AIRec console.
Note: If you started an instance before April 14 by using historical data and want to restart the instance, the restart operations are different from the previous start operations. Follow the instructions in this topic to restart the instance.
Start an instance
In the Instance Start Confirmation message, click OK. It takes about one and a half hours to start the instance.
View instance details
After the instance is started, you can view details about the instance.
Note: After the instance is initiated, you need to click Restart Instance if a large volume of the initial data in MaxConpute needs to be updated. In this case, the initial data in MaxCompute takes effect at 00:00 the next day after you restart the instance.
Incremental data
Use server SDKs to upload incremental data. If the instance is frequently restarted, service stability is affected.
For more information about the operations, see "Parameters of tables pushed by server SDKs" and "Details about data pushing" in the preceding content.
Note: You must first push item data and user data, and then push behavior data.
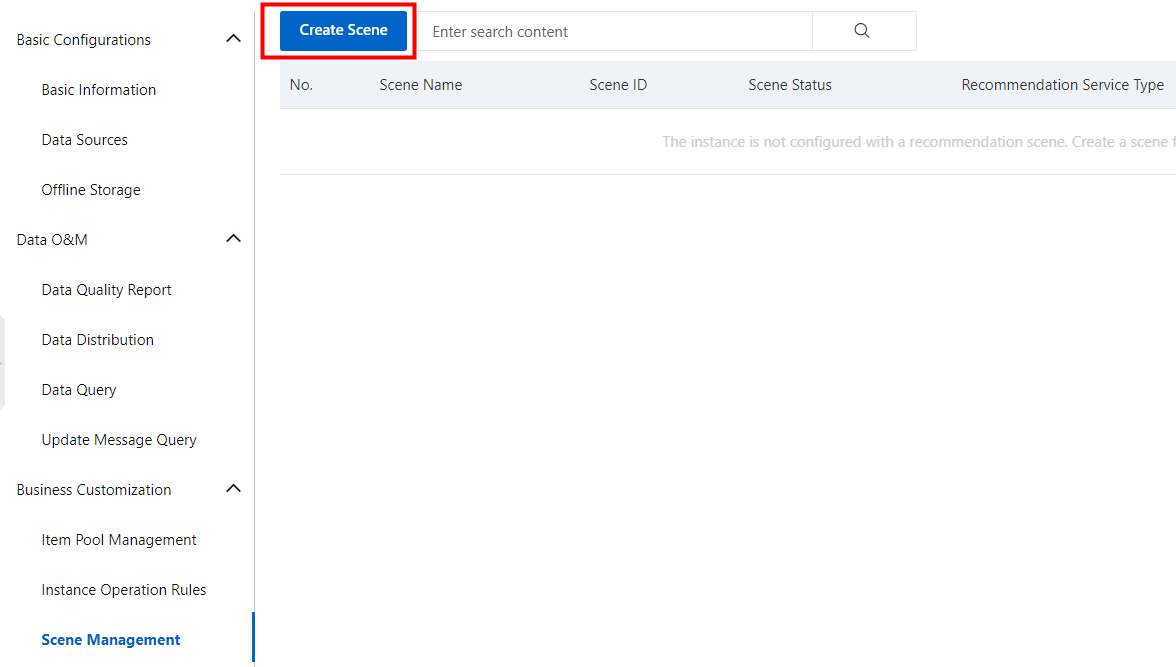
Configure the service type of an AIRec instance
The current version of AIRec allows you to enable the You May Also Like or Related Recommendations feature. On the Scenario Building page in the AIRec console, you can create different scenes to provide different types of services.
Create a scene
In the left-side navigation pane of the AIRec console, click Scenario Building. On the page that appears, click Create Scene.
Select a recommendation service type for the scene
On this page, you can select You May Also Like or Related Recommendations for this scene, specify the scene ID that corresponds to the scene_id parameter in Data specifications, and set other parameters.
List of scenes
After you create a scene, you can view the scene on the Scenario Building page.