Schedule and distribute workloads, applications, and configurations across multiple clusters by enabling ACK One Fleet management.
Prerequisites
Verify the following:
-
An Alibaba Cloud account. RAM users are not supported.
Enable Fleet management
-
Log on to the ACK One console.
-
On the Create Fleet page, configure the Fleet instance.
NoteParameter Description Region The region of the clusters to manage. VPC The VPC for the Fleet instance. vSwitch The vSwitch for the Fleet instance. Resource Group The resource group of the Fleet instance. Labels Key-value pairs attached to the Fleet instance. Keys: required, unique, max 64 characters. Values: optional, max 128 characters. Cannot start with aliyun,acs:,https://, orhttp://. Not case-sensitive. Duplicate keys overwrite existing labels. Exceeding 20 labels invalidates all labels on the resource.SLB instance for API server The SLB instance for the API server. Defaults to Standard I (slb.s2.small) and cannot be changed. Create and associate EIP Specifies whether to expose the API server to the Internet. Disabled by default. If enabled, an EIP is associated with the internal-facing SLB instance, allowing Internet access to the API server. The EIP cannot be disassociated after association because clusters may already connect over the Internet. Enable collection of operation logs and auditing logs Whether to collect operation and audit logs. Enabled by default. -
Click Enable Fleet Management.
-
Wait until the Fleet instance status changes to Running on the Fleet Information page.
Manage Fleet instances
Enabling Fleet management creates a default Fleet instance.
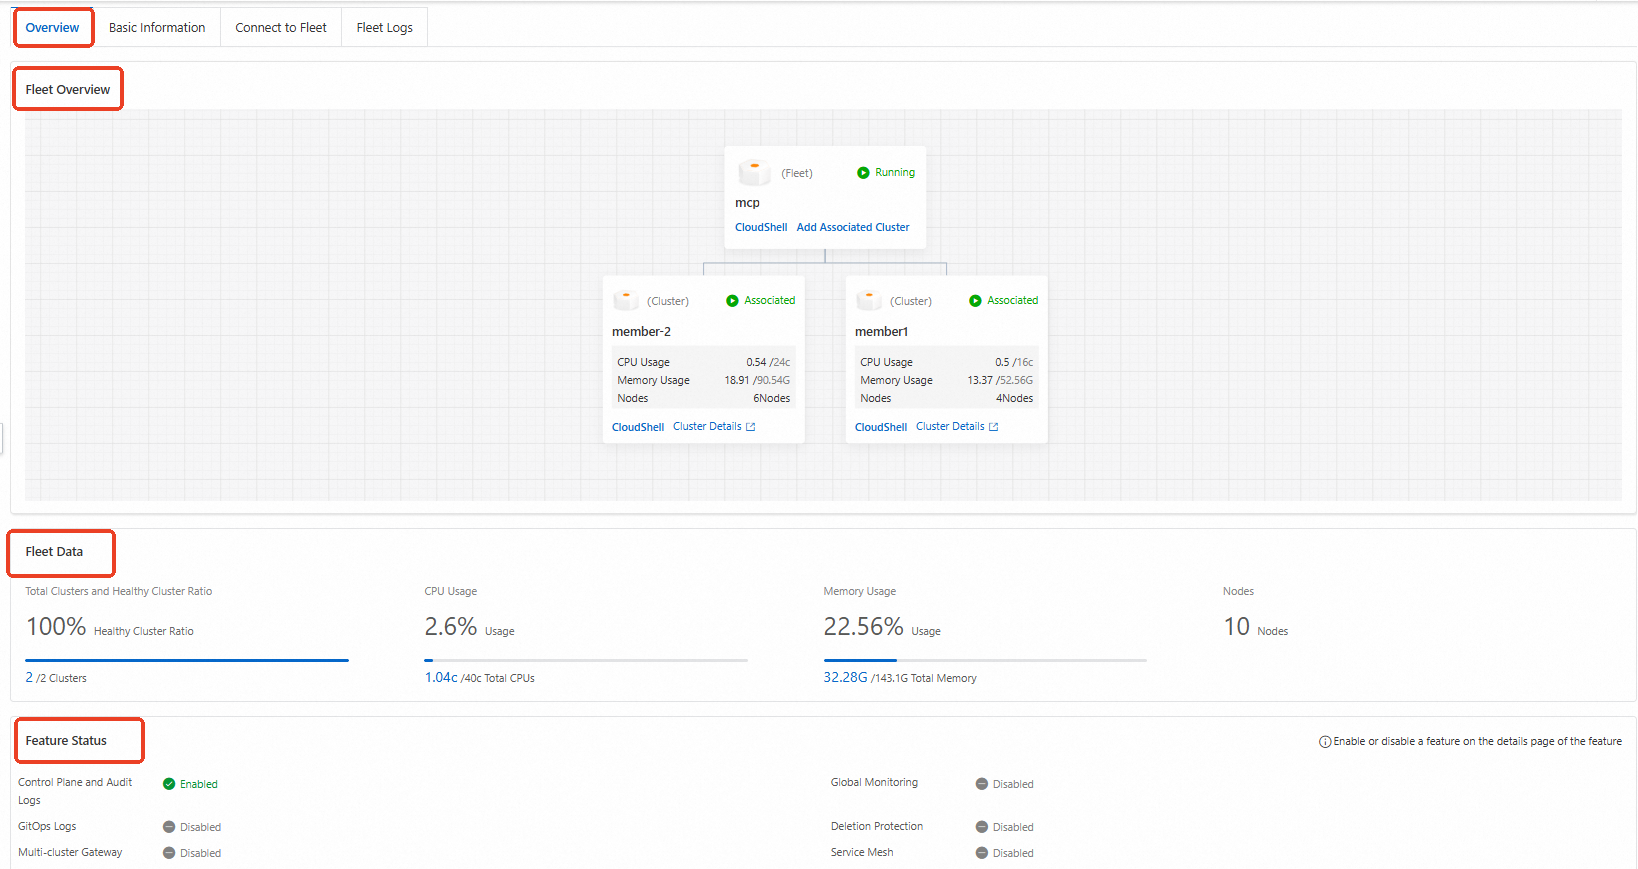
View Fleet instance information
The Fleet Information page provides the following tabs:
| Tab | Information available |
|---|---|
| Overview | Architecture, feature status, cluster health ratio, CPU and memory usage, and node count. |
| Basic Information | Instance ID, region, API server endpoint, and network details. |
| Connect to Fleet | kubeconfig for internal and Internet access. |
| Fleet Logs | Fleet instance logs. |
Create a Fleet instance
To create additional Fleet instances, first request a quota increase from Quota Center.
-
On the Fleet Information page, click Create Fleet.
-
In the Create Fleet panel, set the following parameters:
Parameter Description Fleet Name The Fleet instance name. Region The region of the clusters to manage. VPC The VPC for the Fleet instance. vSwitch The vSwitch for the Fleet instance. Resource Group The resource group of the Fleet instance. Labels Key-value pairs attached to the Fleet instance. Keys: required, unique, max 64 characters. Values: optional, max 128 characters. Cannot start with aliyun,acs:,https://, orhttp://. Not case-sensitive. Duplicate keys overwrite existing labels. Exceeding 20 labels invalidates all labels on the resource.SLB instance for API server Defaults to Standard I (slb.s2.small) and cannot be changed. Create and associate EIP Specifies whether to expose the API server to the Internet. Disabled by default. If enabled, an EIP is associated with the internal-facing SLB instance, allowing Internet access to the API server. The EIP cannot be disassociated after association because clusters may already connect over the Internet. Enable collection of operation logs and auditing logs Whether to collect operation and audit logs. Enabled by default. -
Click Create.
-
Wait until the Fleet instance status changes to Running.
Switch between Fleet instances
On the Fleet Information page, click the expand button next to the Fleet name and select the target instance.

Delete a Fleet instance
Remove all clusters associated with the Fleet instance before deleting it.
On the Fleet Information page, click Delete Fleet.
Connect to a Fleet instance with Cloud Shell
Cloud Shell connects over the Internet only. Ensure the API server is exposed to external access.
-
On the Fleet Information page, click Cloud Shell Managed Fleet. Cloud Shell opens and loads the kubeconfig file for the Fleet instance.
-
List the clusters associated with the Fleet instance:
kubectl amc get managedclusterExpected output:
Name Alias HubAccepted c984b098b377f44b9a48c74fa55cf**** cluster2-beijing true cc36f4feb49824c9d840d9fd9cdf9**** cluster1-beijing true -
To manage clusters with AMC, see Use AMC.