The Instance User Data feature of Auto Scaling provides more flexible scaling options and allows you to scale instances faster. You can use the Instance User Data feature to implement safe and reliable automatic configuration of Elastic Compute Service (ECS) instances. This offloads the burden of manually configuring ECS instances and allows you to focus on your business.
Prerequisites
An Alibaba Cloud account is created. To create an Alibaba Cloud account, go to the account registration page.
Background information
Compared with open-source IT infrastructure management tools such as Terraform, the Instance User Data feature is more efficient and reliable. You need to only prepare a custom instance script, encode the script in the Base64 format, and then pass the Base64-encoded script to an active scaling configuration. When Auto Scaling starts ECS instances based on the scaling configuration, the script is automatically executed, which accelerates the scaling of instances.
- Custom features: You can use the Instance User Data feature to configure a custom instance script to manage instance startups. The custom instance script is automatically executed when Auto Scaling starts instances.
- Data reference: You can use the Instance User Data feature to pass data to instances and reference data on the instances.
Usage notes
- Before you use the Instance User Data feature to automatically configure ECS instances, take note of the following items:
- The scaling group for which you want to enable the Instance User Data feature must reside in a virtual private cloud (VPC).
- The instance user data must be Base64-encoded.
- The instance user data is passed to instances in plaintext. We recommend that you do not pass confidential information such as passwords and private keys as instance user data. If you must pass confidential information, we recommend that you encrypt the confidential information, pass the encrypted information in the Base64 format, and then decrypt the information on the instances.
- When you call an API operation to create a scaling configuration, you can use the UserData parameter to pass instance user data. For more information, see CreateScalingConfiguration.
- In addition to the Instance User Data feature, you can also use Secure Shell (SSH) key pairs, RAM roles, and tags to implement more efficient and convenient management for ECS instances. For more information, see Configure parameters in a scaling configuration to implement automatic deployment.
Step 1: Prepare instance user data
| Item | Description |
|---|---|
| Script format | The script must start with #!. Example: #!/bin/sh. |
| Script size | The size of the script content cannot exceed 16 KB before you encode the script in the Base64 format. |
| Execution frequency | The script is executed only once when ECS instances are started for the first time. |
- Create a custom Shell script to enable the Yellow dog Updater, Modified (YUM) and Network Time Protocol (NTP) services when ECS instances are started. The following code shows a sample Shell script:
#!/bin/sh # Modify yum repo and update rm -rf /etc/yum.repos.d/* touch myrepo.repo echo "[base]" | tee /etc/yum.repos.d/myrepo.repo echo "name=myrepo" | tee -a /etc/yum.repos.d/myrepo.repo echo "baseurl=http://mirror.centos.org/centos" | tee -a /etc/yum.repos.d/myrepo.repo echo "gpgcheck=0" | tee -a /etc/yum.repos.d/myrepo.repo echo "enabled=1" | tee -a /etc/yum.repos.d/myrepo.repo yum update -y # Modify NTP Server echo "server ntp1.aliyun.com" | tee /etc/ntp.conf systemctl restart ntpd.service - Encode the Shell script in the Base64 format. The following code shows the results of Base64 encoding:
IyEvYmluL3NoCiMgTW9kaWZ5IHl1bSByZXBvIGFuZCB1cGRhdGUKcm0gLXJmIC9ldGMveXVtLnJlcG9zLmQvKgp0b3VjaCBteXJlcG8ucmVwbwplY2hvICJbYmFzZV0iIHwgdGVlIC9ldGMveXVtLnJlcG9zLmQvbXlyZXBvLnJlcG8KZWNobyAibmFtZT1teXJlcG8iIHwgdGVlIC1hIC9ldGMveXVtLnJlcG9zLmQvbXlyZXBvLnJlcG8KZWNobyAiYmFzZXVybD1odHRwOi8vbWlycm9yLmNlbnRvcy5vcmcvY2VudG9zIiB8IHRlZSAtYSAvZXRjL3l1bS5yZXBvcy5kL215cmVwby5yZXBvCmVjaG8gImdwZ2NoZWNrPTAiIHwgdGVlIC1hIC9ldGMveXVtLnJlcG9zLmQvbXlyZXBvLnJlcG8KZWNobyAiZW5hYmxlZD0xIiB8IHRlZSAtYSAvZXRjL3l1bS5yZXBvcy5kL215cmVwby5yZXBvCnl1bSB1cGRhdGUgLXkKIyBNb2RpZnkgTlRQIFNlcnZlcgplY2hvICJzZXJ2ZXIgbnRwMS5hbGl5dW4uY29tIiB8IHRlZSAvZXRjL250cC5jb25mCnN5c3RlbWN0bCByZXN0YXJ0IG50cGQuc2VydmljZQ==
Step 2: Create and enable a scaling group
- Create a scaling group. After you create the scaling group, you can view the scaling group details. For more information, see Manage scaling groups.The following table describes the parameters that you must configure when you create a scaling group.
Parameter Description Minimum Number of Instances In this example, set the value to 1. In this case, Auto Scaling creates one ECS instance when you enable the scaling group. Instance Configuration Source In this example, set the value to Create from Scratch. Network Type In this example, select VPC. VPC Select an existing VPC. vSwitch Select a vSwitch that resides in the specified VPC. After you create a scaling group, the scaling group is displayed on the Scaling Groups page and stays in the Disabled state. You can click Details in the Actions column to view the details of the scaling group. - Create and enable a scaling configuration. For more information, see Create scaling configurations for scaling groups that contain ECS instances.The following table describes the parameters that you must configure when you create a scaling configuration.
Parameter Description Basic Configurations Image In this example, select CentOS 7.9 64 below Public Images. System Configurations Logon Credentials In this example, select Key Pair. Key Pair Select an existing key pair. For information about how to create a key pair, see Create an SSH key pair. Pass the script that is prepared in Step 1: Prepare instance user data. - Enable the scaling group. For more information, see Enable a scaling group.
Step 3: Verify the effect of the Instance User Data feature
In Step 2, the Minimum Number of Instances parameter of the scaling group is set to 1. After you enable the scaling group, Auto Scaling creates one ECS instance in the scaling group to ensure that the minimum number of instances is reached.
- Check the scaling activity. For more information, see View the details of a scaling activity. In this example, one ECS instance is created during the scaling activity.
- Log on to the ECS instance. To verify the effect of the Instance User Data feature, you must log on to the ECS instance. For Linux instances, we recommend that you use a key pair. For more information, see Create an SSH key pair and Connect to a Linux instance by using an SSH key pair.Note If you configured a logon password for or associated a key pair with the ECS instance, you can use Workbench to log on to the ECS instance. For more information, see Connect to a Linux instance by using a password or key.
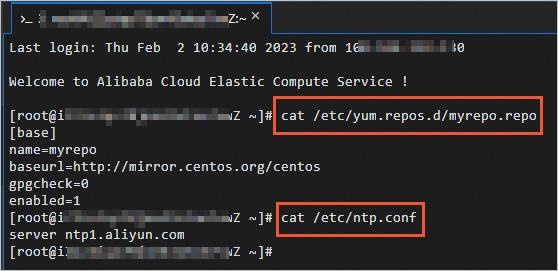
- Check the service status. The following figure shows that the YUM and NTP services are enabled. This proves that the Instance User Data feature configured in the scaling configuration has taken effect.