After a device is connected to IoT Platform, the device submits data to IoT Platform. Then, the data can be forwarded to your server by using Advanced Message Queuing Protocol (AMQP). This topic describes how to configure an AMQP server-side subscription. This way, your server can receive data from a street lamp by using an AMQP client.
Background information
The following figure shows how to configure an AMQP server-side subscription to obtain device messages. For more information, see Configure an AMQP server-side subscription and Connect an AMQP client to IoT Platform. 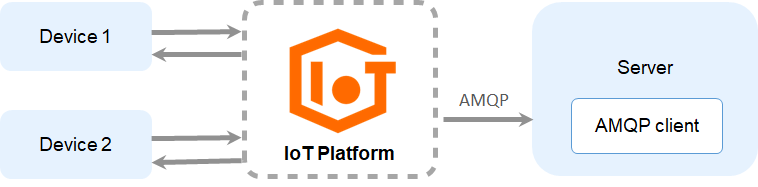
Procedure
Log on to the IoT Platform console.
On the Overview tab, click Public Instance.
ImportantIf IoT Platform is activated in the China (Shanghai), Singapore, Japan (Tokyo), or US (Virginia) region, perform this step. If IoT Platform is activated in other regions, skip this step.
Configure a consumer group to consume messages. Your server can listen to the consumer group to obtain device messages.
In the left-side navigation pane, choose . On the Server-side Subscription page, click Consumer Groups.
On the Consumer Groups tab, click Create Consumer Group.
In the Create Consumer Group dialog box, set the Consumer Group Name parameter to StreetLampConsumerGroup and click OK.
Configure a server-side subscription for the product to which the street lamp device belongs. This way, your server can subscribe to various types of messages of the product.
In the left-side navigation pane, choose .
On the Subscriptions tab of the Server-side Subscription page, click Create Subscription.
In the Create Subscription dialog box, configure the parameters and click OK. The following table describes the parameters.
Parameter
Description
Product
Select StreetLamp.
Subscription Type
Select AMQP.
Consumer Group
Select the StreetLampConsumerGroup consumer group that is created in the previous step.
Message Type
Select Device Upstream Notification.
Connect the AMQP client to IoT Platform.
In this example, Java is used for development. We recommend that you use the Apache Qpid JMS client. To download the client and view the instructions, see Qpid JMS 0.57.0.
In this example, the development environment consists of the following components:
Operating system: Windows 10 (64-bit)
Java Development Kit (JDK): JDK 8
Integrated development environment (IDE): IntelliJ IDEA Community Edition
To connect the AMQP client to IoT Platform, perform the following steps:
Download the demo package and decompress it.
Open IntelliJ IDEA and import the sample project amqp-demo in the demo package.
In the AmqpClient.java file that is stored in the src/main/java/com.aliyun.iotx.demo directory, configure the required parameters to connect the JMS client to IoT Platform. The following table describes the parameters.
Parameter
Example
Description
accessKey
LTAI****************
Log on to the IoT Platform console, move the pointer over the profile picture, and then click AccessKey Management to obtain the AccessKey ID and AccessKey secret.
NoteIf you use a RAM user, you must attach the AliyunIOTFullAccess permission policy to the user. The policy allows the user to manage IoT Platform resources. If you do not attach the policy to the user, the connection to IoT Platform fails. For more information about how to grant permissions on a RAM user, see RAM user access.
accessSecret
yourAccessKeySecret
consumerGroupId
VWhGZ2QnP7kxWpeSSjt******
The ID of the consumer group that is created in Step 3. To obtain the ID, perform the following steps: Go to the Public Instance page of the IoT Platform console. Choose . On the Server-side Subscription page, click Consumer Groups. The Consumer Groups tab displays the ID.
iotInstanceId
Public instance of the new version: iot-w3***
Public instance of the old version: ""
The ID of the instance.
If you use a public instance of the new version, you can obtain the instance ID on the Overview page. Find the public instance and view the ID.
If you use a public instance of the old version, leave this parameter empty.
For more information, see Overview.
clientId
12345
The ID of the client. You must specify a custom ID. The ID must be 1 to 64 characters in length. We recommend that you use a unique identifier as the client ID, such as the UUID, MAC address, or IP address of the server on which the client runs.
After the AMQP client is connected to IoT Platform and started, perform the following steps to view the details of the client: Log on to the IoT Platform console and click the card of the instance that you want to manage. In the left-side navigation pane, choose . On the Consumer Groups tab, find the consumer group that you want to manage and click View in the Actions column. The ID of each client is displayed on the Consumer Group Status tab. You can use client IDs to identify clients with ease.
connectionCount
4
The number of connections that are enabled on the AMQP client. Maximum value: 128. This parameter is used for scale-out in real-time message pushing scenarios.
On the Consumer Group Details page, each connected client is displayed as
${clientId}+"-"+ Number. The minimum number is 0.host
Public instance of the new version: iot-***.amqp.iothub.aliyuncs.com
Public instance of the old version: 198426864******.iot-amqp.cn-shanghai.aliyuncs.com
The AMQP endpoint.
If you use a Java, .NET, Python 2.7, Node.js, or Go client, the port number is 5671.
If you use a Python 3 or PHP client, the port number is 61614.
For more information, see View the endpoint of an instance.
After you run the sample code, the following log data is returned. The data indicates that the AMQP client is connected to IoT Platform and can receive messages.
NoteIn this example, the
Thread.sleep(60 * 1000);code snippet is added to terminate the program after the program starts and runs for 1 minute. You can specify the running time based on your business requirements.