This topic describes the overdue payment warning and service suspension policies of MaxCompute.
If you have an overdue payment, the system sends you a notification. You must renew your subscription service at the earliest opportunity to prevent service suspension.
Overdue payment warning and service suspension policies
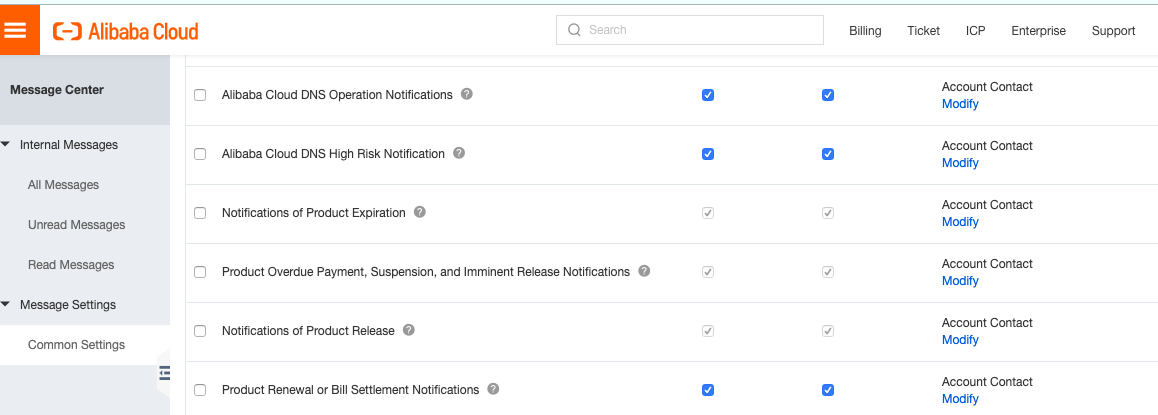
The following table describes the overdue payment warning and service suspension policies of MaxCompute.
Billing method | Overdue payment warning and service suspension policy |
Subscription | If you do not renew your MaxCompute service after it expires, your MaxCompute service is immediately suspended and then released on the 15th day after the service is suspended. If the service is released, data of all MaxCompute projects will be lost and cannot be recovered. During the first 15 days, you cannot use MaxCompute to develop data. |
Pay-as-you-go |
|
If the following error is returned when you run a computing job, MaxCompute is suspended or has overdue payments.
ODPS-0420095: Access Denied - Authorization Failed [4093], You have NO privilege to do the restricted operation on {acs:odps:*:projects/project_name}. Access Mode is AllDenied.Configure the notification methods of alerts for overdue payments
By default, the system notifies you of overdue payments by sending short messages or emails to the mobile phone or email address that is bound to your Alibaba Cloud account. To have these notifications sent to a Resource Access Management (RAM) user, perform the following steps on the Message Center page of your Alibaba Cloud account. To configure the notification methods of alerts, perform the following steps:
Go to the Message Center page.
In the left-side navigation pane, click Common Settings.
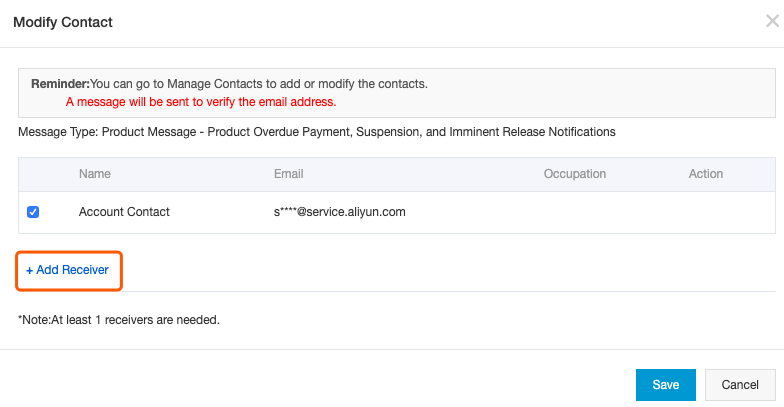
On the Common Settings page, select Product Overdue Payment, Suspension, and Imminent Release Notifications, and click Modify in the Account Contact column.
In the Modify Contact dialog box, modify the contact to whom you want to send the notification.
After you modify the contact, the notifications for overdue payments, service suspensions, and the imminent release of all Alibaba Cloud services within the account are sent to this contact.
Add an existing user as the message recipient: Select the user you want to add as a message recipient and click Save.
Add a new user as the message recipient.
Click Add Receiver.
Specify Name and Email, and click OK.
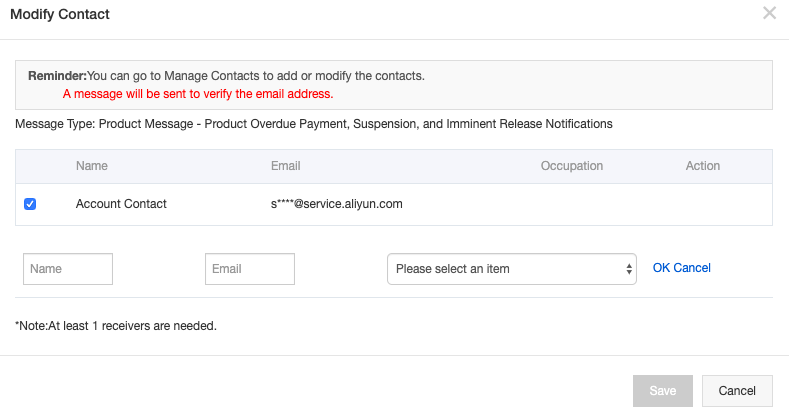
Select the newly added user and click Save.