This topic describes how to enable the secondary Domain Name System (DNS) feature of Alibaba Cloud DNS.
Limits
The secondary DNS feature is available only for users of Alibaba Cloud DNS Enterprise Ultimate Edition. If you want to purchase Alibaba Cloud DNS of this edition, click here.
If the secondary DNS feature is enabled for a domain name, Domain Name System Security Extensions (DNSSEC) cannot be enabled for the domain name.
After you enable the secondary DNS feature for a domain name, Alibaba Cloud DNS server works as the secondary DNS server, and your original DNS server works as the primary DNS server.
After you enable the secondary DNS feature for a domain name, you cannot modify the DNS records of the domain name in the Alibaba Cloud DNS console. You must synchronize DNS records from the primary DNS server to update the DNS records in Alibaba Cloud DNS.
The secondary DNS feature is available only for self-managed DNS servers and the DNS servers that are hosted by third-party DNS service providers. If you use a DNS server that is hosted by a third-party DNS service provider, make sure that the third-party DNS service provider also supports the secondary DNS feature.
If you use a self-managed DNS server, make sure that the DNS server supports the zone transfer (XFR) and NOTIFY mechanisms of Requests for Comments (RFCs). We recommend that you use a Berkeley Internet Name Domain (BIND) version later than 9.1.0 because such a version has high compatibility with the secondary DNS feature of Alibaba Cloud DNS.
Step 1: Make preparations
Before you enable the secondary DNS feature in Alibaba Cloud DNS, you must complete specific configurations for the primary DNS server. The following section uses a self-managed DNS server of BIND 9.9.4 or later as an example to describe how to perform configurations for the primary DNS server. The actual procedure varies based on the DNS server type.
1. Generate a TSIG key
You can run the following dnssec-keygen command to generate a file that contains information about a transaction signature (TSIG) key:
dnssec-keygen -a HMAC-SHA256 -b 128 -n HOST test_key
If no key file is generated long after the command is run, you can use the following command that contains the -r /dev/urandom parameter:
dnssec-keygen -a HMAC-SHA256 -b 128 -n HOST -r /dev/urandom test_key
Parameter description
• -a: the encryption algorithm to use. Valid values: HMAC-MD5, HMAC-SHA1, and HMAC-SHA256.
• -b: the number of bytes in the key. The key size allowed is determined by the encryption algorithm. A Hash-based Message Authentication Code (HMAC) key can contain 1 to 512 bytes in length.
• -n: the owner type of the key. Valid values: ZONE, HOST, ENTITY, and USER. The values HOST and ZONE are used in most cases.
• test_key: the name of the key file. This parameter is equivalent to the allow-transfer parameter in the primary DNS configurations in BIND and the TSIG Key Name parameter in Primary DNS Information in the Alibaba Cloud DNS console.
• -r /dev/urandom: the random number generator.
After the command is run, a .key file and a .private file are generated in the current directory. Example: Ktest_key.+157+64252.key and Ktest_key.+157+64252.private. The .key file contains a DNS key record, which is used to set the TSIG Key Value parameter in Primary DNS Information in the Alibaba Cloud DNS console. The .private file contains the fields that are specified by the encryption algorithm.
2. Use BIND to configure the primary DNS server
Add the following code to the /etc/named.conf configuration file:
zone "The domain name such as xxx.com" IN {
type master;
allow-update { 127.0.0.1; };
allow-transfer {key test_key;};
notify explicit;
also-notify {47.92.XX.XX port 53  key test_key;47.92.XX.XXX port 53  key test_key;};
file "zone_file";
};
Parameter description
zone: the domain name for which you want to enable the secondary DNS feature.
allow-transfer: the name of the TSIG key that is used to enable communication between the primary and secondary DNS servers.
Note: We recommend that you use TSIG to ensure the security of communication between DNS servers, based on RFCs. Typically, TSIG uses shared keys and one-way hashing to authenticate the communication between DNS servers. This ensures that data can be securely synchronized between the primary and secondary DNS servers. You can generate a TSIG key that is encrypted by using the HMAC-MD5, HMAC-SHA256, or HMAC-SHA1 algorithm and then specify the key in the configurations of your primary and secondary DNS servers. For more information, see the Generate a TSIG key step.
also-notify: the IP address of the secondary DNS server to receive notifications when the zone of your domain name changes. You can specify multiple IP addresses. In this example, set this parameter to the IP addresses of secondary DNS servers of Alibaba Cloud DNS. For more information about the IP addresses, see the secondary DNS configuration page in the Alibaba Cloud DNS console.
DNS server name:
IP addresses: 47.92.XX.XX,47.92.XX.XXX test_key: the name of the key file. This parameter is equivalent to the allow-transfer parameter in the primary DNS configurations in BIND and the TSIG Key Name parameter in Primary DNS Information in the Alibaba Cloud DNS console.
3. Add the generated key to the named.conf file by using one of the following ways
Directly add the key in the required format
key "test_key" { algorithm hmac-sha256; secret " The encrypted string in the generated .key file.";};
Run the include command
You can run the include command to add the key to the named.conf file. Sample command:
include "/etc/named/dns-key";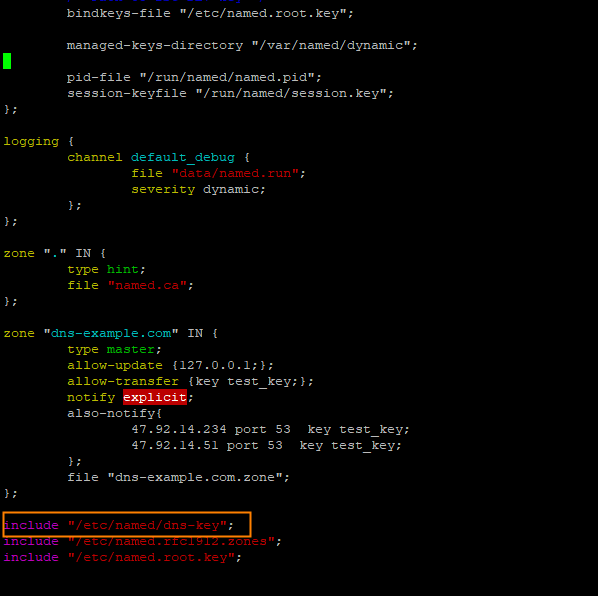 The content of the /etc/named/dns-key file is in the following format:
key "test_key" {
        algorithm hmac-sha256;
        secret "The encrypted string in the generated .key file.";
};Note: After you modify the configurations in the named.conf file, you need to run the following command to restart your application:
systemctl restart named
Step 2: Perform the required configurations
1. Configure the secondary DNS feature
a. Log on to the Alibaba Cloud DNS console.
b. In the left-side navigation pane, click Secondary DNS. On the page that appears, click Enable Secondary DNS.
c. Click Add Secondary DNS. In the Add Secondary DNS panel, specify the domain name for which you want to enable the secondary DNS feature and click OK.
d. On the Add Secondary DNS page, complete settings in the Add Primary DNS Information and Add Server IP Address of Notification Sender sections, specify whether to receive notifications on failures, and then click OK.

Primary DNS Servers section: Click Add in the upper-right corner of this section. Then, add a record for the primary DNS server.

IP Address: the IP address of primary DNS server. Make sure that the address can be accessed over Internet.
TSIG Key Type: the name of the generated TSIG key. Valid values: SHA1, SHA256, and MD5.
TSIG Key Name: the name of the generated TSIG key. In this example, enter test_key.
TSIG Key Value: the value of the generated TSIG key. In this example, enter the encrypted string of TSIG key file.key.
Add Server IP Address of Notification Sender section: Click Add in the upper-right corner of this section. Then, specify the IP address or CIDR block that is used to receive notifications on the changes of the primary DNS server.

IP address: the IP address of the server that is used to send notifications when the DNS records of the primary DNS server are changed based on the standard Notify Protocol. Make sure that the IP address can be connected to prevent notifications from being blocked.
Setting of whether to receive notifications on failures: If you select the check box, Alibaba Cloud DNS sends text messages to you once the communication between the primary and secondary DNS servers is interrupted. Click OK.

e. Check whether the domain name appears on the Secondary DNS page. If the domain name appears on the Secondary DNS page, the secondary DNS feature is enabled and configured for the domain name.
If the value displayed in the Connection Status column is Connected for the domain name, the secondary DNS server is connected to the primary DNS server.
If the value displayed in the Connection Status column is Disconnected for the domain name, the secondary DNS server is disconnected from the primary DNS server. When this issue occurs, check the following items:
- Whether the parameter settings for the secondary DNS feature are valid and whether the specified IP address or CIDR block of the primary DNS server is accessible over the Internet.
- Whether the primary DNS server works properly.
- Whether the configuration file of the primary DNS server complies with the RFCs. For example, check whether the sequence number of the Start of Authority (SOA) record involved is within the range of [1, 2^32-1]. If the sequence number of the SOA record of the primary DNS server is beyond this range, the resource records of the primary DNS server are not synchronized to the secondary DNS server. For more information, see Synchronization errors.
f. Manually trigger the synchronization between the primary and secondary DNS servers without using the NOTIFY mechanism. This operation is available only if the secondary DNS feature is enabled for your domain name and the secondary DNS server is connected to the primary DNS server. To do so, go to the Domain Name Resolution page, click the domain name, and then click Configure Synchronization on the DNS Settings page.
2. Add DNS records for your domain name
After you enable the secondary DNS feature, use one of the following three methods to add DNS records:
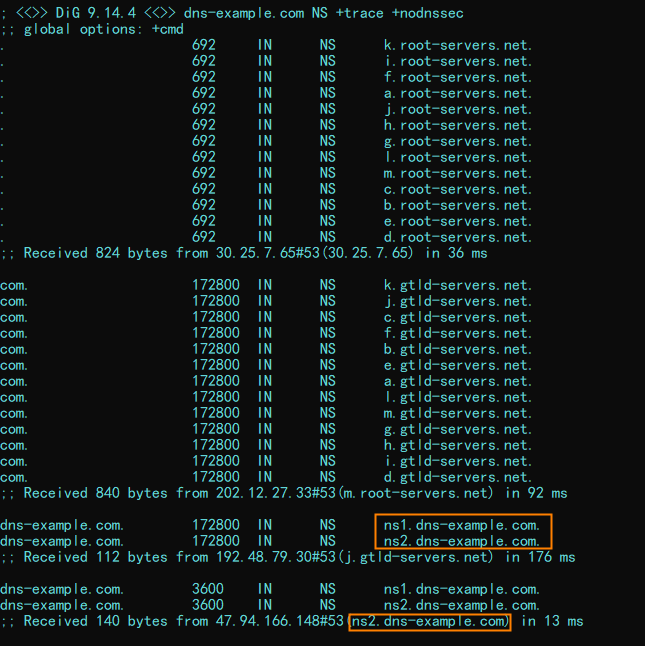
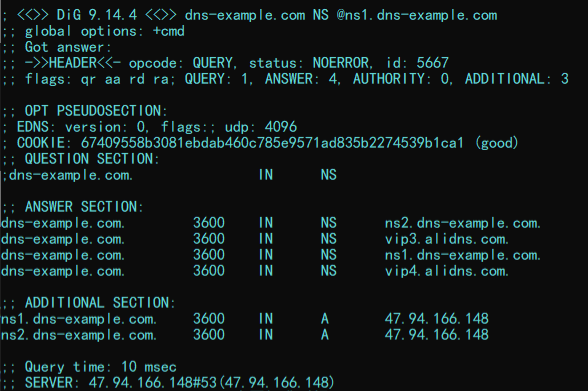
(1) Configure only the primary DNS server
Specify that the primary DNS server is used for domain name resolution and that the secondary DNS server is used for real-time data backup.
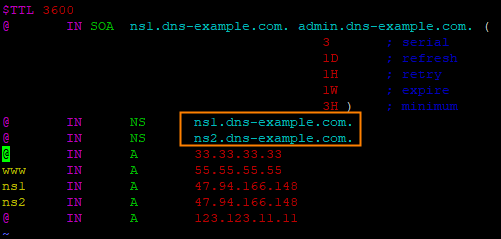
In this example, add the name server (NS) records shown in the following figure for a domain name whose Hostname is @:
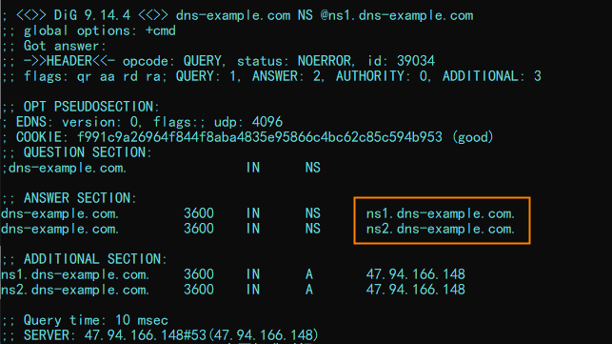
Run the dig dns-example.com NS @ns1.dns-example.com command to query the authoritative resolution results. Sample results:
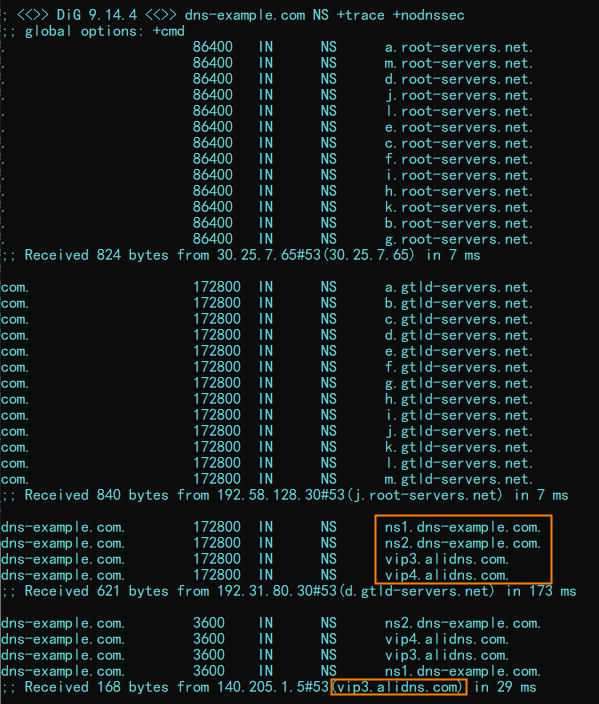
Run the dig dns-example.com NS +trace +nodnssec command to query the recursive resolution results. Sample results:
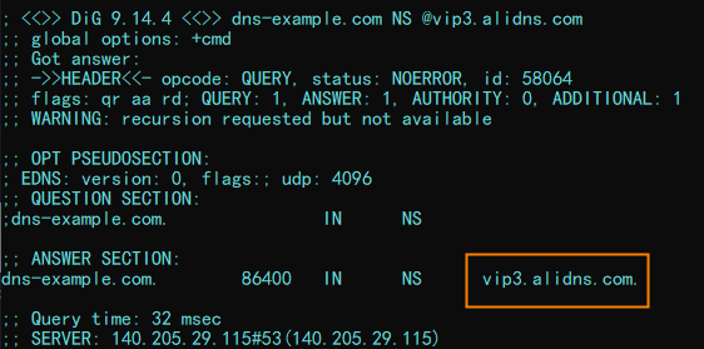
(2) Configure only the secondary DNS server
Specify that the secondary DNS server, which indicates Alibaba Cloud DNS, is used for domain name resolution. This method helps ensure the security of the primary DNS server.
In this example, add the NS records shown in the following figure for the root domain name whose Hostname is @:

Run the dig dns-example.com NS @vip3.alidns.com command to query the authoritative resolution results. Sample results:
Run the dig dns-example.com NS +trace +nodnssec command to query the recursive resolution results. Sample results:
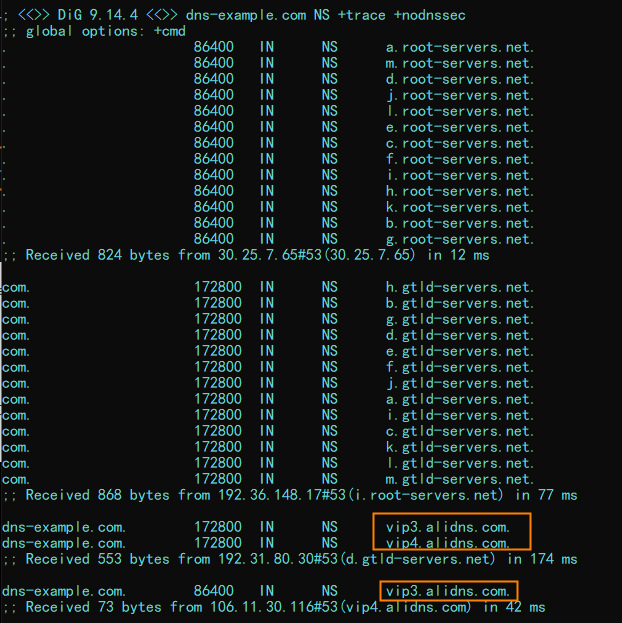
(3) Configure both the primary and secondary DNS servers
Specify that the on-premises DNS server sends resolution requests to a set of authoritative DNS servers by using a specific algorithm, and the authoritative DNS servers provide resolution services.
In this example, add the NS records shown in the following figure for the root domain name whose Hostname is @:

Run the dig dns-example.com NS @ns1.dns-example.com command to query the authoritative resolution results. Sample results:
Run the dig dns-example.com NS +trace +nodnssec command to query the recursive resolution results. Sample results: