This topic describes how to connect an ECS-hosted self-managed database to Database Autonomy Service (DAS).
Prerequisites
DAS supports the following database engines for ECS-hosted self-managed databases:
MySQL 5.6 and later
PostgreSQL 9.0 and later
MongoDB 3.2 and later
Redis 2.8 and later
The ECS instance that hosts your database and DAS must belong to the same Alibaba Cloud account.
Connection types
DAS supports three connection types for ECS-hosted self-managed databases:
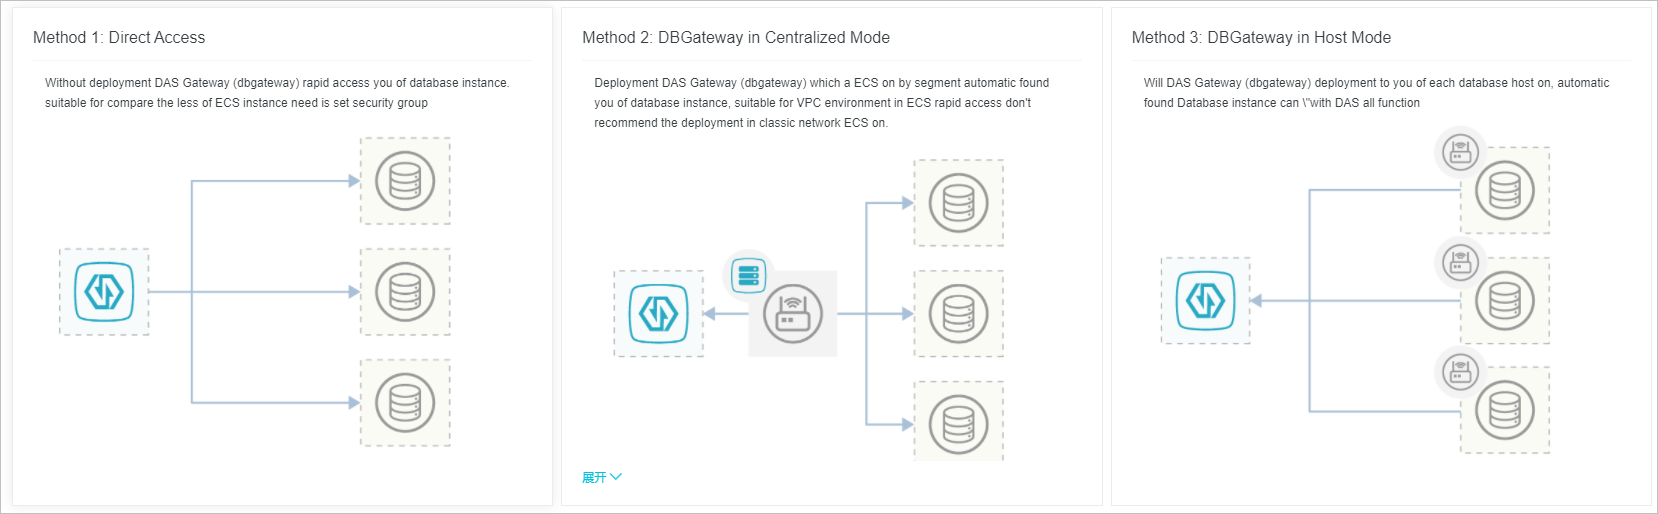
Direct connection: You do not need to deploy a database gateway (DBGateway). You can connect quickly by entering your database account and password. This method is suitable for a small number of ECS instances. You must configure security group rules.
Centralized mode: Deploy DBGateway on at least one ECS instance. We recommend that you deploy DBGateway on two or more ECS instances for disaster recovery. DBGateway automatically discovers your database instances by scanning CIDR blocks. This method is ideal for quickly connecting ECS instances in a VPC. Do not use this method for ECS instances in a classic network.
Host mode: Deploy DBGateway on each ECS instance. DBGateway automatically discovers database instances. This mode supports all DAS features, such as full SQL analysis, SQL response time, and security audit. For a detailed comparison of features across connection types, see Feature comparison across connection types.
DBGateway supports only Linux systems.
Feature comparison across connection types
Take the MySQL engine as an example.
Feature | Direct connection | Centralized mode | Host mode |
Database monitoring metrics | Supported | Supported | Supported |
Real-time performance | Supported | Supported | Supported |
Real-time sessions | Supported | Supported | Supported |
Storage analysis | Supported | Supported | Supported |
SQL diagnostics | Supported | Supported | Supported |
Slow request analysis | Partially supported (only when slow logs are stored in tables) | Partially supported (only when slow logs are stored in tables) | Supported |
Host monitoring metrics | Not supported | Not supported | Supported |
Full request analysis | Not supported | Not supported | Supported |
SQL response time | Not supported | Not supported | Supported |
Security audit | Not supported | Not supported | Supported |
Direct connection
Log on to the DAS console.
In the navigation pane on the left, click Intelligent O&M Center > Instance monitoring.
Click Access Instance in the upper-right corner of the page.
Click DB Instances on ECS.
Click Direct connection.
Select a region.
In the Add DAS access rules column for the target security group, select Private Network and then click Save.
NoteDAS automatically adds the IP addresses of the DAS service in the selected region to the security group rules of your ECS instance. For a list of DAS service IP addresses by region, see DAS service IP address list.
You must add the DAS service IP address to the private network rules of at least one security group.
Select the ECS instances that you want to connect and then click Next.
Enter the logon information for your database.
Parameter name
Description
Select engine
Select your ECS-hosted self-managed database engine. Supported engines include MySQL, PostgreSQL, MongoDB, and Redis.
Port
The port of your ECS-hosted self-managed database.
Database account
The account for your ECS-hosted self-managed database.
Password
The password for your ECS-hosted self-managed database.
NoteThe database account must have the required permissions. For more information, see Permissions.
If your database already has an account with the required permissions, enter the username and password, and then click Authorize.
If your database does not have an account with the required permissions, enter the username and password, click Generate Authorization Command, copy the command, run it on your database, and then click Authorize.
Click Authorize. After you click Authorize, the status changes to Connection normal if the authorization is successful. Otherwise, an error message is displayed:
Unauthorized: You did not enter a username or password.
Cannot connect: The network or the instance may be down.
Authentication failed: The username or password is incorrect.
Insufficient permissions: You can connect to the instance, but the account lacks the required permissions. For more information, see Permissions.
Click Complete.
Centralized mode
Log on to the DAS console.
In the navigation pane on the left, click Intelligent O&M Center > Instance monitoring.
Click Access Instance in the upper-right corner of the page.
Click DB Instances on ECS.
Click Use database gateway in centralized mode.
Select a connection method:
If you have not deployed DBGateway in the target VPC, select Deploy a new DAS DBGateway and search for instances..
Select the ECS instances in the target region and then click Generate Deployment Command.
Copy the deployment command and run it on the selected ECS instance.
If the command line returns
successfully, the program is deployed. If the deployment fails, see Troubleshoot DBGateway deployment issues to resolve the issue and then redeploy.After the deployment is successful, DAS automatically discovers the gateway. If the Current status is Normal, click Next.
If you have already deployed DBGateway in the target VPC, select Use existing DAS DBGateway to scan for new instances .
On the Select DBGateway page, select the DBGateway.
Click Discover Instance.
On the Discover Instance page, specify the instances to discover.
DAS can discover database instances in two ways:
Select Auto-scan:
In the Scan address text box, enter the CIDR block that you want to scan.
In the Port range text box, enter the port range.
Click Start probing.
Select Enter instance list:
In the Instance list text box, enter the instances according to the on-screen instructions.
Click Start probing.
After DAS discovers the instances, click Next.
Enter the logon information for your database.
Parameter Name
Description
Select engine
Select your ECS-hosted self-managed database engine. Supported engines include MySQL, PostgreSQL, MongoDB, and Redis.
Database account
The account for your ECS-hosted self-managed database.
Password
The password for your ECS-hosted self-managed database.
Database IP
Select the database IP address to authorize.
NoteThe database account must have the required permissions. For more information, see Permissions.
If your database already has an account with the required permissions, enter the username and password, and then click Authorize.
If your database does not have an account with the required permissions, enter the username and password, click Generate Authorization Command, copy the command, run it on your database, and then click Authorize.
Click Authorize. After you click Authorize, the status changes to Connection normal if the authorization is successful. Otherwise, an error message is displayed:
Unauthorized: You did not enter a username or password.
Cannot connect: The network or the instance may be down.
Authentication failed: The username or password is incorrect.
Insufficient permissions: You can connect to the instance, but the account lacks the required permissions. For more information, see Permissions.
Click Complete.
Host mode
Log on to the DAS console.
In the navigation pane on the left, click Intelligent O&M Center > Instance monitoring.
Click Access Instance in the upper-right corner of the page.
Click DB Instances on ECS.
Click Use database gateway in host mode.
Select the ECS instances in the target region and then click Generate Deployment Command.
Copy the deployment command and run it on each selected ECS instance.
If the command line returns
successfully, the program is deployed. If the deployment fails, see Troubleshoot DBGateway deployment issues to resolve the issue and then redeploy.After the deployment is successful, DAS automatically discovers the gateway. If the Current status is Normal, click Next.
Enter the logon information for your database.
Parameter Name
Description
Select engine
Select your ECS-hosted self-managed database engine. Supported engines include MySQL, PostgreSQL, MongoDB, and Redis.
Database account
The account for your ECS-hosted self-managed database.
Password
The password for your ECS-hosted self-managed database.
Database IP
Select the database IP address to authorize.
NoteThe database account must have the required permissions. For more information, see Permissions.
If your database already has an account with the required permissions, enter the username and password, and then click Authorize.
If your database does not have an account with the required permissions, enter the username and password, click Generate Authorization Command, copy the command, run it on your database, and then click Authorize.
Click Authorize. After you click Authorize, the status changes to Connection normal if the authorization is successful. Otherwise, an error message is displayed:
Unauthorized: You did not enter a username or password.
Cannot connect: The network or the instance may be down.
Authentication failed: The username or password is incorrect.
Insufficient permissions: You can connect to the instance, but the account lacks the required permissions. For more information, see Permissions.
Click Complete.
Related API operation
Operation | Description |
Connects a database instance to DAS. |