You can use SSL-VPN to connect clients (Windows, Linux, Android, and macOS) to a VPC on the cloud over the internal network, enabling secure access in an internet environment.
For iOS/iPadOS clients, see Connect an iPhone or iPad to a VPC using SSL-VPN.
Scenarios
You can use SSL-VPN if you have the following requirements:
No static public IP address on-premises: SSL-VPN establishes connections by having the client initiate the dial-up, which does not require the on-premises network to have a static public IP address. It can be used in Dynamic IP address environments such as home broadband, mobile office, and offices with dynamic IP addresses. A connection can be initiated as long as the client device can access the internet. If you already have a gateway device with a static public IP address on-premises, you can also choose IPsec-VPN to establish a site-to-site connection.
Access ECS instances over the internal network only: ECS instances in a VPC do not need to be associated with a public IP address. After a client successfully dials up over SSL-VPN, it can directly use the private IP address of an ECS instance to access resources in the same VPC.
Secure access control: You can configure the security group associated with the ECS instance to allow only traffic from the SSL-VPN Client CIDR Block, so that you can prohibit direct access over the internet and allow access only after logging on over SSL-VPN, reducing the risk of exposing high-risk ports (such as SSH 22 and RDP 3389) to the internet.
Scenario example
Objective: Create an SSL-VPN gateway so that on-premises clients can securely access ECS instances in a VPC over internal IP addresses.

The resource plan is as follows:
VPC
Name:
vpc-demoRegion: China (Hangzhou)
CIDR block: 10.0.0.0/16
vSwitches: Create two, named
vsw1andvsw2respectivelyvsw1is located in zone J, CIDR block: 10.0.0.0/24vsw2is located in zone K, CIDR block: 10.0.1.0/24
ECS: address 10.0.0.1, operating system
Alibaba Cloud Linux 3.2104 LTS 64-bit
On-premises CIDR block where the client is located: 172.16.0.0/16
Step 1: Configure VPN resources on the cloud
Before connecting the client to the VPC, you need to first create and configure a VPN gateway, an SSL server, and an SSL client in the Alibaba Cloud console.
1. Create a VPN gateway
The VPN gateway is the entry and exit point of the SSL-VPN connection on the cloud.
Go to the VPN gateway page in the console and click Create VPN Gateway.
Configure on the VPN gateway page:
Instance Name:
vpn-demoRegion: China (Hangzhou).
Virtual Private Cloud (VPC): Select the VPC that the client needs to access.
vSwitch 1/vSwitch 2: Select
vsw1andvsw2respectively.The VPN gateway uses a hot-standby architecture at the underlying layer. In regions where the VPC supports multiple zones, to ensure cross-zone high availability, the VPC must contain at least two vSwitches located in different zones. If this condition is not met, Create a vSwitch first.
Maximum Bandwidth: 10M
IPsec-VPN: Disabled (the option to disable it is available only after you enable SSL-VPN below).
SSL-VPN: Enable.
SSL-VPN Connections: 5.
Service-linked Role: If you have not created one, click Create Service-linked Role.
For a detailed description of the parameters for creating a VPN gateway, see Create and manage a VPN gateway instance.
After the purchase and payment are complete, you can see the created VPN gateway on the VPN gateway page.
The status of the newly created VPN gateway is Preparing. After about 1 to 5 minutes, the status changes to Normal, at which point you can start using it.
2. Create an SSL server
The SSL server is used to define the range of the cloud network that clients can access and to configure the client IP address pool.
Go to the SSL Servers page, switch to the China (Hangzhou) region in the top menu bar, and click Create SSL Server.
On the Create SSL Server panel, configure the SSL server based on the following information:
Name: Enter
server-demoVPN Gateway: Select the VPN gateway you just created.
Local Network: Enter the CIDR block of the VPC
10.0.0.0/16.This CIDR block is the range of the cloud network that you want clients to access, which is usually your VPC CIDR block.
Client CIDR Block: The address pool that the VPN gateway uses to allocate IP addresses to the client virtual network adapters. It must not overlap with the Local Network or the CIDR blocks already used by the clients (for example, On-premises CIDR block where the client is located), otherwise a routing conflict occurs. We recommend that you select a subnet that does not conflict with the existing network (for example,
10.200.200.0/24) from the private address ranges defined in RFC 1918 (10.0.0.0/8,172.16.0.0/12,192.168.0.0/16) and allocate it to the clients.
Keep the other options at their default values. For a detailed description of the parameters for creating an SSL server, see Create and manage an SSL server.
3. Create an SSL client and download the certificate
The SSL client is responsible for client certificate management. Each client that needs to connect must import a certificate for identity authentication and encryption.
In the left-side navigation pane, choose Interconnections - VPN-SSL Clients. In the top menu bar, confirm that the region is China (Hangzhou). On the SSL Client page, click Create SSL Client.
On the Create SSL Client panel, enter
client-demofor the name, selectserver-demofor SSL server, and then click OK.On the SSL Client page, find the created SSL client and click Download certificate in its Actions column.
Step 2: Configure the client
View the corresponding configuration method based on the operating system of the client.
Windows client
Download the OpenVPN client that is compatible with your Windows system version, and complete the installation as prompted by the interface:
Windows 64-bit system (Intel/AMD): OpenVPN client (Windows 64-bit).
Windows ARM64 system: OpenVPN client (Windows ARM64).
Decompress the downloaded SSL client certificate and copy the extracted all files to the OpenVPN configuration directory.
Default path:
C:\Program Files\OpenVPN\configNote: If you have modified the installation path, copy them to the config folder in your actual installation directory.

Open the
config.ovpnfile with Notepad and add one line at the end:disable-dco.The Data Channel Offload (DCO) feature introduced in OpenVPN 2.6 has compatibility issues on some Windows systems (such as specific versions of Windows 10/11). This configuration is used to disable DCO to resolve the issue of some devices being unable to connect.

Right-click the OpenVPN icon in the tray at the bottom-right corner of the desktop, and then click Connect to establish the VPN connection.

If the State is displayed as Connected and an IP address is assigned, the connection has been established successfully.

Linux client
Run the following commands to install the OpenVPN client and create the
confdirectory.CentOS
yum install -y openvpn
mkdir -p /etc/openvpn/conf
Ubuntu
apt-get update
apt-get install -y openvpn
mkdir -p /etc/openvpn/conf
Decompress and copy the downloaded SSL client certificate to the /etc/openvpn/conf/ directory.
[root@iZt4n******* conf]# ls -lh /etc/openvpn/conf/
total 16K
-rw-r--r-- 1 root root 1.3K Nov 26 01:07 ca.crt
-rw-r--r-- 1 root root  218 Nov 26 01:21 config.ovpn
-rw-r--r-- 1 root root 1.2K Nov 26 01:07 vsc-rj9s*******.crt
-rw-r--r-- 1 root root 1.7K Nov 26 01:07 vsc-rj9s*******.key
Go to the /etc/openvpn/conf/ directory and run the following command to establish the VPN connection.
openvpn --config /etc/openvpn/conf/config.ovpn --daemon(Optional) Enable the OpenVPN process to start automatically on boot
Edit the /etc/rc.local file and add the commands to the file.
#Open the /etc/rc.local file in edit mode
vi /etc/rc.local
#Press the i key to enter file editing mode, and then add the following commands to the /etc/rc.local file
cd /etc/openvpn/conf/
openvpn --config /etc/openvpn/conf/config.ovpn --daemon
#Press the Esc key to exit file editing mode, and then enter the following command to save and exit the file
:wq
Add execute permission to the /etc/rc.local file.
chmod +x /etc/rc.local
Android client
Download and install OpenVPN client (Android version).
This topic uses a client running Android 9.0 with OpenVPN client 3.0.5 installed.
Transfer the downloaded SSL client certificate to the Android device and decompress the certificate.
NoteIf your Android device does not have decompression software, you can decompress the certificate on a computer and then transfer the extracted files to the Android client.
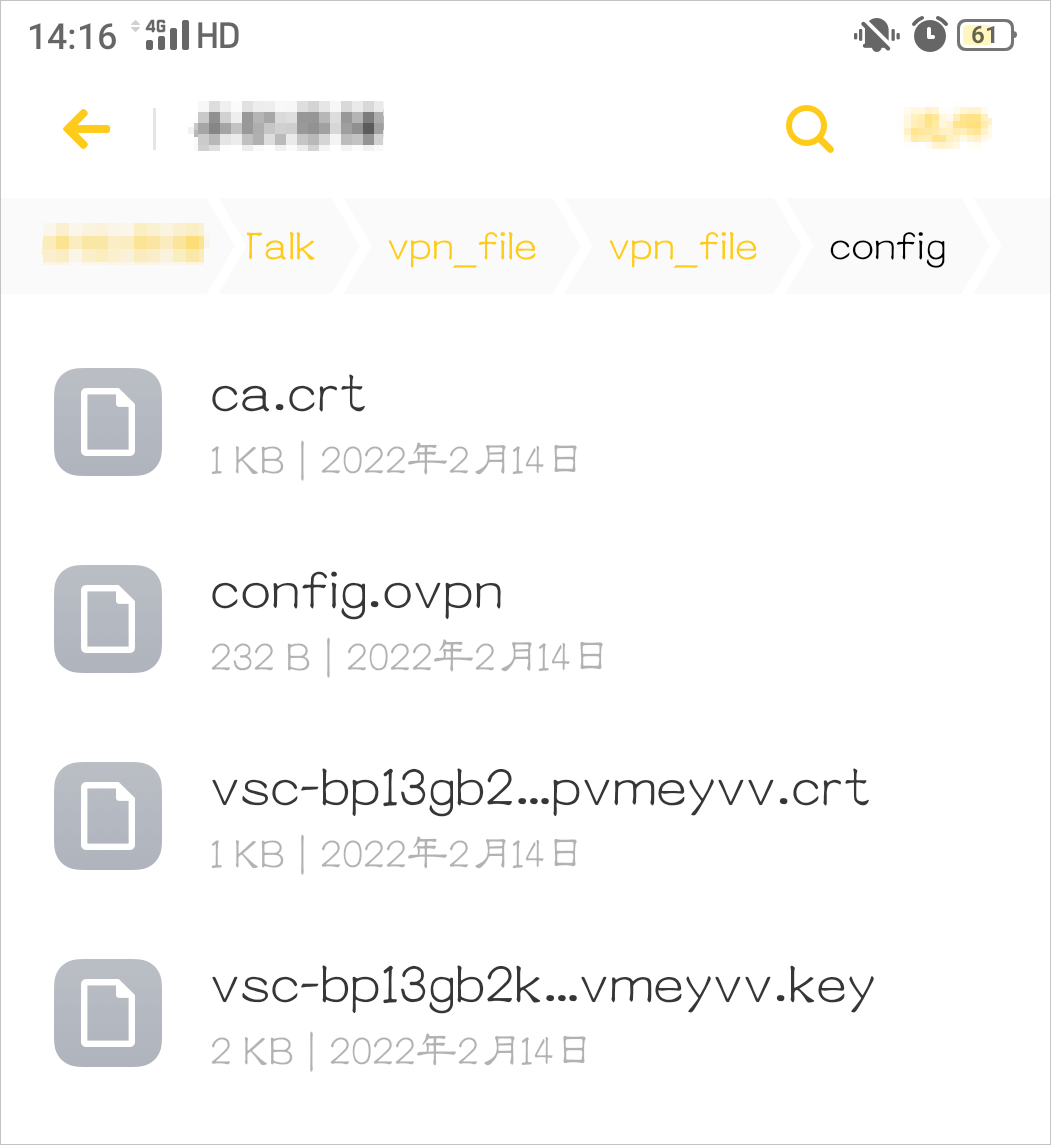
Make sure that the extracted files are in the same folder, as shown in the following figure.
Open the OpenVPN client, import the
config.ovpnfile, and add a VPN connection.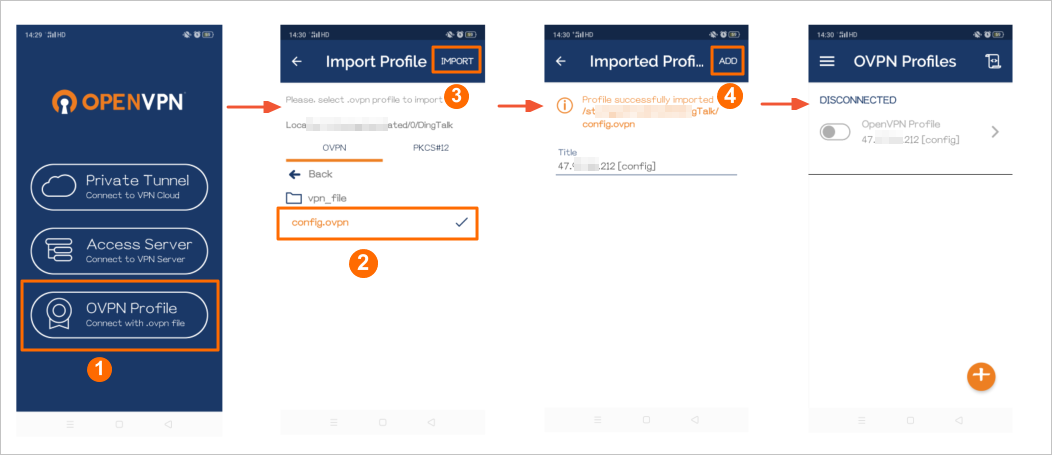
No.
Description
①
Select the OVPN Profile connection method.
②
Find the
config.ovpnfile in the storage directory.③
Click IMPORT to import the
config.ovpnfile.④
The system automatically reads the information in the
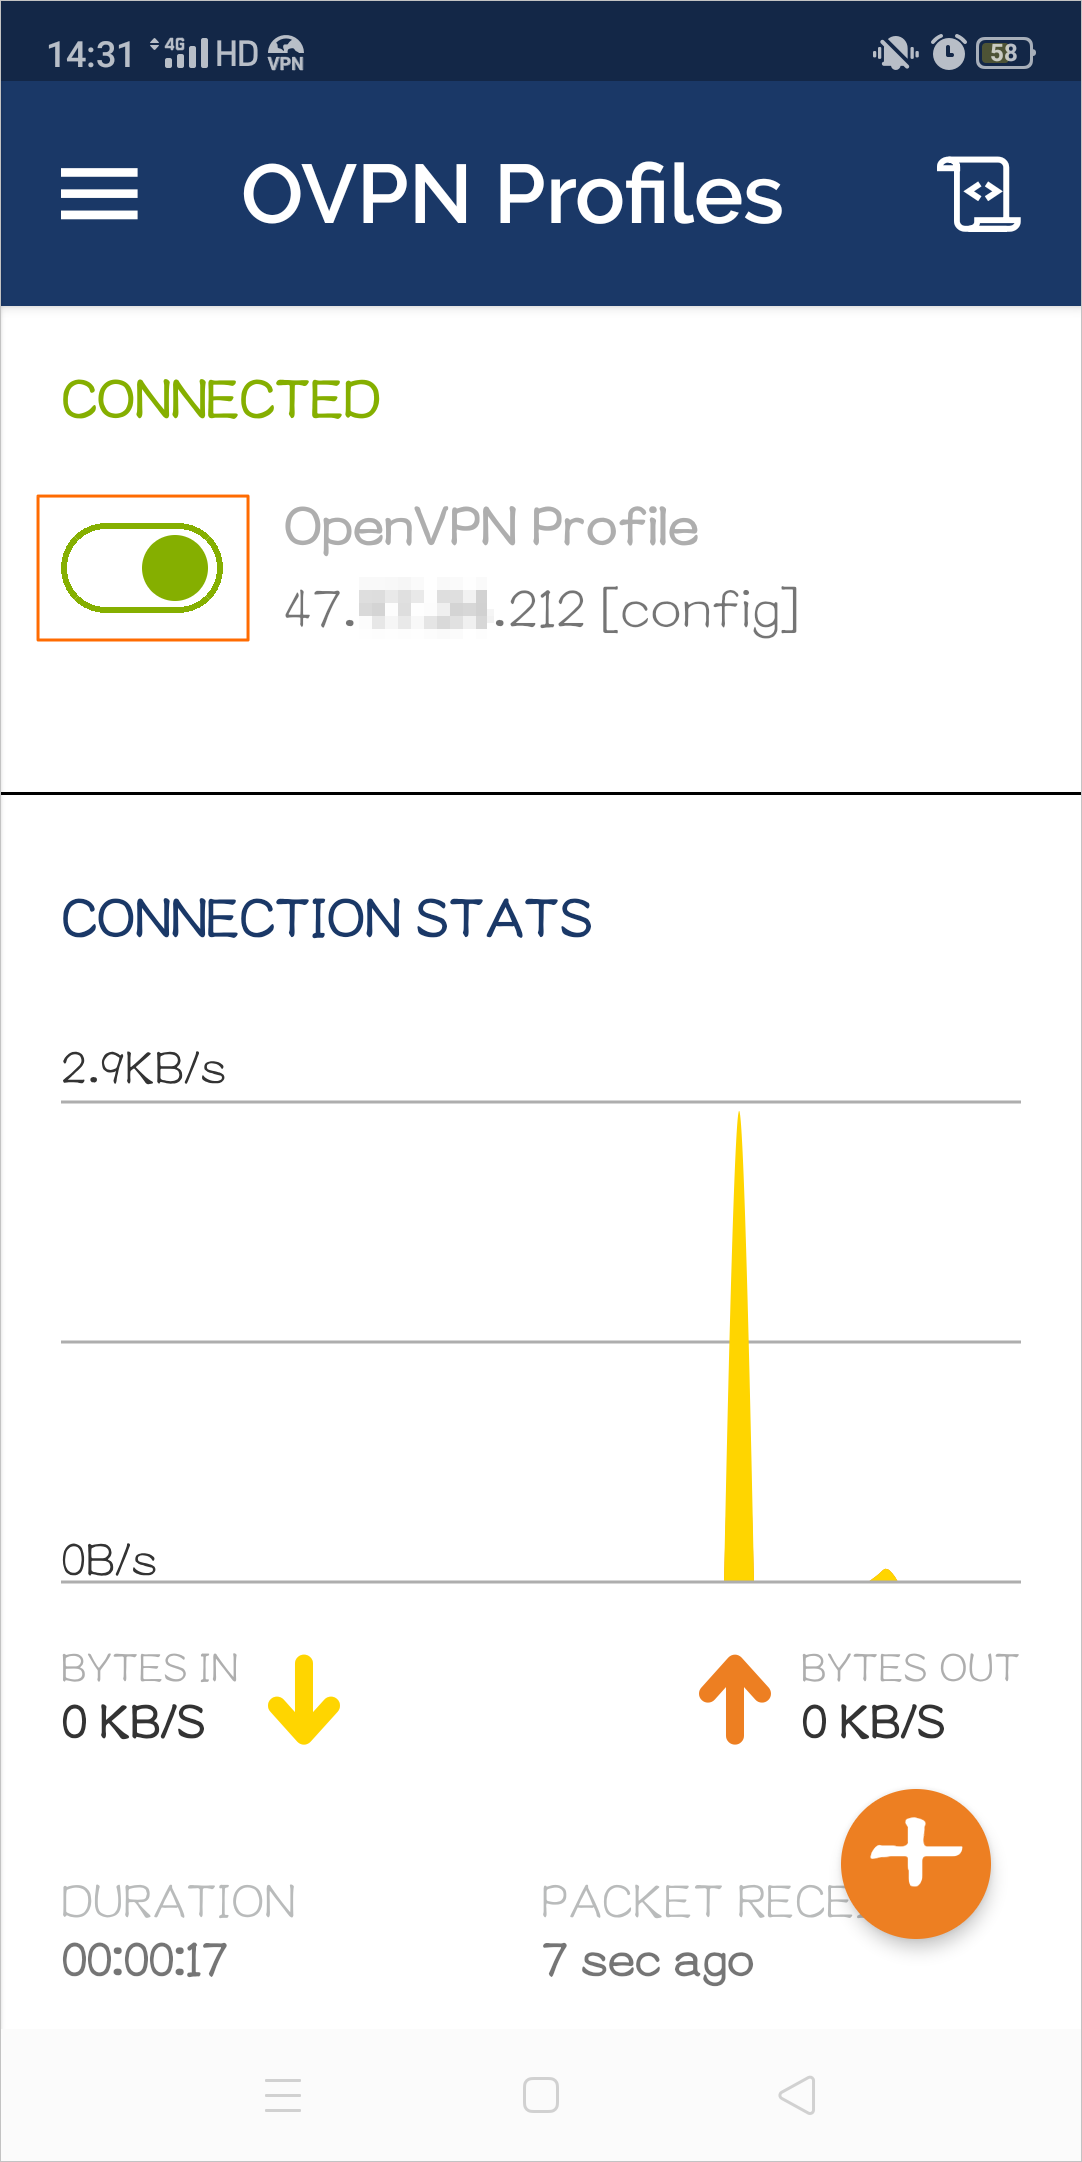
config.ovpnfile and displays the public IP address of the VPN gateway to be connected. Click ADD to add the VPN connection.Click the slider button to enable the VPN connection.
Mac client (GUI, recommended for M-series chips)
Open the Tunnelblick Releases page and find the latest stable version to download the dmg file. This topic uses version
Tunnelblick 4.0.1 (build 5971)as an example. In the Assets panel, download the file in.dmgformat.
Install the Tunnelblick software.

No.
Description
①
Double-click the downloaded Tunnelblick installation package.
②
Double-click the Tunnelblick icon.
③
Select I have configuration files.
④
Click OK.
First decompress the downloaded SSL client certificate, and then drag the extracted
config.ovpnfiles to the configuration panel to establish the VPN connection.
No.
Description
①
Click the Tunnelblick icon in Launchpad to open the Tunnelblick software.
②
Drag the extracted files
config.ovpnto the Configurations panel.③
Select Only Me.
④
Click Connect.
Mac client (command line)
Open a Terminal command line window. If Homebrew is not yet installed on your client, run the following command to install Homebrew.
NoteBecause the Homebrew installation script contains the sudo command, you will be prompted to enter the administrator password during the process. When "Press RETURN/ENTER to continue..." appears, press the Enter key to continue.
/bin/bash -c "$(curl -fsSL https://raw.githubusercontent.com/Homebrew/install/HEAD/install.sh)"Run the following command to install the OpenVPN client.
brew install openvpnDecompress and copy the downloaded SSL client certificate to the configuration directory.
Back up the /opt/homebrew/etc/openvpn directory.
cp -r /opt/homebrew/etc/openvpn /opt/homebrew/etc/openvpn_bakRun the following command to delete the current OpenVPN configuration file.
rm /opt/homebrew/etc/openvpn/*Run the following command to copy the downloaded SSL client certificate to the configuration directory.
cp /path/to/certs.zip /opt/homebrew/etc/openvpn/Note/path/to/certs.zipis the path of the SSL client certificate downloaded in the step for creating the SSL client, which is usually in the Downloads directory of the current user, for example,/Users/example/Downloads/certs.zip.
Run the following command to decompress the certificate.
cd /opt/homebrew/etc/openvpn/
unzip /opt/homebrew/etc/openvpn/certs.zip
Select a running method.
Run in the foreground
You can run the following command to start the client process and establish the VPN connection:
sudo /opt/homebrew/opt/openvpn/sbin/openvpn --config /opt/homebrew/etc/openvpn/config.ovpnAfter you run this command, it keeps running in the foreground. When you need to disconnect, enter Ctrl+C to terminate the command.
Run in the background
Run the following command to make the VPN client process run in the background as a service and start automatically on boot:
cp config.ovpn openvpn.conf
sudo brew services start openvpn
When you need to stop it, run the following command:
sudo brew services stop openvpn
Step 3: Test the connectivity
Configure security group rules
To ensure that clients can access resources in the VPC, add an inbound rule in the security group associated with the ECS instance to allow traffic from Client CIDR Block (
10.200.200.0/24).For connectivity testing: Allow the ICMP protocol so that the
pingcommand can work properly.For business access: Allow the specific ports required by your business, such as TCP 22 (SSH), TCP 3389 (RDP), and TCP 80/443 (web services).
Ping test
On the client device, use the ping command to access the ECS instance:
ping 10.0.0.1If the ping succeeds, the client is connected to the ECS instance over the internal network:
C:\Users\Administrator>ping 10.0.0.1

Pinging 10.0.0.1 with 32 bytes of data:
Reply from 10.0.0.1: bytes=32 time=8ms TTL=63
Reply from 10.0.0.1: bytes=32 time=8ms TTL=63
Reply from 10.0.0.1: bytes=32 time=8ms TTL=63
Reply from 10.0.0.1: bytes=32 time=8ms TTL=63

Ping statistics for 10.0.0.1:
    Packets: Sent = 4, Received = 4, Lost = 0 (0% loss),
Approximate round trip times in milli-seconds:
    Minimum = 8ms, Maximum = 8ms, Average = 8ms
Service port test
To further verify business access, you can try to access a service running on the ECS instance. For example, install and start a web service (such as Nginx) on the ECS instance:
# Run on the ECS instance (using Alibaba Cloud Linux 3 as an example:)
yum install -y nginx
systemctl start nginx.service
After confirming that the security group associated with the ECS instance allows traffic on TCP port 80 from the client CIDR block, access
http://10.0.0.1in the client browser.If you can see the Nginx welcome page, business access works properly.

FAQ
How do I use the username and password authentication method?
You can enable two-factor authentication, so that a client can establish an SSL-VPN connection only after passing both certificate authentication and username and password authentication.
Does the client need to enter the VPN gateway address when connecting?
You do not need to manually enter the VPN gateway address when connecting. The config.ovpn configuration file downloaded from the console already contains the public IP address of the VPN gateway. After it is imported into the OpenVPN client, it can be automatically recognized without additional input.
I already have another OpenVPN client installed on-premises. Can I use them at the same time?
Yes, you can use them at the same time, but you need to avoid configuration file conflicts. If multiple OpenVPN clients share the same config directory, the imported certificates and config.ovpn may overwrite each other or be loaded incorrectly, resulting in OpenVPN conflicts and connection anomalies.
We recommend that you isolate them as follows:
Install the OpenVPN client used by Alibaba Cloud SSL-VPN in a different path from the existing client (for example, if the existing client is located at
C:\Program Files\OpenVPN, install the new client in another directory).Make sure that the config folders of the two clients are independent of each other. The certificate files of Alibaba Cloud SSL-VPN are decompressed and copied only to the config folder in the current installation directory.
When connecting, initiate the connection from the client in the corresponding installation directory, and avoid mixing multiple sets of configuration files in the same client.
How do I disconnect the VPN connection on a Linux or Mac client?
Open the command line and run the following command to search for the OpenVPN process and record the process ID.
ps aux | grep openvpnRun the following command to terminate the OpenVPN process.
kill -9 <process ID>
After connecting over SSL-VPN, do I still need to purchase a bastion host to log on to the ECS instance over SSH?
No. As long as the SSL-VPN connection is normal and the security group associated with the ECS instance allows TCP port 22 from Client CIDR Block, you can directly use an SSH tool to complete SSH logon through the private IP address of the ECS instance, without purchasing an additional bastion host.
If your enterprise has requirements for session auditing, fine-grained permission control, or multi-user collaborative logon for O&M operations, you can use a bastion host together with SSL-VPN. However, a bastion host is not a prerequisite for establishing an SSL-VPN connection or logging on to an ECS instance over the internal network.
Unable to connect successfully?
After an SSL-VPN client connects successfully, it automatically establishes internal network interconnection with ECS instances in the same VPC, without needing to add route entries or additionally connecting the network. Therefore, if the connection is established but access fails, the problem is usually not in the VPN link itself, but in the access control on the target ECS side.
Symptom | Possible causes and troubleshooting steps |
Unable to connect, for example client logs the message | 1. Network issues: Confirm that your client device can access the internet properly, and that the local network firewall or security software does not block the OpenVPN client from accessing the public IP address and port of the VPN gateway (TCP/1194 by default). 2. Certificate issues: Confirm that the |
Connected successfully, but | 1. Security group rules (the first item to check): When the ping fails, first log on to the ECS console and check whether the security group of the corresponding instance has an inbound rule added to allow 2. ECS internal firewall: Check whether the firewall inside the ECS operating system (such as firewalld or iptables) blocks ICMP requests. |
Connected successfully, and | 1. Security group rules: Check the ECS security group to ensure that the corresponding service ports (such as TCP 80 and TCP 22) have been allowed for your client CIDR block. 2. Service listening status: Log on to the ECS instance and confirm that the port is listening properly (for example, use 3. ECS's own firewall allows the port: Log on to the ECS instance and confirm that the firewall of the ECS operating system itself allows the port |
After connecting to the VPN, unable to access the local network (such as a printer) or unable to access the internet | Routing conflict: The Client CIDR Block you configured on the SSL server may conflict with the CIDR block of your current local network. Return to Step 1, change the client CIDR block of the SSL server to a less common CIDR block (such as |
The ECS instance cannot actively | Normal behavior. For security reasons, the operating system firewall of the client blocks active connection requests from external sources (including the VPN peer) by default. This is expected behavior and does not affect the client's access to cloud resources. If there are requests from cloud resources to access the client, allow the ICMP protocol on the client firewall. |
For more questions, see SSL-VPN connection FAQ.