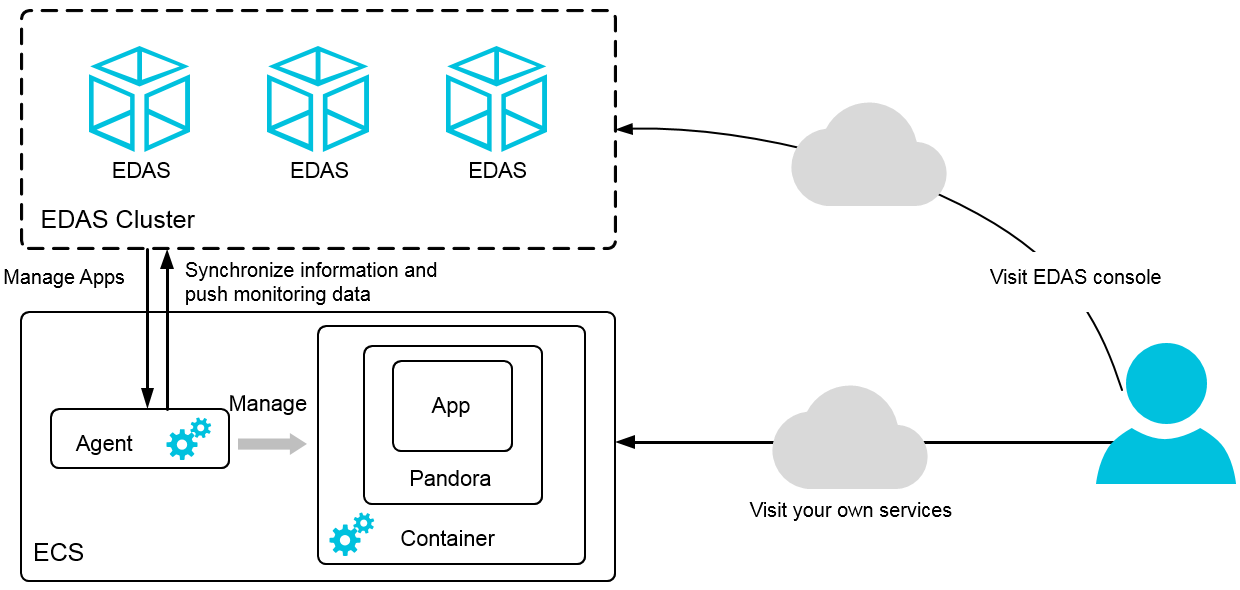
Enterprise Distributed Application Service (EDAS) Agent is the daemon that is installed on an Elastic Compute Service (ECS) instance for communication between an EDAS cluster and the applications deployed on the ECS instance. EDAS deploys applications only on ECS instances on which EDAS Agent is installed. The application deployment includes initial installation and scale-out. In EDAS, application instances are the ECS instances on which EDAS Agent is installed and applications are deployed. If you want to use a purchased ECS instance in EDAS, you must install EDAS Agent on the ECS instance.
Background information
EDAS Agent provides the following features:
Application lifecycle management: deploys, starts, and stops applications.
Status reporting: reports the application liveness status, health check status, and Ali-Tomcat container status.
Information retrieval: retrieves the monitoring information of ECS instances and containers.
EDAS Agent is used for communication between the EDAS console and your application. EDAS Agent allows you to retrieve information to determine whether your application is properly and timely released on an ECS instance.
EDAS Agent supports 64-bit CentOS 7.0 and later.
To use the preceding features, you must install EDAS Agent.

You can install EDAS Agent by using one of the following methods:
By default, EDAS Agent is installed with Java Development Kit (JDK) 8. If you want to use JDK 7 or other versions, install EDAS Agent by using a command script.
To use the script, log on to your ECS instance as the root user.
The script can be repeatedly run. If you repeatedly run the script, the existing version of EDAS Agent that is installed on the ECS instance is overwritten. EDAS Agent does not provide a script for an update. To update EDAS Agent, you must run the script that is used for installation.
The installation script is region-specific. You must switch to the region in which your ECS instance resides before you use the script. Then, you can install EDAS Agent.
The EDAS Agent status varies based on the image and cluster type that you select. The EDAS Agent status determines the types of applications that can be deployed on the ECS instance. Follow the instructions for the installation method that you use.
Automatically install EDAS Agent by selecting the EDAS base image when you purchase an ECS instance
You can install EDAS Agent in one step by using the EDAS base image selected when you purchase an ECS instance.
If you use this method, disks are formatted. To prevent disk formatting, we recommend that you manually install EDAS Agent by using a command script. For more information, see Manually install EDAS Agent by using a command script.
- Log on to the EDAS console.
In the left-side navigation pane, choose .
On the ECS page, click Create Instance in the upper-right corner.
In the Image section of the ECS purchase page, select Marketplace Images and click Select from Alibaba Cloud Marketplace (with Operating System).
In the Alibaba Cloud Marketplace dialog box, enter EDAS in the search box and click Search.
In the search results, select EDAS Java Environment (Common ECS). By default, the latest version is selected. We recommend that you do not select earlier versions. Click Use.
Purchase the ECS instance by following the on-screen instructions.
Automatically install EDAS Agent by importing an ECS instance
If you do not specify the EDAS Java Environment (Common ECS) image when you purchase an ECS instance, you can install EDAS Agent by using the Import ECS feature in the EDAS console. You can import an ECS instance directly or by using an image.
If an ECS instance meets one of the following conditions, the instance cannot be imported:
The instance is created before December 1, 2017.
The instance is created in the classic network and imported to a cluster that uses the classic network.
The instance is stopped, or is in the starting or stopping process.
The instance is a Windows-based instance or does not support simple Shell commands.
The instance is not imported from an ECS cluster.
If you use an ECS image, the disks on the ECS instance are formatted. If you do not want to format disks, we recommend that you use a command script to install EDAS Agent. For more information, see Manually install EDAS Agent by using a command script.
- Log on to the EDAS console.
In the left-side navigation pane, choose .
On the ECS page, select the region in which you want to import an ECS instance in the top navigation bar, and select a microservices namespace from the Microservice Namespace drop-down list. The microservices namespace is optional. Then, click Import ECS in the upper-right corner of the ECS page
In the Select Cluster and Existing ECS Instances step of the Import ECS wizard, select a microservices namespace and the cluster to which the ECS instance is imported. Select the ECS instance in the instance list and then click Next.
NoteIf the desired ECS instance is not displayed in the instance list, click Synchronize ECS to refresh the instance list.
 Note
NoteIf you have not created a destination cluster, click Create Cluster next to the Select Destination Cluster drop-down list.
If you want to manually install EDAS Agent, click Switch to Manual Installation in the upper-right corner of the page to go to the Manually Install EDAS Agent on Single Instance page. Then, run a command script to manually install EDAS Agent.
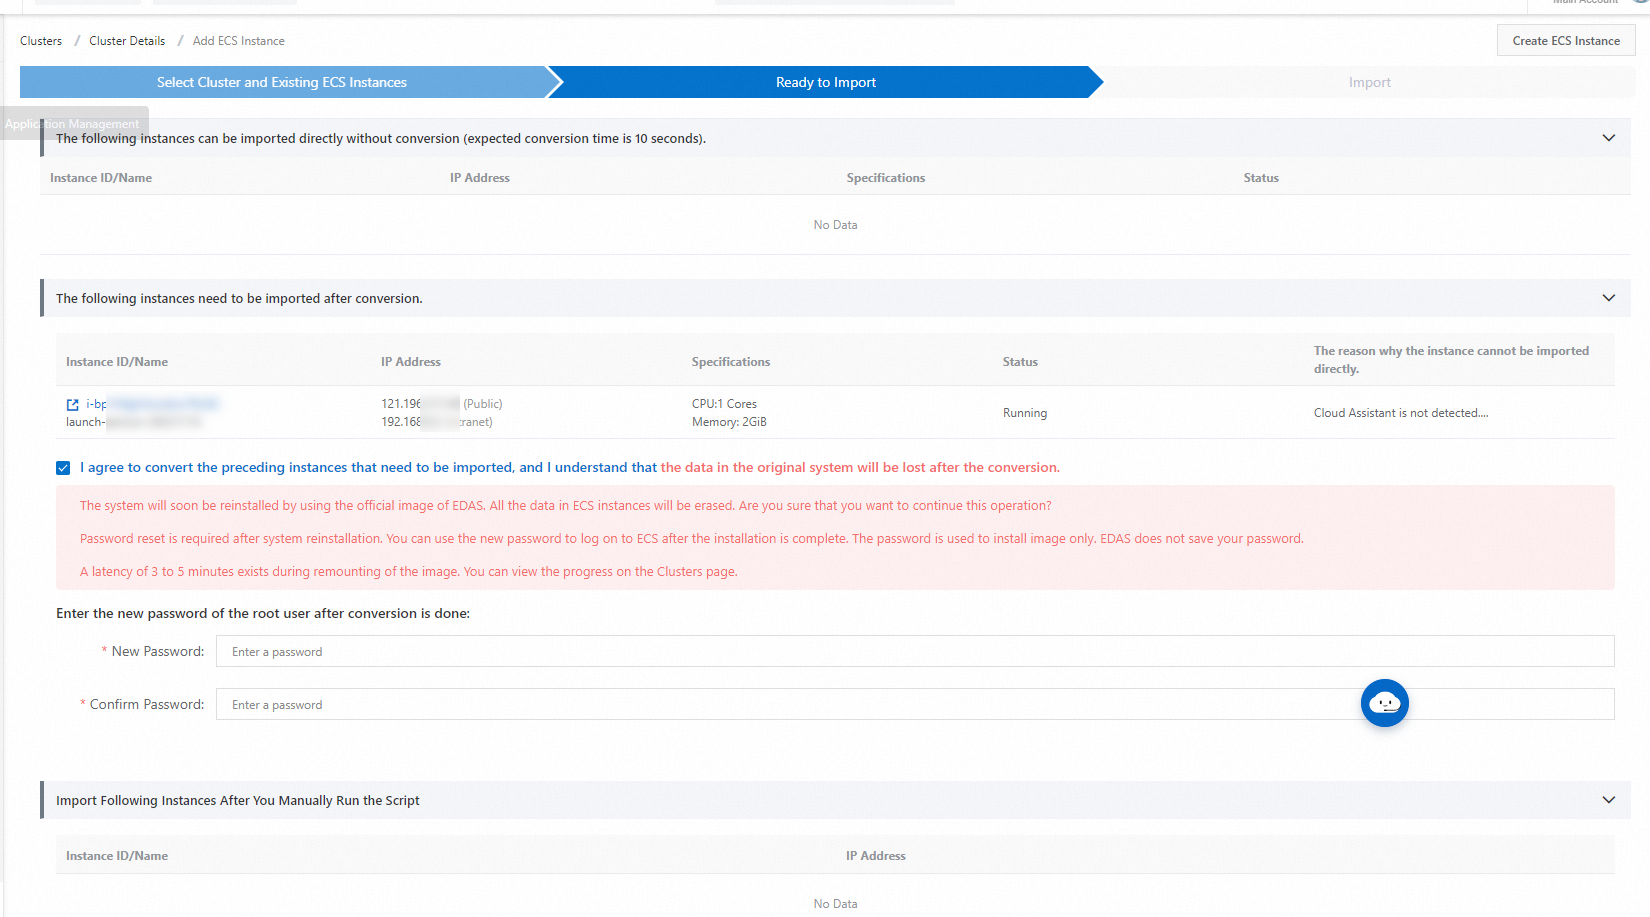
In the Ready to Import step, view the information about the instance.
ECS instances that can be imported are displayed in the The following instances can be imported directly without conversion (expected conversion time is 10 seconds) section. Click Confirm and Import.
If Cloud Assistant is not installed on the desired ECS instance or Cloud Assistant fails to work as expected, you must convert the desired ECS instance before you can import the ECS instance. In this case, select I agree to convert the preceding instances that need to be imported, and I understand that the data in the original system will be lost after the conversion, and enter the new logon password of the root user after the conversion. After you complete the configurations, click Confirm and Import.

For Ubuntu-based ECS instances that resides in the classic network, you must manually execute a script before you import the ECS instance.
In the Import step, view the import progress of the instance.
If the ECS instance can be directly imported, you can view the import progress in the Import step. Wait until the Directly imported. message appears. Then, you can click Back to Cluster Details. When the ECS instance status changes to Running, the ECS instance is imported to the cluster.
If the ECS instance can be imported only by using an image, the import status of the ECS instance that is displayed in the Import step is Converting. It might take..
If you click Back to Cluster Details before the import is completed, the health check status is Converting. When the import is completed, the health check status changes to Running. The instance is imported.
Manually install EDAS Agent by using a command script
This method is applicable only to ECS instances in an ECS cluster.
- Log on to the EDAS console.
In the left-side navigation pane, choose .
In the top navigation bar of the ECS page, select a region, select a microservices namespace at the top of the page, and then click Import ECS in the upper-right corner of the page.
In the Import ECS wizard, click Switch to Manual Installation in the upper-right corner. On the Manually Install EDAS Agent on Single Instance page, click Copy.
 Note
NoteTo install EDAS Agent by using an image, click Switch to Image Installation. For more information, see Automatically install EDAS Agent by importing an ECS instance.
Use the root user to log on to the ECS instance on which you want to install EDAS Agent. On the ECS instance, paste the copied command and run the command. If the log contains
EDAS Agent installation finished!, EDAS Agent is installed.
Verify the result
After EDAS Agent is installed, choose Resource Management > ECS in the left-side navigation pane of the EDAS console, select a region in the top navigation bar of the ECS page, and then select a microservices namespace. You can view the EDAS Agent status in the Agent Status column. If EDAS Agent is installed, the Online state is displayed.
Update EDAS Agent
The procedure for updating EDAS Agent is the same as the procedure for installing EDAS Agent by using a command script. For more information, see Manually install EDAS Agent by using a command script.