A single MySQL database server has performance limitations and risks single points of failure (SOPFs), which may lead to the unavailability of business systems. You can build a high-availability MySQL InnoDB Cluster with multiple Elastic Compute Service (ECS) instances, and use a proxy service to achieve flexible scheduling and read/write splitting, thereby improving database availability and fault tolerance.
Architecture
When you build a service cluster, using ECS instances across multiple zones reduces the risk of business downtime and provides resiliency to single-zone failures, enhancing the stability of business systems.
Proxy node: responsible for handling client requests and forwarding them to appropriate database nodes. The proxy node can be deployed across multiple zones to further enhance high availability.
Primary node: serves as the core data processing node in a cluster to handle all write operations and synchronize data to other nodes.
Secondary node: maintains data consistency by replicating data from the primary node and supports only read operations. If the primary node fails, a new primary node is automatically elected from the secondary nodes to ensure the continuous operation of the cluster.

Prepare an environment
Create four ECS instances. In this example, ECS instances that run Alibaba Cloud Linux 3 are created.
Description
Instance
Internet access
Virtual private cloud (VPC)
vSwitch
IP address
Proxy node
ECS Instance A
Internet access is required.
After MySQL is installed, disable Internet access to enhance security.
192.168.0.0/16
192.168.0.0/24
192.168.0.1
Primary node (read/write)
ECS Instance B
192.168.1.0/24
192.168.1.1
Secondary node (read-only)
ECS Instance C
192.168.2.0/24
192.168.2.1
Secondary node (read-only)
ECS Instance D
192.168.2.2
Install the same MySQL version on ECS Instances B, C, and D. In this example, MySQL 8.4 is installed. For information about how to install MySQL, see Install MySQL on Linux.
Procedure
Step 1: Configure cluster nodes
Connect to ECS Instances B, C, and D. For more information, see Connect to Linux.
Create the same MySQL account, with the same username and password, on ECS Instances B, C, and D.
ImportantReplace <username> with the username of the MySQL account that you want to create.
Replace <password> with the password of the MySQL account. The password must be at least eight characters in length and contain at least one uppercase letter, one lowercase letter, one digit, and one special character.
#Enter the password of the root user after running the following command:
sudo mysql -uroot -p \
-e "CREATE USER '<username>'@'%' IDENTIFIED BY '<password>';" \
-e "GRANT ALL PRIVILEGES ON *.* TO '<username>'@'%' WITH GRANT OPTION;" \
-e "FLUSH PRIVILEGES;"
Add the following content to the
/etc/my.cnfMySQL configuration file on ECS Instances B,C, and D:#Set the hostname to the node IP address. report_host=192.168.x.x #Enable GTID strong consistency. enforce_gtid_consistency=ON gtid_mode=ON #Specify the node service ID, which must be a unique positive integer for each node. server_id=1 #Specify the maximum number of connections for each node, which must be the same for all nodes. max_connections=1024 #Disable storage engines other than InnoDB. disabled_storage_engines="MyISAM,BLACKHOLE,FEDERATED,ARCHIVE,MEMORY"Restart the MySQL service on ECS Instances B, C, and D for the configuration changes to take effect.
sudo systemctl restart mysqld
Step 2: Create a cluster
Connect to ECS Instance A. For more information, see Connect to Linux.
Install mysql-shell and mysql-router on ECS Instance A.
#Add the official MySQL repository.
sudo rpm -Uvh https://repo.mysql.com/mysql84-community-release-el8-1.noarch.rpm
#Install mysql-shell and mysql-router.
sudo dnf install -y mysql-shell mysql-router mysql-community-client
Connect to the primary node by using MySQL Shell. Replace
<username>with the username of the MySQL account you created in Step 1: Configure cluster nodes and<IP>with the IP address of the primary node. Enter the password of the MySQL account and choose whether to save the password as prompted. Saving the password eliminates the need to enter it for subsequent connections.mysqlsh --js <username>@<IP>:3306
Create a cluster. Replace
<cluster_name>with a cluster name.var cluster = dba.createCluster('<cluster_name>');Add a secondary node to the cluster. Replace
<username>with the username of the MySQL account you created in Step 1: Configure cluster nodes and<IP>with the IP address of the secondary node. Repeat this step to add all secondary nodes.NoteFor example, to add a node with the IP address
192.168.2.1and the usernamecluster_user, run thecluster.addInstance('cluster_user@192.168.2.1:3306');command.cluster.addInstance('<username>@<IP>:3306');The following output shows that the secondary node is added.

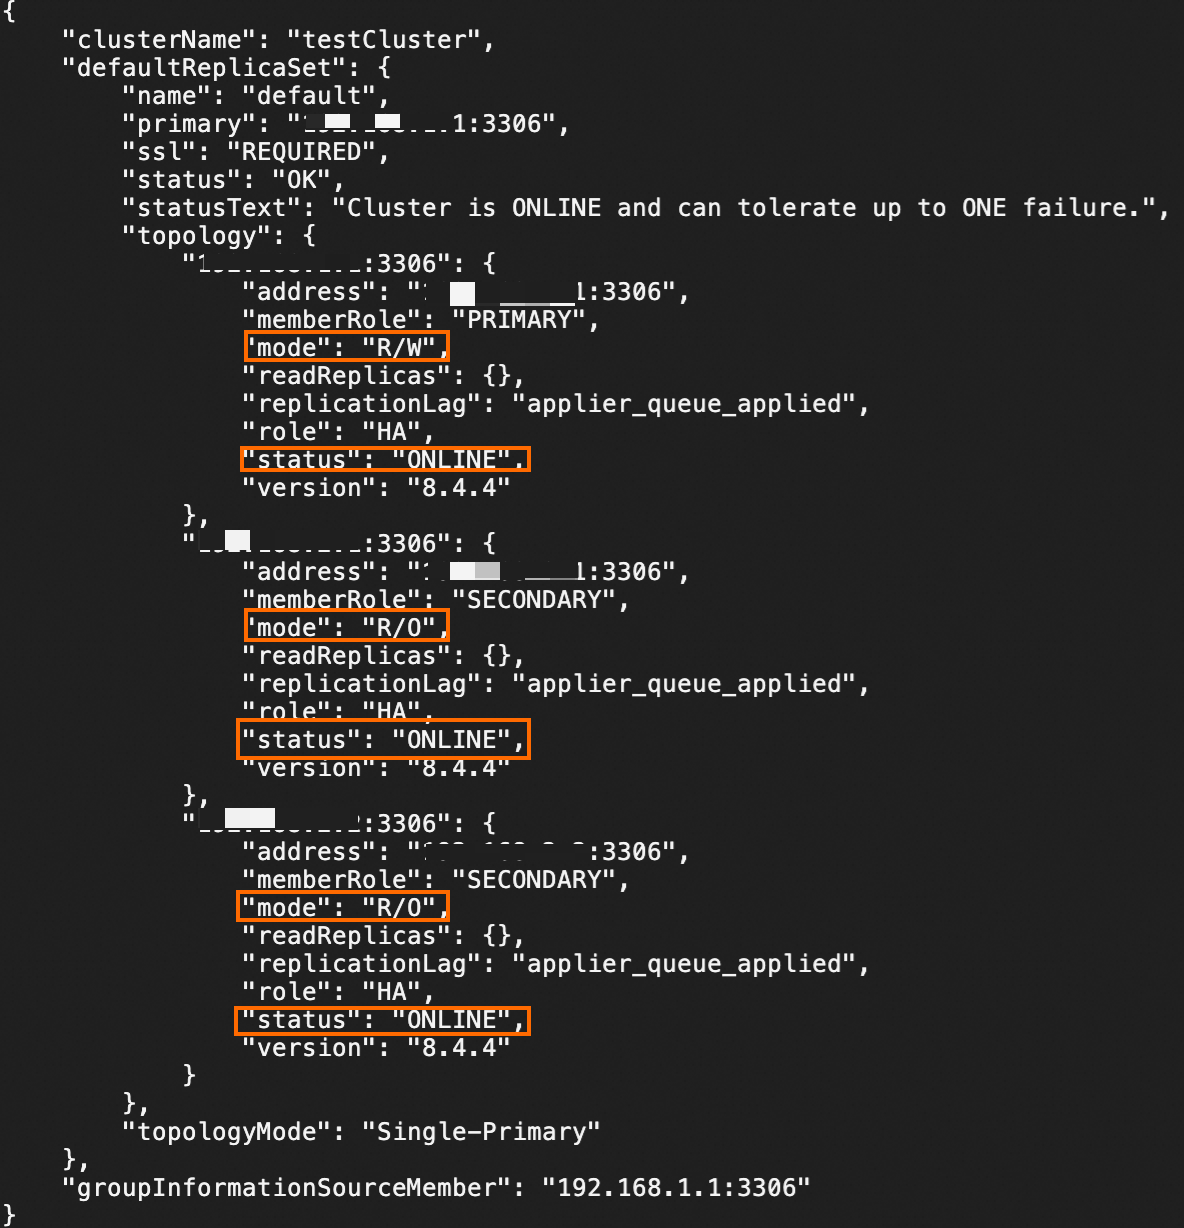
Check the cluster status.
cluster.status();The following output shows that the cluster is created.
Step 3: Configure the proxy node
Connect to ECS Instance A. For more information, see Connect to Linux.
Initialize the proxy settings. Replace
<username>with the username of the MySQL account you created in Step 1: Configure cluster nodes and<IP>with the IP address of the primary node. Enter the password of the MySQL account as prompted.NoteBy default, the command stores the initialization file in the
/mnt/mysqlrouterdirectory.sudo mysqlrouter --bootstrap <username>@<IP>:3306 --directory /mnt/mysqlrouter \ --conf-bind-address 0.0.0.0 --user=mysqlrouterEdit the mysqlrouter service file.
NoteBy default, the command uses the
/mnt/mysqlrouterdirectory. If you changed the directory, you must update the ExecStart and ExecStop paths.sudo tee /usr/lib/systemd/system/mysqlrouter.service <<-'EOF' [Unit] Description=MySQL Router Service After=network.target [Service] User=mysqlrouter Group=mysqlrouter Type=forking ExecStart=/mnt/mysqlrouter/start.sh ExecStop=/mnt/mysqlrouter/stop.sh Restart=on-failure StandardOutput=journal [Install] WantedBy=multi-user.target EOFStart the mysqlrouter service.
#Refresh service files.
sudo systemctl daemon-reload
#Start the mysqlrouter service.
sudo systemctl start mysqlrouter.service
#Configure mysqlrouter to automatically start at boot.
sudo systemctl enable mysqlrouter.service
#Check the status of the mysqlrouter service.
sudo systemctl status mysqlrouter.service
Verify the cluster
Simulate a failure by stopping the primary node (ECS Instance B) to verify that the cluster automatically switches nodes and continues to provide services.
Connect to ECS Instance A. For more information, see Connect to Linux.
Use a MySQL client to connect to the proxy node (ECS Instance A). Replace
<username>with the username of the MySQL account you created in Step 1: Configure cluster nodes.mysql -h127.0.0.1 -P6450 -u<username> -pExecute the following SQL statement to check the cluster status. The result shows that three nodes are online, with one node serving as the primary node.
SELECT * FROM performance_schema.replication_group_members;
Execute SQL statements to add a test database and test table.
-- 1. Create a database.
CREATE DATABASE test_db;

-- 2. Use the database.
USE test_db;

-- 3. Create a table named test_table.
CREATE TABLE test_table (
    id INT AUTO_INCREMENT PRIMARY KEY, -- Auto-increment primary key
    name VARCHAR(100) NOT NULL,        -- Name
    value DECIMAL(10, 2) NOT NULL
);

-- 4. Add entries to test_table.
INSERT INTO test_table (name, value) VALUES
('Item A', 100.50),
('Item B', 200.75);
Stop the primary node (ECS Instance B) to simulate a breakdown event.
After the primary node is stopped, execute the following SQL statement again to check the cluster status. You will find that two nodes are online, and a secondary node becomes the primary node.
SELECT * FROM performance_schema.replication_group_members;
Execute the following SQL statement to query data and check for data loss:
SELECT * FROM test_table;Start the primary node (ECS Instance B) to simulate recovery from the breakdown.
Execute the following SQL statement to check the cluster status. The result shows that three nodes are online, with ECS Instance B automatically joining the cluster.
SELECT * FROM performance_schema.replication_group_members;
Add nodes to the cluster
If you want to scale up a MySQL InnoDB Cluster or nodes in the cluster fail, connect to the cluster by using MySQL Shell and run the addInstance command to add new nodes. The new nodes automatically synchronize data.
When more than half of the nodes in a cluster fail, the cluster becomes unavailable. To ensure availability, we recommend that you configure an odd number of nodes in the cluster.
Before a node joins the cluster, install MySQL on the node and perform steps 2, 3, and 4 in Step 1: Configure cluster nodes to configure it.
Connect to ECS Instance A. For more information, see Connect to Linux.
Connect to any node in the cluster by using MySQL Shell. Replace
<username>with the username of the MySQL account you created in Step 1: Configure cluster nodes and<IP>with the IP address of the node. Enter the password of the MySQL account and choose whether to save the password as prompted. Saving the password eliminates the need to enter it for subsequent connections.mysqlsh --js <username>@<IP>:3306Get the cluster information.
var cluster = dba.getCluster();Add a node to the cluster. Replace
<username>with the username of the MySQL account you created in Step 1: Configure cluster nodes and<IP>with the IP address of the node.NoteFor example, to add a node with the IP address
192.168.2.1and the usernamecluster_user, run thecluster.addInstance('cluster_user@192.168.2.1:3306');command.cluster.addInstance('<username>@<IP>:3306');The following output shows that the node is added.
Specify a primary node for the cluster
In a MySQL InnoDB Cluster, if the primary node fails, a new primary node is automatically elected from the remaining nodes. You can connect to the cluster by using MySQL Shell and run the setPrimaryInstance command to manually specify a primary node.
Connect to ECS Instance A. For more information, see Connect to Linux.
Connect to any node in the cluster by using MySQL Shell. Replace
<username>with the username of the MySQL account you created in Step 1: Configure cluster nodes and<IP>with the IP address of the node. Enter the password of the MySQL account and choose whether to save the password as prompted. Saving the password eliminates the need to enter it for subsequent connections.mysqlsh --js <username>@<IP>:3306Get the cluster information.
var cluster = dba.getCluster();Specify a primary node for the cluster. Replace
<username>with the username of the MySQL account you created in Step 1: Configure cluster nodes and<IP>with the IP address of the node.NoteFor example, to specify a node with the IP address
192.168.2.1and the usernamecluster_useras the primary node, run thecluster.setPrimaryInstance('cluster_user@192.168.2.1:3306');command.cluster.setPrimaryInstance('<username>@<IP>:3306');The following output shows that the node is configured as the primary node.

References
For information about MySQL InnoDB Cluster, see MySQL official documentation.
We recommend that you use ApsaraDB RDS to simplify deployment and management. For more information, see What is ApsaraDB RDS for MySQL
Monitor cluster services in real time, including metrics such as CPU, memory, disk I/O, and network traffic, to promptly detect and handle exceptions. For more information, see What is CloudMonitor