An ECS instance does not have a default password. If you forget your password, you can reset it. If you do not set a login name when creating an instance, the system assigns a default one.
Operating system | Default username | Description |
Linux |
| The superuser for the Linux operating system. |
Windows |
| The administrator account for the Windows operating system. |
The root user has elevated permissions, which poses a security risk if used directly. We recommend that you use the ecs-user account and run the sudo command to temporarily gain root privileges for sensitive operations.
2. Password management
2.1 Reset a forgotten password
An online password reset does not require an instance restart. We recommend that you try this method first.
Online reset (no restart)
An online password reset requires the Cloud Assistant Agent to be installed on the instance. For more information, see Check the status of Cloud Assistant Agent and Install the Cloud Assistant Agent.
Go to the ECS console - Instances page, select a region and resource group, and then find the target instance.
Follow the instructions below to open the Reset Password dialog box.
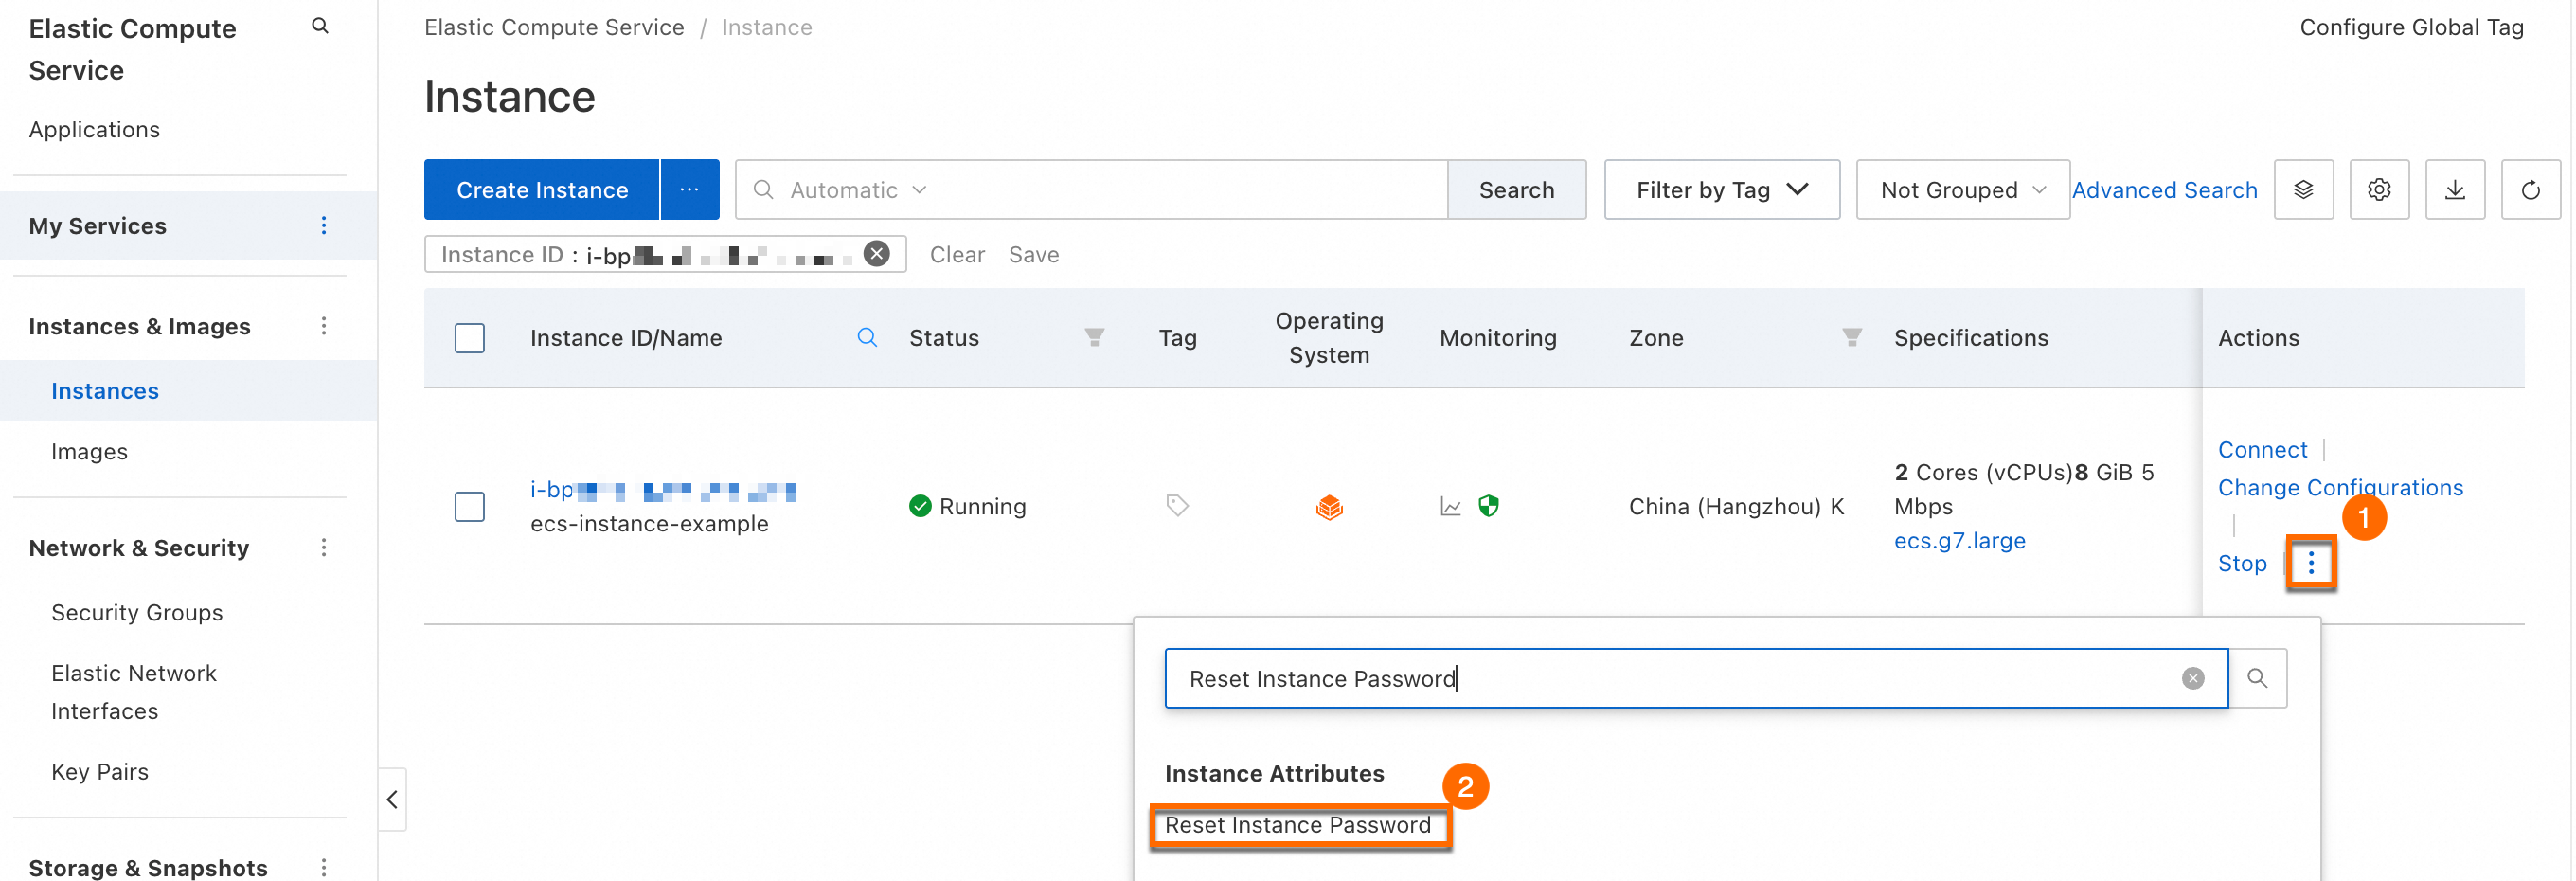
In the Reset Password dialog box, configure the following parameters and click OK. Leave other parameters at their default values.
New Password/Confirm Password: Enter a strong password for the instance. A strong password must contain uppercase letters, lowercase letters, digits, and special characters.
Password Reset Method: Select Online Password Reset.
ImportantIf you cannot select Online Password Reset, use the offline password reset (requires restart) method.
If the password reset fails, use the offline password reset (requires restart) method.
Offline reset (requires restart)
An offline password reset takes effect only after you restart the instance. Restarting the instance may interrupt your services. We recommend that you perform this action during off-peak hours.
Go to the ECS console - Instances page, select a region and resource group, and then find the target instance.
Follow the instructions below to open the Reset Password dialog box.
In the Reset Password dialog box, configure the following parameters and click OK.
New Password/Confirm Password: Enter a strong password for the instance. A strong password must contain uppercase letters, lowercase letters, digits, and special characters.
Password Reset Method: Select Offline Password Reset.
The password reset takes effect only after the instance is restarted. To minimize service disruptions, perform the restart during off-peak hours.
Connect to and log on to the instance by using VNC.
A successful VNC logon indicates that the password has been reset in the operating system.
If you can successfully log on to the instance by using VNC but fail to log on by using tools such as Workbench, the password has been reset. The logon failure may be caused by an SSH configuration issue. For troubleshooting, see Troubleshoot connection issues for Linux instances.
2.2 Change a password
We recommend that you first try to reset the password online in the console.
Online password reset
An online password reset requires the Cloud Assistant Agent to be installed on the instance. For more information, see Check the status of Cloud Assistant Agent and Install the Cloud Assistant Agent.
Go to the ECS console - Instances page, select a region and resource group, and then find the target instance.
Based on your console version, open the Reset Password dialog box.
In the Reset Password dialog box, configure the following parameters and click OK. Leave other parameters at their default values.
New Password/Confirm Password: Enter a strong password for the instance. A strong password must contain uppercase letters, lowercase letters, digits, and special characters.
Password Reset Method: Select Online Password Reset.
ImportantIf you cannot select Online Password Reset, manually change the password on the instance.
If the password reset fails, manually change the password on the instance.
Manual password change
Windows instance
The following example uses a Windows Server 2019 instance:
Right-click the Start icon
 , click Run, enter
 compmgmt.msc, and then pressEnter.In the navigation pane on the left, choose .
Right-click the name of the user whose password you want to change, such as Administrator, and then click Set Password.
In the Set Password for Administrator dialog box, click Continue, and then enter a new password in the New Password and Confirm fields.
ImportantUse a strong password that contains uppercase letters, lowercase letters, digits, and special characters.
Click OK. A confirmation message appears, indicating that the password has been changed.
Linux instance
The following example uses an Alibaba Cloud Linux 3 instance:
Run the following command:
Replace
<username>with the user whose password you want to change.sudo passwd <username>Enter the new password and press
Enter. Re-enter the new password and pressEnteragain.ImportantUse a strong password that contains uppercase letters, lowercase letters, digits, and special characters.
A successful password change returns the following message:
passwd: all authentication tokens updated successfully.
2. Key pair management
When you create an instance, you can attach a key pair that you have created or imported in Alibaba Cloud to log on. If you do not attach a key pair when you create an instance, you must attach a key pair to the instance.
A key pair is a secure logon credential. It helps protect your instance from brute-force and dictionary attacks. It consists of two parts: a public key, which is stored in the instance, and a private key, which you keep. To log on to an instance, you must provide the private key for authentication.
The following figure shows the simplified Secure Shell (SSH) key pair authentication process. After a client sends a logon request, the server encrypts a random string with the public key. The client decrypts this string with the private key and returns it to the server. The server then authenticates the client by comparing the two strings to see if they match.

To use a key pair with a Windows instance, enable the SSH service on the instance. You cannot manage the key pair from the console.
2.1 Create or import a key pair
Console
Create a key pair
Go to the ECS console - Key Pairs page. In the upper-left corner, select a region and a resource group.
ECS instances can be attached only to key pairs in the same region.
Click Create Key Pair. Set the creation method to Auto-create.
Click OK.
After the key pair is created, the browser automatically downloads the private key file (key_pair_name.pem) to your local computer.
Import a key pair
View the public key from a private key
Local machine is Linux or macOS
Use the
ssh-keygencommand to extract and display the public key from an existing private key file.<path_to_key_pair> is the path to the private key file, such as
/path_to_key_pair/my-key-pair.pem.ssh-keygen -y -f <path_to_key_pair>The public key is returned:
ssh-rsa AAAAB3NzaC1yc2EAAAADAQABAAABA****+GF9q7rhc6vYrExwT4WU4fsaRcVXGV2Mg9RHex21hl1au77GkmnIgukBZjywlQOT4GDdsJy2nBOdJPrCEBIPxxxxxxxxxx/fctNuKjcmMMOA8YUT+sJKn3l7rCLkesE+S5880yNdRjBiiUy40kyr7Y+fqGVdSOHGMXZQPpkBtojcxxxxxxxxxxx/htEqGa/Jq4fH7bR6CYQ2XgH/hCap29Mdi/G5Tx1nbUKuIHdMWOPvjxxxxxxxxxx+lHtTGiAIRG1riyNRVC47ZEVCxxxxxxLocal machine is Windows
To view the public key, do the following:
Start PuTTYgen.
Click Load.
Select a
.ppkor.pemfile.PuTTYgen displays the public key.
Import the key pair (public key)
Go to the ECS console - Key Pairs page. In the upper-left corner, select a region.
ECS instances can be attached only to key pairs in the same region.
Click Create Key Pair. Set the creation method to Import and provide the Public Key:.
Click OK to complete the import.
API
Create a key pair: CreateKeyPair.
Import a public key: ImportKeyPair.
2.2 Attach or replace a key pair
Console
You can attach, detach, and replace key pairs for Linux instances in the console.
Attach a key pair when you create an instance
When you create an instance by using the custom launch template, set Logon Credential to Key Pair, and then select an existing Key Pair.
Attach or replace a key pair
Attaching or replacing a key pair in the console requires you to restart the instance for the change to take effect. A restart may interrupt services on the instance. Plan the restart time accordingly.
You can attach a maximum of one key pair to an instance in the console. To attach multiple key pairs, manually attach them within the instance.
Attach or replace in the console (restart required)
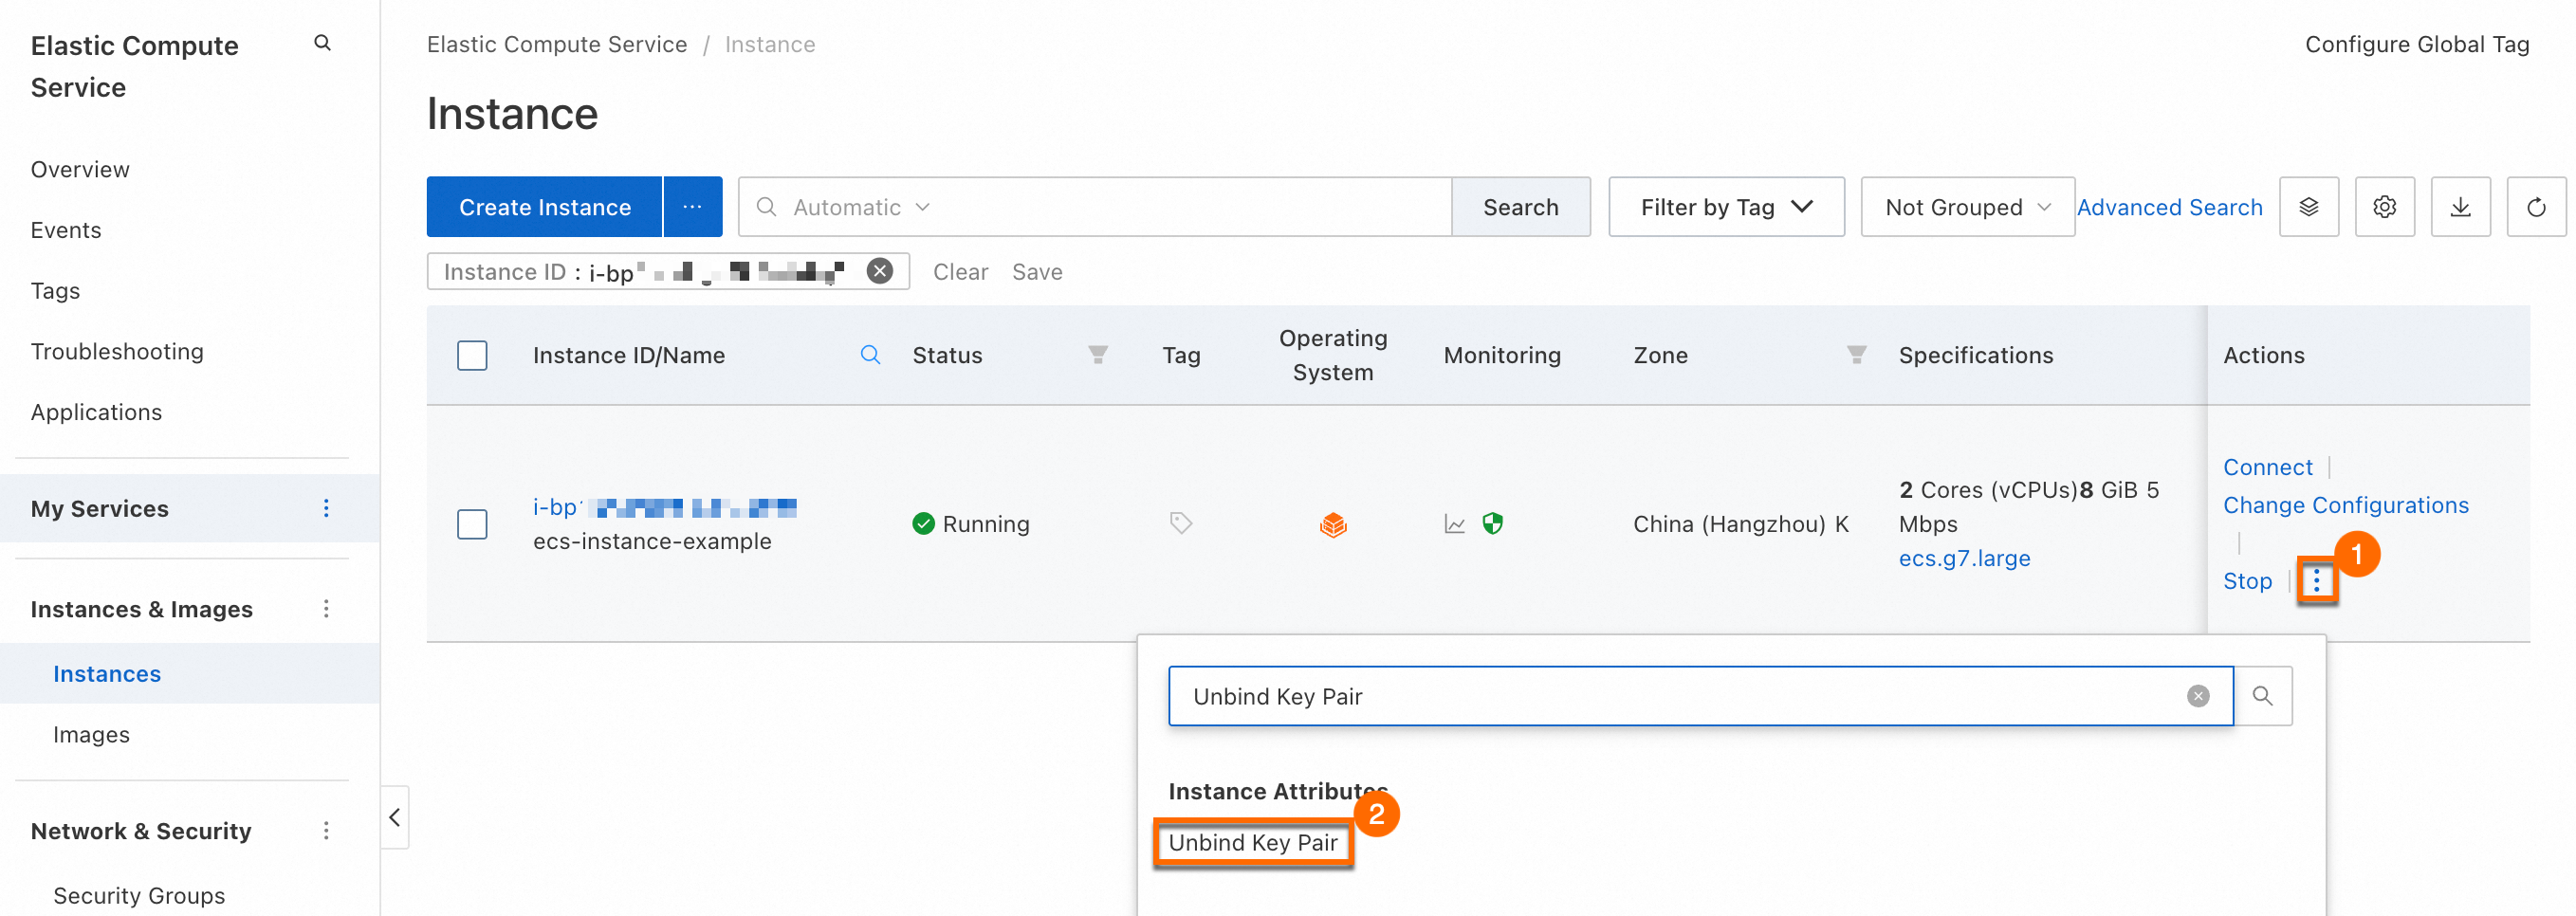
Go to the ECS console - Instances page. In the upper-left corner, select a region and a resource group. Find the target ECS instance and follow the instructions below:
In the Actions column, click . Select an existing key pair and click OK. The change takes effect after you restart the instance.

Manually attach in the instance (no restart required)
Generate a key pair
The steps to generate a key pair vary depending on the tool. This section uses the
ssh-keygentool as an example.Enter the following command to generate a key pair.
ssh-keygen -t rsa -b 2048 -f id_rsaParameters:
-t rsa: The key type isrsa.-b 2048: The key length is 2048 bits.-f id_rsa: The filename and save location for the key pair.
The system prompts you to enter a passphrase. The passphrase protects your private key. Setting a passphrase is a recommended security measure. If you do not need a passphrase, press Enter to continue.
After the command runs, two files are generated in the current directory:
id_rsa: Your private key.id_rsa.pub: Your public key.
ImportantKeep your private key secure. Do not share it with others.
Attach the public key to the instance
After you log on to the instance using Workbench, follow these steps.
The procedure to attach a public key for a root user is different from that for a non-root user. Choose the procedure based on your needs.
Set the public key for the root user
Create the
authorized_keysconfiguration file.If the
/root/.sshdirectory or theauthorized_keysfile does not exist, run the following commands to create them.sudo mkdir /root/.ssh sudo touch /root/.ssh/authorized_keysAdd the public key.
Open the
authorized_keysfile with a text editor, such as Vim.sudo vim /root/.ssh/authorized_keysPaste your public key into the file. You can add multiple public keys. Each public key must be on a new line. After you finish, save and close the file.
Set file permissions.
SSH requires strict permission settings. Incorrect permissions will cause SSH logon to fail.
Run the following commands to set the correct permissions.
sudo chmod 700 /root/.ssh
sudo chmod 600 /root/.ssh/authorized_keys
Set the public key for a non-root user
Create the
authorized_keysconfiguration file.If the
/home/<username>/.sshdirectory or theauthorized_keysfile does not exist, run the following commands to create them.In the commands,
<username>is the username of the user to whom you want to attach the public key.sudo mkdir /home/<username>/.ssh sudo touch /home/<username>/.ssh/authorized_keysAdd the public key.
Open the
authorized_keysfile with a text editor, such as Vim.sudo vim /home/<username>/.ssh/authorized_keysPaste your public key into the file. You can add multiple public keys. Each public key must be on a new line. After you finish, save and close the file.
Set file permissions.
SSH requires strict permission settings. Incorrect permissions will cause SSH logon to fail.
Run the following commands to set the correct permissions.
sudo chown -R <username>:<username> /home/<username>/.ssh
sudo chmod 700 /home/<username>/.ssh
sudo chmod 600 /home/<username>/.ssh/authorized_keys
Enable public key authentication for the SSH service
After you configure the public key, you must enable SSH public key authentication on the server. Otherwise, key-based logon will fail.
Back up the SSH configuration file
/etc/ssh/sshd_config.sudo cp /etc/ssh/sshd_config /etc/ssh/sshd_config.bak
Use a text editor, such as Vim, to open the
/etc/ssh/sshd_configfile. Find thePubkeyAuthenticationparameter and set it toyes. This enables public key authentication.sudo vim /etc/ssh/sshd_configRestart the SSH service to apply the changes.
Example for Alibaba Cloud Linux 3:
sudo systemctl restart sshdOn some operating systems, such as Ubuntu or Debian, the SSH service is named
sshinstead ofsshd. Adjust the command as needed.ImportantIf you are connected to the instance over SSH, restarting the service may disconnect you. You can reconnect after the service restarts.
API
You can use API operations to attach, replace, or detach key pairs only for Linux instances.
Set a key pair when creating an instance: When you call RunInstances to create an instance, set
KeyPairNameto the name of the key pair.Attach or replace a key pair: Call AttachKeyPair and specify the key pair name
KeyPairNameand the instance IDsInstanceIds.Detach a key pair: Call DetachKeyPair and specify the key pair name
KeyPairNameand the instance IDsInstanceIds.
2.3 Detach a key pair
Detaching a key pair in the console requires you to restart the instance for the change to take effect. A restart may interrupt services on the instance. Plan the restart time accordingly.
Detach in the console (restart required)
Go to the ECS console - Instances page. In the upper-left corner, select a region and a resource group. Find the target ECS instance and follow the instructions below:
In the Actions column, click , and then click Unbind. The change takes effect after you restart the instance.
Manually detach in the instance (no restart required)
You can manually detach a key pair within an instance by removing its public key from the authorized_keys file. The path to the authorized_keys file varies for different users:
root user:
/root/.ssh/authorized_keysnon-root user:
/home/<username>/.ssh/authorized_keyswhere
<username>is the username of the user.
2.4 Delete a key pair
Console
You cannot delete a key pair that is attached to an instance.
Go to the ECS console - Key Pairs page. In the upper-left corner, select a region and a resource group.
Find the key pair that you want to delete. In the Actions column, click Delete. This deletes the key pair.
API
Call DeleteKeyPairs and set KeyPairNames to the list of names of the key pairs that you want to delete.
3. Multi-user remote logon
To set up multiple users for an ECS instance, follow these steps to create a standard user and enable remote access.
Linux systems
Log on to the instance using Workbench and create a user as follows:
Create a user
Replace <username> in the command with the username of the user to create. For example, to create a user named
exampleuser, runsudo useradd -m exampleuser.sudo useradd -m <username>Set a password or key pair
Attach a key pair
Generate a key pair file on your local machine.
ImportantFor security, do not use ssh-keygen to create a key pair on the instance. Do not save the generated private key on the ECS instance you will connect to.
The steps to generate a key pair vary depending on the tool. This section uses the
ssh-keygentool as an example.Enter the following command to generate a key pair.
ssh-keygen -t rsa -b 2048 -f id_rsaParameters:
-t rsa: The key type isrsa.-b 2048: The key length is 2048 bits.-f id_rsa: The filename and save location for the key pair.
The system prompts you to enter a passphrase. The passphrase protects your private key. Setting a passphrase is a recommended security measure. If you do not need a passphrase, press Enter to continue.
After the command runs, two files are generated in the current directory:
id_rsa: Your private key.id_rsa.pub: Your public key.
ImportantKeep your private key secure. Do not share it with others.
Attach the public key to the user.
Create the
authorized_keysconfiguration file.If the
/home/<username>/.sshdirectory or theauthorized_keysfile does not exist, run the following commands to create them.In the commands,
<username>is the username of the user to whom you want to attach the public key.sudo mkdir /home/<username>/.ssh sudo touch /home/<username>/.ssh/authorized_keysAdd the public key.
Open the
authorized_keysfile with a text editor, such as Vim.sudo vim /home/<username>/.ssh/authorized_keysPaste your public key into the file. You can add multiple public keys. Each public key must be on a new line. After you finish, save and close the file.
Set file permissions.
SSH requires strict permission settings. Incorrect permissions will cause SSH logon to fail.
Run the following commands to set the correct permissions.
sudo chown -R <username>:<username> /home/<username>/.ssh
sudo chmod 700 /home/<username>/.ssh
sudo chmod 600 /home/<username>/.ssh/authorized_keys
Enable public key authentication for the SSH service.
After you configure the public key, you must enable SSH public key authentication on the server. Otherwise, key-based logon will fail.
Back up the SSH configuration file
/etc/ssh/sshd_config.sudo cp /etc/ssh/sshd_config /etc/ssh/sshd_config.bak
Use a text editor, such as Vim, to open the
/etc/ssh/sshd_configfile. Find thePubkeyAuthenticationparameter and set it toyes. This enables public key authentication.sudo vim /etc/ssh/sshd_configRestart the SSH service to apply the changes.
Example for Alibaba Cloud Linux 3:
sudo systemctl restart sshdOn some operating systems, such as Ubuntu or Debian, the SSH service is named
sshinstead ofsshd. Adjust the command as needed.ImportantIf you are connected to the instance over SSH, restarting the service may disconnect you. You can reconnect after the service restarts.
Set a password
Run the following command:
Replace
<username>with the username whose password you want to change.sudo passwd <username>Enter the new password and press
Enter. Re-enter the new password and pressEnter.After the password is changed successfully, the system displays a message similar to the following:
passwd: all authentication tokens updated successfully.(Verification) Remotely log on to the ECS instance with the new user account.
Windows systems
By default, Windows systems support a maximum of two concurrent remote connections through Remote Desktop Protocol (RDP). To allow more than two users to log on to a Windows instance at the same time, you must use Microsoft's Remote Desktop Services.
Log on to the instance using Workbench and perform the following steps:
Create a user
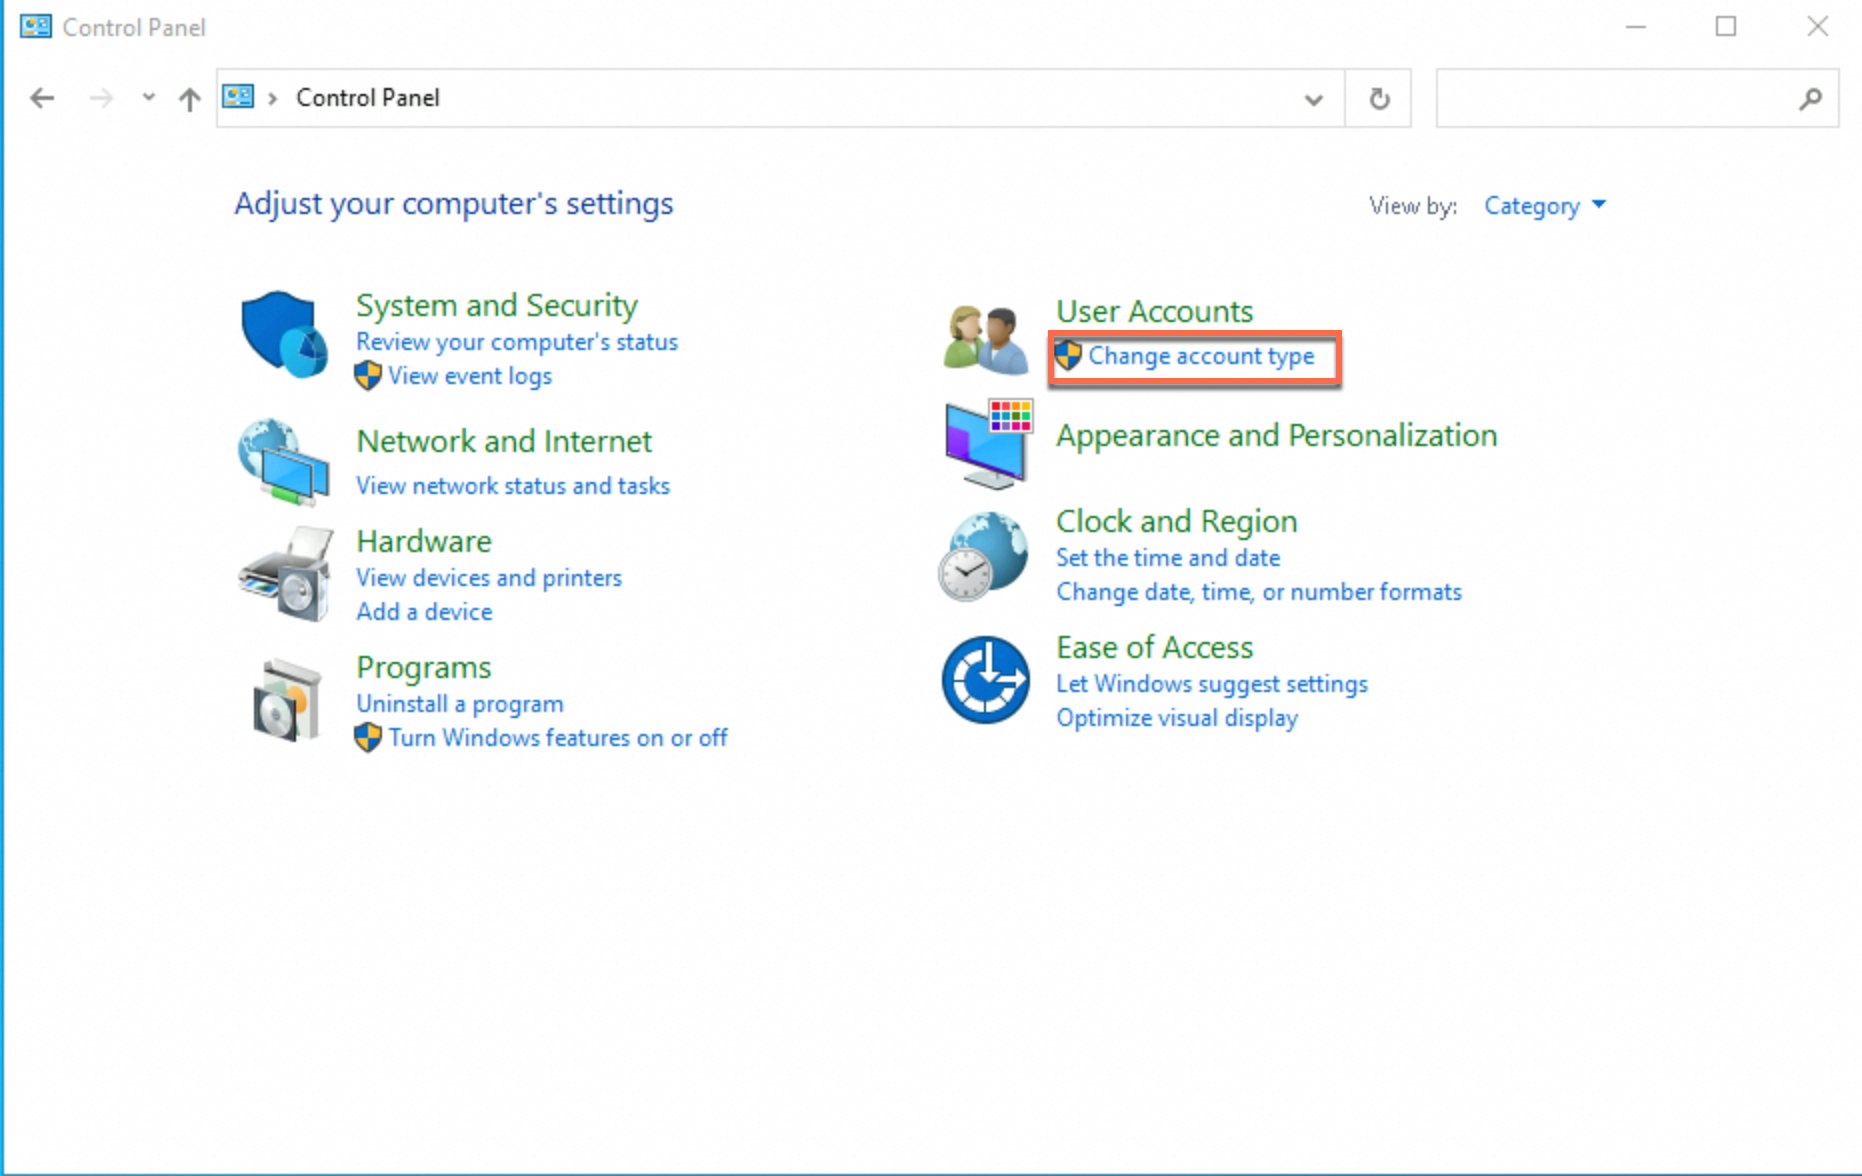
Open Control Panel, find User Accounts, and then click Change account type.
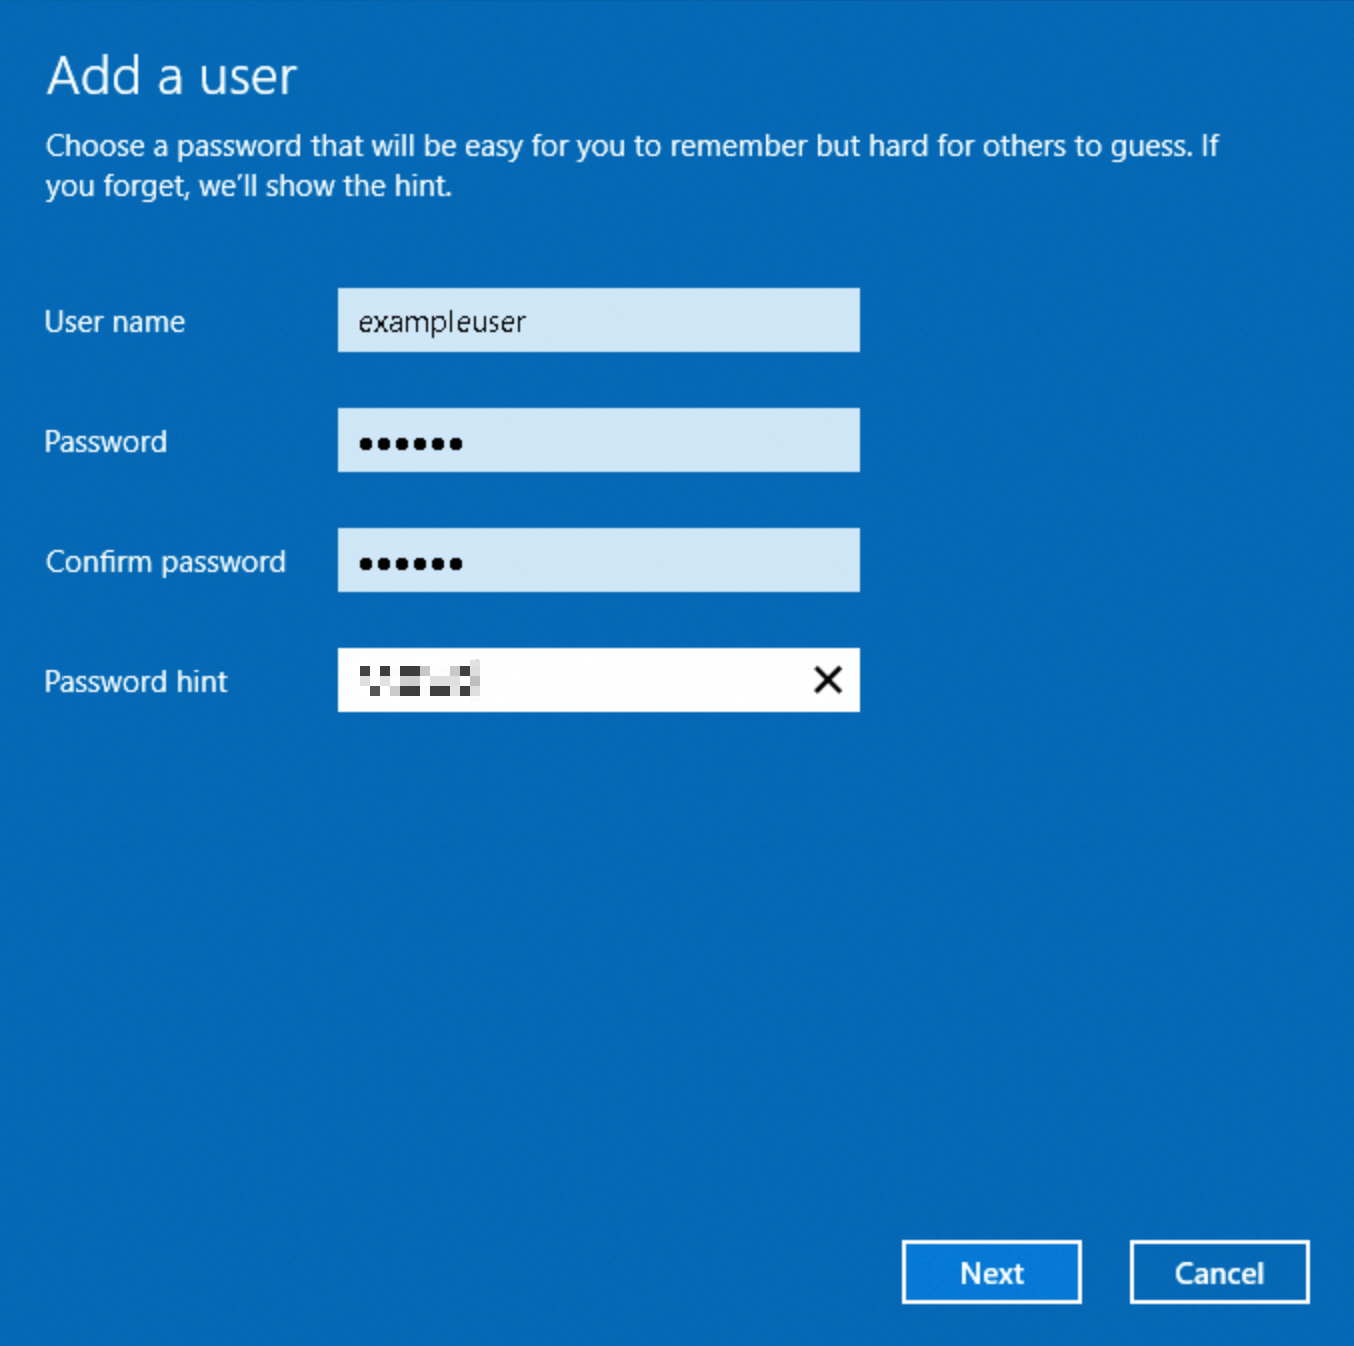
On the Manage Accounts page, click Add a user account to go to the Add User page.

On the Add a user page, follow the on-screen instructions to set the username and password for the new user.
This example creates a user named
exampleuser. Set the User Name as needed.Click Next, and then click Complete. The new user is created.
Add the new user to the
Remote Desktop UsersgroupOnly users in the Remote Desktop Users group can remotely log on to the instance.
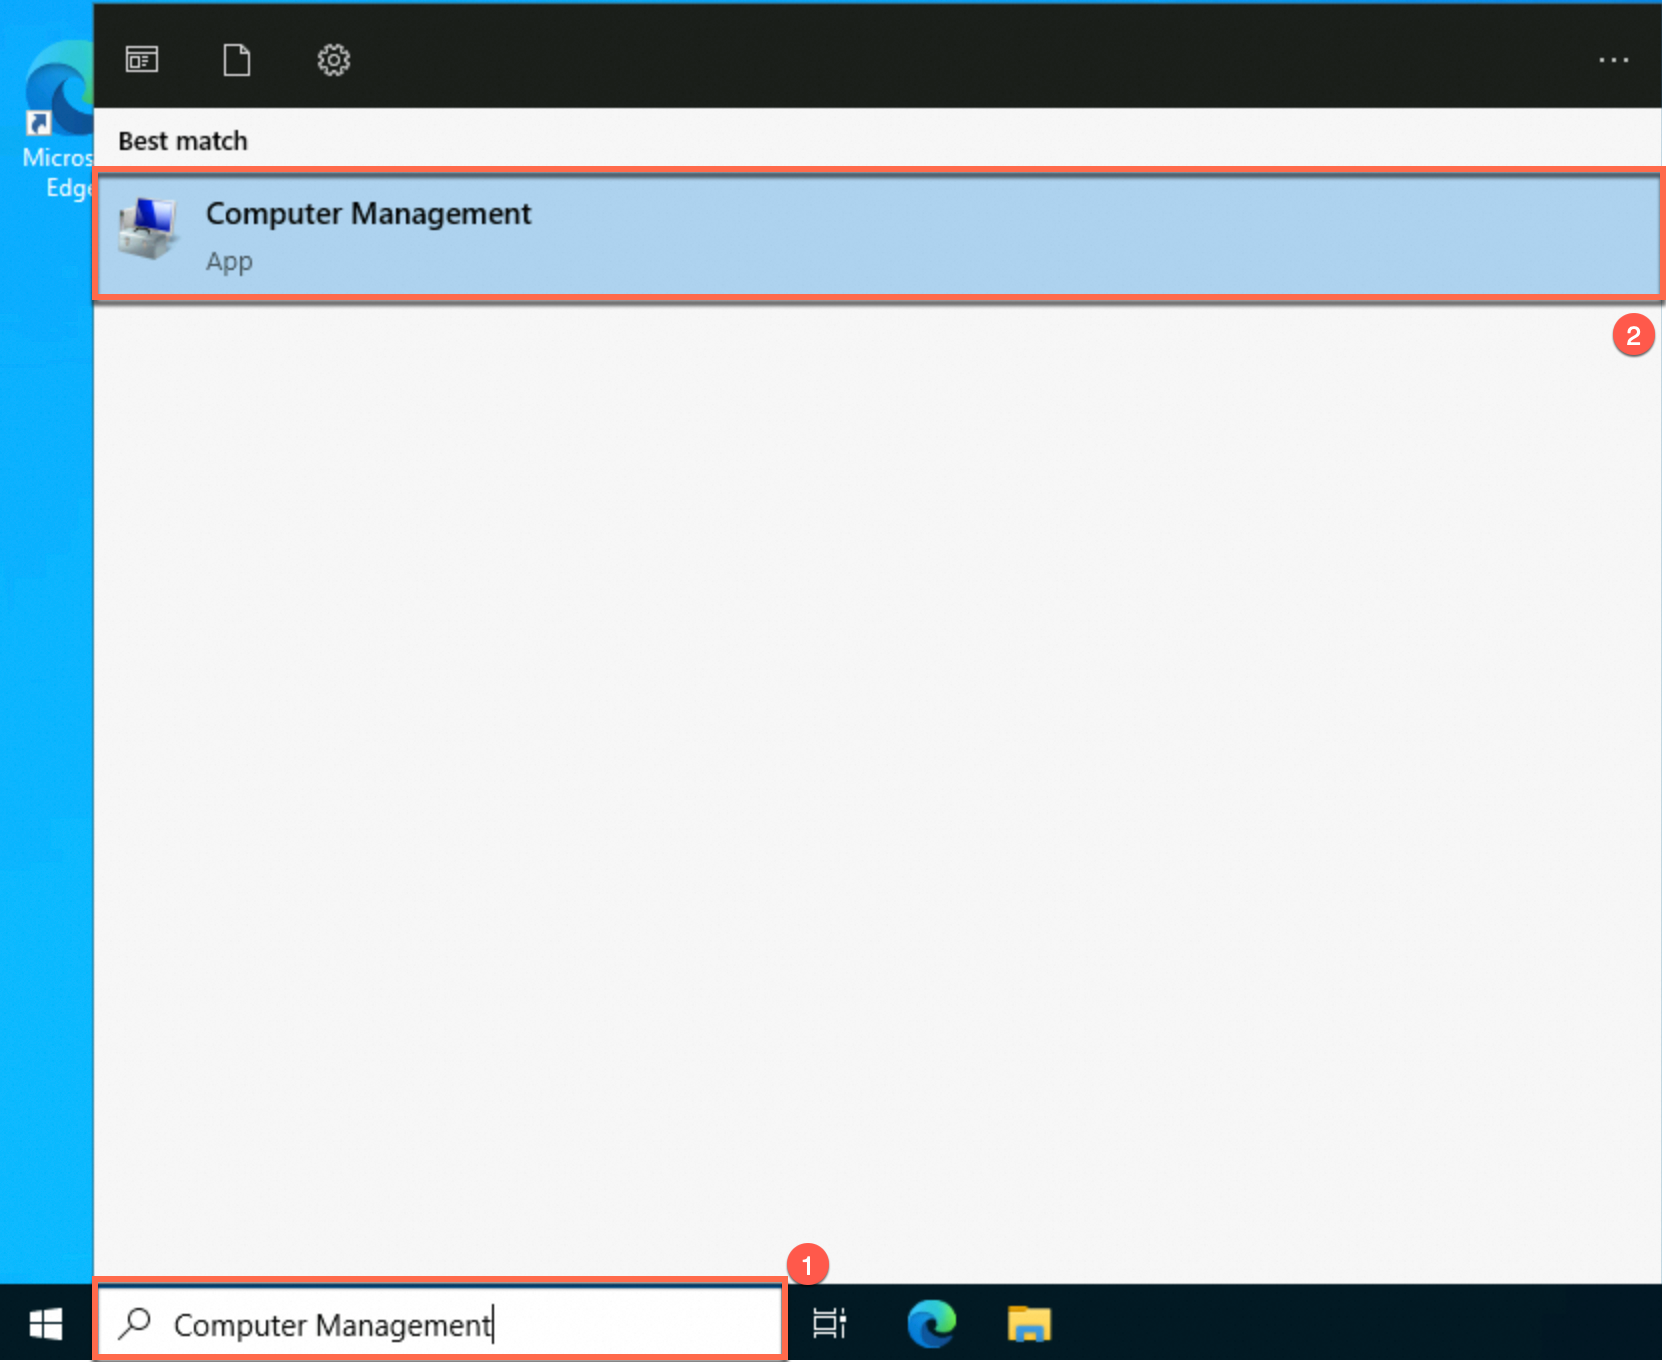
In the search box on the taskbar, search for Computer Management. Click Computer Management in the search results to open the Computer Management page.
Under , find the Remote Desktop Users group. Double-click it to open the Remote Desktop Users Properties page.
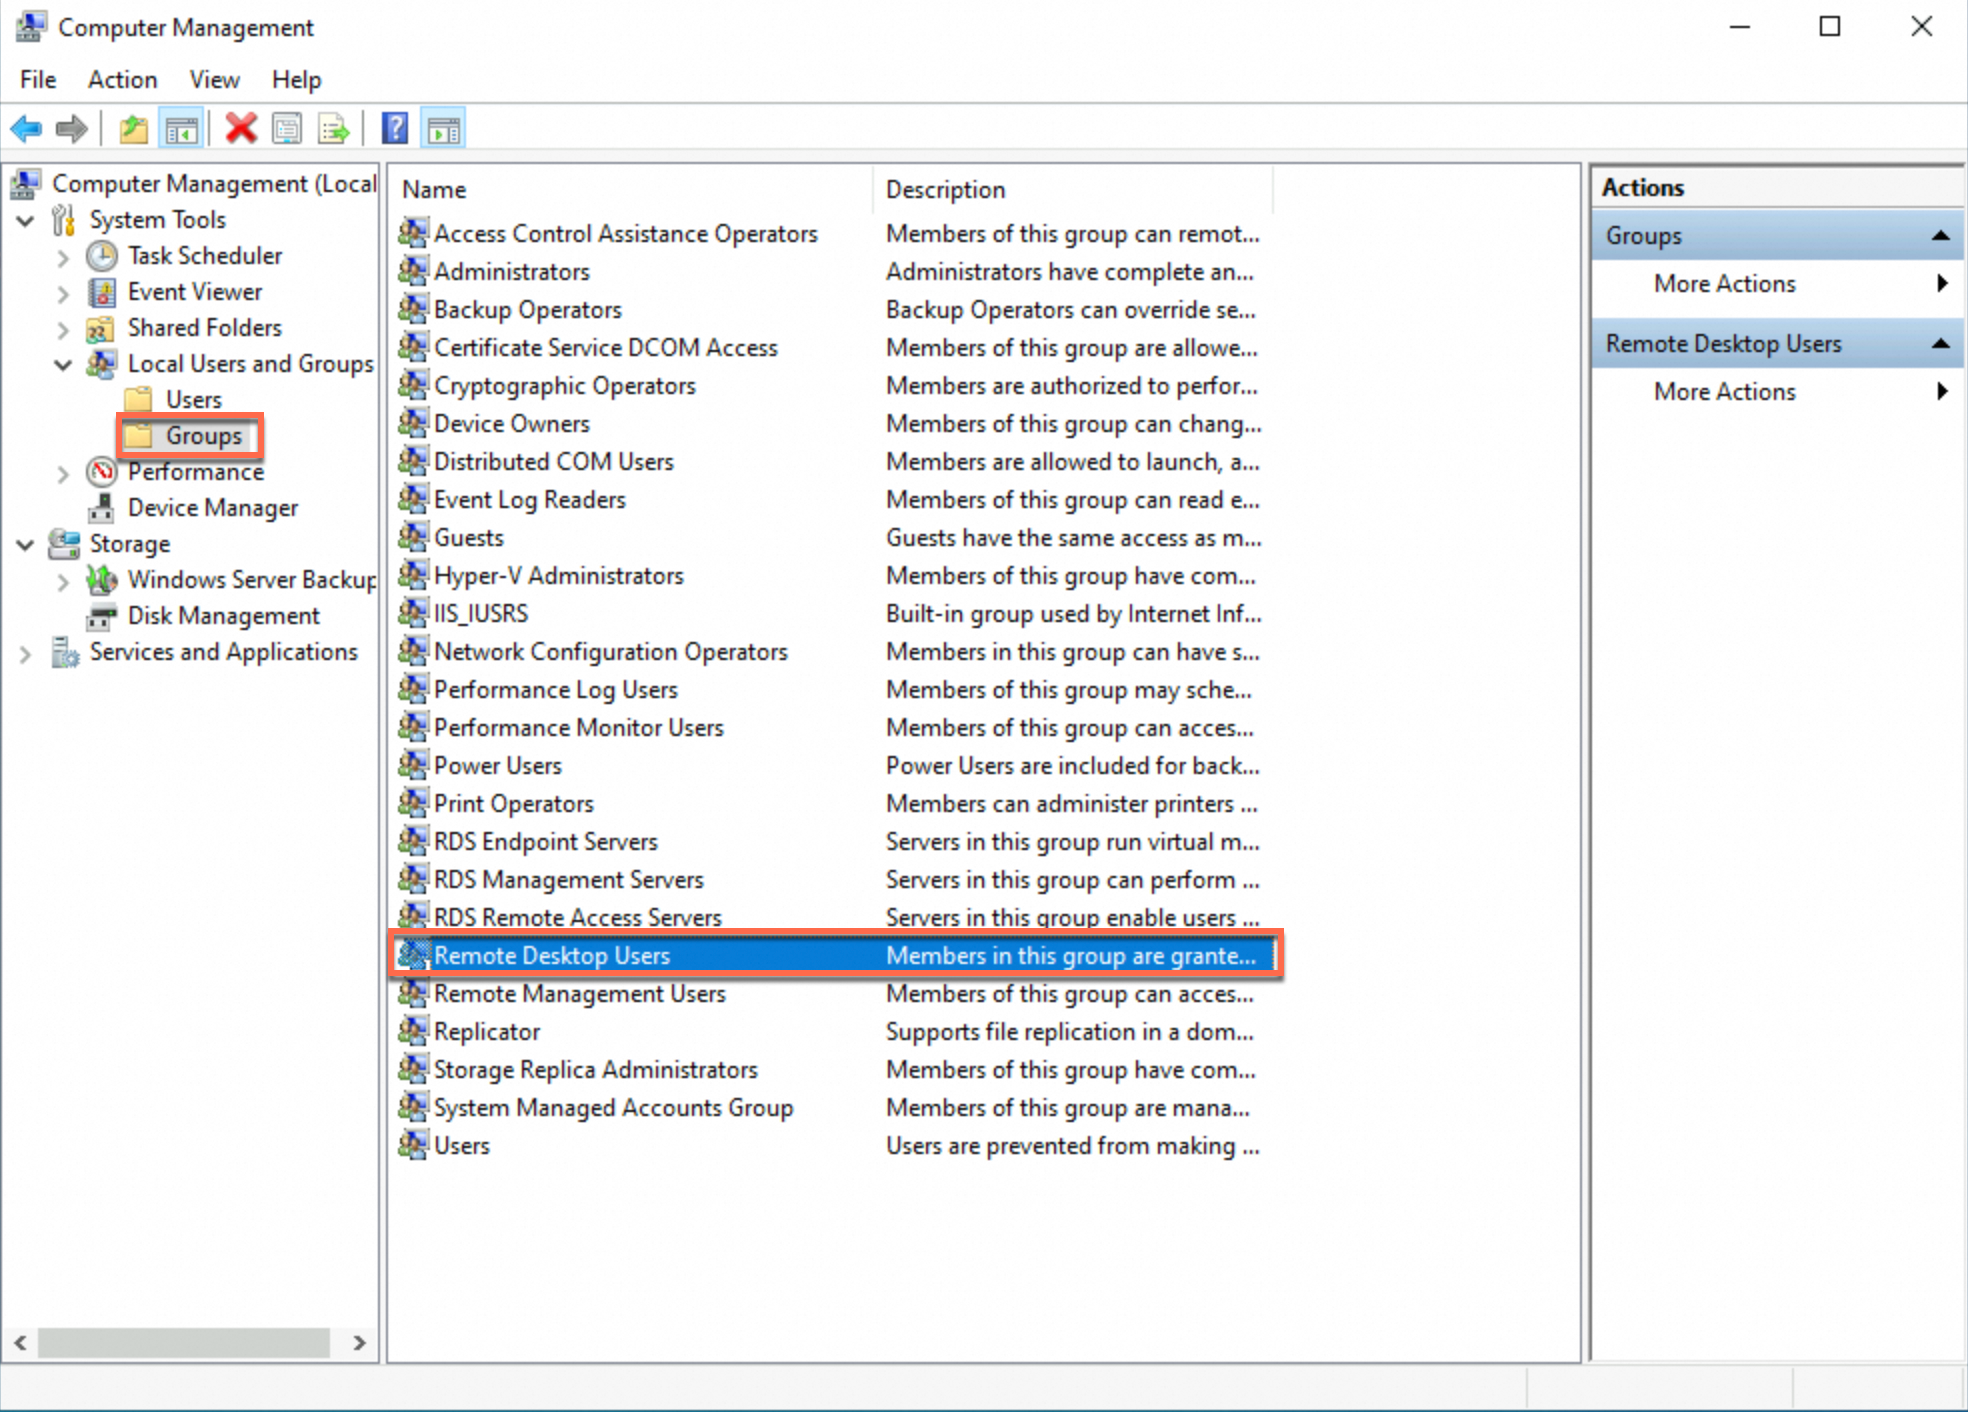
The procedure is shown in the image.
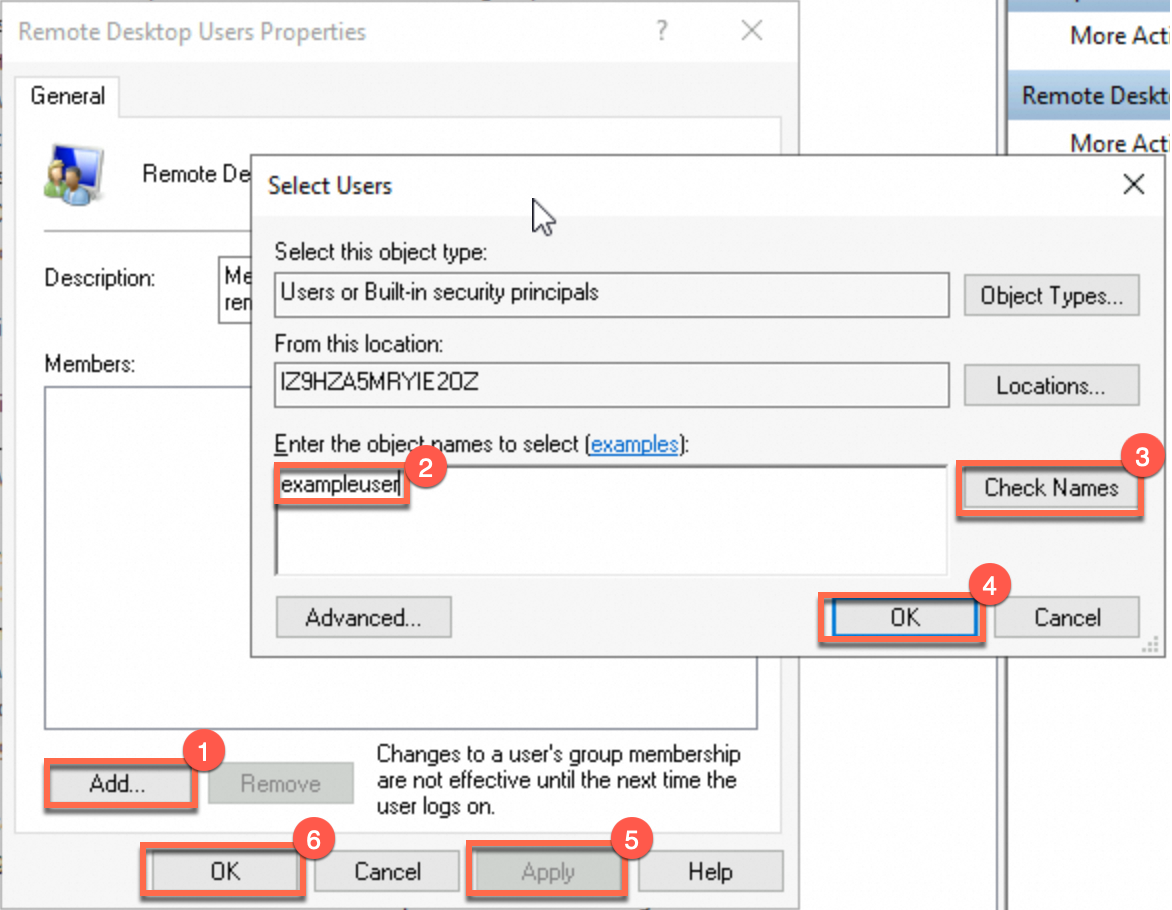
On the Remote Desktop Users Properties page, click Add.
Enter the username of the user you created, and then click Check Names. The full name of the user is automatically entered in the text box.
Click OK. On the Remote Desktop Users Properties page, click OK and then OK. The user is added to the user group.
(Verification) Remotely log on to the ECS instance with the new user account.
FAQ
Q1: What is the default or initial login name for an ECS instance?
For Linux instances: The default is
root. If you set the instance to use ecs-user during creation, the login name is ecs-user.For Windows instances: The default is
Administrator.
Q2: What is the default or initial password for an ECS instance?
None.
For security reasons, Alibaba Cloud does not set a default or initial password for ECS instances. If you did not set a password when you created the instance, see Reset a password (if you do not know or have forgotten the original password).
Q3: How can I view the instance password?
Alibaba Cloud does not save your instance password, so it cannot be viewed.
Q4: How do I recover credentials if I forget my login name or password?
Forgotten login name: Use the Reset Password feature to find your login name. The login name that you set when you created the instance appears at the top of the Reset Instance Password dialog box.
Forgotten password: See Reset a password (if you do not know or have forgotten the original password).
Q5: Why does an online password reset fail?
Most failures occur because security software on the instance blocks the Cloud Assistant command to change the password. Use an offline password reset instead.
Q6: How do I switch between "root" and "ecs-user"?
Switching from root to ecs-user
You can set the login name to
ecs-useronly when you create an instance with a custom configuration using specific Linux images.After an instance is created, you cannot directly switch the login name to
ecs-user. However, you can achieve a similar result. Add a new user for remote login namedecs-user, and then grant that usersudopermissions.Switching from ecs-user to root
We strongly recommend that you continue to use
ecs-userand run commands that require privileges withsudo. Do not log in directly as therootuser.If you must switch to the
rootuser in an active session, log in to the instance as ecs-user, and then run thesudo sucommand to switch to therootuser.
Note: Features in the console, such as offline password reset and attaching a key pair, apply only to the login name that was set when the instance was created.
Q7: How can I enable a Linux instance to support both SSH key pair and password authentication?
Modify the /etc/ssh/sshd_config configuration file for the SSH service.
Enable SSH key pair authentication (recommended for better security): This is controlled by the
PubkeyAuthenticationoption. Set this option toyesto enable key pair authentication. After you change the configuration, restart the SSH service on the instance.Enable SSH password authentication (not recommended due to lower security): This is controlled by the
PasswordAuthenticationoption. Set this option toyesto enable password authentication. After you change the configuration, restart the SSH service on the instance.
Q8: How do I set the ECS login name when creating an instance with Terraform?
The default login name for an ECS instance is determined by its image. The default is root for Linux and Administrator for Windows. When you create an ECS instance using Terraform, you can use the image_options block and the login_as_non_root parameter to configure a non-root login user.
Parameter:
login_as_non_root(Boolean).Value: Set this parameter to
true.Result: The login name for the instance changes to
ecs-user.