A BI portal, also known as a data product, is a set of dashboards that are organized in the form of menus. You can use a BI portal to perform complex topic-based data analysis with navigation menus.
Create a BI portal
- Log on to the Quick BI console.
- Click the Workspace tab. In the left-side navigation pane, click BI Portals.
- On the BI Portals page that appears, click Create BI Portal in the upper-right corner.
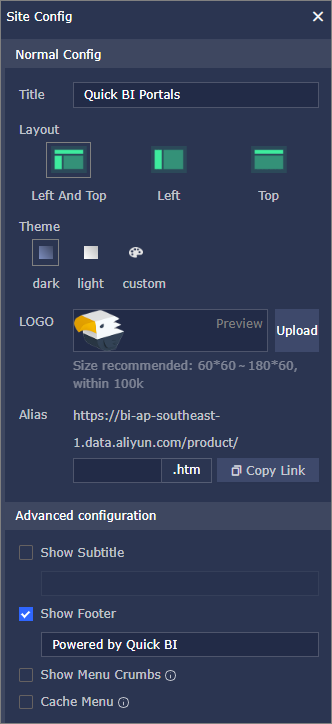
- On the Site Config tab, configure the title, logo, theme, and footer of the portal.
- Click the Exit icon. Menu Config and Content settings tabs appear for you to configure the menus.
- On the Menu Config tab, add menus, configure menu levels, and specify whether to set a menu as the home page. You can also drag and drop a menu to adjust its level.
- On the Content settings tab, configure the display name, external link, icon, and view mode of each menu.
- Click Preview to view the BI portal.
Configure the menus
| Tab | Parameter | Description |
|---|---|---|
| Menu Config | Add main menu | Add a level-1 menu.
Note You can also drag and drop a menu to adjust its level. |
 |
Hides a menu. If a parent menu is hidden, its child menus are also hidden.
If you want to show a menu after it is hidden, click the icon again. |
|
 |
Adds a level-2 or lower menu. | |
 |
Set a menu as the home page. When you open a BI portal, this home page appears. | |
 |
Deletes a menu. | |
| Content settings | Menu display name | Specifies the name of a menu. |
| Show menu icon | Sets the icon of a menu. | |
| Menu can fold | Specifies whether a menu can be folded. | |
| Default folding | Specifies the default state of a menu.
Note This option can be selected only if Menu can fold is selected. |
|
| Set to empty node | If this option is selected, you cannot set the menu content. | |
| Content settings | The following content types are supported:
View mode: The options are Open in current page and Open in a new window. Note This field cannot be configured if Set to empty node is selected. |
Manage BI portals
- Search for the BI Portal Enter the name of the BI portal in the search box and click the search icon.

- Edit the BI portal
Click the Edit icon in the Actions column. On the BI portal edit page that appears, edit this portal.
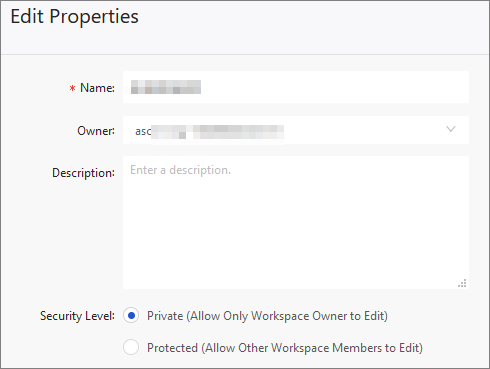
- Edit Properties Click the Edit Properties icon in the Actions column. In the Edit Properties side pane that appears, edit the portal name, owner, description, and security policy of the BI portal.
- Share the BI portal
Click the Share icon in the Actions column. In the Share side pane that appears, authorize users in the same organization to access this portal. For more information, see Share the data objects in a group workspace and Share the data objects in the personal workspace.
- Manage Menu Permissions
Click the More icon in the Actions column and select Manage Menu Permissions. In the dialog box that appears, authorize users to access menus in the BI portal. For more information, see Configure menu permissions for a BI portal.
- Delete
Click the More icon in the Actions column and select Delete. In the confirmation message that appears, click OK.