By default, workloads in a Service Mesh (ASM) instance can communicate with each other. You can create authorization policies to perform access control and permission management on workloads in a cluster. In this case, only requests that meet specific requirements can access the workloads. For example, you can control access to workloads by specifying request paths, request methods, and IP addresses of clients. This improves security and protects the resources of the ASM instance.
Prerequisites
Feature introduction
You can specify the CUSTOM, DENY, or ALLOW action in an authorization policy. The authorization policies have different levels of priority when you apply multiple authorization policies to a single workload. To be specific, the system verifies requests based on the CUSTOM, DENY, and ALLOW authorization policies in sequence. If you create multiple authorization policies for a workload, the following rules take effect:
If a request matches the condition in a CUSTOM authorization policy that rejects the request, the request is rejected.
If a request matches the condition in a DENY authorization policy that rejects the request, the request is rejected.
By default, if no ALLOW authorization policy is configured for a workload, the request can access the workload.
If an ALLOW authorization policy is configured for a workload and a request matches the condition in the ALLOW authorization policy, the request can access the workload.
If a request does not meet all the preceding requirements, the request is rejected.
This topic provides the following four examples to help you quickly understand and configure authorization policies:
Scenario 1: Control access to a specific path of a workload
In this example, an authorization policy is created to specify that applications in the foo namespace can access the /headers path of the HTTPBin application. The HTTPBin application resides in the foo namespace. Requests to other paths fail. Applications in namespaces other than the foo namespace cannot access the HTTPBin application.
Step 1: Enable automatic sidecar proxy injection for the default and foo namespaces
Create the default and foo namespaces. For more information, see Create a namespace.
Enable automatic sidecar proxy injection for the default and foo namespaces. For more information, see Enable automatic sidecar proxy injection.
Step 2: Deploy test applications
Deploy the sleep application in the default and foo namespaces.
Create a sleep.yaml file that contains the following content:
Run the following command to deploy the sleep application in the default namespace:
kubectl apply -f sleep.yaml -n defaultRun the following command to deploy the sleep application in the foo namespace:
kubectl apply -f sleep.yaml -n foo
Deploy the HTTPBin application in the foo namespace.
Create an httpbin.yaml file that contains the following content:
Run the following command to deploy the HTTPBin application in the foo namespace:
kubectl apply -f httpbin.yaml -n foo
Step 3: Create an authorization policy
Log on to the ASM console. In the left-side navigation pane, choose .
On the Mesh Management page, click the name of the ASM instance. In the left-side navigation pane, choose . On the page that appears, click Create.
On the Create page, configure the parameters that are described in the following table and click Create.
Parameter
Description
Name
The name of the authorization policy.
Policy Type
The authorization action. In this example, the value is set to ALLOW.
Namespace
The namespace in which you want to create the authorization policy. In this example, the Namespace parameter on the Workload Scope tab is set to foo.
Effective Scope
The effective scope of the authorization policy. In this example, the value is set to Service.
Workload
The workload on which the authorization policy takes effect. In this example, the value is set to httpbin.
Request Matching Rules
The request matching rule of the authorization policy. In this example, the switch next to Namespaces is turned on in the Add Request Source section and the value is set to foo. This setting allows all applications in the foo namespace to access the HTTPBin application.
In this example, the switch next to Paths is turned on in the Add Request Target section and the value is set to /headers. This setting allows applications in all namespaces other than the foo namespace to access only the /headers path of the HTTPBin application in the foo namespace.
Step 4: Check whether the authorization policy that controls access to the specific path takes effect
Send a request by using the sleep application in the default namespace to access the HTTPBin application in the foo namespace.
Log on to the ACK console. In the left-side navigation pane, click Clusters.
On the Clusters page, find the cluster that you want to manage and click its name. In the left-side pane, choose .
In the upper part of the Pods page, select default from the Namespace drop-down list. Find the sleep container in the list, click in the Actions column.
Run the following command in the Terminal section of the sleep container to access the /headers path of the HTTPBin application:
curl httpbin.foo.svc.cluster.local:8000/headersThe 403 code is returned, which indicates that the request is rejected.
Run the following command in the Terminal section of the sleep container to access the /ip path of the HTTPBin application:
curl httpbin.foo.svc.cluster.local:8000/ipThe 403 code is returned, which indicates that the request is rejected.
Send a request by using the sleep application in the foo namespace to access the HTTPBin application in the foo namespace.
In the left-side navigation pane of the details page, choose .
In the upper part of the Pods page, select foo from the Namespace drop-down list. Find the sleep container in the list, click in the Actions column.
Run the following command in the Terminal section of the sleep container to access the /headers path of the HTTPBin application:
curl httpbin.foo.svc.cluster.local:8000/headersExpected output:
{
  "headers": {
    "Accept": "*/*",
    "Host": "httpbin.foo.svc.cluster.local:8000",
    "User-Agent": "curl/7.82.0-DEV",
    "X-Envoy-Attempt-Count": "1",
    "X-Forwarded-Client-Cert": "By=spiffe://cluster.local/ns/foo/sa/httpbin;Hash=f7ab4985563b5b1986314d5a36c6e46819213e2f38301f534f00afb7cd4b9164;Subject=\"\";URI=spiffe://cluster.local/ns/foo/sa/sleep"
  }
}
Run the following command in the Terminal section of the sleep container to access the /ip path of the HTTPBin application:
curl httpbin.foo.svc.cluster.local:8000/ipThe 403 code is returned, which indicates that the request is rejected.
The output results indicate that applications in the default namespace cannot access paths of the HTTPBin application in the foo namespace. Applications in the foo namespace can access the /headers path of the HTTPBin application.
Scenario 2: Control the request method and access to a specific path of a workload
In this example, an authorization policy is created to specify that applications in namespaces other than the foo namespace can access only the /status path of the HTTPBin application by using GET requests. The HTTPBin application resides in the foo namespace. Requests to other paths of the HTTPBin application and requests that use a request method other than GET fail.
Step 1: Enable automatic sidecar proxy injection for the default and foo namespaces
Create the default and foo namespaces. For more information, see Create a namespace.
Enable automatic sidecar proxy injection for the default and foo namespaces. For more information, see Enable automatic sidecar proxy injection.
Step 2: Deploy test applications
Deploy the sleep application in the default and foo namespaces.
Create a sleep.yaml file that contains the following content:
Run the following command to deploy the sleep application in the default namespace:
kubectl apply -f sleep.yaml -n defaultRun the following command to deploy the sleep application in the foo namespace:
kubectl apply -f sleep.yaml -n foo
Deploy the HTTPBin application in the foo namespace.
Create an httpbin.yaml file that contains the following content:
Run the following command to deploy the HTTPBin application in the foo namespace:
kubectl apply -f httpbin.yaml -n foo
Step 3: Create an authorization policy
Log on to the ASM console. In the left-side navigation pane, choose .
On the Mesh Management page, click the name of the ASM instance. In the left-side navigation pane, choose . On the page that appears, click Create.
On the Create page, configure the parameters that are described in the following table and click Create.
Turn on the switch next to Methods and set the value to GET.
Turn on the switch next to Paths and set the value to /status/*. This setting allows applications in all namespaces other than the foo namespace to access only the /status path of the HTTPBin application by using the GET requests. The HTTPBin application resides in the foo namespace.
Parameter | Description |
Name | The name of the authorization policy. |
Policy Type | The authorization action. In this example, the value is set to ALLOW. |
Namespace | The namespace in which you want to create the authorization policy. In this example, the Namespace parameter on the Workload Scope tab is set to foo. |
Effective Scope | The effective scope of the authorization policy. In this example, the value is set to Service. |
Workload | The workload on which the authorization policy takes effect. In this example, the value is set to httpbin. |
Request Matching Rules | The request matching rule of the authorization policy. For this example, perform the following operations in the Add Request Target section: |
Step 4: Check whether the authorization policy that controls the request method and access to the specific path of a workload takes effect
Log on to the ACK console. In the left-side navigation pane, click Clusters.
On the Clusters page, find the cluster that you want to manage and click its name. In the left-side pane, choose .
In the upper part of the Pods page, select default from the Namespace drop-down list. Find the sleep container in the list, click in the Actions column.
Run the following command in the Terminal section of the sleep container to access the /status path of the HTTPBin application by using a POST request:
curl -I -X POST "httpbin.foo.svc.cluster.local:8000/status/200" -H "accept: text/plain"The 403 code is returned, which indicates that the request is rejected.
Run the following command to access the /IP path of the HTTPBin application by using a GET request:
curl -I -X GET "httpbin.foo.svc.cluster.local:8000/IP/200" -H "accept: text/plain"The 403 code is returned, which indicates that the request is rejected.
Run the following command to access the /status path of the HTTPBin application by using a GET request:
curl -I -X GET "httpbin.foo.svc.cluster.local:8000/status/200" -H "accept: text/plain"Expected output:
HTTP/1.1 200 OK
server: envoy
date: Fri, 29 Apr 2022 03:01:16 GMT
content-type: text/html; charset=utf-8
access-control-allow-origin: *
access-control-allow-credentials: true
content-length: 0
x-envoy-upstream-service-time: 5
The result indicates that applications in the default namespace can access the /status path of the HTTPBin application only by using GET requests. This means that the authorization policy takes effect.
Example 3: Control access to a workload by client IP addresses
You can create an authorization policy that allows requests from only authorized client IP addresses to access the HTTPBin application in the foo namespace.
Step 1: Enable automatic sidecar proxy injection for the foo namespace
Create the foo namespace. For more information, see Manage global namespaces.
Enable automatic sidecar proxy injection for the foo namespace. For more information, see Enable automatic sidecar proxy injection.
Step 2: Deploy an ingress gateway
Log on to the ASM console. In the left-side navigation pane, choose .
On the Mesh Management page, click the name of the ASM instance. In the left-side navigation pane, choose .
On the Ingress Gateway page, click Create, configure the parameters as required, and then click Create.
Parameter
Description
Name
The name of the ingress gateway.
Cluster
The cluster in which you want to deploy the ingress gateway.
LoadBalancer
The type of the load balancer instance that you want to use. Valid values: Network Load Balancer (NLB) and Classic Load Balancer (CLB). In this example, select CLB and Internet Access.
Create LoadBalancer Instance
The load balancer instance that you want to use. You can select a load balancer instance by using one of the following methods:
Use Existing LoadBalancer Instance: Select an existing load balancer instance from the drop-down list.
Create LoadBalancer Instance: Click Create LoadBalancer Instance and select the instance specifications that you need from the drop-down list.
Port Mapping
The ports over which services are exposed. Set Protocol and Service Port.
External Traffic Policy
The policy to distribute external traffic. For this example, click Advanced Options and set External Traffic Policy to Local.
Step 3: Create a virtual service and an Istio gateway
Use the following content to create a virtual service in the foo namespace. For more information, see Manage virtual services.
apiVersion: networking.istio.io/v1beta1
kind: VirtualService
metadata:
  name: httpbin
spec:
  gateways:
    - httpbin-gateway
  hosts:
    - '*'
  http:
    - match:
        - uri:
            prefix: /headers
      route:
        - destination:
            host: httpbin
            port:
              number: 8000
Use the following content to create an Istio gateway in the foo namespace. For more information, see Manage Istio gateways.
apiVersion: networking.istio.io/v1beta1
kind: Gateway
metadata:
  name: httpbin-gateway
spec:
  selector:
    istio: ingressgateway
  servers:
    - hosts:
        - '*'
      port:
        name: http
        number: 80
        protocol: HTTP
Step 4: Create an authorization policy
Obtain the IP address of the ingress gateway. For more information, see Create an ingress gateway.
Obtain the IP address of the client.
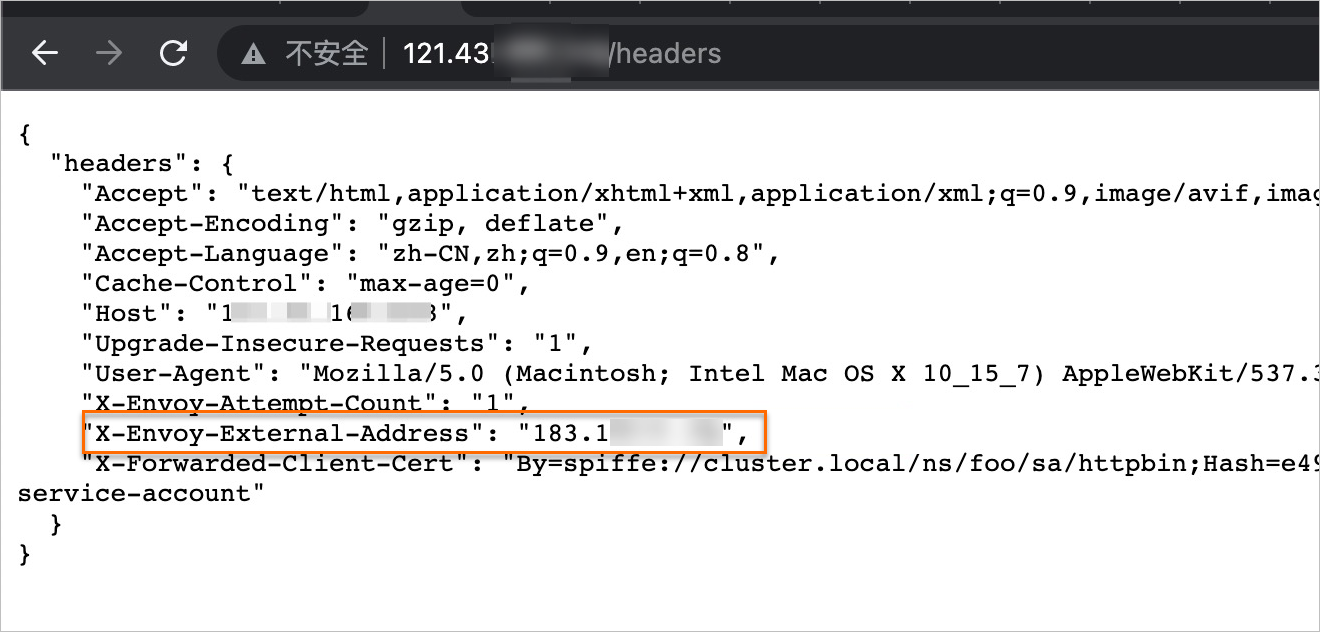
Enter http://{IP address of the ingress gateway}/headers in the address bar of your browser. On the page that appears, obtain the value of the X-Envoy-External-Address parameter.
Create an authorization policy.
Log on to the ASM console. In the left-side navigation pane, choose .
On the Mesh Management page, click the name of the ASM instance. In the left-side navigation pane, choose . On the page that appears, click Create.
On the Create page, configure the parameters that are described in the following table and click Create.
Parameter
Description
Name
The name of the authorization policy.
Policy Type
The authorization action. In this example, the value is set to DENY.
Namespace
The namespace in which you want to create the authorization policy. In this example, the Namespace parameter on the Workload Scope tab is set to foo.
Effective Scope
The effective scope of the authorization policy. In this example, the value is set to Service.
Workload
The workload on which the authorization policy takes effect. In this example, the value is set to httpbin.
Request Matching Rules
The request matching rule of the authorization policy. In this example, the switch next to RemoteIPBlocks is turned on in the Add Request Source section and the value is set to the IP address of the client that is obtained in Step 2. This setting denies the requests that are sent from the specified client IP address to access the HTTPBin application.
Step 5: Check whether the authorization policy that denies the requests sent from the specified client IP address takes effect
Enter http://{IP address of the ingress gateway}/headers in the address bar of your browser. If the RBAC:access denied message is returned, the request to access the HTTPBin application fails. This indicates that the authorization policy takes effect.
Example 4: Control service access across namespaces
Step 1: Enable automatic sidecar proxy injection for the demo-frontend and demo-server namespaces
Create the demo-frontend and demo-server namespaces. For more information, see Create a namespace.
Enable automatic sidecar proxy injection for the demo-frontend and demo-server namespaces. For more information, see the "Enable automatic sidecar proxy injection" section of the Manage global namespaces topic.
Step 2: Deploy test services
Create a service named sleep in the demo-frontend namespace and a service named httpbin in the demo-server namespace. The sleep service is used to send requests to access the httpbin service.
Create a service named sleep in the demo-frontend namespace.
Create a sleep.yaml file that contains the following content:
Use kubectl to connect to the Container Service for Kubernetes (ACK) cluster based on the information in the kubeconfig file, and then run the following command to create a sleep service:
kubectl apply -f sleep.yaml -n demo-frontend
Create a service named httpbin in the demo-server namespace.
Create an httpbin.yaml file that contains the following content:
Use kubectl to connect to the ACK cluster based on the information in the kubeconfig file, and then run the following command to create an httpbin service:
kubectl apply -f httpbin.yaml -n demo-server
Verify that sidecar proxies are injected into the pods where the sleep and httpbin services reside.
Log on to the ACK console. In the left-side navigation pane, click Clusters.
On the Clusters page, find the cluster that you want to manage and click its name. In the left-side pane, choose .
In the upper part of the Pods page, select demo-frontend from the Namespace drop-down list and click the pod name of the sleep service.
On the Container tab, a sidecar proxy named istio-proxy is displayed. This indicates that a sidecar proxy is injected into the pod where the sleep service resides.
In the upper part of the Pods page, select demo-server from the Namespace drop-down list and click the pod name of the httpbin service.
On the Container tab, a sidecar proxy named istio-proxy is displayed. This indicates that a sidecar proxy is injected into the pod where the httpbin service resides.
Step 3: Create an authorization policy to control service access across namespaces
You can create an authorization policy and modify the action parameter in the authorization policy to deny or allow access requests from services in the demo-frontend namespace to services in the demo-server namespace. This way, you can control service access across namespaces.
Create an authorization policy to deny access requests from the demo-frontend namespace to the demo-server namespace.
Log on to the ASM console. In the left-side navigation pane, choose .
On the Mesh Management page, click the name of the ASM instance. In the left-side navigation pane, choose . On the page that appears, click Create.
On the Create page, configure the parameters that are described in the following table and click Create.
Parameter
Description
Name
The name of the authorization policy.
Policy Type
The authorization action. In this example, the value is set to DENY.
Namespace
The namespace in which you want to create the authorization policy. In this example, the Namespace parameter on the Workload Scope tab is set to demo-server.
Effective Scope
The effective scope of the authorization policy. In this example, the value is set to Namespace Scope.
Request Matching Rules
In this example, Namespaces is turned on in the Add Request Source section and the value is set to demo-frontend.
Access the httpbin service.
Log on to the ACK console. In the left-side navigation pane, click Clusters.
On the Clusters page, find the cluster that you want to manage and click its name. In the left-side pane, choose .
In the upper part of the Pods page, select demo-frontend from the Namespace drop-down list. Find the pod name of the sleep service and click in the Actions column.
Run the following command on the terminal of the sleep container to access the httpbin service:
curl -I httpbin.demo-server.svc.cluster.local:8000Expected output:
HTTP/1.1 403 Forbidden
content-length: 19
content-type: text/plain
date: Wed, 11 Oct 2023 08:15:25 GMT
server: envoy
x-envoy-upstream-service-time: 4
The preceding output indicates that the services in the demo-frontend namespace failed to access the services in the demo-server namespace.
Change the value of the action parameter in the authorization policy to ALLOW to allow access requests from the demo-frontend namespace to the demo-server namespace.
Log on to the ASM console. In the left-side navigation pane, choose .
On the Mesh Management page, click the name of the ASM instance. In the left-side navigation pane, choose .
On the AuthorizationPolicy page, find the authorization policy that you want to manage and click YAML in the Actions column.
In the Edit dialog box, change the value of the action parameter to ALLOW, and then click OK.
Run the following command on the terminal of the sleep container to access the httpbin service:
curl -I httpbin.demo-server.svc.cluster.local:8000Expected output:
HTTP/1.1 200 OK
server: envoy
date: Wed, 11 Oct 2023 08:21:40 GMT
content-type: text/html; charset=utf-8
content-length: 9593
access-control-allow-origin: *
access-control-allow-credentials: true
x-envoy-upstream-service-time: 13
The preceding output indicates that the services in the demo-frontend namespace successfully access the services in the demo-server namespace.
#### The test results indicate that an authorization policy can be used to control service access across namespaces.