ApsaraVideo Media Processing (MPS) jobs can be run in synchronous or asynchronous mode. You cannot receive the results of asynchronous jobs in real time. If you want to monitor status changes of asynchronous jobs in MPS queues or workflows, you can enable the notification feature for the jobs. After you enable this feature, you can monitor whether a transcoding job is successful or whether an automated review job is complete. This topic describes how to enable the notification feature for MPS jobs or workflows.
To enable the notification feature, perform the following steps:
Create a queue or topic in SMQ based on your business requirements. For more information, see the following sections of this topic:
NoteThe queue-based model is a highly reliable and concurrent consumption model in a one-to-one manner. The topic-based model is a publishing and subscription model in a one-to-many manner.
Optional. Associate the queue or topic in SMQ with an MPS queue. For more information, see the Associate the queue or topic section of this topic.
Enable the notification feature for a job or workflow. For more information, see the following sections of this topic:
Step 1: Activate Simple Message Queue (formerly MNS)
The notification feature relies on SMQ. You can use this feature free of charge in MPS, but you are charged for using SMQ. For more information about the billing details, see Billing.
Activate Simple Message Queue (formerly MNS) and authorize the current user to access SMQ. For more information, see Activate SMQ and authorize RAM users to access SMQ.
Click Console to go to the Simple Message Queue (formerly MNS) console.
Step 2: Create a topic or queue in SMQ
MPS can send notifications about jobs and workflows to topics or queues in SMQ. You can create a topic or queue in SMQ based on your business requirements.
Create a topic
In the left-side navigation pane of the SMQ console, choose Topic Model > Topics. On the Topics page, click Create Topic.
In the Create Topic panel, configure the parameters that are described in the following table.
Parameter
Description
Name
The name of the SMQ topic.
NoteThe name can be up to 120 characters in length and can contain letters, digits, and hyphens (-). The name must start with a letter.
Maximum Message Length
The maximum size of a message that can be sent to the SMQ topic. Unit: bytes. Valid values: 1024 to 65536. Default value: 65536.
Enable Logging Feature
Specifies whether to enable the logging feature.
Click OK. The SMQ topic is created, and the details page of the SMQ topic appears.
On the Subscriptions tab, click Create Subscription. In the Create Subscription panel, configure the parameters that are described in the following table.
Parameter
Description
Topic Name
The name of the subscription.
NoteThe name can be up to 255 characters in length and can contain letters, digits, and hyphens (-). The name must start with a letter.
Subscription
The push type. Default value: HTTP.
Receiver Endpoint
The endpoint of the message receiver.
NoteThe endpoint is an HTTP URL that starts with http:// or https://.
Message Filtering Tag
The tag that is used to filter messages. This parameter is optional.
NoteThe tag can be up to 16 characters in length.
Retry policy
The retry policy that is applied when an error occurs during message delivery from the SMQ topic to the receiver. Valid values:
Backoff Retry: retries three times. The retry interval is a random value in the range of 10 to 20. Unit: second.
Exponential Decay Retry: retries 176 times within one day at the following retry intervals that are measured in seconds: 2^0, 2^1, ..., 512, 512, ..., and 512.
Message Format
The format in which a message is pushed to the receiver. Valid values:
SIMPLIFIED: The message contains only the published message body and does not contain attribute information.
JSON: The message is in the JSON format and contains the message body and message attributes.
XML: The message is in the XML format and contains the message body and message attributes.
Click OK. The subscription is created.
Create an SMQ queue
In the left-side navigation pane of the SMQ console, choose Queue Model > Queues.
On the Queues page, click Create Queue. In the Create Queue panel, configure the parameters that are described in the following table.
Parameter
Description
Name
The name of the SMQ queue.
Maximum Message Length
The maximum size of a message that can be sent to the SMQ queue.
Long Polling Period
The maximum period that a ReceiveMessage request can wait till a message is in the SMQ queue.
Visibility Timeout Period
The period during which a received message remains in the Inactive state.
Message Retention Period
The maximum period during which a message can be retained in the SMQ queue. After the specified period ends, the message is deleted regardless of whether the message is consumed.
Scheduled Period
The period after which all messages sent to the SMQ queue can be consumed.
Enable Logging Feature
Specifies whether to enable the logging feature.
Click OK. The SMQ queue is created.
Step 3: (Optional) Associate the SMQ queue or topic with an MPS queue
If you run a job that is added to a regular MPS queue and want to receive notifications about the job, associate the MPS queue with an SMQ topic or queue. When you create the job, select the MPS queue that is associated with an MNS topic or queue.
If you run a workflow, you do not need to associate the MPS queue with an SMQ queue or topic. Notifications of jobs in the workflow can be sent based on another logic. To receive the notifications about these jobs, you need to only configure the SMQ topic or queue for the Input node of the workflow. For more information, see the Enable the notification feature for a workflow section of this topic.
Log on to the MPS console.
In the top navigation bar, select a region.
NoteMake sure that you select the region in which you submit the MPS jobs. Otherwise, the messages cannot be received.
In the left-side navigation pane, choose .
On the MPS Queue and Callback page, find the MPS queue for which you want to enable the notification feature and click Set Notifications in the Actions column.
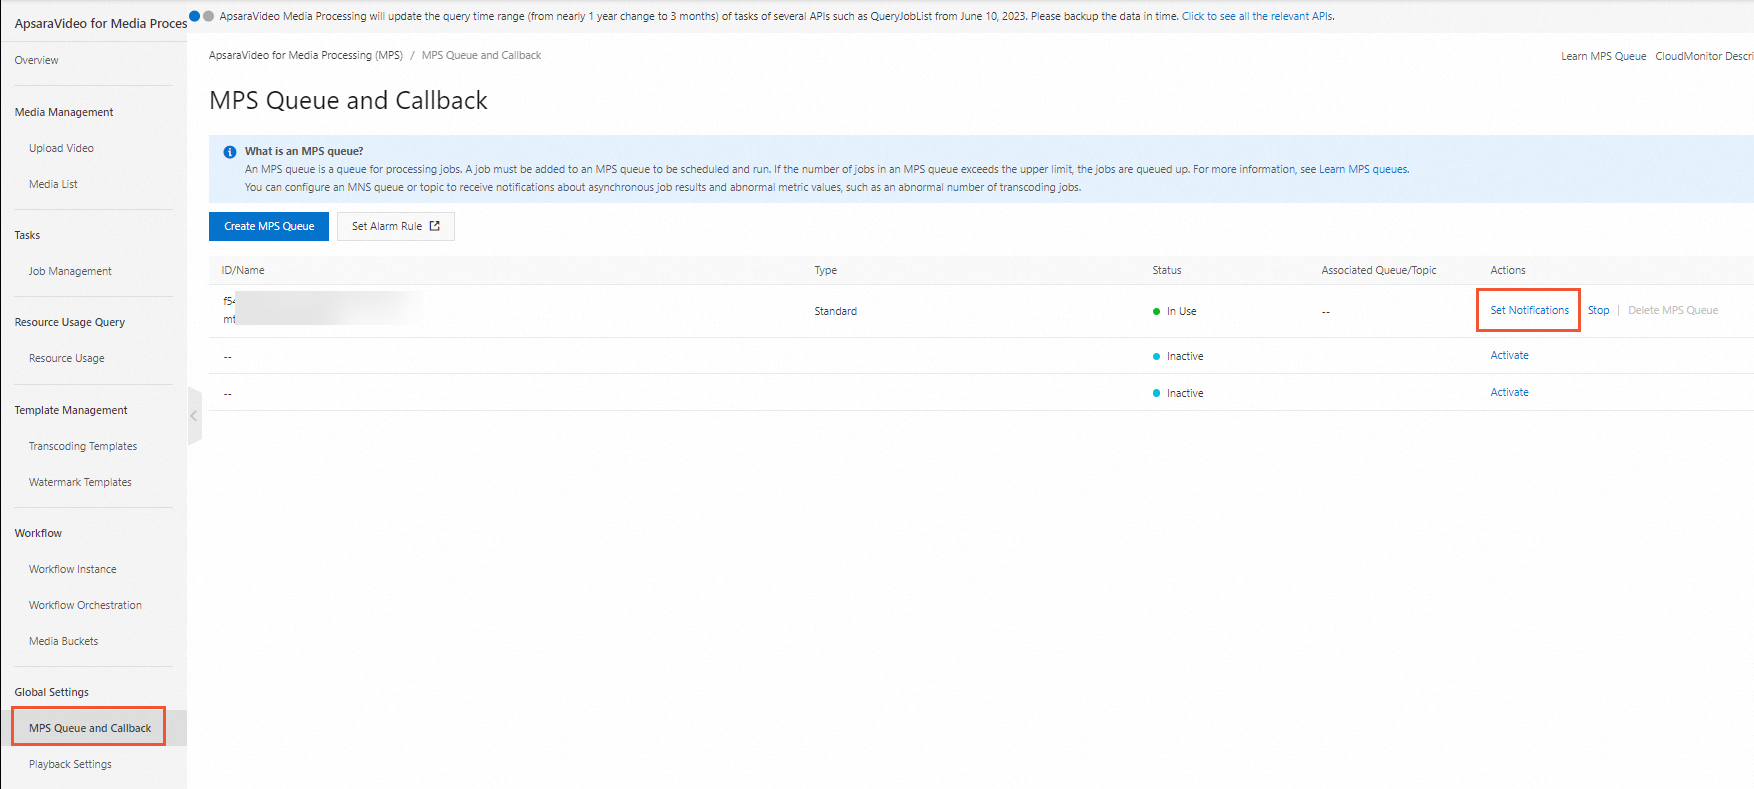
In the Notification Settings dialog box, configure the parameters that are described in the following table.
Parameter
Description
Notifications
Turn on Notifications.
Message Type
Select Queue or Topic based on your business requirements.
Queue Name
If you set the Message Type parameter to Queue, select a queue from the Queue Name drop-down list.
Topic Name
If you set the Message Type parameter to Topic, select a topic from the Topic Name drop-down list.
Click OK. The MPS queue is associated with an SMQ queue or topic.
Step 4: Enable the notification feature
Enable the notification feature for a job
When you create a job, select an MPS queue that is associated with an SMQ queue or topic. If the status of the job changes, MPS sends notifications to the SMQ queue or topic associated with the MPS queue.
The type of the MPS queue that you select must be the same as the type of the job. For example, if you create an intelligent thumbnail job, you must select an MPS queue for intelligent thumbnails that is associated with an SMQ queue or topic.
Enable the notification feature for a workflow
If you enable the notification feature for a workflow, MPS sends notifications to the associated SMQ queue or topic when the workflow starts and ends.
In the MPS console, choose in the left-side navigation pane.
On the Workflow Orchestration page, click Create Workflow. The Create Workflow page appears.
In the Task Configuration (Topology) section of the Create Workflow page, click the Pen icon next to the Input node.
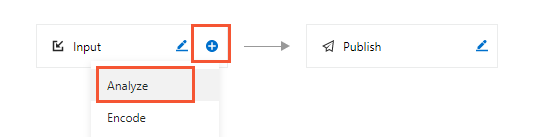
In the Input dialog box, turn on Notifications and configure the parameters that are described in the following table.
NoteAfter you turn on Notifications and select an MPS queue for the Encoding Pipeline parameter, notifications about jobs in the workflow are sent only to the SMQ queue or topic that you select in the Input dialog box regardless of whether you have associated the MPS queue with an SMQ queue or topic.
Parameter
Description
Input Bucket
You do not need to configure this parameter. The name of the input bucket automatically appears after you configure the Input Path parameter.
Input Path
Click Select next to the Input Path field, configure the parameters in the Select Input Path dialog box, and then click OK to specify the input path of the file to be processed.
Encoding Pipeline
Select the MPS queue for transcoding for which you have enabled the notification feature in the previous step.
Notifications
Turn on Notifications.
Message Type
Select Queue or Topic based on the Message Type parameter that you set when you enable the notification feature for the MPS queue.
Queue Name or Topic Name
Select an SMQ queue or topic.
For more information about how to configure other nodes, see Create a workflow.
FAQ
For information about answers to some frequently asked questions (FAQ) about the notification feature, see FAQ about messages.