Sidecar proxies help enhance network security, reliability, and observability for service calls. Service Mesh (ASM) refines the settings of sidecar proxies in Istio and supports namespace-level sidecar proxies to help you better manage sidecar proxies. This topic describes how to configure settings such as the resources, lifecycle, and termination drain duration for namespace-level sidecar proxies.
Prerequisites
An ASM instance whose version is v1.10.5 or later is created. For more information, see Create an ASM instance.
- An ACK managed cluster is created. For more information, see Create an ACK managed cluster.
- The cluster is added to the ASM instance. For more information, see Add a cluster to an ASM instance.
Automatic sidecar injection is enabled. For more information, see Enable automatic sidecar proxy injection.
Background information
The following table describes the features that are supported by ASM for namespace-level sidecar proxies.
Feature | Description |
Allows you to configure the minimum and maximum resources for Istio proxies. | |
Allows you to configure the minimum and maximum resources for the istio-init container. | |
Allows you to enable or disable sidecar proxies for ingress and egress traffic by IP address or port. | |
Allows you to configure the lifecycle of sidecar proxies. For more information, see Container Lifecycle Hooks. | |
Configure the termination drain duration for sidecar proxies | Allows you to configure a custom termination drain duration for sidecar proxies. The duration indicates the maximum amount of time that the system waits before it destroys sidecar proxies for existing connections after pods are stopped. |
Allows you to enable the Domain Name System (DNS) proxy feature for sidecar proxies. After the DNS proxy feature is enabled, sidecar proxies intercept DNS queries and return resolution results without awareness of clients. |
Priorities of settings
You can configure sidecar proxies by using pod annotations, namespace settings, and global settings. These settings comply with the following priorities:
Pod annotations > Namespace settings > Global settings
Configure resources for injected Istio proxies
Log on to the ASM console.
In the left-side navigation pane, choose .
On the Mesh Management page, find the ASM instance that you want to configure. Click the name of the ASM instance or click Manage in the Actions column.
On the details page of the ASM instance, choose in the left-side navigation pane.
On the Sidecar Proxy Setting page, click the Namespace tab.
Select the namespace that you want to configure. Click the
 icon on the left of Resource Settings for Injected Proxies, set the Istio resource parameters, and then click Update Settings.
 Parameter
Description
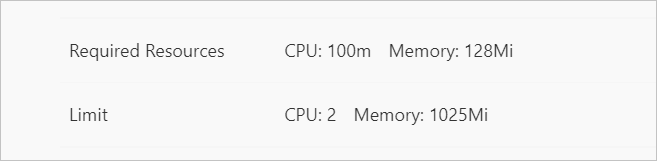
Resource Limits
The maximum CPU and memory resources that an Istio proxy can request. In this example, set the CPU parameter to 2 (cores) and the Memory parameter to 1025 (MiB).
Resource Requirements
The minimum CPU and memory resources that are available to an Istio proxy. In this example, set the CPU parameter to 0.1 (cores) and the Memory parameter to 128 (MiB).
Restart a pod for the settings of sidecar proxies to take effect.
- Log on to the ACK console.
- In the left-side navigation pane of the ACK console, click Clusters.
- On the Clusters page, find the cluster that you want to manage and click the name of the cluster or click Details in the Actions column. The details page of the cluster appears.
- In the left-side navigation pane of the details page, choose .
On the Pods page, find the pod that you want to delete and click Delete in the Actions column.
In the Delete Pod message, click OK.
Wait until the pod is started again. The settings of sidecar proxies take effect after the pod is started.
View the resources settings of sidecar proxies.
On the Pods page, click the name of the pod that you want to view.
On the Container tab, click the
icon on the left of istio-proxy. View the resource settings of the Istio proxy. If the settings are the same as those you specified, resources are configured for Istio proxies.
Configure resources for the istio-init container
Log on to the ASM console.
In the left-side navigation pane, choose .
On the Mesh Management page, find the ASM instance that you want to configure. Click the name of the ASM instance or click Manage in the Actions column.
On the details page of the ASM instance, choose in the left-side navigation pane.
On the Sidecar Proxy Setting page, click the Namespace tab.
Select the namespace that you want to configure. Click the
icon on the left of istio-init initializes container resource limits, set the Istio resource parameters, and then click Update Settings. Parameter
Description
Resource Limits
The maximum CPU and memory resources that the istio-init container can request. In this example, set the CPU parameter to 0.916 (cores) and the Memory parameter to 512 (MiB).
Resource Requirements
The minimum CPU and memory resources that are available to the istio-init container. In this example, set the CPU parameter to 0.016 (cores) and the Memory parameter to 18 (MiB).
Restart a pod for the settings of sidecar proxies to take effect.
- Log on to the ACK console.
- In the left-side navigation pane of the ACK console, click Clusters.
- On the Clusters page, find the cluster that you want to manage and click the name of the cluster or click Details in the Actions column. The details page of the cluster appears.
- In the left-side navigation pane of the details page, choose .
On the Pods page, find the pod that you want to delete and click Delete in the Actions column.
In the Delete Pod message, click OK.
Wait until the pod is started again. The settings of sidecar proxies take effect after the pod is started.
Run the following command to view the resource settings of the istio-init container:
kubectl get pod -n <Namespace> <Pod name> -o yamlExpected output:
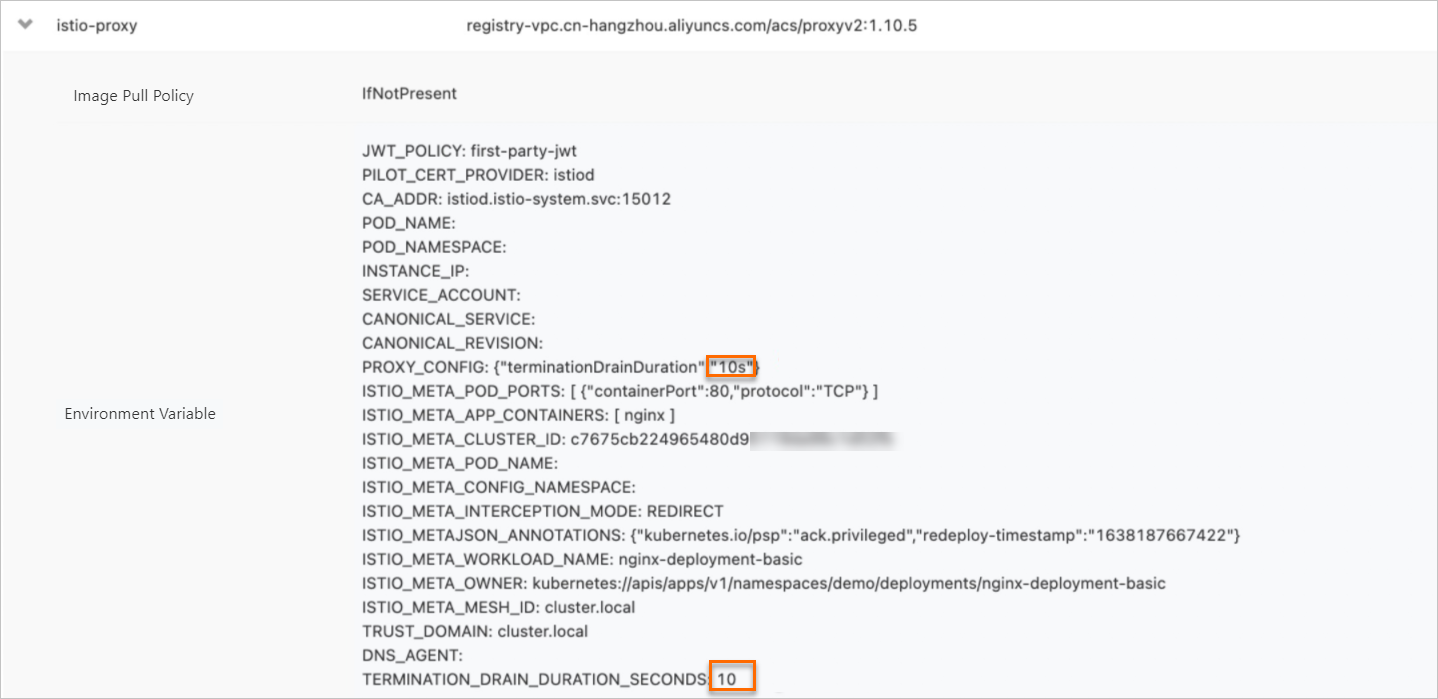
    - name: DNS_AGENT
    image: registry-vpc.cn-hangzhou.aliyuncs.com/acs/proxyv2:1.10.5
    imagePullPolicy: IfNotPresent
    name: istio-init
    resources:
      limits:
        cpu: 916m
        memory: 512Mi
      requests:
        cpu: 16m
        memory: 18Mi
    securityContext:
      allowPrivilegeEscalation: false
Enable or disable sidecar proxies by IP address or port
Log on to the ASM console.
In the left-side navigation pane, choose .
On the Mesh Management page, find the ASM instance that you want to configure. Click the name of the ASM instance or click Manage in the Actions column.
On the details page of the ASM instance, choose in the left-side navigation pane.
On the Sidecar Proxy Setting page, click the Namespace tab.
Select the namespace that you want to configure. Click the
icon on the left of enable/disable Sidecar proxy by port or address, set the Blocked Addresses for External Access, Address range that does not block external access, inbound ports for which traffic redirected to Envoy, outbound ports for which traffic redirected to Envoy, Set the port numbers to prevent InboundTraffic from passing through the sidecar proxy, and Set the port numbers to prevent OutboundTraffic from passing through the sidecar proxy parameters, and then click Update Settings. In this example, set the Blocked Addresses for External Access parameter to 192.168.1.2/32, the Address range that does not block external access parameter to 192.168.1.1/32, the inbound ports for which traffic redirected to Envoy parameter to *, the outbound ports for which traffic redirected to Envoy parameter to 7015,7016, the Set the port numbers to prevent InboundTraffic from passing through the sidecar proxy parameter to 7015,7016, and the Set the port numbers to prevent OutboundTraffic from passing through the sidecar proxy parameter to 7011,7012.
Restart a pod for the settings of sidecar proxies to take effect.
- Log on to the ACK console.
- In the left-side navigation pane of the ACK console, click Clusters.
- On the Clusters page, find the cluster that you want to manage and click the name of the cluster or click Details in the Actions column. The details page of the cluster appears.
- In the left-side navigation pane of the details page, choose .
On the Pods page, find the pod that you want to delete and click Delete in the Actions column.
In the Delete Pod message, click OK.
Wait until the pod is started again. The settings of sidecar proxies take effect after the pod is started.
Run the following command to check whether the sidecar proxy is enabled or disabled for a pod as expected:
kubectl get pod -n <Namespace> <Pod name> -o yamlExpected output:
    - "15001"
    - -z
    - "15006"
    - -u
    - "1337"
    - -m
    - REDIRECT
    - -i
    - 192.168.1.2/32
    - -x
    - 192.168.0.1/32,192.168.1.1/32
    - -b
    - '*'
    - -d
    - 15090,15021,15081,9191,7013,7014
    - -o
    - 7011,7012
Configure the lifecycle of sidecar proxies
Log on to the ASM console.
In the left-side navigation pane, choose .
On the Mesh Management page, find the ASM instance that you want to configure. Click the name of the ASM instance or click Manage in the Actions column.
On the details page of the ASM instance, choose in the left-side navigation pane.
On the Sidecar Proxy Setting page, click the Namespace tab.
Select the namespace that you want to configure. Click the
icon on the left of Sidecar proxy lifecycle, modify the following content as needed, copy the content to the code editor, and then click Update Settings. { "postStart": { "exec": { "command": [ "pilot-agent", "wait" ] } }, "preStop": { "exec": { "command": [ "/bin/sh", "-c", "sleep 13" ] } } }command within postStart: the action to be taken after the sidecar container is started. In this example, the system waits until pilot-agent starts after the sidecar container is started.
command with preStop: the action to be taken before the sidecar container is stopped. In this example, the system sleeps for 13 seconds before the sidecar container is stopped.
Restart a pod for the settings of sidecar proxies to take effect.
- Log on to the ACK console.
- In the left-side navigation pane of the ACK console, click Clusters.
- On the Clusters page, find the cluster that you want to manage and click the name of the cluster or click Details in the Actions column. The details page of the cluster appears.
- In the left-side navigation pane of the details page, choose .
On the Pods page, find the pod that you want to delete and click Delete in the Actions column.
In the Delete Pod message, click OK.
Wait until the pod is started again. The settings of sidecar proxies take effect after the pod is started.
Run the following command to view the lifecycle of the sidecar proxy:
kubectl get pod -n <Namespace> <Pod name> -o yamlExpected output:
    - name: TERMINATION_DRAIN_DURATION_SECONDS
      value: "5"
    image: registry-vpc.cn-hangzhou.aliyuncs.com/acs/proxyv2:1.10.5
    imagePullPolicy: IfNotPresent
    lifecycle:
      postStart:
        exec:
          command:
          - pilot-agent
          - wait
      preStop:
        exec:
          command:
          - /bin/sh
          - -c
          - sleep 13
    name: istio-proxy
Configure the termination drain duration for sidecar proxies
Log on to the ASM console.
In the left-side navigation pane, choose .
On the Mesh Management page, find the ASM instance that you want to configure. Click the name of the ASM instance or click Manage in the Actions column.
On the details page of the ASM instance, choose in the left-side navigation pane.
On the Sidecar Proxy Setting page, click the Namespace tab.
Select the namespace that you want to configure. Click the
icon on the left of Sidecar proxy termination duration time, enter a duration, and then click Update Settings. In this example, set the Sidecar proxy termination duration time parameter to 10s. Restart a pod for the settings of sidecar proxies to take effect.
- Log on to the ACK console.
- In the left-side navigation pane of the ACK console, click Clusters.
- On the Clusters page, find the cluster that you want to manage and click the name of the cluster or click Details in the Actions column. The details page of the cluster appears.
- In the left-side navigation pane of the details page, choose .
On the Pods page, find the pod that you want to delete and click Delete in the Actions column.
In the Delete Pod message, click OK.
Wait until the pod is started again. The settings of sidecar proxies take effect after the pod is started.
View the termination drain duration configured for sidecar proxies.
On the Pods page, click the name of the pod that you want to view.
On the Container tab, click the
icon on the left of istio-proxy. View the termination drain duration configured for the sidecar proxy. If the duration is the same as that you specified, the termination drain duration is configured for sidecar proxies.
Enable the DNS proxy feature
Log on to the ASM console.
In the left-side navigation pane, choose .
On the Mesh Management page, find the ASM instance that you want to configure. Click the name of the ASM instance or click Manage in the Actions column.
On the details page of the ASM instance, choose in the left-side navigation pane.
On the Sidecar Proxy Setting page, click the Namespace tab.
Select the namespace that you want to configure. Click the
icon on the left of DNS proxy, select Enable DNS Proxy, and then click Update Settings. Restart a pod for the settings of sidecar proxies to take effect.
- Log on to the ACK console.
- In the left-side navigation pane of the ACK console, click Clusters.
- On the Clusters page, find the cluster that you want to manage and click the name of the cluster or click Details in the Actions column. The details page of the cluster appears.
- In the left-side navigation pane of the details page, choose .
On the Pods page, find the pod that you want to delete and click Delete in the Actions column.
In the Delete Pod message, click OK.
Wait until the pod is started again. The settings of sidecar proxies take effect after the pod is started.
Run the following command to view the DNS proxy settings:
kubectl get pod -n <Namespace> <Pod name> -o yamlExpected output:
    - name: TRUST_DOMAIN
      value: cluster.local
    - name: DNS_AGENT
    - name: TERMINATION_DRAIN_DURATION_SECONDS
      value: "10"
    - name: ISTIO_META_DNS_AUTO_ALLOCATE
      value: "true"
    - name: ISTIO_META_DNS_CAPTURE
      value: "true"
    image: registry-vpc.cn-hangzhou.aliyuncs.com/acs/proxyv2:v1.10.5-33-gba0adb2df7-pro-aliyun
    imagePullPolicy: IfNotPresent
--
--
    - 7011,7012
    - -q
    - 7015,7016
    env:
    - name: DNS_AGENT
    - name: ISTIO_META_DNS_AUTO_ALLOCATE
      value: "true"
    - name: ISTIO_META_DNS_CAPTURE
      value: "true"
    image: registry-vpc.cn-hangzhou.aliyuncs.com/acs/proxyv2:v1.10.5-33-gba0adb2df7-pro-aliyun