The Fleet management feature allows you to schedule and distribute workloads, applications, and configurations to multiple clusters by using a Fleet instance of ACK One. This topic describes how to enable Fleet management and manage Fleet instances.
Prerequisites
An Alibaba Cloud account is created. You can enable Fleet management only by using Alibaba Cloud accounts.
Procedure
Log on to the ACK One console.
On the Create Fleet page, specify the basic information required for creating a Fleet instance.
NoteFor more information about the regions supported by Fleet management, see Regions that support ACK One.
Parameter
Description
Region
Select the region where the clusters that you want to manage are deployed.
VPC
Select a virtual private cloud (VPC) for the Fleet instance.
vSwitch
Select a vSwitch for the Fleet instance.
Resource Group
The resource group to which the cluster belongs. Each resource can belong to only one resource group. You can regard a resource group as a project, an application, or an organization based on your business scenarios.
Labels
Enter a key and a value to add a label to the cluster. Keys are required and must be unique. A key must not exceed 64 characters in length. Values are optional. A value must not exceed 128 characters in length.
A key or a value cannot start with
aliyun,acs:,https://, orhttp://. Keys and values are not case-sensitive.The keys of labels that are added to the same resource must be unique. If you add a label with a used key, the label overwrites the label that uses the same key.
If you add more than 20 labels to a resource, all labels become invalid. You must remove the excessive labels so that the remaining labels can take effect.
SLB Instance for API Server
Default value: Standard I (slb.s2.small). You cannot change the default setting.
Create and Associate EIP
Specify whether to expose the API server to external access. By default, the API server is not exposed to external access.
ImportantIf you turn on this switch, an elastic IP address (EIP) is associated with the internal-facing Server Load Balancer (SLB) instance of the API server, enabling access to the API server through the Internet. Once associated, the EIP cannot be disassociated because some clusters may already be connected to the Fleet instance over the Internet.
Enable Collection of Operation Logs and Auditing Logs
Specify whether to collect operation logs and audit logs. By default, this feature is enabled.
Click Enable Fleet Management.
Wait a few minutes and go to the Fleet Information page. If the cluster is in the Running state, the Fleet management feature is enabled.
Manage Fleet instances
View information about a Fleet instance
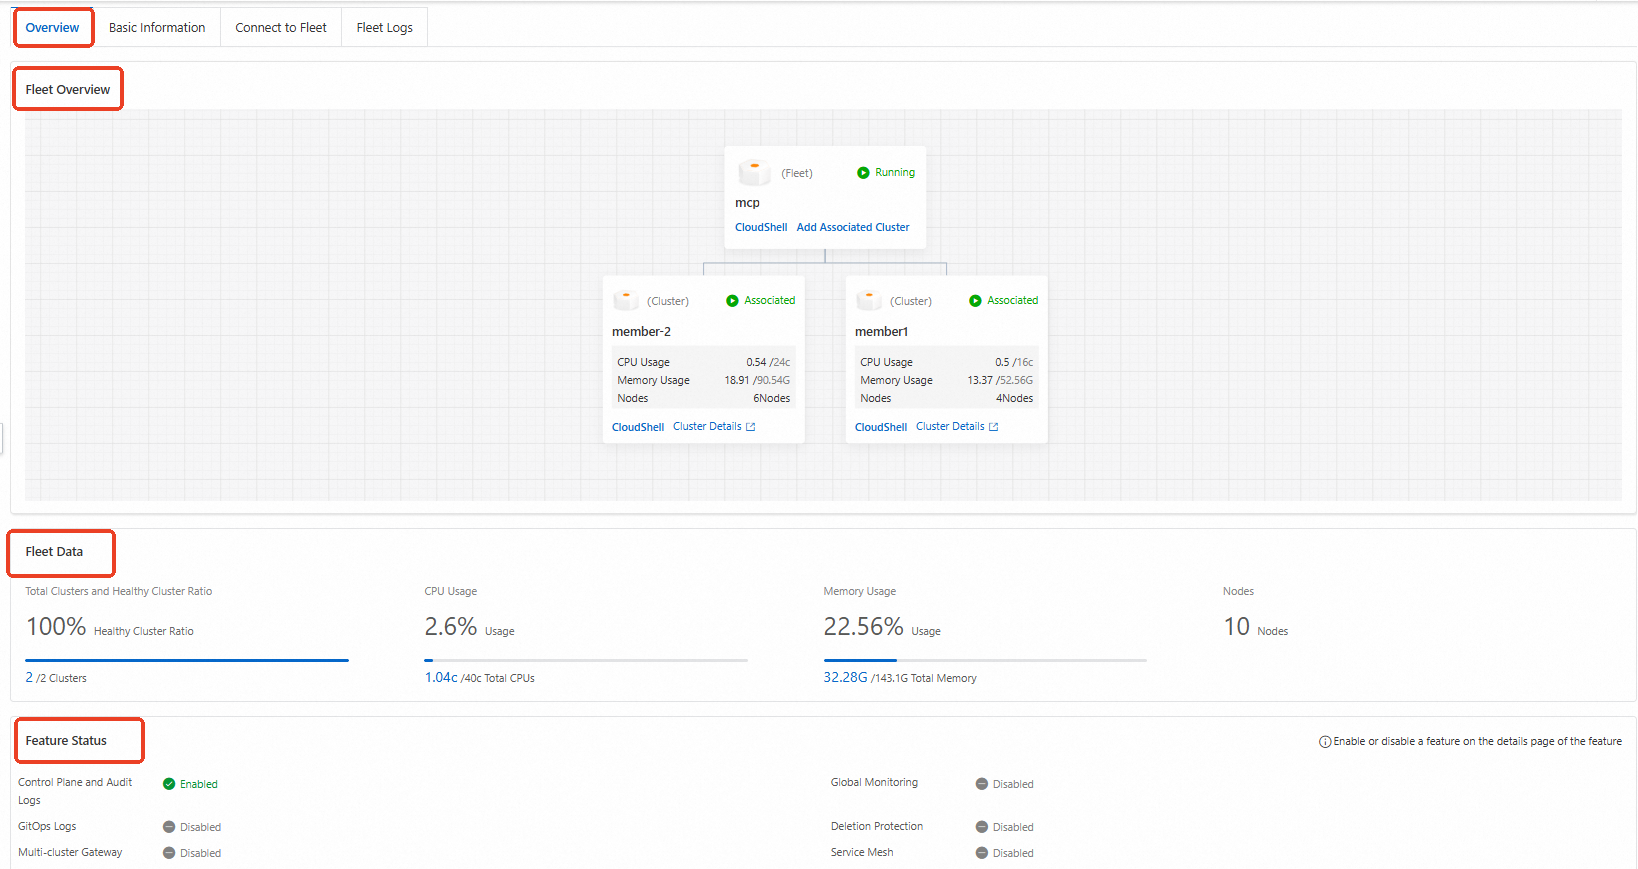
On the Fleet Information page, you can view the overview, basic information, connection information, and logs of a Fleet instance.
On the Overview tab, you can view the architecture and feature status of the Fleet instance. You can also view the details of the Fleet instance, including the number of associated clusters, the ratio of healthy associated clusters, the CPU usage, the memory usage, and the number of nodes managed by the Fleet instance.
On the Basic Information tab, you can view the instance ID, region, API server endpoint, and network information of the Fleet instance.
On the Connect to Fleet tab, you can view the content of the kubeconfig files for internal access and external access. The kubeconfig files store the configurations for connecting kubectl to the Fleet instance over the Internet and internal network.
On the Fleet Logs tab, you can view the logs of the Fleet instance.
Delete a Fleet instance
You must delete all clusters that are associated with a Fleet instance before you can delete the Fleet instance.
On the Fleet Information page, click Delete Fleet in the upper-right corner to delete the Fleet instance.
Create a Fleet instance
After you enable the Fleet management feature, the system automatically creates a default Fleet instance. If you want to create additional Fleet instances, go to Quota Center and request a quota increase.
On the Fleet Information page, click Create Fleet.
In the Create Fleet panel, specify parameters such as Fleet Name, Region, VPC, and vSwitch.
Parameter
Description
Fleet Name
Enter the name of the Fleet instance.
Region
Select the region where the clusters that you want to manage are deployed.
VPC
Select a virtual private cloud (VPC) for the Fleet instance.
vSwitch
Select a vSwitch for the Fleet instance.
Resource Group
The resource group to which the cluster belongs. Each resource can belong to only one resource group. You can regard a resource group as a project, an application, or an organization based on your business scenarios.
Labels
Enter a key and a value to add a label to the cluster. Keys are required and must be unique. A key must not exceed 64 characters in length. Values are optional. A value must not exceed 128 characters in length.
A key or a value cannot start with
aliyun,acs:,https://, orhttp://. Keys and values are not case-sensitive.The keys of labels that are added to the same resource must be unique. If you add a label with a used key, the label overwrites the label that uses the same key.
If you add more than 20 labels to a resource, all labels become invalid. You must remove the excessive labels so that the remaining labels can take effect.
SLB Instance for API Server
Default value: Standard I (slb.s2.small). You cannot change the default setting.
Create and Associate EIP
Specify whether to expose the API server to external access. By default, the API server is not exposed to external access.
ImportantIf you turn on this switch, an elastic IP address (EIP) is associated with the internal-facing Server Load Balancer (SLB) instance of the API server, enabling access to the API server through the Internet. Once associated, the EIP cannot be disassociated because some clusters may already be connected to the Fleet instance over the Internet.
Enable Collection of Operation Logs and Auditing Logs
Specify whether to collect operation logs and audit logs. By default, this feature is enabled.
Click Create.
Wait a few minutes. After the status of the Fleet instance changes to Running, the Fleet instance is created.
Switch to another Fleet instance
On the Fleet Information page, click the expand button on the right of the Fleet instance name and select a Fleet instance.

Use Cloud Shell to connect to a Fleet instance
Cloud Shell can connect to Fleet instances only over the Internet. Make sure that the API server of the Fleet instance that you want to access is exposed to external access.
Click Cloud Shell Managed Fleet in the upper-right corner of the Fleet Information page to connect to the Fleet instance. Then, you can use kubectl in Cloud Shell to manage the clusters that are associated with the Fleet instance.
When you open Cloud Shell to manage a Fleet instance, the system automatically loads the kubeconfig file of the Fleet instance. You can use kubectl to manage the clusters that are associated with the Fleet instance, and then follow the instructions to install the AMC command-line tool. For more information, see Use AMC.
Run the following command to query the clusters that are associated with the Fleet instance:
kubectl amc get managedclusterExpected output:
Name                                Alias              HubAccepted
c984b098b377f44b9a48c74fa55cf****   cluster2-beijing   true
cc36f4feb49824c9d840d9fd9cdf9****   cluster1-beijing   true