After you configure a Paimon catalog, you can use Realtime Compute for Apache Flink to directly access Paimon tables in Data Lake Formation (DLF). This topic describes how to create, view, and delete Paimon catalogs, and how to manage Paimon databases and tables in the development console of Realtime Compute for Apache Flink.
Precautions
Only Ververica Runtime (VVR) 8.0.5 or later supports the creation and configuration of Paimon catalogs and tables. To use DLF as the metastore, VVR 11.1.0 or later is required.
Object Storage Service (OSS) is used to store files related to Paimon tables, including data files and metadata files. Make sure that you have activated OSS and that the storage class of the OSS bucket is Standard. For more information, see Getting Started with the Console and Storage Classes.
ImportantYou can also use the OSS bucket specified when you activated Realtime Compute for Apache Flink. However, to better distinguish data and prevent accidental operations, we recommend that you create and use a separate OSS bucket in the same region.
The AccessKey that you provide when you create a Paimon catalog must have read and write permissions on the OSS bucket and the DLF directory.
After you use SQL statements to create or delete a catalog, database, or table, click the
 icon to refresh the Metadata page.
The following table shows the version mapping between Paimon and VVR.
Apache Paimon version
VVR version
1.3
11.4
1.2
11.2、11.3
1.1
11
1.0
8.0.11
0.9
8.0.7, 8.0.8, 8.0.9, and 8.0.10
0.8
8.0.6
0.7
8.0.5
0.6
8.0.4
0.6
8.0.3
Create a Paimon DLF Catalog
You can create a Paimon Catalog in DLF. For more information, see Quick start with DLF.
The DLF Catalog must be in the same region as the Flink workspace. Otherwise, you cannot associate them in the subsequent steps.
You can create a Paimon Catalog in the Realtime Compute for Apache Flink development console.
NoteThis operation creates a mapping to your DLF catalog. Creating or deleting the catalog in Flink does not affect actual data in DLF.
Log on to the Realtime Compute for Apache Flink management console.
Click your workspace name to open the Development Console.
Register your catalog using one of the following methods:
UI
In the left navigation menu, click Catalogs.
On the Catalog List page, click Create Catalog.
In the Create Catalog wizard, select Apache Paimon, and then click Next.
Set metastore to DLF. For catalog name, select the DLF catalog to connect.
Click Confirm.
SQL commands
In the Scripts SQL editor, copy and run the following SQL code to register a DLF catalog in Flink.
CREATE CATALOG `flink_catalog_name`
WITH (
  'type' = 'paimon',
  'metastore' = 'rest',
  'token.provider' = 'dlf',
  'uri' = 'http://cn-hangzhou-vpc.dlf.aliyuncs.com',
  'warehouse' = 'dlf_test'
);
The following table describes the connector options:
Option
Description
Required
Example
typeThe catalog type. Set this option to
paimon.Yes
paimonmetastoreThe catalog metastore. Set this option to
rest.Yes
resttoken.providerThe token provider. Set this option to
dlf.Yes
dlfuriThe Rest URI for the DLF catalog service. Format:
http://[region-id]-vpc.dlf.aliyuncs.com. See Region ID in Endpoints.Yes
http://ap-southeast-1-vpc.dlf.aliyuncs.com
warehouseThe name of the DLF paimon catalog.
Yes
dlf_test
Manage Paimon databases
In the Data Query text editor, enter the following command, select the code, and click Run.
Create a database
After you create an Apache Paimon catalog, a database named
defaultis automatically created in the catalog.-- Replace my-catalog with the name of your Paimon catalog. USE CATALOG `my-catalog`; -- Replace my_db with a custom database name in English. CREATE DATABASE `my_db`;Delete a database
ImportantYou cannot delete the `default` database from a DLF catalog. You can delete the `default` database from a Filesystem catalog.
-- Replace my-catalog with the name of your Paimon catalog.
USE CATALOG `my-catalog`;

-- Replace my_db with the name of the database that you want to delete.
DROP DATABASE `my_db`; -- Deletes a database only if it contains no tables.
DROP DATABASE `my_db` CASCADE; -- Deletes the database and all tables in it.
Manage Paimon tables
Create a table
Modify a table schema
Enter the following command in the Data Query editor, select the code, and click Run.
Operation | Sample code |
Add or modify table parameters | Set the value of the |
Temporarily modify table parameters | You can temporarily modify table parameters when writing to a table by adding an SQL hint after the table name. The temporarily modified table parameters take effect only for the current SQL job.
|
Rename a table | Rename the `my_table` table to `my_table_new`. Important Because the rename operation in object storage is not atomic, exercise caution when you rename a table if you use OSS to store Paimon table files. We recommend that you use the OSS-HDFS service to ensure the atomicity of file operations. |
Add a new column |
|
Rename a column | Rename the `c0` column to `c1` in the `my_table` table. |
Drop a column | Drop the `c1` and `c2` columns from the `my_table` table. |
Drop a partition | Drop the |
Modify a column comment | Change the comment of the `buy_count` column in the `my_table` table to `this is buy count`. |
Modify column order |
|
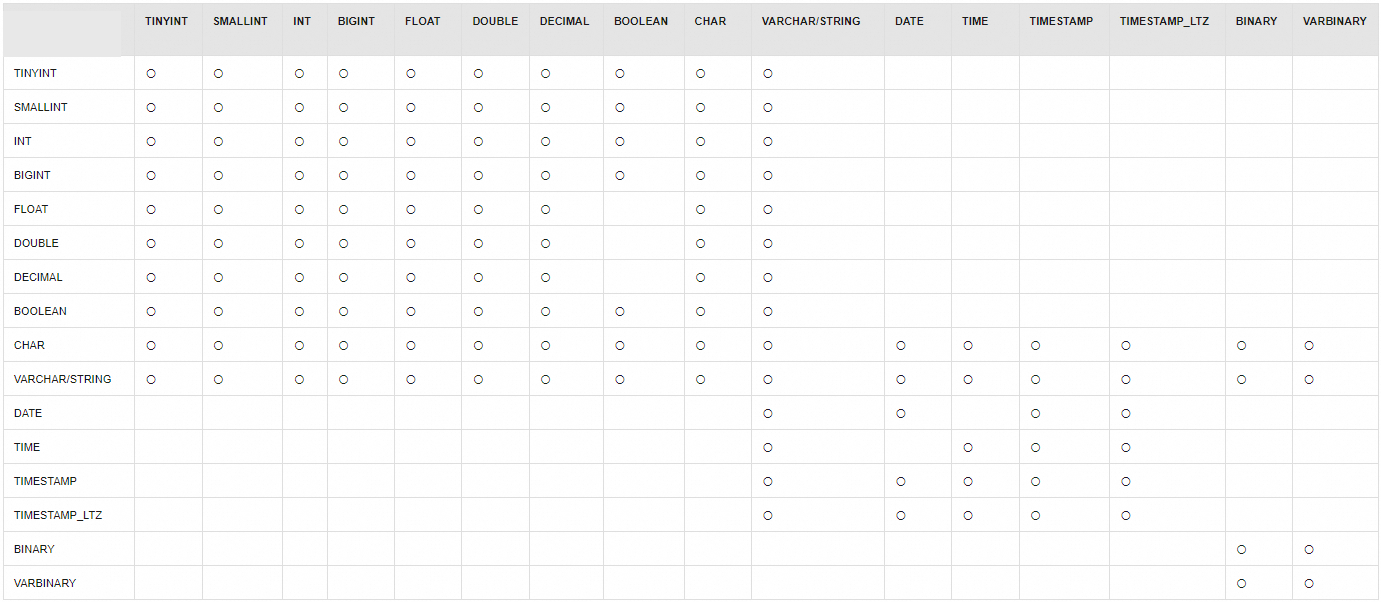
Modify a column type | Change the type of the `col_a` column in the `my_table` table to `DOUBLE`. The following table describes the supported column type modifications for Paimon tables. In the figure, 〇 indicates that the type conversion is supported. An empty cell indicates that the type conversion is not supported. |
Delete a table
View or delete a Paimon catalog
In the Realtime Compute for Apache Flink console, click Console in the Actions column for the target workspace.
On the Data Management page, you can view and drop Apache Paimon catalogs.
On the Catalog List page, you can view the Catalog Name and Type of each catalog. To view the databases and tables in a catalog, click View.
On the Catalog List page, click Delete in the Actions column for the catalog that you want to delete.
NoteDeleting a Paimon catalog removes only its definition from Data Management in the Flink project. The data files of the Paimon tables are not affected. After you delete a catalog, you can run the `CREATE CATALOG` command again to reuse the Paimon tables in it.
In the Data Query text editor, you can also enter
DROP CATALOG <catalog name>;, select the code, and click Run.
References
After you create a Paimon table, you can consume data from or write data to the table. For more information, see Write data to and consume data from a Paimon table.
If the built-in catalogs cannot meet your business requirements, you can use custom catalogs. For more information, see Manage custom catalogs.
For information about common optimizations for Paimon primary key tables and append-only tables in different scenarios, see Paimon performance optimization.