Standard blacklist and whitelist policies control access by IP address, domain, or port. When you need finer-grained control -- for example, authenticating requests based on specific HTTP paths, methods, or custom headers -- custom authorization lets you delegate those decisions to a custom authorization service.
This guide covers deploying an external authorization service, connecting it to an ASM ingress gateway, and verifying that requests are correctly allowed or denied.
When to use custom authorization
Custom authorization is an advanced security feature of Service Mesh (ASM). Choose the approach that best fits your requirements:
| Approach | Use case | Learn more |
|---|---|---|
| Blacklist or whitelist | Block or allow requests by IP address, domain name, or port | Configure a blacklist or whitelist for an ingress gateway |
| Authorization policies | Apply standard allow/deny rules based on request attributes | Overview of zero trust security |
| OIDC-based SSO | Authenticate users through an identity provider (IdP) such as IDaaS | Configure OIDC-based SSO on an ingress gateway |
| Custom authorization | Implement business-specific authentication logic using a custom authorization service | This document |
How it works
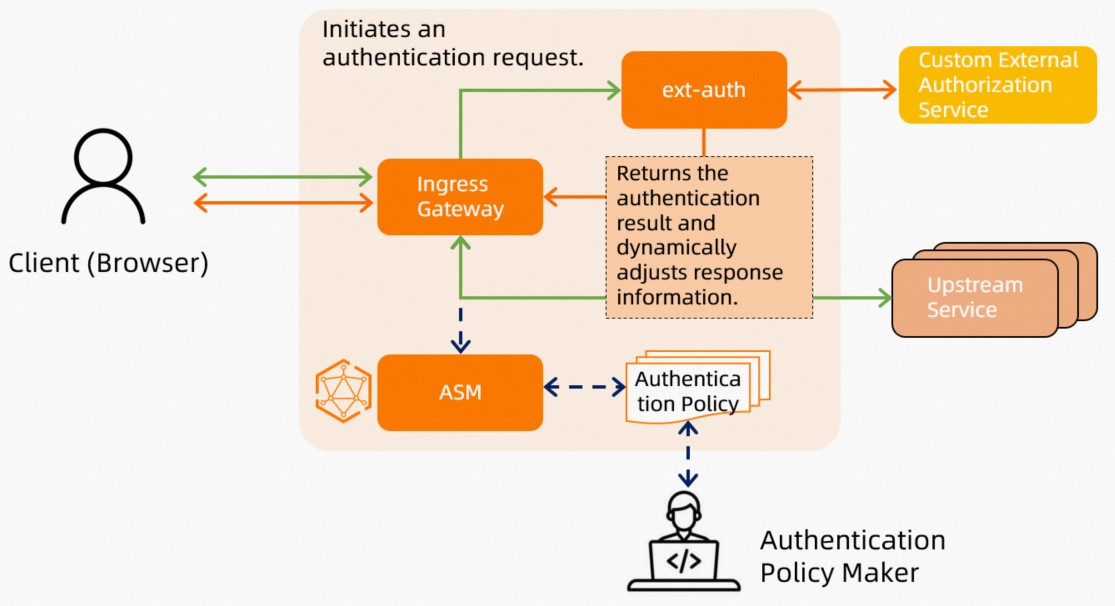
ASM encapsulates the custom authorization feature of Istio. The request flow is:
A client sends a request to the ingress gateway.
The ingress gateway forwards the request to the custom authorization service for evaluation.
The authorization service returns an allow or deny decision.
If allowed, the ingress gateway routes the request to the backend service. The response may contain additional information, such as the service version number and user ID in the response header. If denied, the gateway returns an HTTP 403 response.
Prerequisites
Before you begin, ensure that you have:
An application deployed in a cluster added to the ASM instance
kubectl configured to connect to your Container Service for Kubernetes (ACK) cluster. For details, see Obtain the kubeconfig file of a cluster and use kubectl to connect to the cluster
Step 1: Deploy the external authorization service
Deploy a custom authorization service in an ACK cluster. The service must comply with the Istio ext-authz API specification and support both HTTP and gRPC protocols.
The sample service used here allows only requests that include the x-ext-authz: allow header. To build your own authorization service, see the Istio ext-authz sample code.
Create a file named
ext-authz.yamlwith the following content:Apply the manifest:
kubectl apply -f ext-authz.yamlVerify the pod is running: Expected output:
kubectl get podNAME READY STATUS RESTARTS AGE ext-authz-6d458d5f8f-bh2m9 2/2 Running 0 1mCheck the logs to confirm the ext-authz service started: Expected output: Both the HTTP server (port 8000) and gRPC server (port 9000) should be running.
kubectl logs "$(kubectl get pod -l app=ext-authz -n default -o jsonpath={.items..metadata.name})" -n default -c ext-authz2023/12/12 10:01:31 Starting HTTP server at [::]:8000 2023/12/12 10:01:31 Starting gRPC server at [::]:9000Record the service addresses for the next step. The ext-authz service exposes two endpoints in the
defaultnamespace: You can also verify these ports in the ACK console: go to Clusters > select your cluster > Network > Services > ext-authz, and check the Endpoint section.Protocol Port Service address HTTP 8000 ext-authz.default.svc.cluster.local:8000gRPC 9000 ext-authz.default.svc.cluster.local:9000
Step 2: Configure the ingress gateway to use the authorization service
Connect the ext-authz service to the ingress gateway through the ASM console and define which requests require authorization.
Log on to the ASM console.
In the left-side navigation pane, choose Service Mesh > Mesh Management.
On the Mesh Management page, click the name of the ASM instance.
In the left-side navigation pane, choose ASM Gateways > Ingress Gateway.
Click the target ingress gateway.
In the left-side navigation pane, choose Gateway Security > Custom Authorization Service.
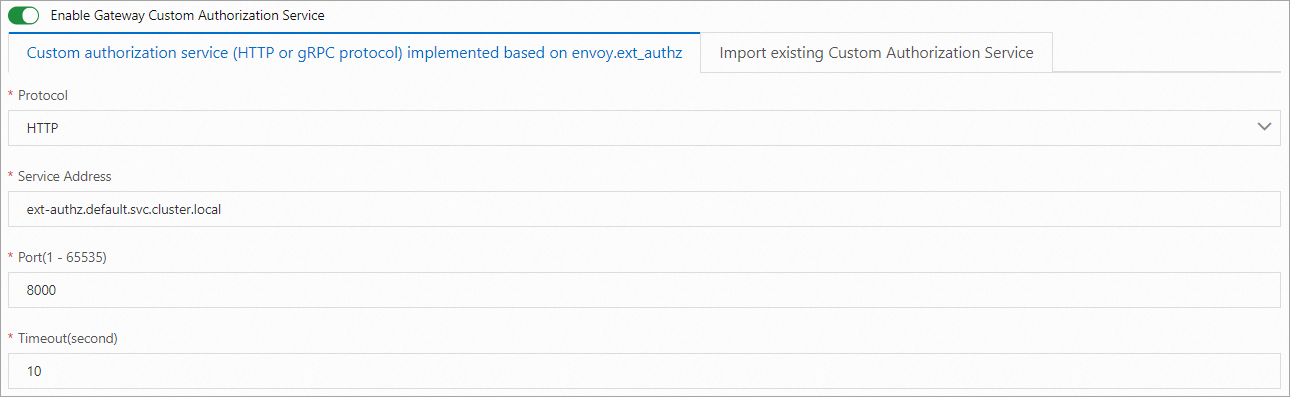
In the Custom Authorization Service Configuration step, turn on Enable Gateway Custom Authorization Service.
Configure the authorization service using one of the following methods, and then click Next.
Method 1: Create a new authorization service
On the Custom authorization service (HTTP or gRPC protocol) implemented based on envoy.ext_authz tab, specify the protocol, service address, and port. For parameter details, see Implement custom authorization by using the HTTP protocol.
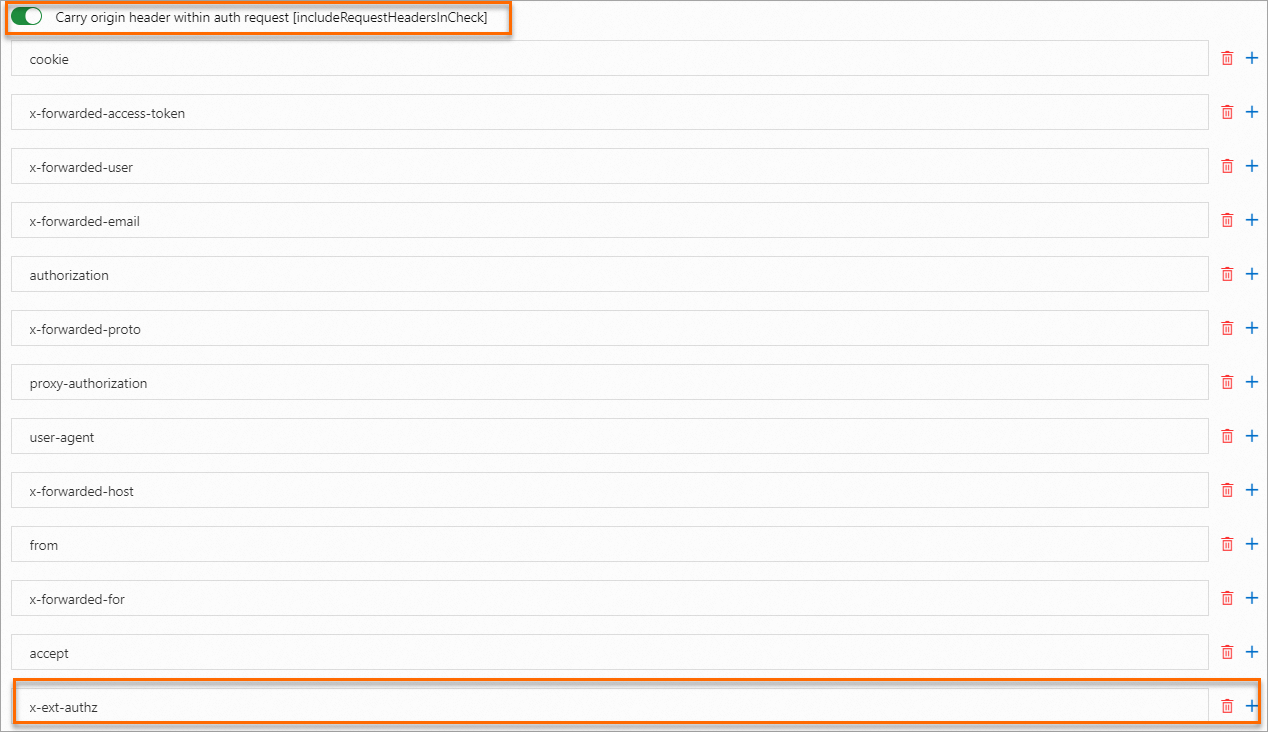
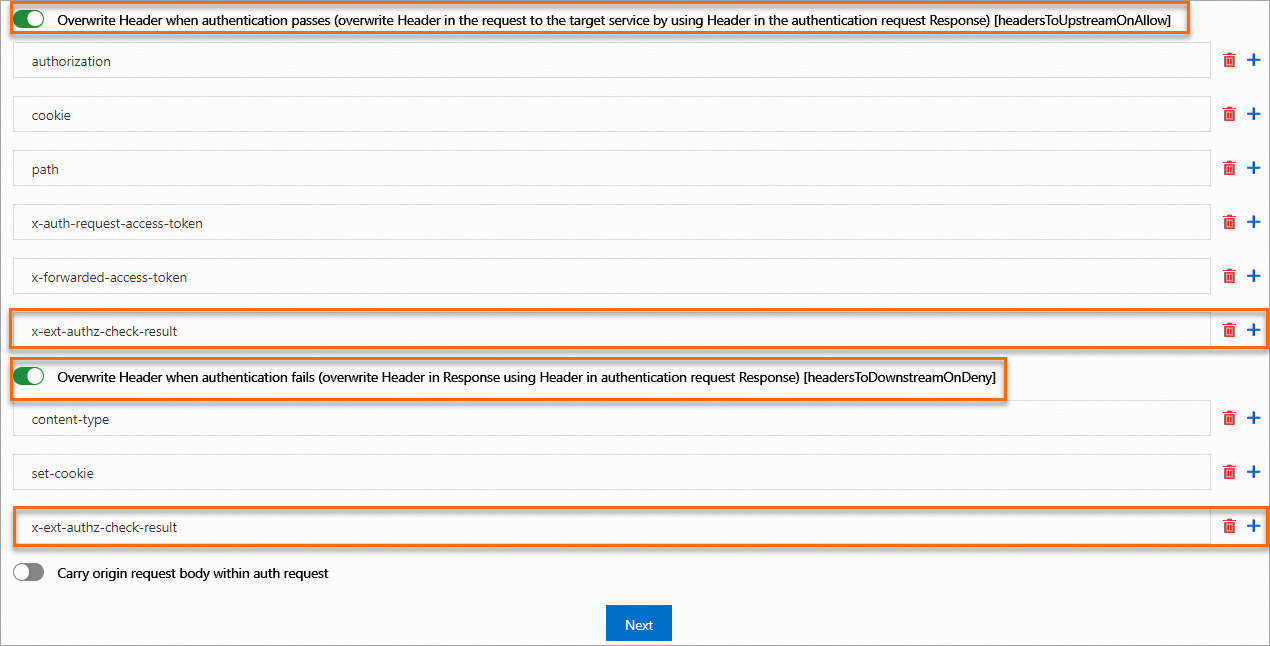
Method 2: Import an existing authorization service
On the Import existing Custom Authorization Service tab, select a previously configured authorization service.
In the Match Rules step, specify which requests require authorization, and then click Submit. For example, to authorize all requests to the
/productpagepath, set the path match accordingly. After the configuration is saved, the message Gateway Custom Authorization Service Created successfully appears.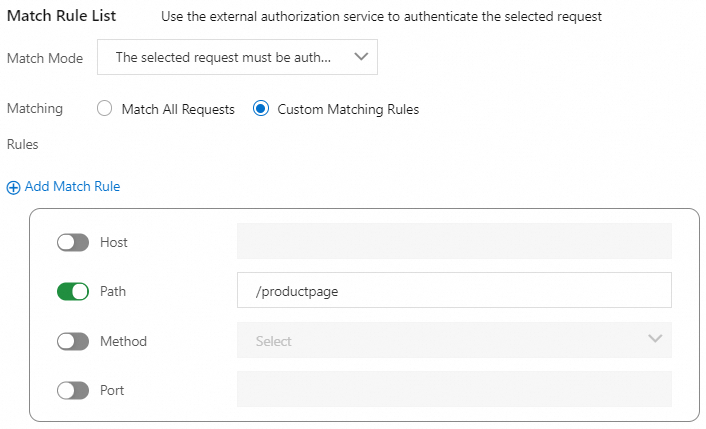
Step 3: Verify the setup
Test the authorization service with three scenarios to confirm it works as expected. Replace <ingress-gateway-ip> with the IP address of your ingress gateway. To get this IP, see Substep 1 in Step 3 in Use Istio resources to route traffic to different versions of a service.
Scenario 1: Non-matching paths bypass authorization
Send a request to /api/v1/products, a path not covered by the match rules:
curl -I http://<ingress-gateway-ip>/api/v1/productsExpected output:
HTTP/1.1 200 OK
server: istio-envoy
date: Wed, 13 Dec 2023 02:41:20 GMT
content-type: application/json
content-length: 395
x-envoy-upstream-service-time: 1
The request succeeds because /api/v1/products is not configured for custom authorization. Only requests matching the paths defined in the match rules are sent to the ext-authz service.
Scenario 2: Unauthorized requests are denied
Send a request to /productpage with the x-ext-authz: deny header:
curl -I -H "x-ext-authz: deny" http://<ingress-gateway-ip>/productpageExpected output:
HTTP/1.1 403 Forbidden
x-ext-authz-check-result: denied
date: Wed, 13 Dec 2023 02:42:59 GMT
server: istio-envoy
transfer-encoding: chunked
The request is denied because the path /productpage matches the authorization policy, and the ext-authz service rejects requests without the x-ext-authz: allow header. The x-ext-authz-check-result: denied header in the response is added by the authorization service.
Scenario 3: Authorized requests are allowed
Send a request to /productpage with the x-ext-authz: allow header:
curl -I -H "x-ext-authz: allow" http://<ingress-gateway-ip>/productpageExpected output:
HTTP/1.1 200 OK
server: istio-envoy
date: Wed, 13 Dec 2023 02:50:38 GMT
content-type: text/html; charset=utf-8
content-length: 5290
x-envoy-upstream-service-time: 47
The request succeeds. The response contains the x-ext-authz-check-result: allowed header added by the authorization service. After the authentication is successful, the ingress gateway also forwards the request to the backend application with the x-ext-authz-check-result: allowed header attached.
See also
Configure a blacklist or whitelist for an ingress gateway: Reject or allow requests by IP address, domain name, or port.
Configure OIDC-based SSO on an ingress gateway: Authenticate users through identity providers that comply with the OpenID Connect (OIDC) protocol.