Connect an Alibaba Cloud Service Mesh (ASM) ingress gateway to a Web Application Firewall (WAF) instance so that WAF inspects and filters inbound HTTP/HTTPS traffic before it reaches your backend services. After the connection is established, WAF adds custom headers to back-to-origin requests that you can include in your access logs for debugging and O&M.
Prerequisites
An ingress gateway is deployed. For more information, see Create an ingress gateway.
The HTTPBin application is deployed and exposed on port 80 of the gateway. For more information, see Deploy the httpbin application.
How WAF protects ingress traffic
WAF sits between your clients and the ingress gateway. It inspects inbound HTTP/HTTPS requests, filters out malicious traffic, and forwards legitimate requests to the ingress gateway. This protects your origin servers and helps keep your data and services secure.
Choose a connection method
ASM provides two ways to route ingress traffic through a WAF instance: a Layer 4 Classic Load Balancer (CLB) instance or a CNAME record.
| Aspect | Layer 4 CLB (recommended) | CNAME |
|---|---|---|
| Traffic scope | All traffic to the ingress gateway | Only traffic for selected domain names |
| DNS changes required | No | Yes -- point your domain DNS to the WAF CNAME |
| Best for | Single-domain setups or full-coverage WAF protection | Multi-domain setups where only some domains need WAF |
A CLB instance was formerly known as a Server Load Balancer (SLB) instance.
Step 1: Connect the gateway to WAF
Method 1: Use a Layer 4 CLB instance
Log on to the WAF console. Click Subscription or Pay-As-You-Go based on your needs, confirm the region and other settings, and click Buy Now to create a WAF 3.0 instance. If you already have a WAF instance, skip this step.
In the left-side navigation pane, click Website Configuration. On the Website Configuration page, click the Cloud Native tab, click CLB(TCP), and then click Add on the right side.
In the Configure Instance- Layer 4 CLB Instance panel, find the CLB instance associated with your ingress gateway and click Add Port in the Actions column. Select the port used by the ingress gateway and click OK.
In this example, HTTP port 80 is selected. To use HTTPS, configure an HTTPS certificate first.
NoteTo find the CLB instance of your ingress gateway, log on to the ASM console and open the gateway details page.
Select Enable Traffic Mark. Add the following three headers and click OK.
Header type Header name Header value Custom Header customwaftagcustomwaftagvalueOriginating IP Address clientrealipSource Port clientrealportWhen a request carries these headers, it indicates the request was inspected by WAF.
Method 2: Use a CNAME
Log on to the WAF console. Click Subscription or Pay-As-You-Go based on your needs, confirm the region and other settings, and click Buy Now to create a WAF 3.0 instance. If you already have a WAF instance, skip this step.
In the left-side navigation pane, click Website Configuration. On the Website Configuration page, click the CNAME Record tab and click Add.
In the Configure Listener step, configure the listener parameters and click Next.
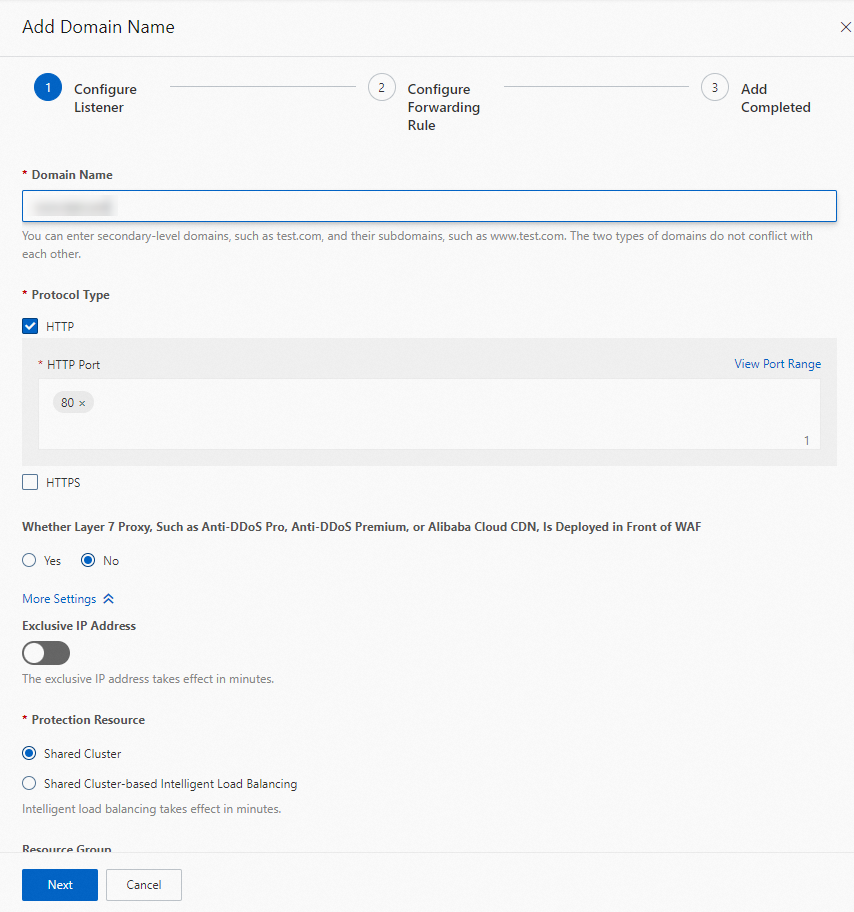
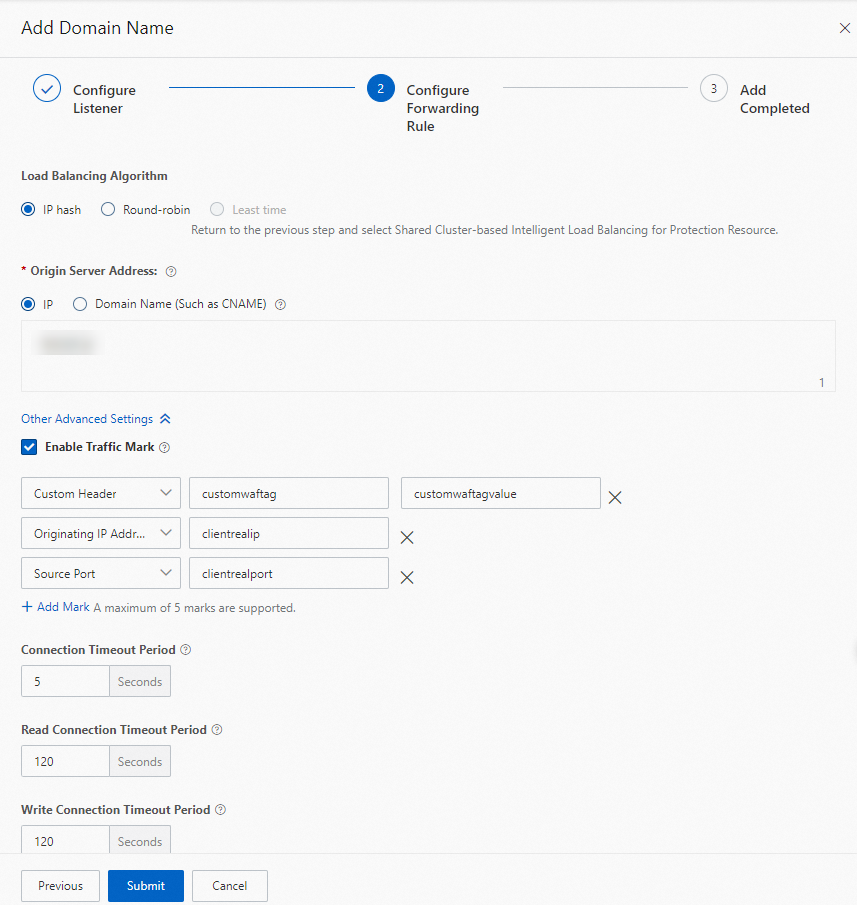
In the Configure Forwarding Rule step, configure the following settings:
Set Load Balancing Algorithm to IP hash.
Set Origin Server Address to IP and enter the public IP address of the ingress gateway.
Select Enable Traffic Mark and add the following three headers. Keep the default values for the remaining parameters and click Submit.
Header type Header name Header value Custom Header customwaftagcustomwaftagvalueOriginating IP Address clientrealipSource Port clientrealportWAF adds these headers to every request it forwards to the ingress gateway.
In the Add Completed step, click Copy CNAME to save the CNAME provided by WAF, then click Complete.
NoteUpdate the DNS record for your domain name to point to this WAF CNAME. Until you do, traffic does not flow through WAF.
Step 2: (Optional) Add WAF headers to your access logs
WAF-inspected requests carry the custom header, originating IP address header, and source port header you configured in Step 1. If these headers do not appear in your gateway access logs, debugging WAF-related traffic is difficult.
To add these headers to your access logs, see Customize access logs on the data plane.
Step 3: Verify the WAF connection
After completing Step 1, verify that the ingress gateway is connected to the WAF instance.
Verify a Layer 4 CLB connection
Open a browser and go to <ingress-gateway-IP>:80/status/418.
Expected output:
-=[ teapot ]=-

       _...._
     .'  _ _ `.
    | ."` ^ `". _,
    \_;`"---"`|//
      |       ;/
      \_     _/
        `"""`
Verify a CNAME connection
Run the following curl command. Replace <domain-name> with the domain name you configured in the WAF console (Step 1, Method 2, step 3) and <waf-cname> with the CNAME you copied in Step 1, Method 2, step 5.
curl -HHost:<domain-name> "http://<waf-cname>/status/418" -vThis example uses the WAF CNAME directly rather than the actual domain name. To access the application through its real domain name, update the DNS record to point the domain name to the WAF CNAME.
Step 4: View WAF-added headers in gateway logs
Log on to the ASM console. In the left-side navigation pane, choose Service Mesh > Mesh Management.
On the Mesh Management page, click the name of your ASM instance. In the left-side navigation pane, choose Observability Management Center > Log Center.
On the ASM Gateway Logs tab, enter
418in the search box and click Search & Analyze.The log entries show the values of the WAF-added headers (
customwaftag,clientrealip,clientrealport).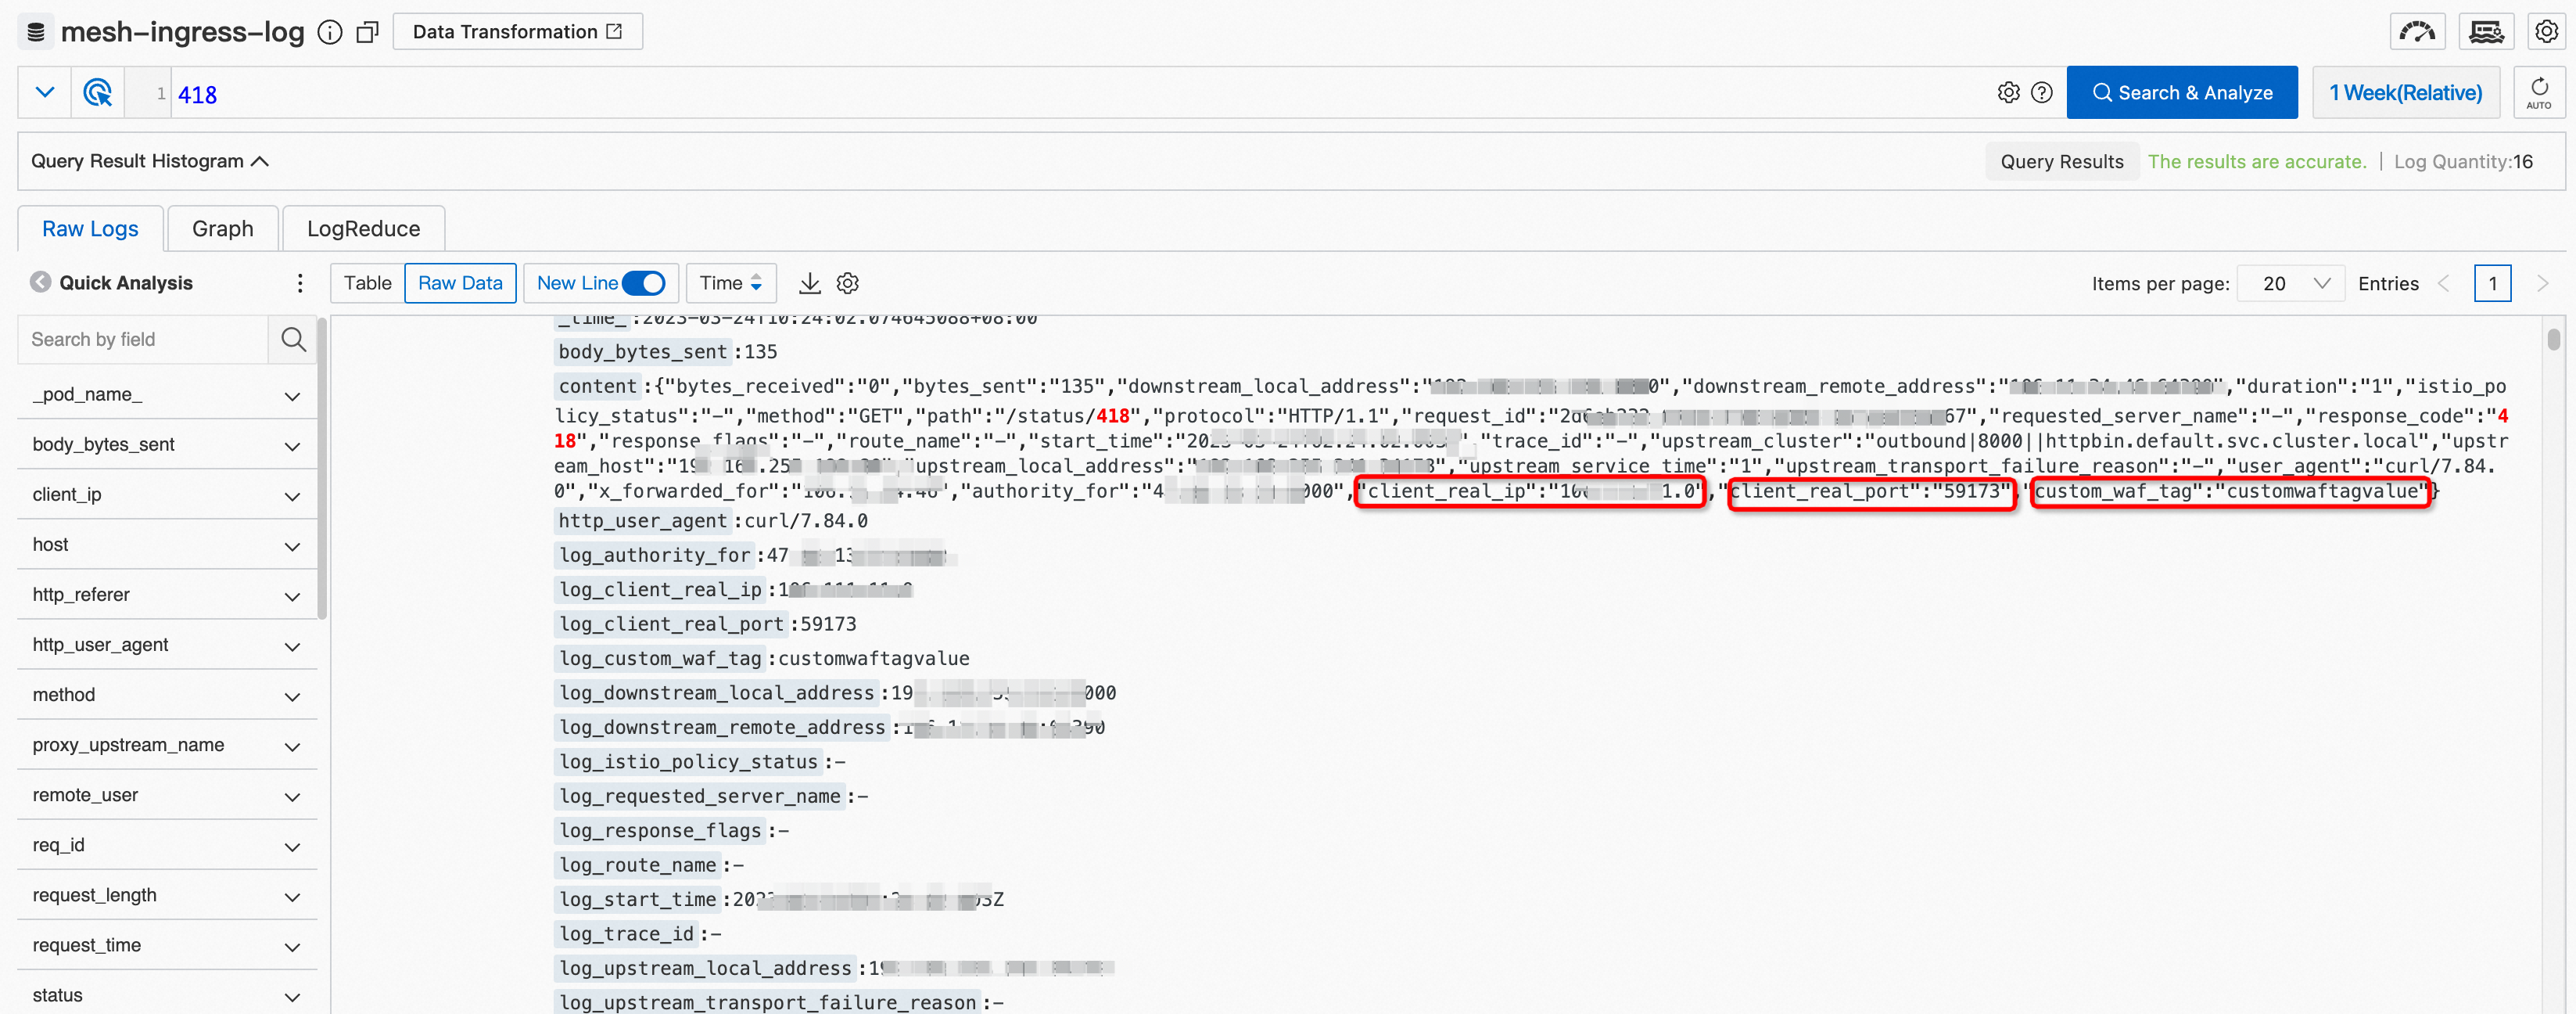
After you complete the connection, you can log on to the WAF console to configure advanced mitigation capabilities and protect your website from attacks. If you have other custom headers that you need to observe across the entire call chain, you can configure them as described in Step 2.
What to do next
Configure WAF protection rules. Log on to the WAF console to configure advanced protection capabilities to protect your website from attacks.
Monitor additional headers. To track other custom headers in your access logs, repeat Step 2 and add the header fields.