Database Autonomy Service (DAS) scans your databases to find and classify sensitive information. Use built-in templates for finance, power, Internet of vehicles (IoV), and other industries, or create custom templates to meet your specific compliance requirements.
How it works
Sensitive Data Identification is built on three layers: templates, models, and features. Understanding how these relate helps you configure identification correctly.
| Layer | What it is | What you configure |
|---|---|---|
| Identification template | The top-level classification scheme used by an identification task. A template groups models by sensitive data category and assigns sensitivity levels. | Select a built-in template or create a custom one. |
| Identification model | A rule set defined by one or more identification features. The model determines the final identification result for a data type. | Associate models with templates; enable or disable models per template. |
| Identification feature | The detection rule that inspects actual data. Combines regular expressions (regex) with operators such as contains and does not contain. Multiple features in a model use AND or OR logic. |
Select built-in features or create custom ones; combine rules for complex matching. |
A template runs identification tasks and applies models to categorize results. Each model uses one or more features to detect whether data matches the target sensitive data type, and the model's result determines the final classification.
Template types and roles
DAS distinguishes between template *types* (where the template comes from) and template *roles* (how the template is used in tasks).
Template types:
| Type | Description |
|---|---|
| Built-in | Provided by DAS for common industries: finance, power, IoV, Internet, and internal cloud security assurance. Built-in templates cannot be deleted. |
| Custom | Created by you to meet specific requirements. Up to 10 custom templates are supported. |
Template roles:
| Role | Description |
|---|---|
| Primary | The template used by the system default task. Exactly one template can be the primary at any time. It cannot be disabled. All results shown in the DAS console are based on the primary template. The default primary template is Classification And Grading Template For The Internet Industry. |
| Active | An enabled template that can be used in custom tasks. Up to two active templates are supported. To promote an active template to primary, use the Main Template switch. |
| General-purpose | Based on the Personal Information Security Specification GB/T 35273-2020 published by the Standardization Administration of China (SAC). DAS applies this template automatically alongside the primary template when the primary identification template is a built-in identification template. |
When adding a custom identification task, select one primary template and up to two active templates.
Sensitivity levels
DAS supports up to 10 sensitivity levels, S1 through S10. A higher number means a higher sensitivity level.
-
Built-in templates: Sensitivity levels cannot be added or deleted. You can only edit the description.
-
Custom templates: You can add, edit, and delete sensitivity levels.
Prerequisites
Before you begin, make sure the target database instance is authorized in DAS. See Asset authorization.
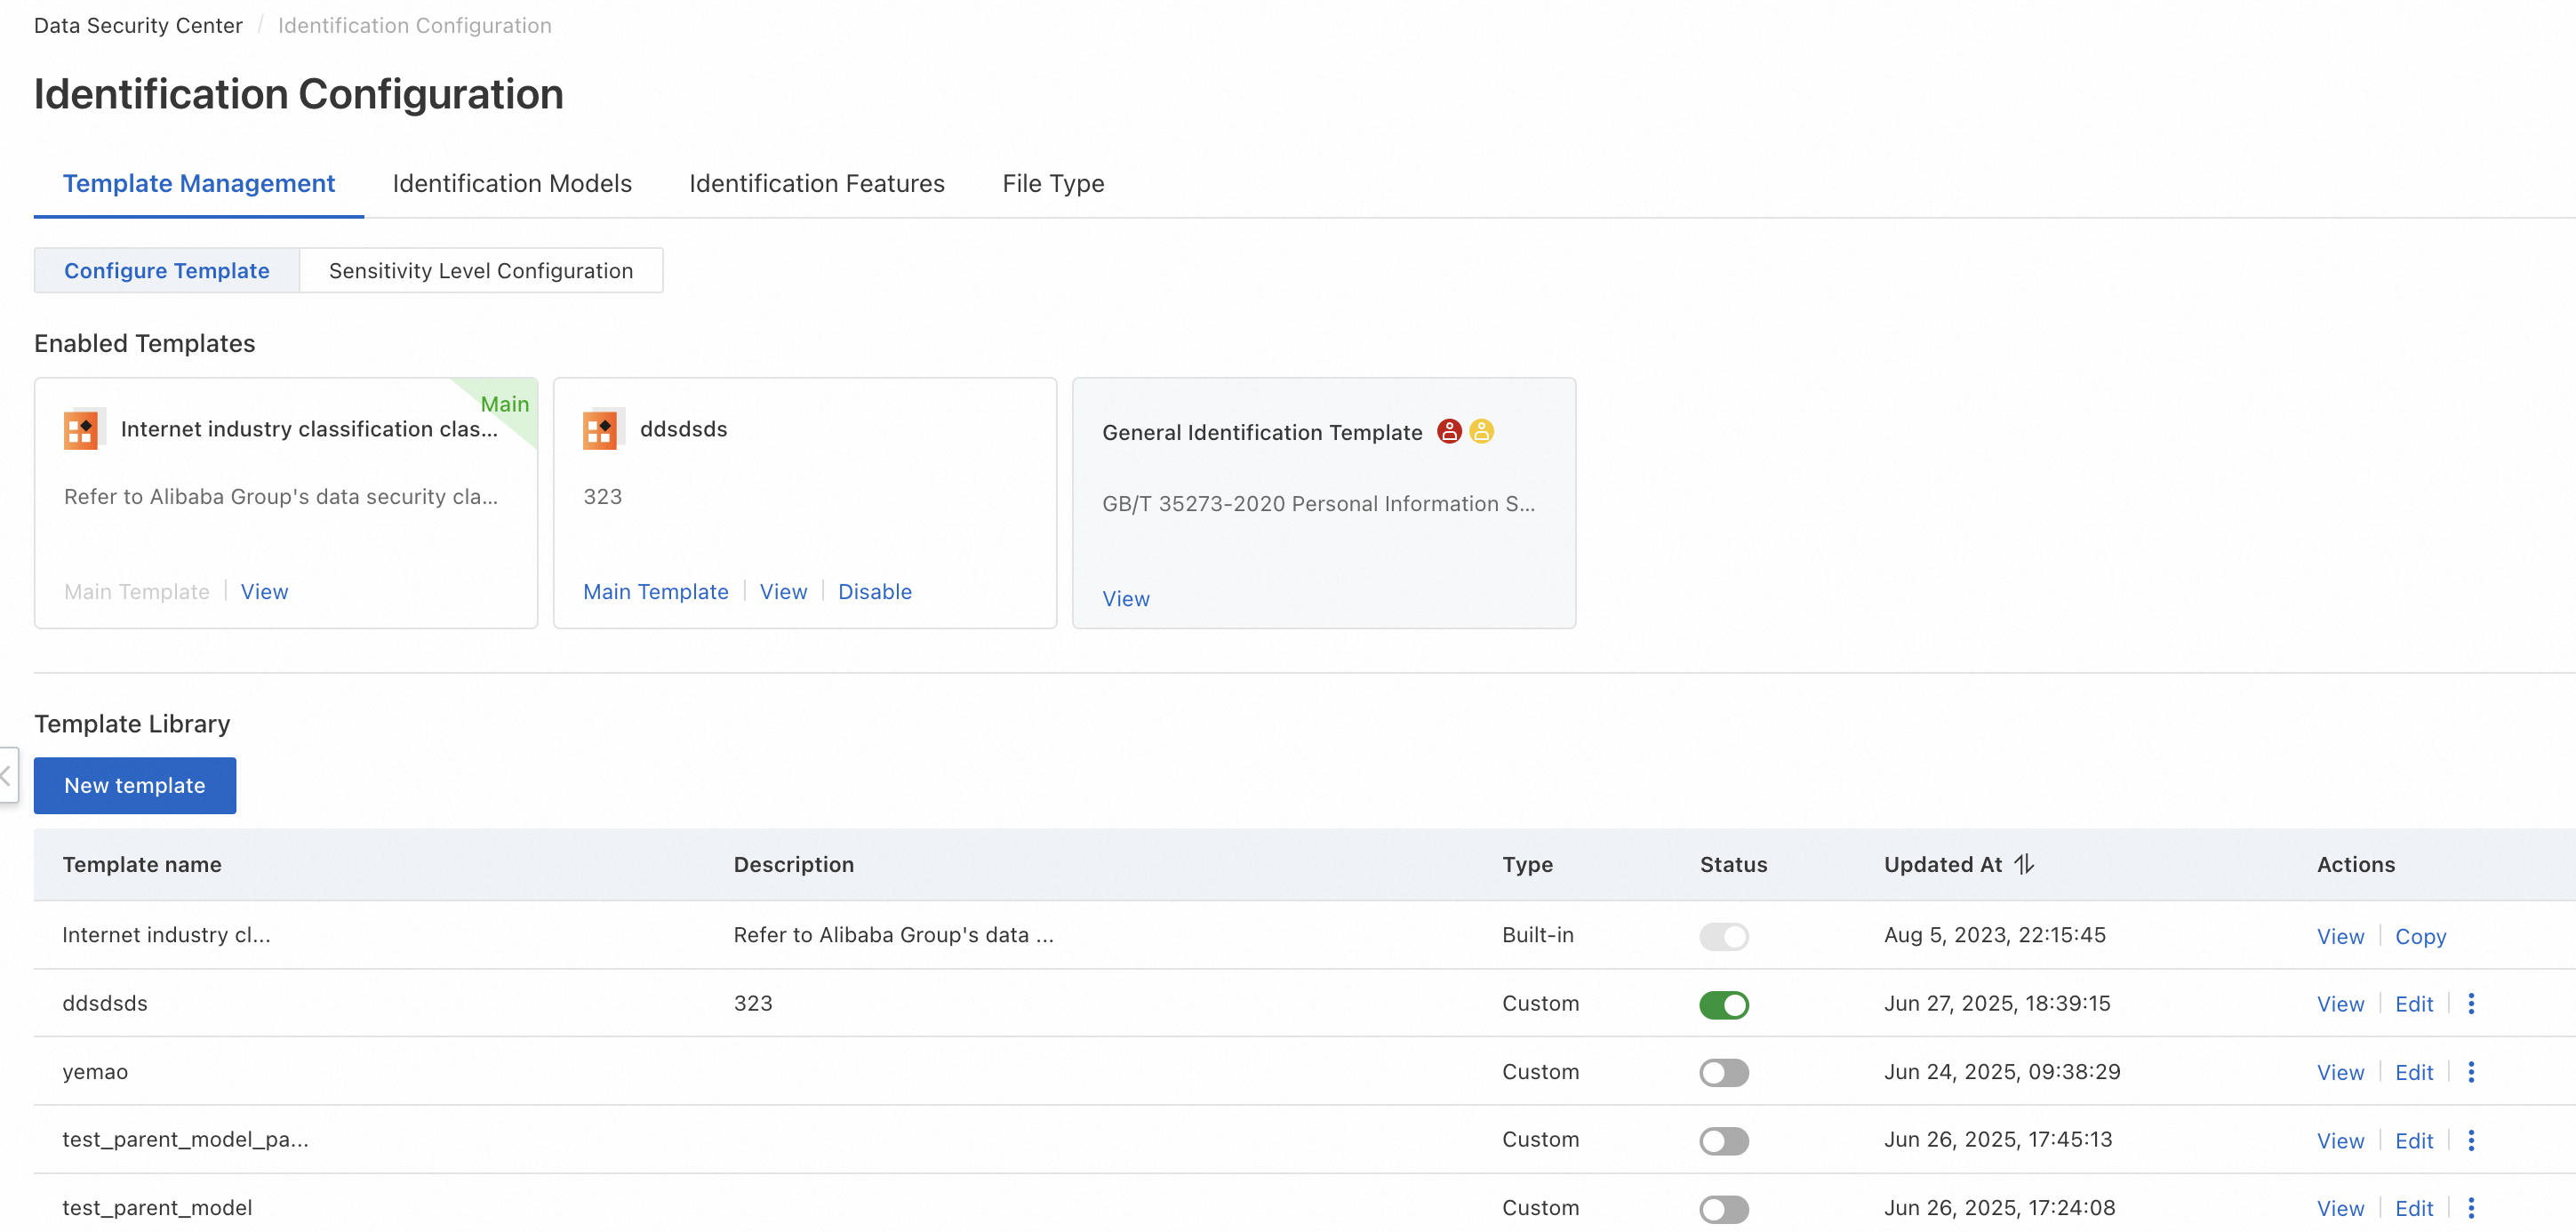
Manage templates
Use a built-in template
-
Log on to the DAS console.
-
In the left navigation pane, choose Data Security Center > Sensitive Data Identification > Identification Configuration.
-
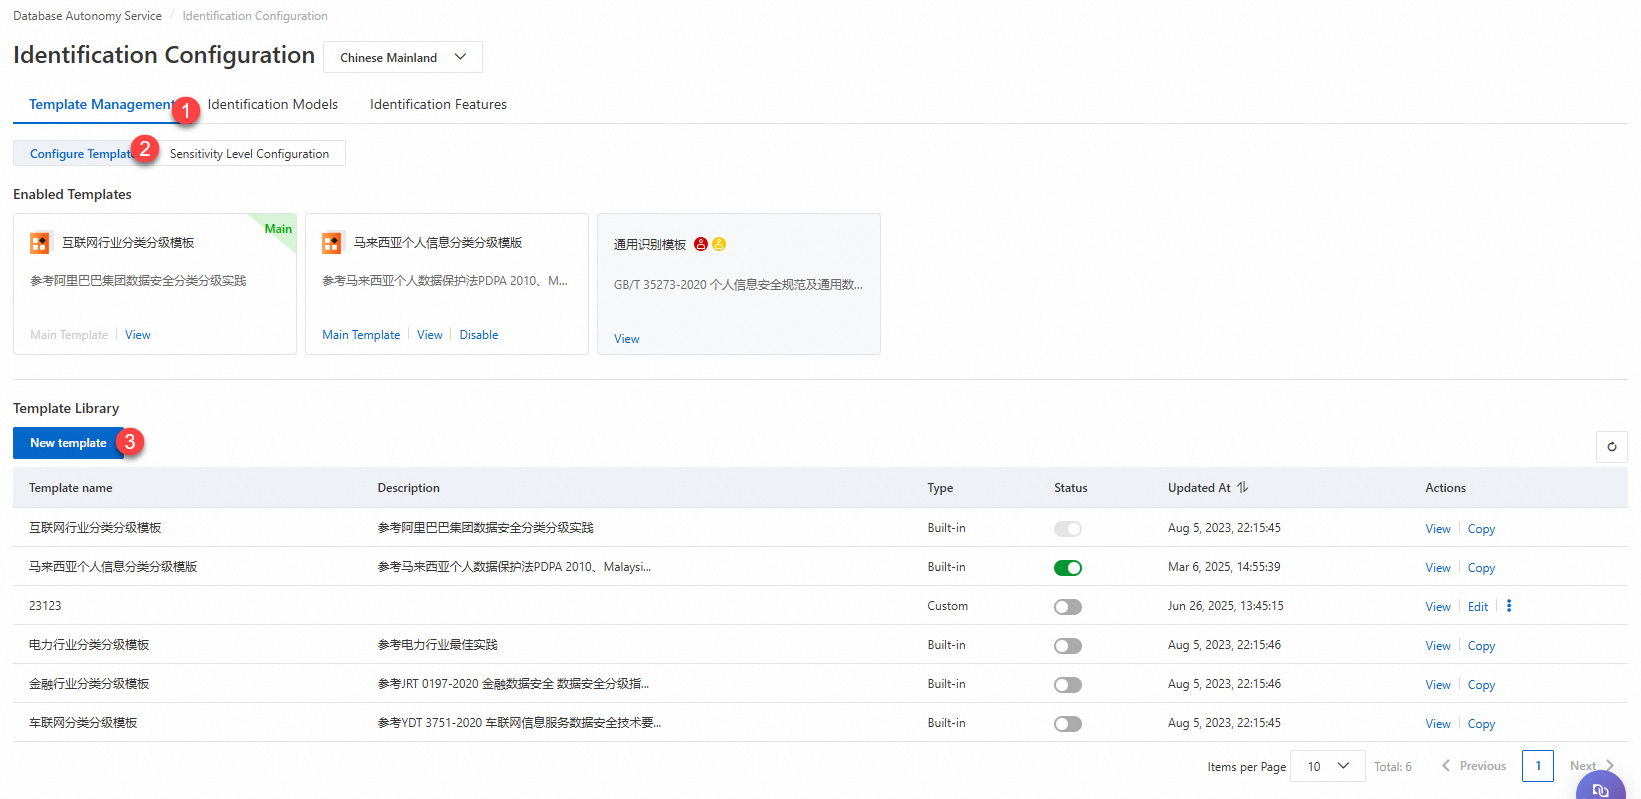
On the Template Management tab, find templates where Type is Built-in.

-
In the Status column, click
 or
or  to enable or disable the template.
 -
For an enabled template, click Main Template to promote it to primary, or click Disable to deactivate it.

If no template has been configured, the default primary template is Classification And Grading Template For The Internet Industry.
Create a custom template
-
Log on to the DAS console.
-
In the left navigation pane, choose Security Center > Sensitive Data Identification > Identification Configuration.
-
On the Template Management tab, click Create Template.
-
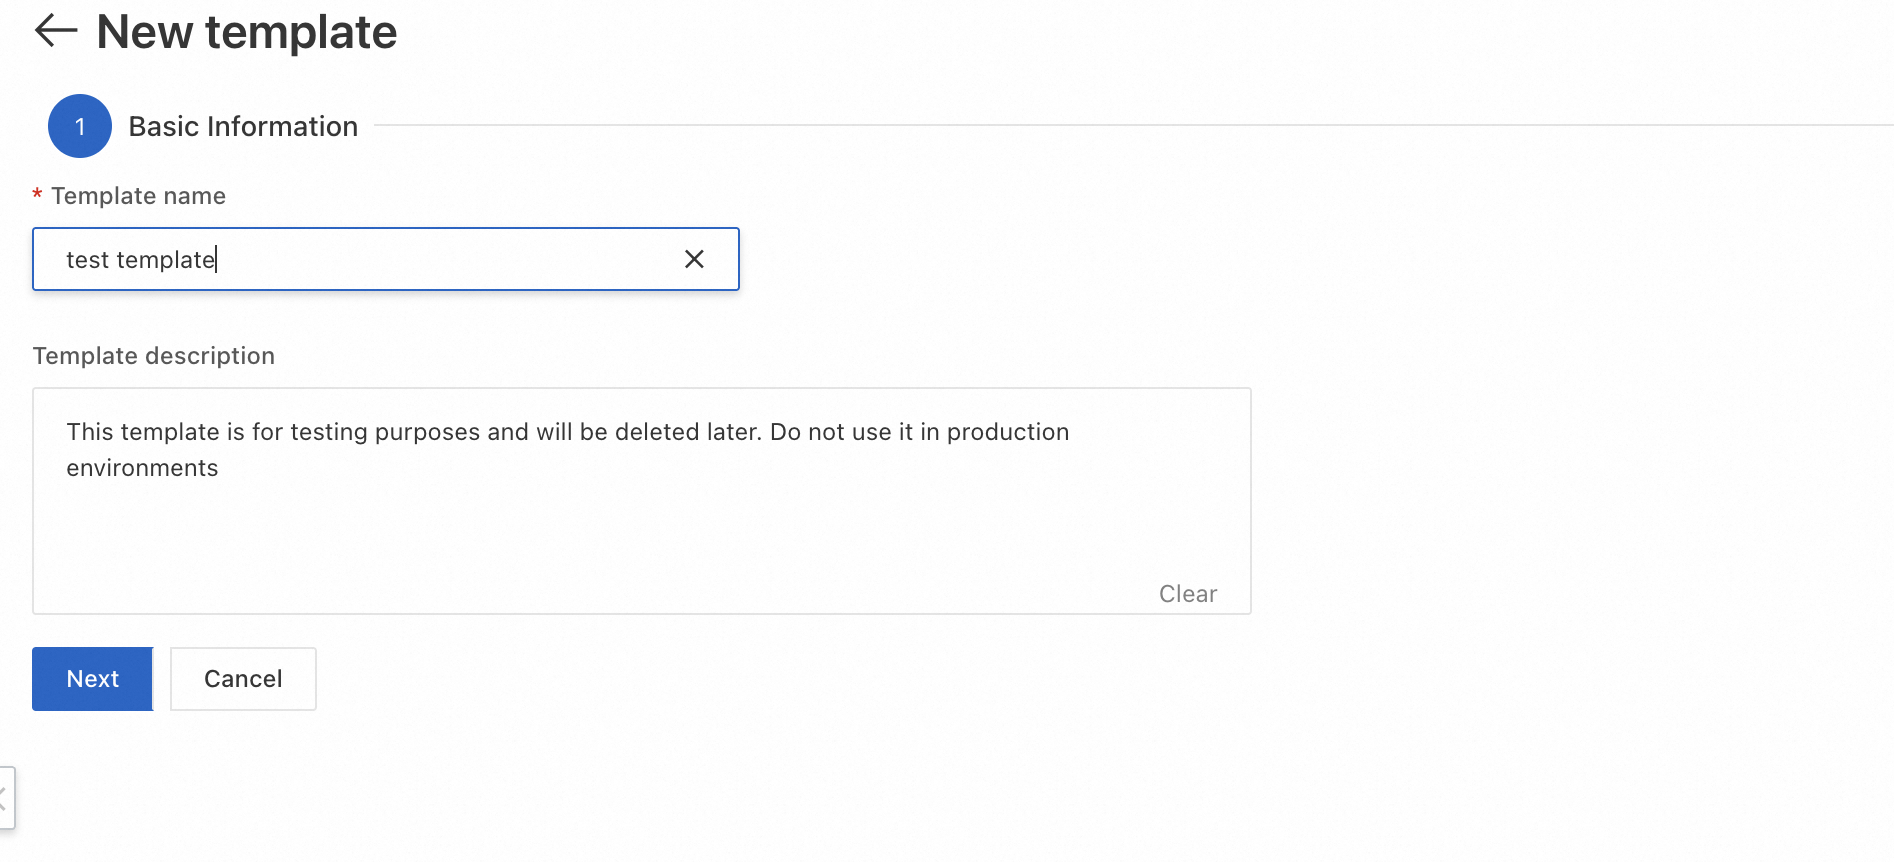
Enter the Template Name and Template Description, then click Next.
-
Under Template Node Configuration, click Add Category. Enter a Category Name and click OK.
-
To add more categories at the same level or as subcategories, click the manage icon
 next to the category, then select Add Sibling Category or Add Subcategory.
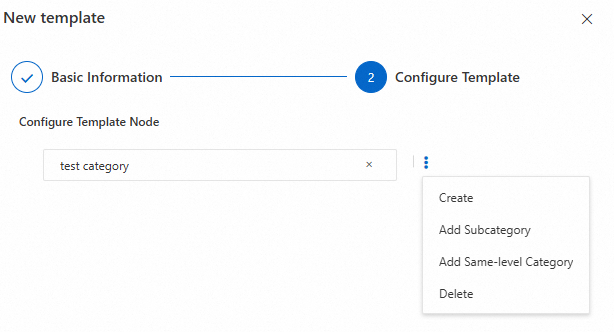
-
-
Add identification models under each category:
-
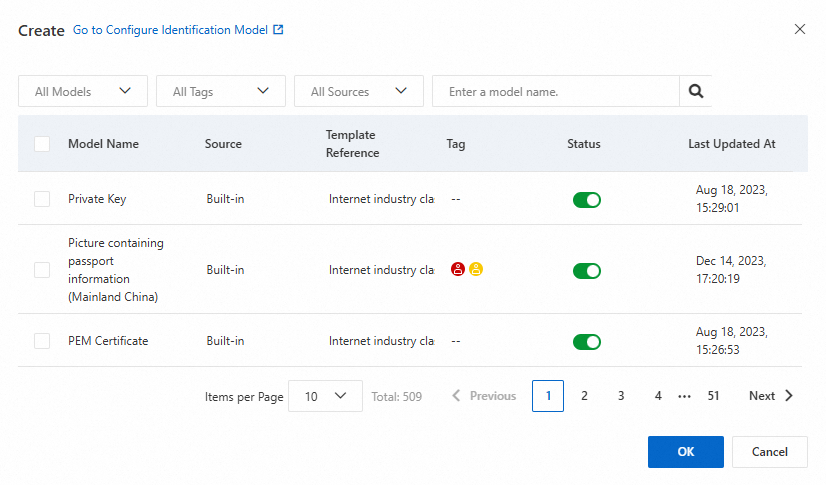
Click the manage icon
 next to the category and select Add Model.
 -
In the Add Model dialog box, select the target models, set each model's status to enabled
 , and click OK.
ImportantEnabling a model in a template activates it for all identification tasks that use this template.
-
Copy a template
Copying is the fastest way to create a custom template based on an existing built-in or custom template.
-
Log on to the DAS console.
-
In the left navigation pane, choose Security Center > Sensitive Data Detection > Identification Configuration.
-
On the Template Management tab, find the template to copy and click Copy in the Actions column.
-
Modify the Template Name and Remarks, then click Confirm.
To edit a template's name, model categories, or identification models after copying, click Edit in the Actions column.
Manage models
-
Log on to the DAS console.
-
In the left navigation pane, choose Security Center > Sensitive Data Identification > Identification Configuration.
-
Click the Identification Model tab, then click Add Model.
-
In the Add Model panel, configure the following parameters and click OK.
| Category | Parameter | Description |
|---|---|---|
| Basic information | Model name | A unique name for the model. |
| Model description | A description of the model. | |
| Data label | The data label for the model. Options: Sensitive Personal Information, Personal Information, General Information. | |
| Data classification | Associate the model with a custom identification template, a sensitive information category, and a risk level. Only custom templates are supported. | |
| Model rule configuration | Identification feature | Select one or more identification features (built-in or custom). Multiple features use OR logic — data matching any selected feature triggers the model. |
| Identification scope | Select the asset types the model applies to. Defaults to all assets authorized to DAS. Multiple asset types use OR logic. | |
| Advanced settings | (Optional) Configure asset-specific conditions: select an asset type, set the relationship between conditions (AND or OR), and add condition groups. | |
| Identification threshold | Minimum hits (unstructured data) | For unstructured data such as NoSQL: the minimum number of times a feature must match within a single file for DAS to classify that file as sensitive. |
| Hit rate (structured data) | For structured data such as ApsaraDB RDS: the percentage of sample rows (out of 200) that must match the model for DAS to classify the column as sensitive. |
Manage identification tasks
DAS supports two types of identification tasks: the system default task and custom tasks.
| System default task | Custom task | |
|---|---|---|
| Created | Automatically, when you grant permissions on a database and select the default scan. | Manually, through Task Management. |
| Template used | Always the primary template (plus the general-purpose template if the primary is built-in). Cannot be changed. | Any enabled template you choose. |
| Scan scope | All authorized instances, databases, and tables. | Configured by you: global scan or specified instances and databases. |
| First scan | Full scan. | Full scan. |
| Subsequent scans | Incremental (new and modified data only). | Full scan on rescan; incremental on periodic runs. |
| Maximum active tasks | — | 5 active tasks total (each periodic task occupies one slot). |
Use the system default task for continuous monitoring of all authorized assets with the primary template. Create a custom task when you need to scan a specific database with a non-primary active template.
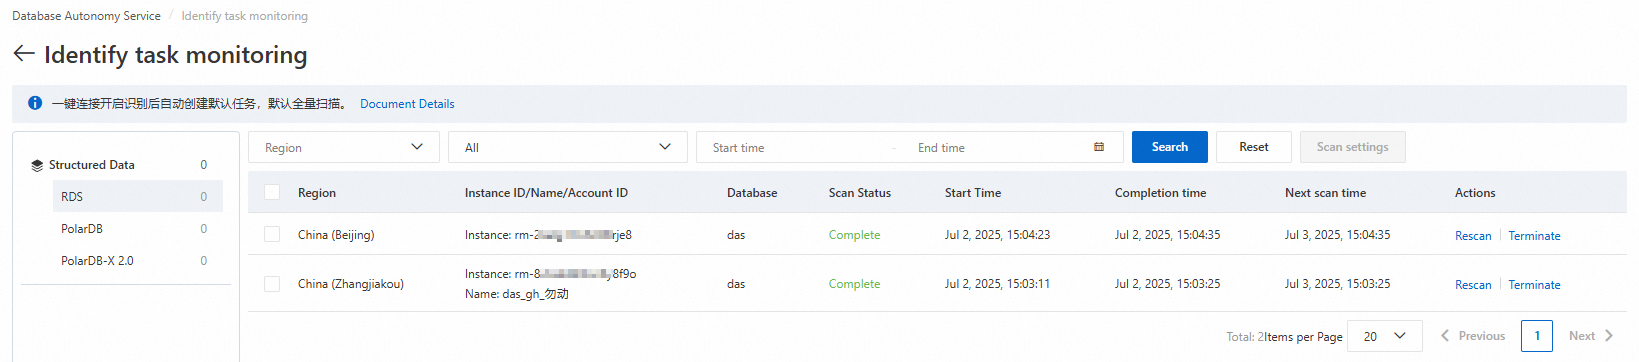
View default tasks
-
Log on to the DAS console.
-
In the left navigation pane, choose Security Center > Sensitive Data Identification > Task Management.
-
On the Identification Task tab, click System Default Task.

-
On the Identification Task Monitoring page, view the task list. From the Actions column, you can:
-
Rescan: Triggers a full scan. Use this after upgrading an identification model, switching the primary template, or when the database content changes significantly.
-
Pause: Temporarily stops a scan in progress if the database service becomes abnormal.
-
Stop: Prevents the task from running in the next epoch. A task that is currently scanning completes its current run before stopping.
-
Enable: Re-enables a stopped task.
-
Adjust scan settings
The system default task supports periodic scanning. Set the scan epoch to match how often your database content changes so that new sensitive data is detected promptly. The minimum scan epoch is 24 hours.
-
On the Identification Task Monitoring page, select the task.
-
Click Scan Settings above the task list and configure the epoch and scan start time.
Switching the primary identification template does not immediately trigger a scan. The new template takes effect the next time the system default task runs.
-
Set the scan start time to off-peak hours to minimize the impact on database performance.
-
If CPU utilization or memory usage spikes abnormally during a scan, click Pause or Stop in the Actions column on the Task Management page.
Create a custom task
-
Log on to the DAS console.
-
In the left navigation pane, choose Security Center > Sensitive Data Detection > Task Management.
-
On the Identification Task tab, select the asset type and click Create Identification Task.

-
In the Create Identification Task panel, configure the following and click Confirm.
| Category | Parameter | Description |
|---|---|---|
| Identification scope | Identification scope for structured data | Global scan: scans all authorized structured data assets. Specified scan: set Instance name, Database name, and Scan limits (first 200 rows by default; maximum 1,000 rows). Click Add Identification Scope to add multiple instances. |
| Other configurations | Identification overwrite | Specifies how to handle data that was previously corrected manually. Skip Manual Tagging Results (recommended): retains the original manual corrections. Overwrite Manual Tagging Results: replaces manual corrections with new identification results. |
-
After the task is created, manage it from the Actions column:
-
Rescan: Triggers a full scan.
-
Pause: Temporarily stops a scan in progress.
-
Stop: Prevents the next scheduled run. Does not interrupt a scan in progress.
-
Enable: Re-enables a stopped task.
-
The system supports a maximum of 5 active identification tasks. Each periodic scan task occupies one slot. After 5 periodic tasks are configured, no new tasks can be created.
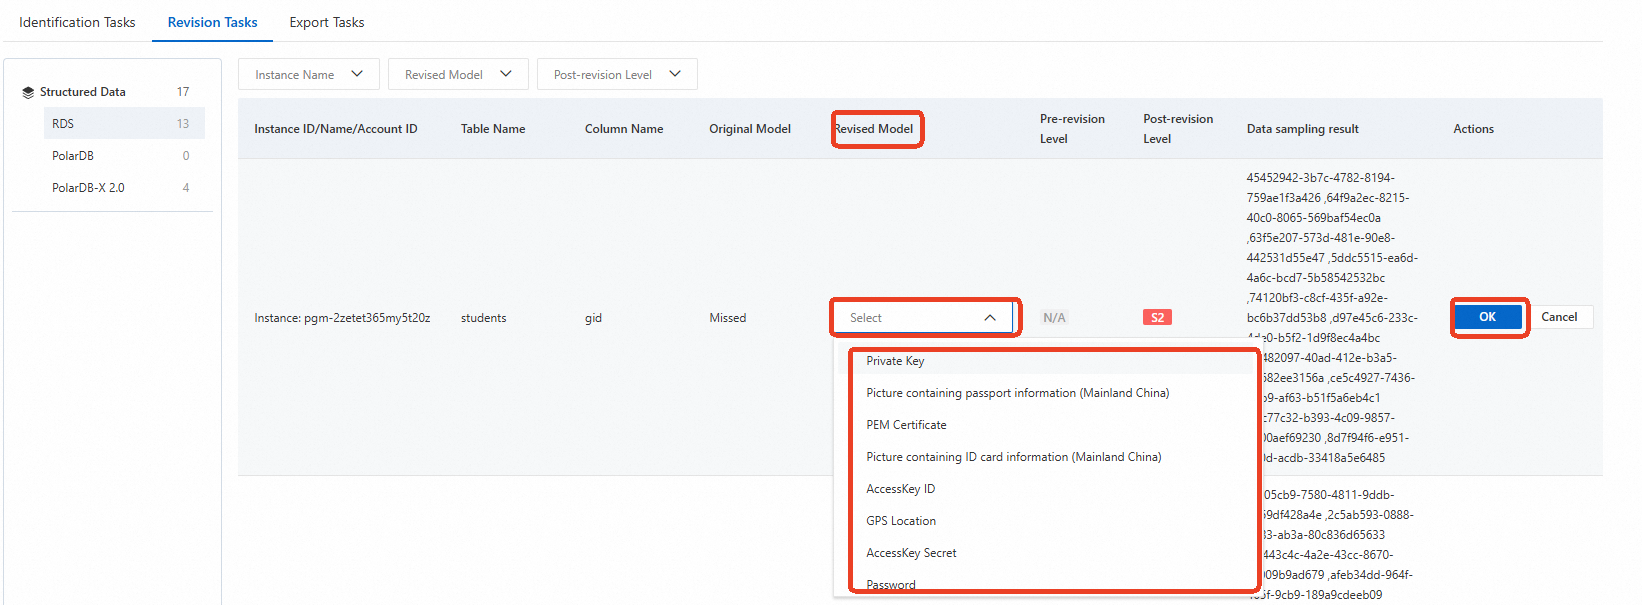
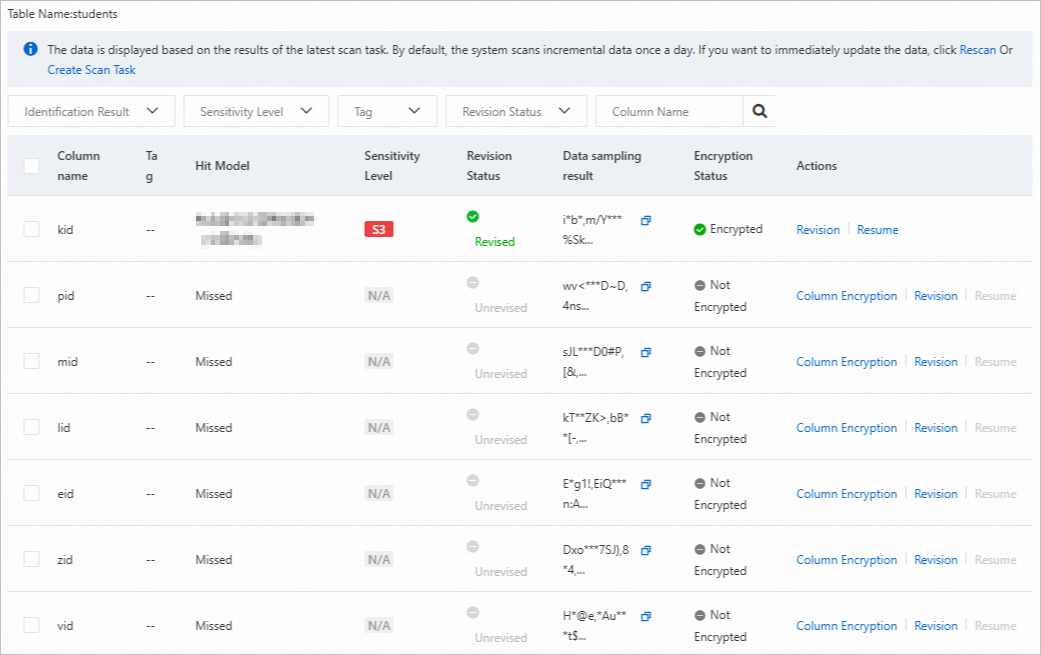
Correct identification results
If the automatic identification result for a data asset is incorrect, correct it manually. After a recovery operation, the model is restored to its state before the correction.
-
Log on to the DAS console.
-
In the left navigation pane, choose Security Center > Sensitive Data Identification > Task Management.
-
Click the Correction Task tab.
-
In the left panel, click the asset type to correct.
-
Click Correct or Recover in the Actions column for the target data. Follow the on-screen instructions to update the Corrected Model and click OK.
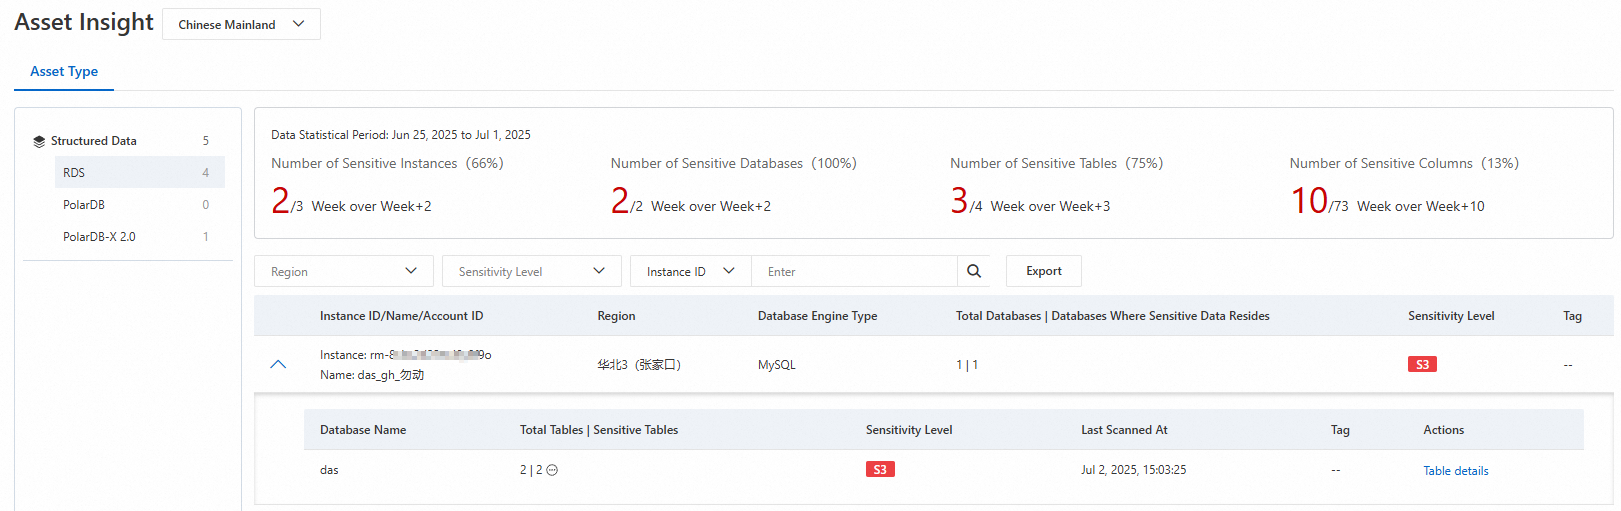
View and export results
After a task completes, view results on the Asset Overview page. Results refresh every 5 minutes.
View results
-
Log on to the DAS console.
-
In the left navigation pane, choose Security Center > Sensitive Data Identification > Asset Overview.
-
On the Asset Type tab, click the data type to view.
-
Click Table Details in the Actions column to view sensitive data statistics for a specific instance.
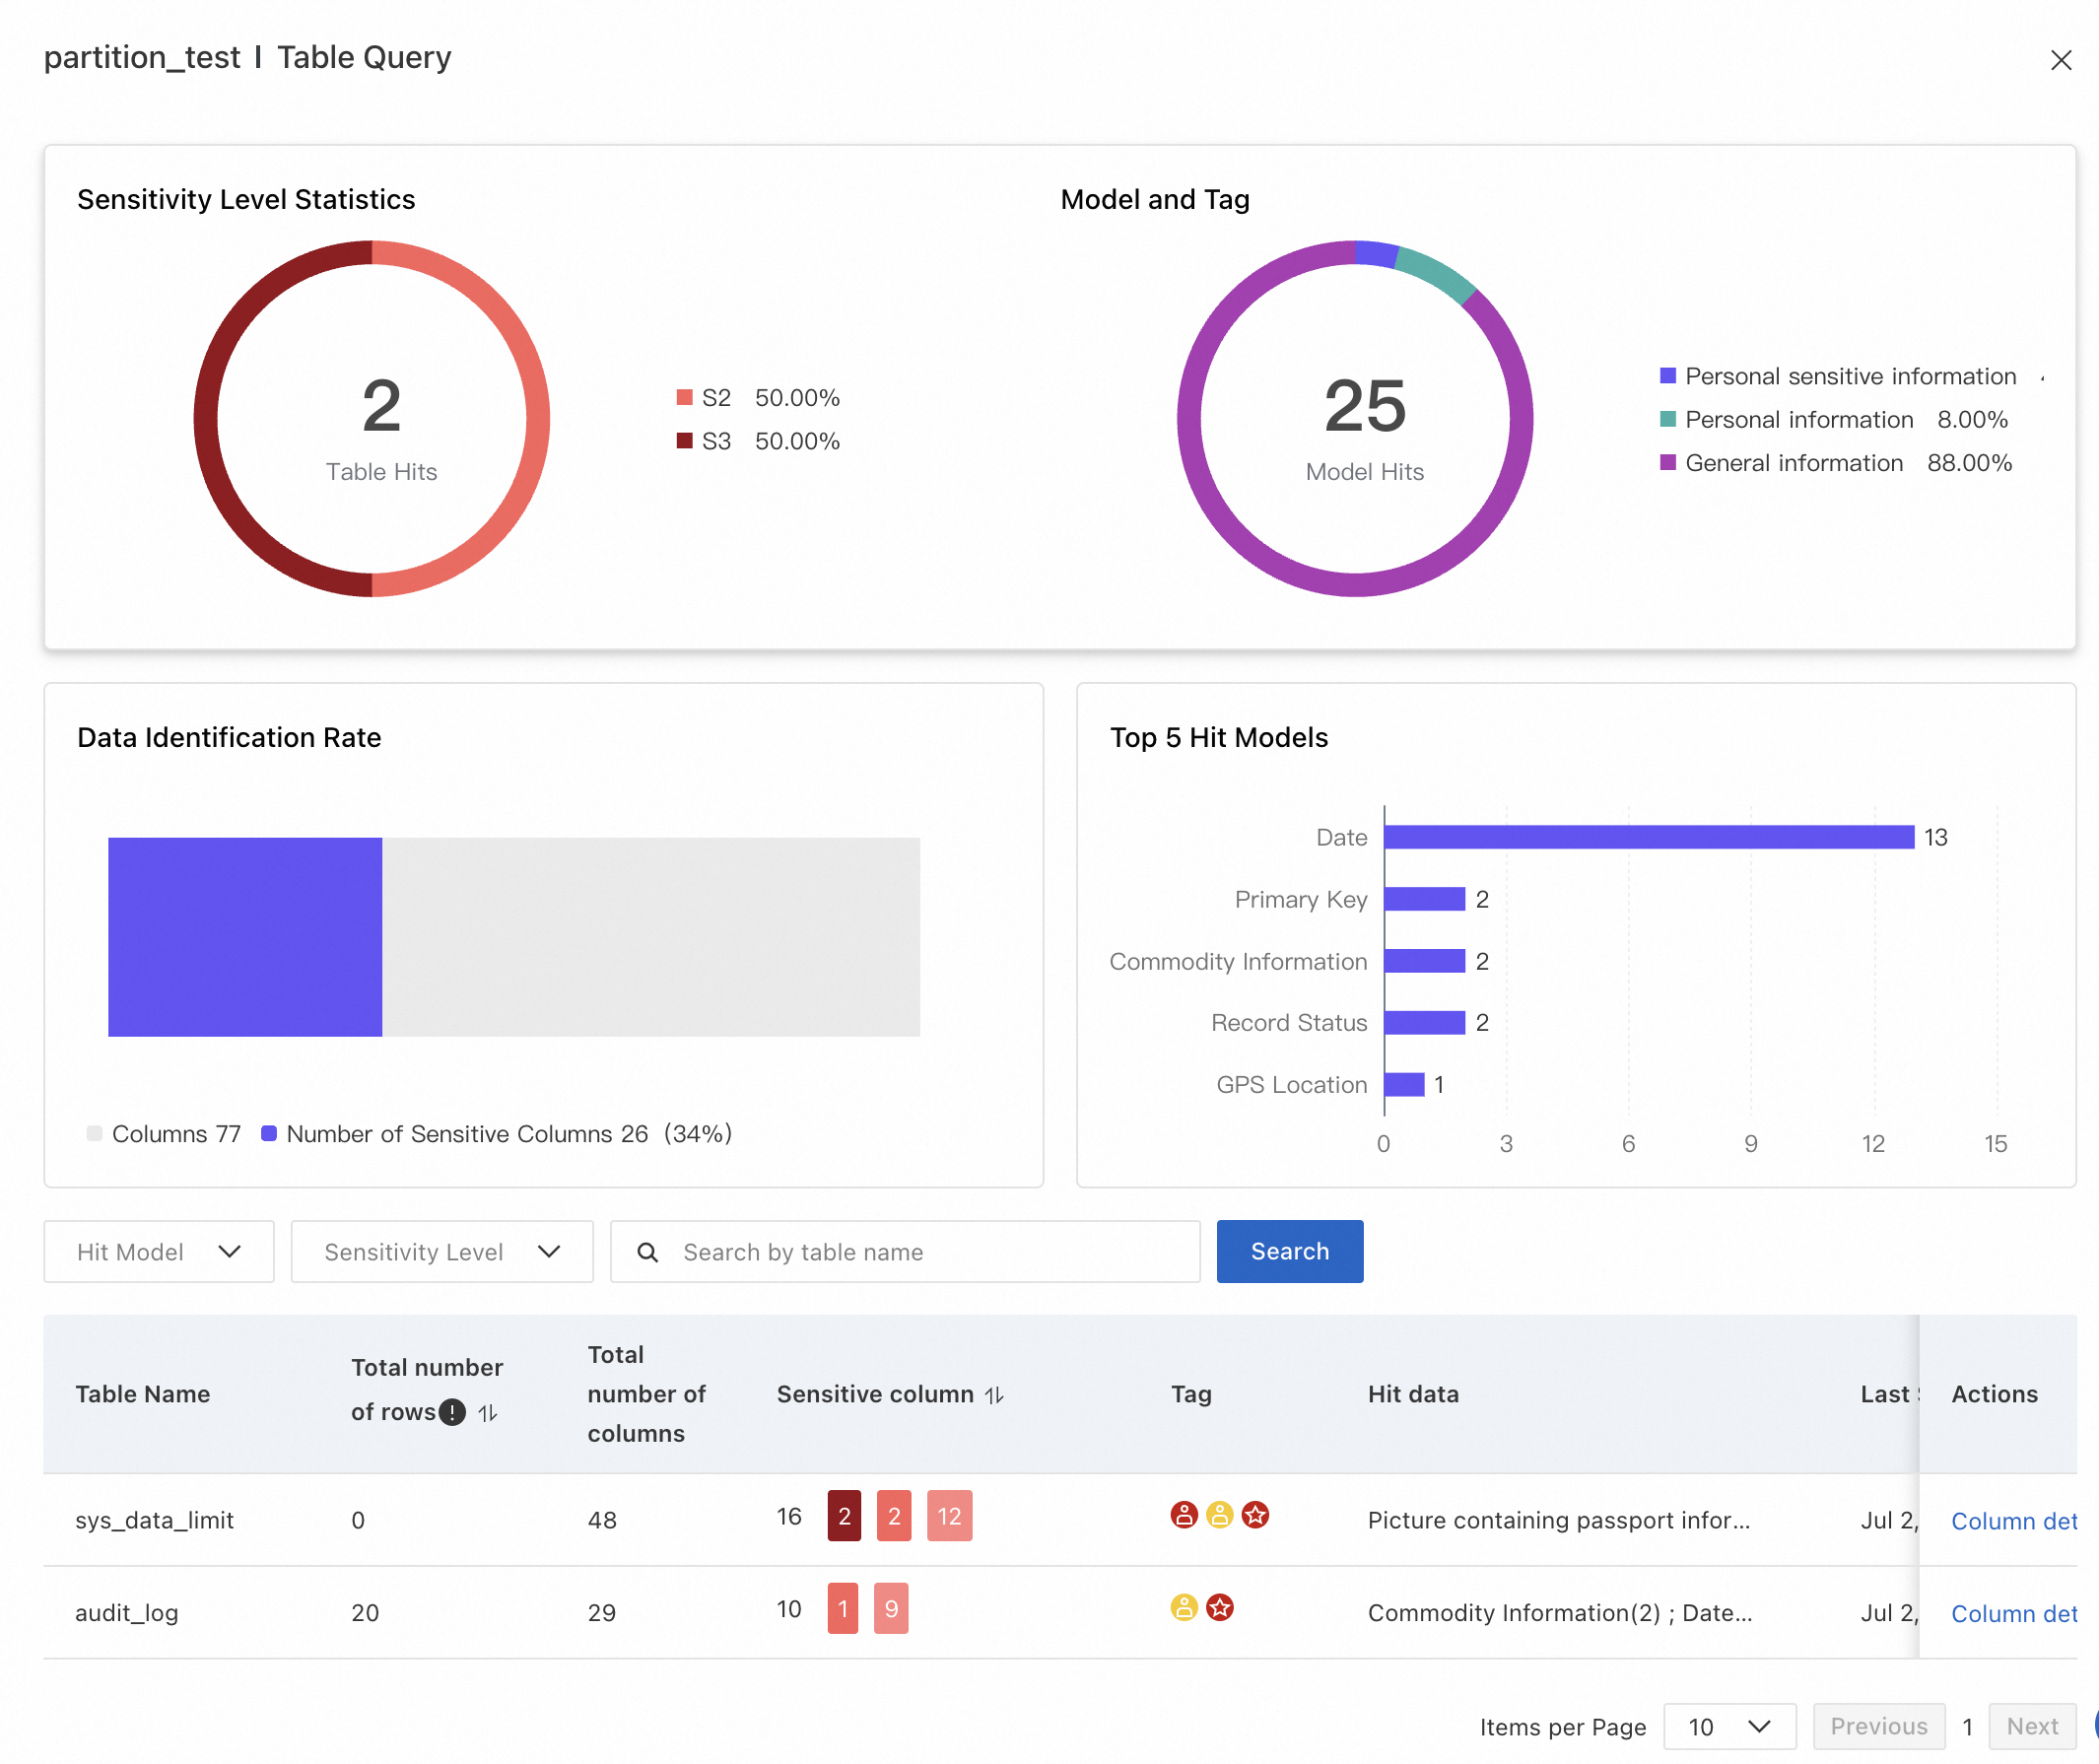
-
In the sensitive data list, click Column Details in the Actions column to see which rules were triggered by the data in each column. If Correct appears in the Actions column, the identification result can be corrected.
Export results
-
Log on to the DAS console.
-
In the left navigation pane, choose Security Center > Sensitive Data Identification > Task Management > Export Task.
-
Click Create Export Task. Configure the following and click OK:
-
Basic information: Enter a task name and select an enabled template.
-
Export dimension: Select Asset Type (all engine instances) or Asset Instance (specific engine instances).
-
After the task is created, track its status in the export task list. Export time varies depending on data volume.
Download exported results
Wait until Export Status shows Completed, then click Download in the Actions column.

Download the exported data within 3 days of export completion. After 3 days, the export task expires and the data can no longer be downloaded.
Limits
| Item | Limit |
|---|---|
| Custom templates | Up to 10 |
| Active templates | Up to 2 |
| Active identification tasks | Up to 5 (each periodic task occupies one slot) |
| Sensitivity levels | Up to 10 (S1–S10) |
| Minimum scan epoch | 24 hours |
| Structured data sample size | 200 rows by default; maximum 1,000 rows |
| Field scan depth (structured data) | First 10 KB per field per row |
| Scan speed (large databases, >1,000 tables) | 1,000 columns/minute |
| Export download window | 3 days after export completion |