This topic describes how to create an accelerated image to reduce the time required from job submission to job execution for Elastic High Performance Computing (E-HPC) clusters with auto scaling enabled.
Background
For auto scaling clusters where jobs take a long time from submission to execution, analysis shows that the main reason is time-consuming scaling decision-making and scaling actions.
To resolve this issue, you can create an accelerated image that includes pre-installed Python environments and other dependency packages, thereby reducing node startup and job execution time.
Prerequisites
Currently, only the China (Hangzhou) region is supported.
The cluster status is Running.
The cluster client (ehpcutil) version is
2.0.47or later.NoteClick the target cluster to access the Cluster Configuration details page, where you can view and perform upgrade operations to update to the latest version. If no upgrade option is available, the current version is already the latest version.
Procedure
Step 1: Create an instance
Go to the Elastic Compute Service (ECS) instance buy page, select the Custom Launch tab, and meet the following requirements. For more information, see Custom purchase of an instance.
Billing Method: Select Pay-as-you-go.
Instance: Select X86_64 architecture.
Image: Select a CentOS 7 series image.
Public IP Address: Select Assign Public IPv4 Address.
Security Group: Select the security group used by the cluster.
Click Create Order to complete the instance creation.
Step 2: Install the environment
After the instance status shows Running, connect to the created ECS compute node instance. For more information, see Use Workbench to connect to a Linux instance over SSH.
Download and install the Python environment, including Python 2 and 3 environments. In this example, Python 2.7 and Python 3.9 are used.
In the root directory, create an installation script named
install_python.sh.#!/bin/bash PYTHON_INSTALL_ROOT=/usr/local/py3.9env SERVICE_INSTALL_ROOT=/usr/local/ehpc_service mkdir $PYTHON_INSTALL_ROOT set -e arch=`arch` srcEnvPath=$1 # Pass this as an argument when calling the script #py3=$2 # Pass this as an argument (0 or 1) to decide which Python version to install pythonenv="python3.9env" echo "Downloading and extracting Python 3.9.10 for ${arch}..." wget -c -nv ${srcEnvPath}/python3.9.10.$arch.tgz -O - | tar -xz -C /usr/local/py3.9env/ echo "Downloading and extracting ${pythonenv} for ${arch}..." curl -s -O ${srcEnvPath}/${pythonenv}.$arch.tgz if [ -d /usr/local/py3.9env/${pythonenv} ]; then rm -rf /usr/local/py3.9env/${pythonenv} fi tar -xzf ${pythonenv}.$arch.tgz -C /usr/local/py3.9env/ echo "Downloading and extracting Python 2.7 environment..." curl -s -O ${srcEnvPath}/centos/7.2/python2.7env.tgz if [ -d /usr/local/python2.7env ]; then rm -rf /usr/local/python2.7env fi tar -xzf python2.7env.tgz -C /usr/local/Add execution permissions to the script.
chmod +x install_python.shExecute the script to download and install.
bash /root/install_python.sh http://public-ehs.vpc100-oss-cn-hangzhou.aliyuncs.com/packages/envCheck that the
py3.9envandpython2.7envdirectories exist in the/usr/local/directory to confirm successful installation.
Download and install Node.js and other dependency packages.
In the root directory, create an installation script named
install_lib.sh.#!/bin/bash set -e arch=`arch` # Pass this as an argument when calling the script srcEnvPath=$1 # Pass this as an argument when calling the script # echo "Installing Node.js for aarch64..." # curl -s -O $srcEnvPath/node-v16.17.1-linux-arm64.tar.xz # tar -xf node-v16.17.1-linux-arm64.tar.xz # mv node-v16.17.1-linux-arm64 /usr/local/node-v16.17.1-linux-arm64 # ln -sfT /usr/local/node-v16.17.1-linux-arm64/bin/node /usr/local/bin/node # ln -sfT /usr/local/node-v16.17.1-linux-arm64/bin/npm /usr/local/bin/npm echo "Installing Node.js for x86_64..." curl -s -O $srcEnvPath/node-v6.11.1-linux-x64.tar.gz tar -xzf node-v6.11.1-linux-x64.tar.gz mv node-v6.11.1-linux-x64 /usr/local/node-v6.11.1 ln -sfT /usr/local/node-v6.11.1/bin/node /usr/local/bin/node ln -sfT /usr/local/node-v6.11.1/bin/npm /usr/local/bin/npm echo "Installing additional libraries..." yum clean all && yum makecache yum install -y perf postgresql-contrib hwloc-devel jsoncpp-devel libcurl-devel nfs-utils cifs-utils environment-modules unzip jq echo "Appending module path..." echo -e "\nexport MODULEPATH=/opt/ehpcmodulefiles" >> /etc/bashrc kernel_version="$(uname -r)" kernel_devel_pkg="kernel-devel-${kernel_version}" base_os="7" kernel_devel_remote_repo="http://mirrors.cloud.aliyuncs.com/opsx/ecs/linux/rpm/driver/${base_os}/x86_64" rpm -q "${kernel_devel_pkg}" || yum install -y "${kernel_devel_pkg}" echo "Installing xdragon-health-protector..." xdragon_pkg="xdragon-health-protector-vm-1.0.x86_64.rpm" curl -s -O $srcEnvPath/${xdragon_pkg} yum install -y ${xdragon_pkg} systemctl enable xdragon-health-protector systemctl restart xdragon-health-protector systemctl status xdragon-health-protectorAdd execution permissions to the script.
chmod +x install_lib.shExecute the installation script. Run the following command. If the status shows
running, the installation is successful.bash /root/install_libs.sh http://public-ehs.vpc100-oss-cn-hangzhou.aliyuncs.com/packages/env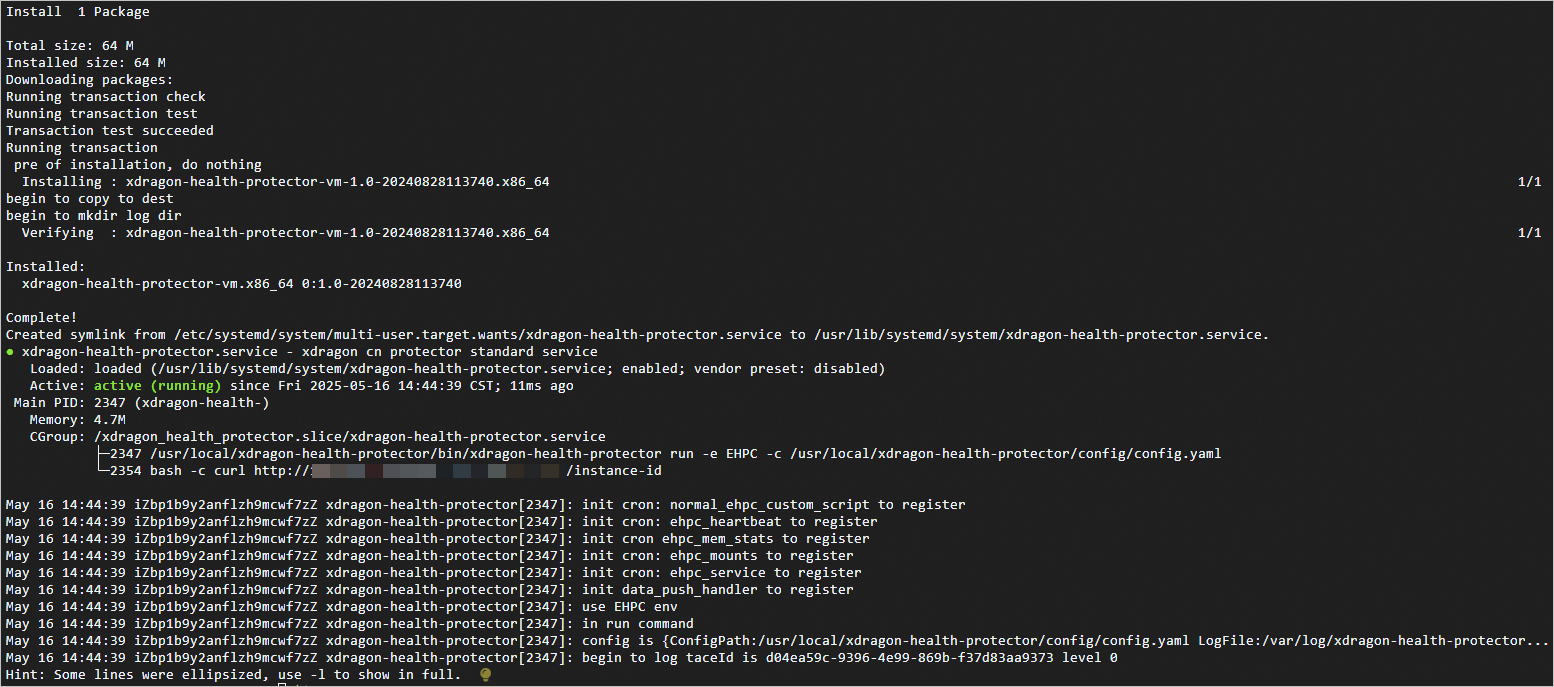
Step 3: Create an image
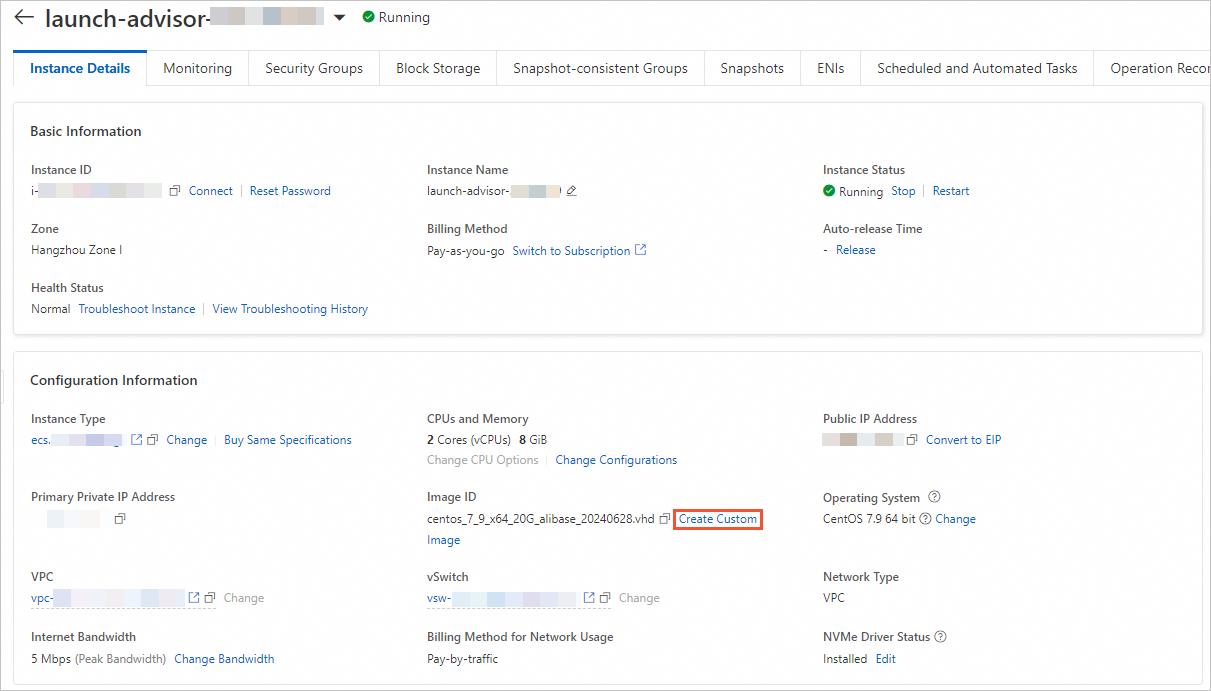
Visit the ECS console - Instances page. Click the target instance to access the Instance Details page.
Click Create Custom Image to complete the creation of the accelerated image.
Step 4: Configure cluster auto scaling
Log on to the E-HPC console. Click the target cluster name to access the Cluster Details page.
In the left navigation bar, select , and click Edit in the Actions column of the target queue.
On the Edit Queue page, complete the parameter configuration for Instance Type Group. For more information, see Configure auto scaling of nodes.
Click Add Instance to select the node specifications.
Click Custom Image to select the created accelerated image.
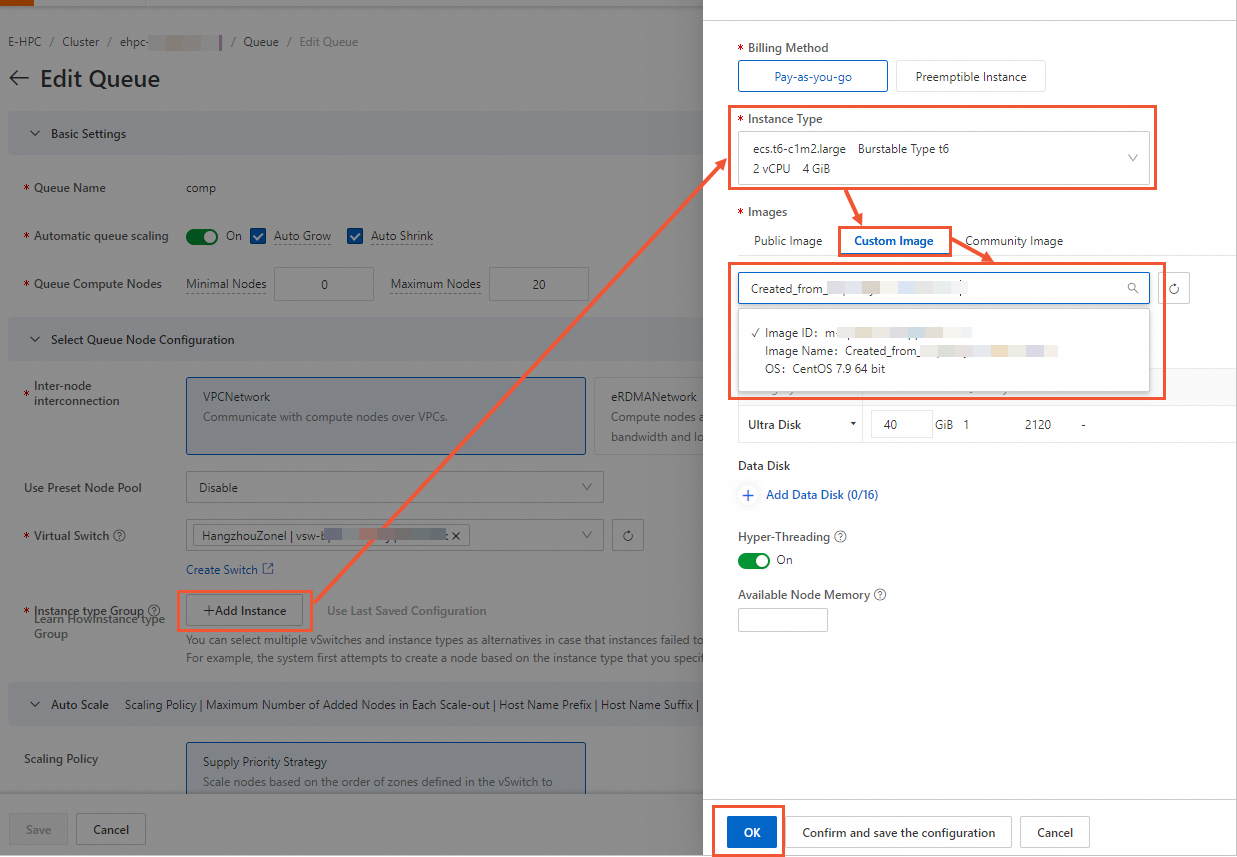
Click OK.
Click Save to complete the cluster auto scaling configuration.