This topic describes how to implement custom partition logic based on FlinkKafkaPartitioner to write data to different Kafka partitions according to your needs.
Partition modes
The Kafka connector can be configured with an appropriate partition mode by setting the sink.partitioner parameter. If none of the available modes meet your requirements, you need to implement custom partition mapping to satisfy different data writing needs.
Mode | Partition logic |
default (default value) |
|
fixed | Each concurrent task corresponds to a fixed partition.
|
round-robin | Data from Flink concurrent tasks will be assigned to Kafka partitions in a round-robin manner. |
Implementing custom partitioning in SQL jobs
Step 1: Write a custom partitioner
The partitioner needs to extend the FlinkKafkaPartitioner class and override the partition method.
KafkaSinkPartitioner.java
Custom partition logic: Extract the last two digits from the date field (string) in the data, take the modulo of the partition count to ensure data with the same date falls into the same partition (target partition count is 3).
package com.aliyun;
import org.apache.flink.streaming.connectors.kafka.partitioner.FlinkKafkaPartitioner;
import org.apache.flink.table.data.GenericRowData;

public class KafkaSinkPartitioner extends FlinkKafkaPartitioner {

    @Override
    public int partition(Object record, byte[] key, byte[] value, String topic, int[] partitionSize) {
    // In FlinkSQL, the actual type of record is GenericRowData
        if (record instanceof GenericRowData){
            GenericRowData grData  = (GenericRowData) record;
            // You can use the following class methods to get all data in this row
            for (int i = 0; i < grData.getArity(); i++){
                Object field = grData.getField(i);
                System.out.println("index: " + i + " :" + field);
            }
            // Based on the date, take the last two digits of the date to write data with the same date to the same partition
            String dateString = grData.getString(2).toString();
            int date = Integer.parseInt(dateString.substring(dateString.length() - 2));
            return date % 3;
        }
        else {
            throw new IllegalArgumentException("record is not GenericRowData");
        }
    }
}
Step 2: Write SQL job
You need to configure the sink.partitioner parameter in the SQL job to use it. This example uses ApsaraMQ for Kafka for demonstration.
CREATE TEMPORARY TABLE KafkaSource (
order_id STRING,
order_name STRING,
dt STRING
) WITH (
'connector' = 'kafka',
'topic' = 'source',
'properties.group.id' = 'test-group', -- Consumer group ID
'properties.bootstrap.servers' = '<bootstrap.servers>', -- Fill in the corresponding Kafka broker address.
'format' = 'csv', -- Data format used for the value part
'scan.startup.mode' = 'earliest-offset' -- Start reading from the earliest partition in Kafka.
);
CREATE TEMPORARY TABLE kafkaSink (
order_id STRING,
order_name STRING,
dt STRING
) WITH (
'connector' = 'kafka',
'topic' = 'sink',
'properties.bootstrap.servers' ='<bootstrap.servers>',
'format' = 'csv',
'properties.enable.idempotence' = 'false',
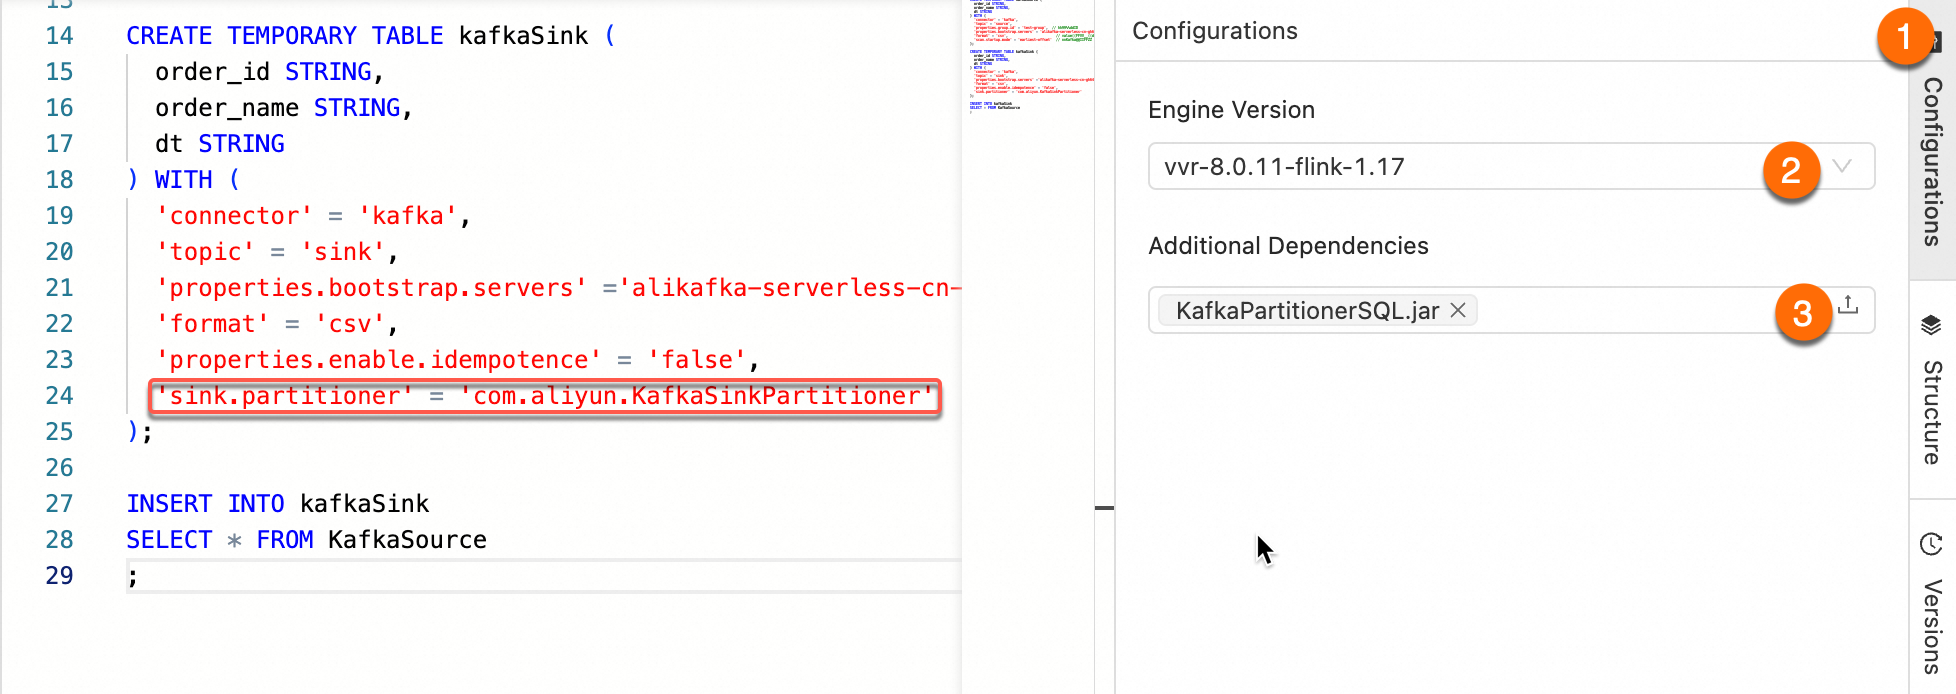
'sink.partitioner' = 'com.aliyun.KafkaSinkPartitioner'
);
INSERT INTO kafkaSink
SELECT * FROM KafkaSource
;pom.xml
Other versions of the VVR Kafka connector are available in the Maven Central Repository.
<project xmlns="http://maven.apache.org/POM/4.0.0" xmlns:xsi="http://www.w3.org/2001/XMLSchema-instance"
         xsi:schemaLocation="http://maven.apache.org/POM/4.0.0 http://maven.apache.org/maven-v4_0_0.xsd">
    <modelVersion>4.0.0</modelVersion>
    <groupId>com.aliyun</groupId>
    <artifactId>KafkaPartitionerSQL</artifactId>
    <version>1.0-SNAPSHOT</version>

    <dependencies>
    <!--Kafka connector-->
        <dependency>
            <groupId>com.alibaba.ververica</groupId>
            <artifactId>ververica-connector-kafka</artifactId>
            <version>1.17-vvr-8.0.11-1</version>
        </dependency>
    <!--flink dependencies-->
        <dependency>
            <groupId>org.apache.flink</groupId>
            <artifactId>flink-table-common</artifactId>
            <version>1.17.2</version>
        </dependency>
    </dependencies>

    <build>
        <finalName>KafkaPartitionerSQL</finalName>
        <plugins>
            <!-- Java compiler -->
            <plugin>
                <groupId>org.apache.maven.plugins</groupId>
                <artifactId>maven-compiler-plugin</artifactId>
                <version>3.13.0</version>
                <configuration>
                    <source>1.8</source>
                    <target>1.8</target>
                </configuration>
            </plugin>
            <!-- Use maven-shade-plugin to create a fat JAR file that contains all the necessary dependencies. -->
            <plugin>
                <groupId>org.apache.maven.plugins</groupId>
                <artifactId>maven-shade-plugin</artifactId>
                <version>3.5.3</version>
            </plugin>
        </plugins>
    </build>
</project>
ApsaraMQ for Kafka does not support idempotent and transactional writes, so it cannot implement Exactly-Once Semantics. You need to add
properties.enable.idempotence=falseto the result table to disable the idempotent write feature.For
sink.partitioner, you need to fill in the complete reference path of the class that extendsFlinkKafkaPartitioner, such ascom.aliyun.KafkaSinkPartitioner.For more information, see Kafka connector WITH parameters.
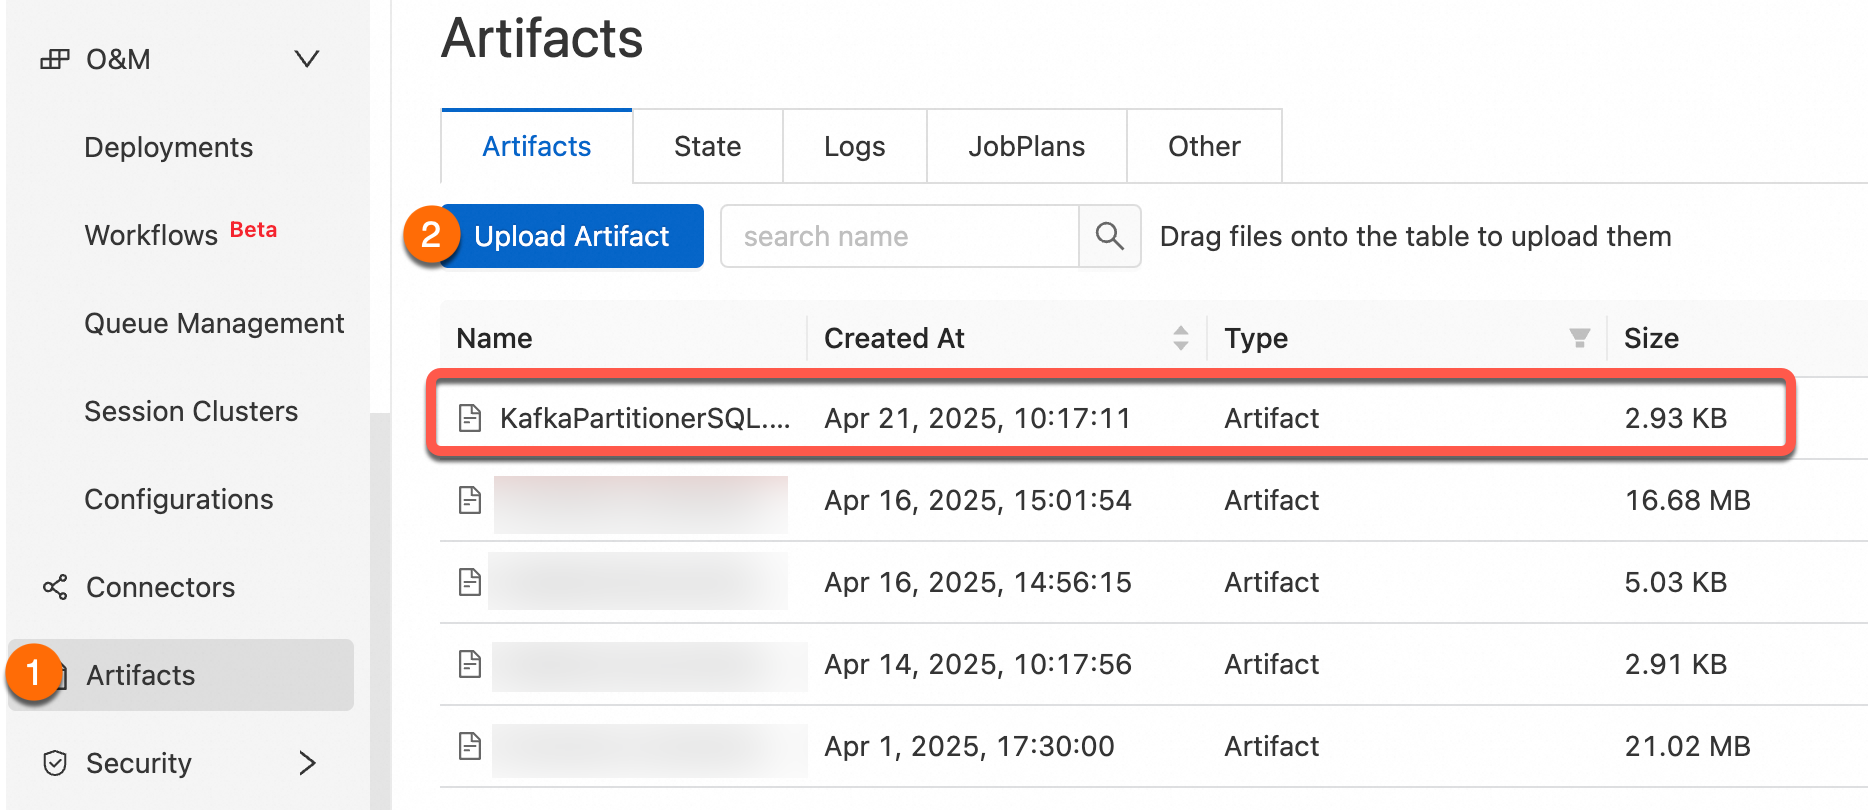
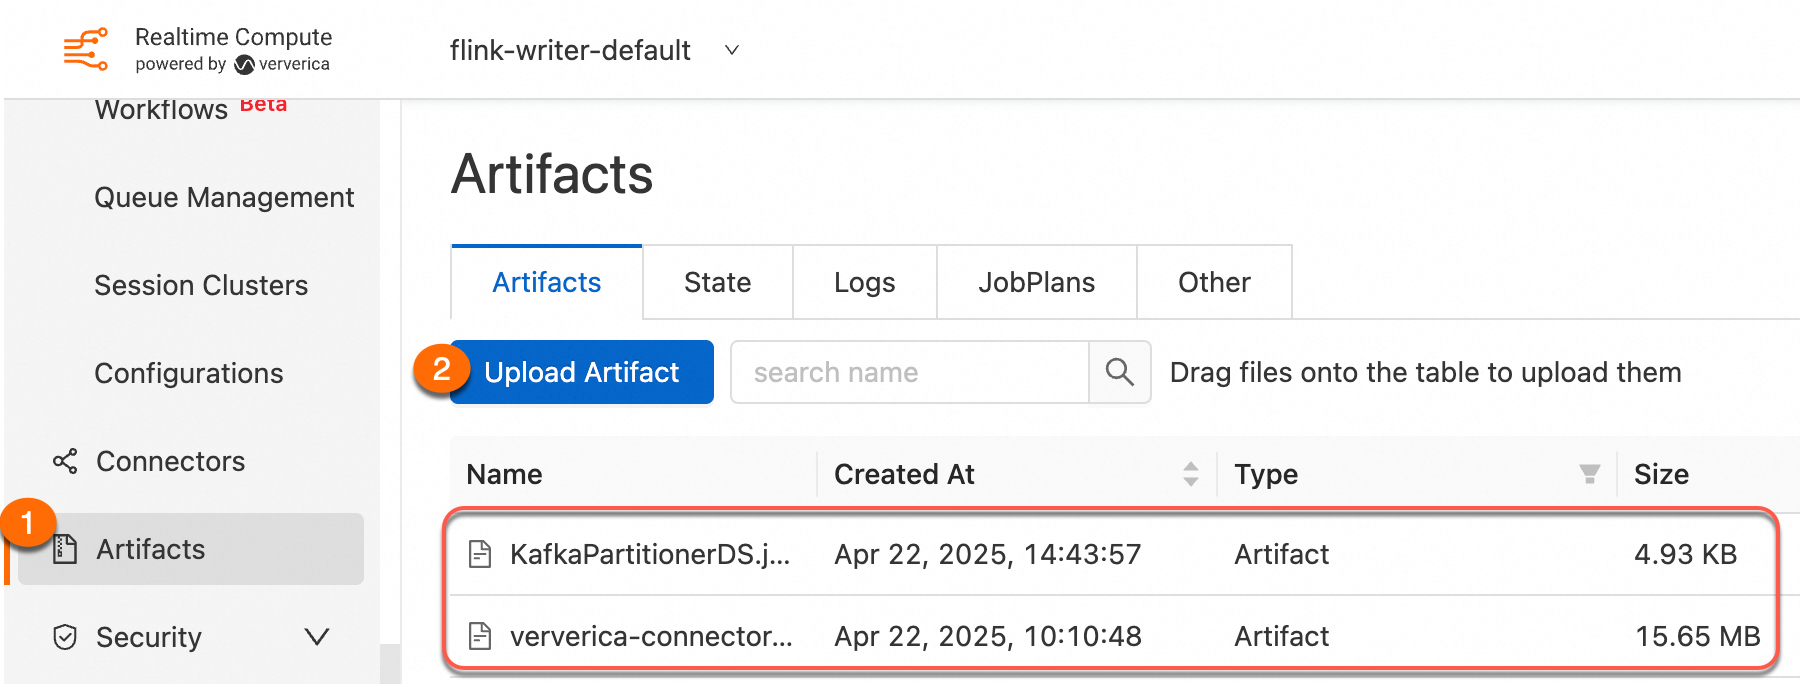
Step 3: Package and upload the custom partitioner
Use the File Management feature to upload the compiled JAR package to the real-time computing console.
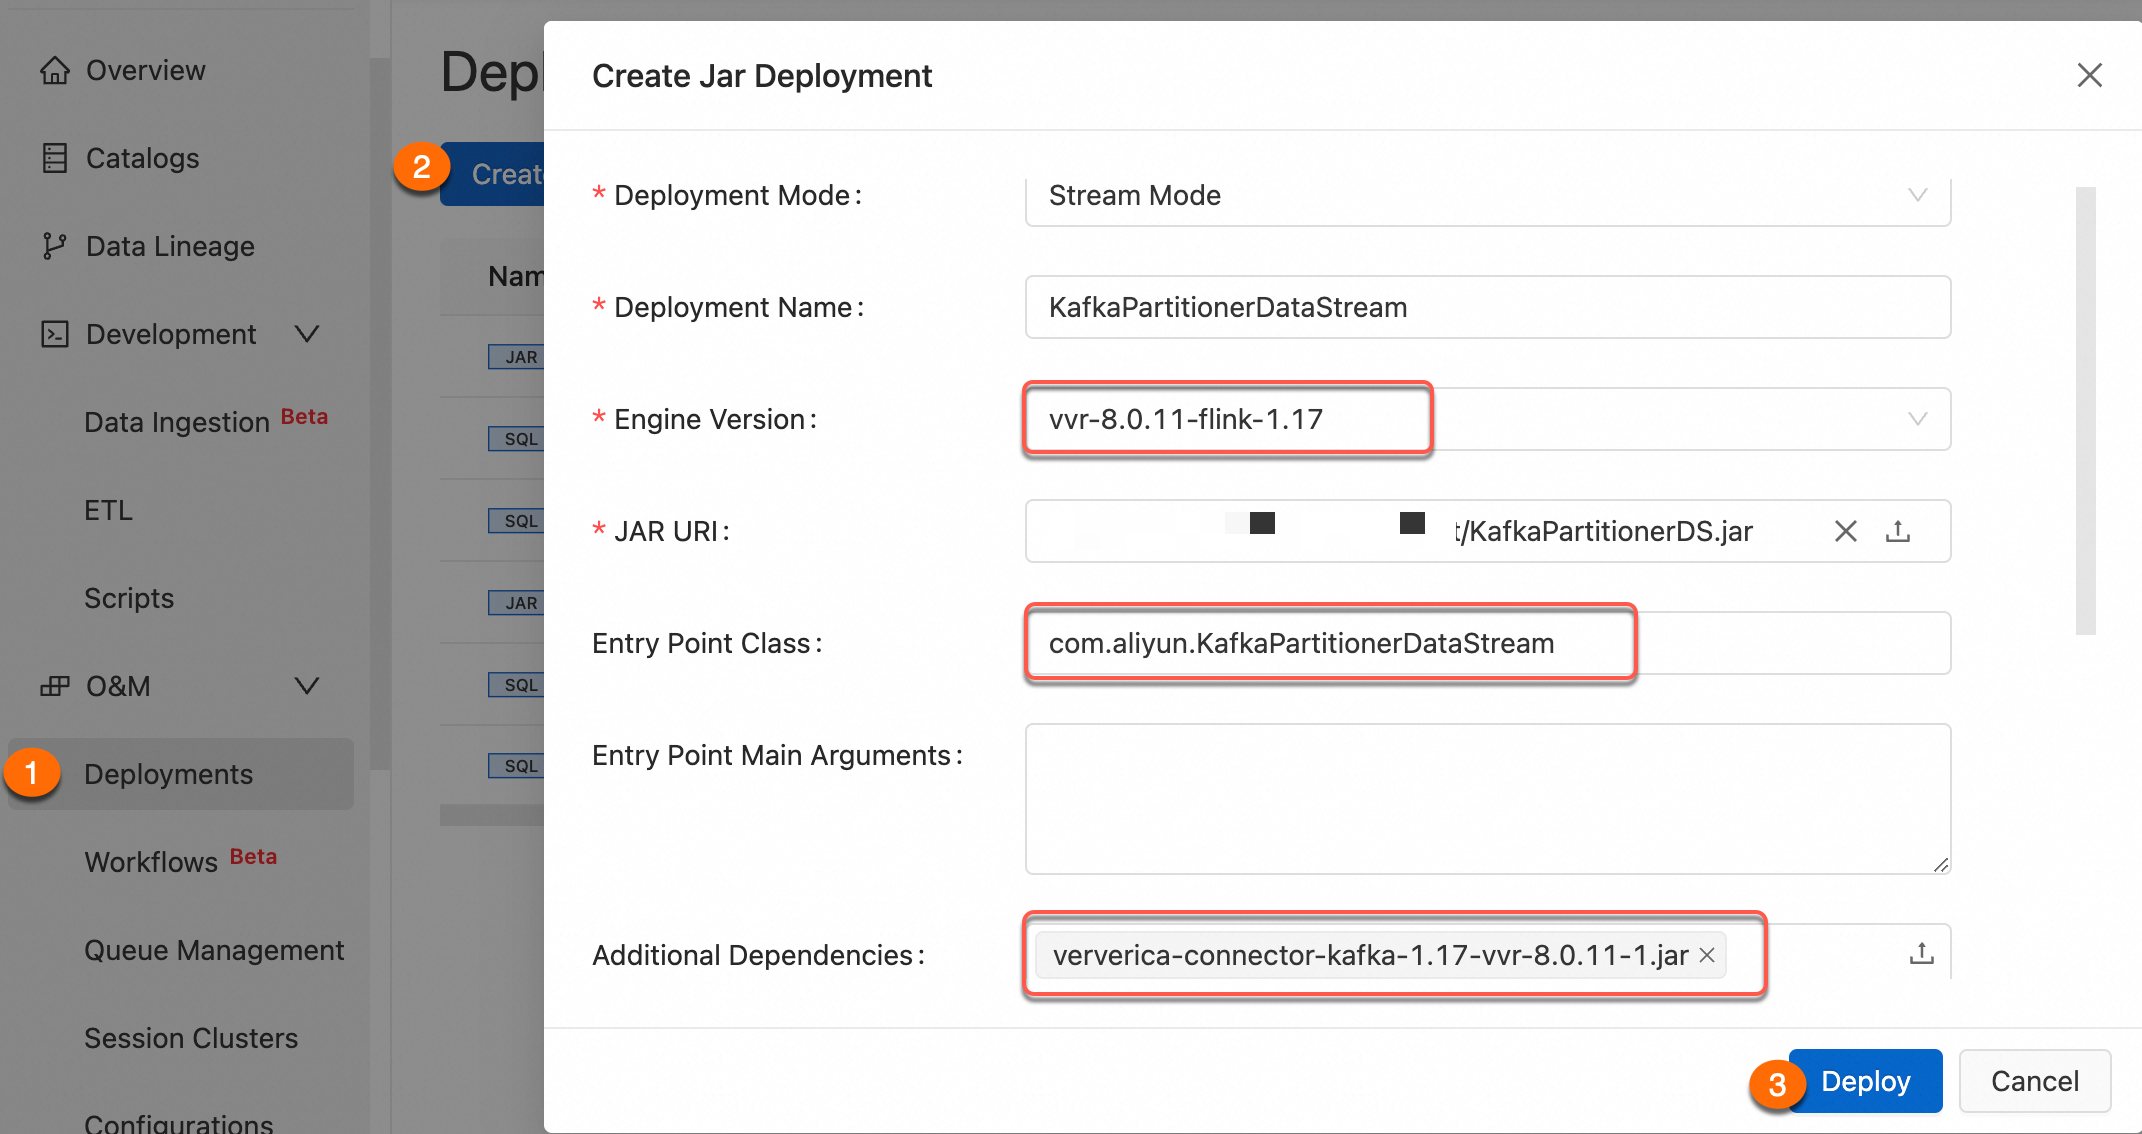
Step 4: Job reference
After referencing the JAR package as an Additional Dependency File, set the sink.partitioner parameter in the WITH parameters. The parameter value should be the complete class path of the partitioner, such as org.mycompany.MyPartitioner.
Step 5: Verification test
Use the quick message sending and receiving experience of ApsaraMQ for Kafka for testing.
Log on to the Message Queue for Kafka console.
In the Overview page, select a region in the Resource Distribution section.
On the Instance List page, click the target instance name.
On the Topic Management page, select the corresponding Topic, and click Experience Message Sending for testing.
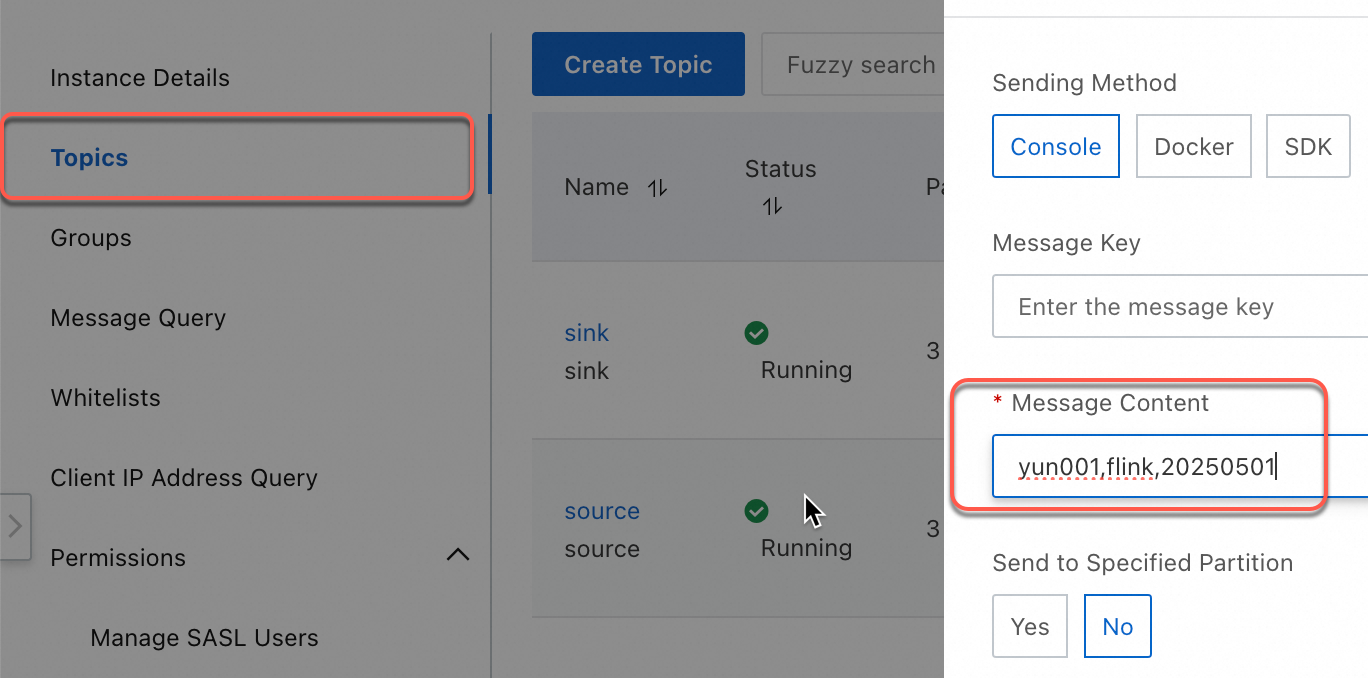
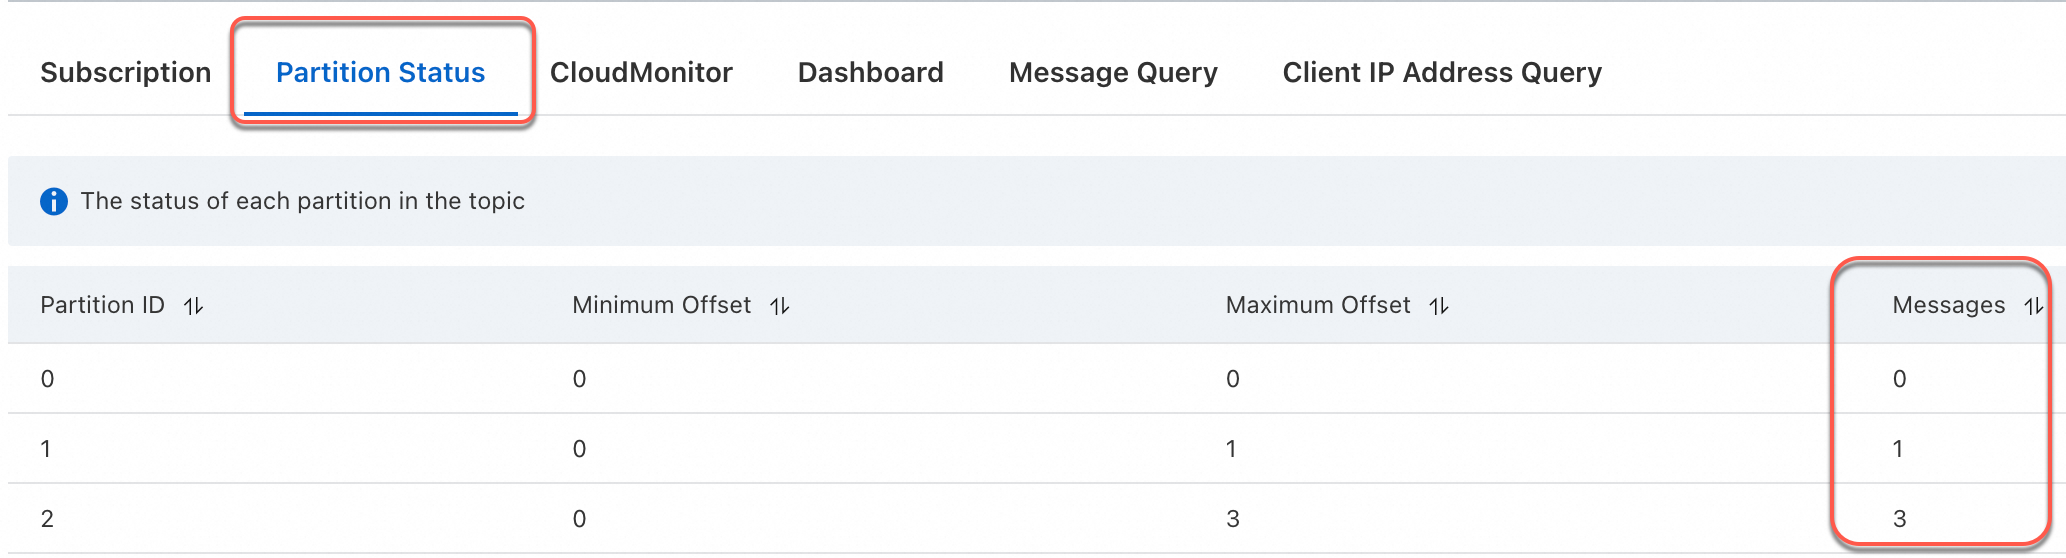
yun001,flink,20250501
yun002,flink,20250505
yun003,flink,20250505
yun004,flink,20250505
After sending four messages, you can check how the messages are written to partitions in the downstream topic.
You can see that data with the same date is written to the same partition.
Implementing custom partitioning in JAR jobs
Step 1: Write a JAR job
Use setPartitioner in the VVR Kafka connector to specify the custom partition logic class.
KafkaPartitionerDataStream.java
Custom partition logic: Extract the last two digits from the date field (string) in the data, take the modulo of the partition count to ensure data with the same date falls into the same partition (target partition count is 3).
package com.aliyun;
import org.apache.flink.api.common.eventtime.WatermarkStrategy;
import org.apache.flink.connector.kafka.sink.KafkaRecordSerializationSchema;
import org.apache.flink.connector.kafka.sink.KafkaSink;
import org.apache.flink.connector.kafka.source.KafkaSource;
import org.apache.flink.connector.kafka.source.enumerator.initializer.OffsetsInitializer;
import org.apache.flink.connector.kafka.source.reader.deserializer.KafkaRecordDeserializationSchema;
import org.apache.flink.kafka.shaded.org.apache.kafka.common.serialization.StringDeserializer;
import org.apache.flink.kafka.shaded.org.apache.kafka.common.serialization.StringSerializer;
import org.apache.flink.streaming.api.datastream.DataStreamSource;
import org.apache.flink.streaming.api.environment.StreamExecutionEnvironment;
import org.apache.flink.streaming.connectors.kafka.partitioner.FlinkKafkaPartitioner;

public class KafkaPartitionerDataStream {
    public static void main(String[] args) throws Exception {
        StreamExecutionEnvironment env = StreamExecutionEnvironment.getExecutionEnvironment();
        // Build Kafka Source
        KafkaSource<String> kafkaSource = KafkaSource.<String>builder()
                .setBootstrapServers("<BootstrapServers>")
                .setTopics("source")
                .setGroupId("test-group")
                .setStartingOffsets(OffsetsInitializer.earliest())
                .setDeserializer(KafkaRecordDeserializationSchema.valueOnly(StringDeserializer.class))
                .build();
        // Use no watermark strategy
        DataStreamSource<String> source = env.fromSource(kafkaSource, WatermarkStrategy.noWatermarks(), "Kafka Source");
        // Build Kafka Sink
        KafkaSink<String> sink = KafkaSink.<String>builder()
                .setBootstrapServers("<BootstrapServers>")
                .setRecordSerializer(
                        KafkaRecordSerializationSchema.builder()
                                .setTopic("sink")
                                // Custom partition
                                .setPartitioner(new KafkaSinkPartitioner())
                                .setKafkaValueSerializer(StringSerializer.class)
                                .build())
                .build();
        source.sinkTo(sink).name("Kafka Sink");
        env.execute();
    }

    static class KafkaSinkPartitioner extends FlinkKafkaPartitioner<String> {
    // Based on the date, take the last two digits of the date to write data with the same date to the same partition
        @Override
        public int partition(String  record, byte[] key, byte[] value, String topic, int[] partitionSize) {
            String[] s = record.split(",");
            int date = Integer.parseInt(s[2].substring(s[2].length() - 2));
            return date % 3;
        }
    }

}
pom.xml
Other versions of the VVR Kafka connector are available in the Maven Central Repository.
<project xmlns="http://maven.apache.org/POM/4.0.0" xmlns:xsi="http://www.w3.org/2001/XMLSchema-instance"
         xsi:schemaLocation="http://maven.apache.org/POM/4.0.0 http://maven.apache.org/maven-v4_0_0.xsd">
    <modelVersion>4.0.0</modelVersion>
    <groupId>com.aliyun</groupId>
    <artifactId>KafkaPartitionerDataStream</artifactId>
    <version>1.0-SNAPSHOT</version>

    <dependencies>
        <!--VVR Kafka Connector-->
        <dependency>
            <groupId>com.alibaba.ververica</groupId>
            <artifactId>ververica-connector-kafka</artifactId>
            <version>1.17-vvr-8.0.11-1</version>
            <scope>provided</scope>
        </dependency>

        <dependency>
            <groupId>org.apache.flink</groupId>
            <artifactId>flink-table-runtime</artifactId>
            <version>1.17.2</version>
            <scope>provided</scope>
        </dependency>

    </dependencies>

    <build>
        <finalName>KafkaPartitionerDS</finalName>
        <plugins>
            <!-- Java compiler -->
            <plugin>
                <groupId>org.apache.maven.plugins</groupId>
                <artifactId>maven-compiler-plugin</artifactId>
                <version>3.13.0</version>
                <configuration>
                    <source>1.8</source>
                    <target>1.8</target>
                </configuration>
            </plugin>
            <!-- Use maven-shade-plugin to create a fat JAR file that contains all the necessary dependencies. -->
            <plugin>
                <groupId>org.apache.maven.plugins</groupId>
                <artifactId>maven-shade-plugin</artifactId>
                <version>3.5.3</version>
                <executions>
                    <execution>
                        <phase>package</phase>
                        <goals>
                            <goal>shade</goal>
                        </goals>
                        <configuration>
                            <filters>
                                <filter>
                                    <artifact>*:*</artifact>
                                    <excludes>
                                        <exclude>META-INF/*.SF</exclude>
                                        <exclude>META-INF/*.DSA</exclude>
                                        <exclude>META-INF/*.RSA</exclude>
                                    </excludes>
                                </filter>
                            </filters>
                            <transformers>
                                <transformer implementation="org.apache.maven.plugins.shade.resource.ManifestResourceTransformer">
                                    <mainClass>com.aliyun.KafkaPartitionerDataStream</mainClass>
                                </transformer>
                            </transformers>
                        </configuration>
                    </execution>
                </executions>
            </plugin>

        </plugins>
    </build>
</project>
Step 2: Package the job and upload
Use the File Management feature to upload the compiled JAR package to the real-time computing console. It is recommended to declare connector dependencies with provided scope and import them as additional dependency files for better version management and lighter JAR packages that are easier to upload. For more information, see Connector dependencies and usage.
Step 3: Deploy the job
For more information about job deployment parameters, see Deploy JAR jobs.
Step 4: Verification test
Use the quick message sending and receiving experience of ApsaraMQ for Kafka for testing.
Log on to the Message Queue for Kafka console.
In the Overview page, select a region in the Resource Distribution section.
On the Instance List page, click the target instance name.
On the Topic Management page, select the corresponding Topic, and click Experience Message Sending for testing.
yun001,flink,20250501
yun002,flink,20250505
yun003,flink,20250505
yun004,flink,20250505
After sending four messages, you can check how the messages are written to partitions in the downstream topic.
You can see that data with the same date is written to the same partition.
References
For more information about JAR job development process, see JAR job development.
If you encounter error issues related to Alibaba Cloud Kafka, see Client errors and solutions when using ApsaraMQ for Kafka.