This topic describes the deployment process of a Ray cluster environment based on the E-HPC custom Ray cluster solution. It also introduces the basic practice of PyTorch-based image classification batch inference on the deployed Ray cluster. The Ray distributed computing framework is suitable for distributed training, simulation evaluation, and policy service execution tasks in AI scenarios, along with big data and various large-scale batch computing scenarios. It enables users to flexibly customize and develop functions according to specific business requirements.
Background information
Ray is a general-purpose open-source distributed computing framework, particularly suitable for machine learning, reinforcement learning, and other compute-intensive tasks. It provides a set of simple, flexible, efficient, and universal APIs to help developers easily build scalable distributed applications.
This topic combines E-HPC custom clusters and templates to provide an efficient deployment method for Ray clusters. It also supports the scale-out and scale-in of various cloud resources such as CPU and GPU, reducing the learning and maintenance costs for AI application developers and improving industry research efficiency.
Preparations
Choose one of the following methods to create a Ray cluster.
ImportantCurrently, Ray clusters can be created in the following regions: Hangzhou, Shanghai, and Beijing.
Create a cluster by using a template. For more information, see Template creation.
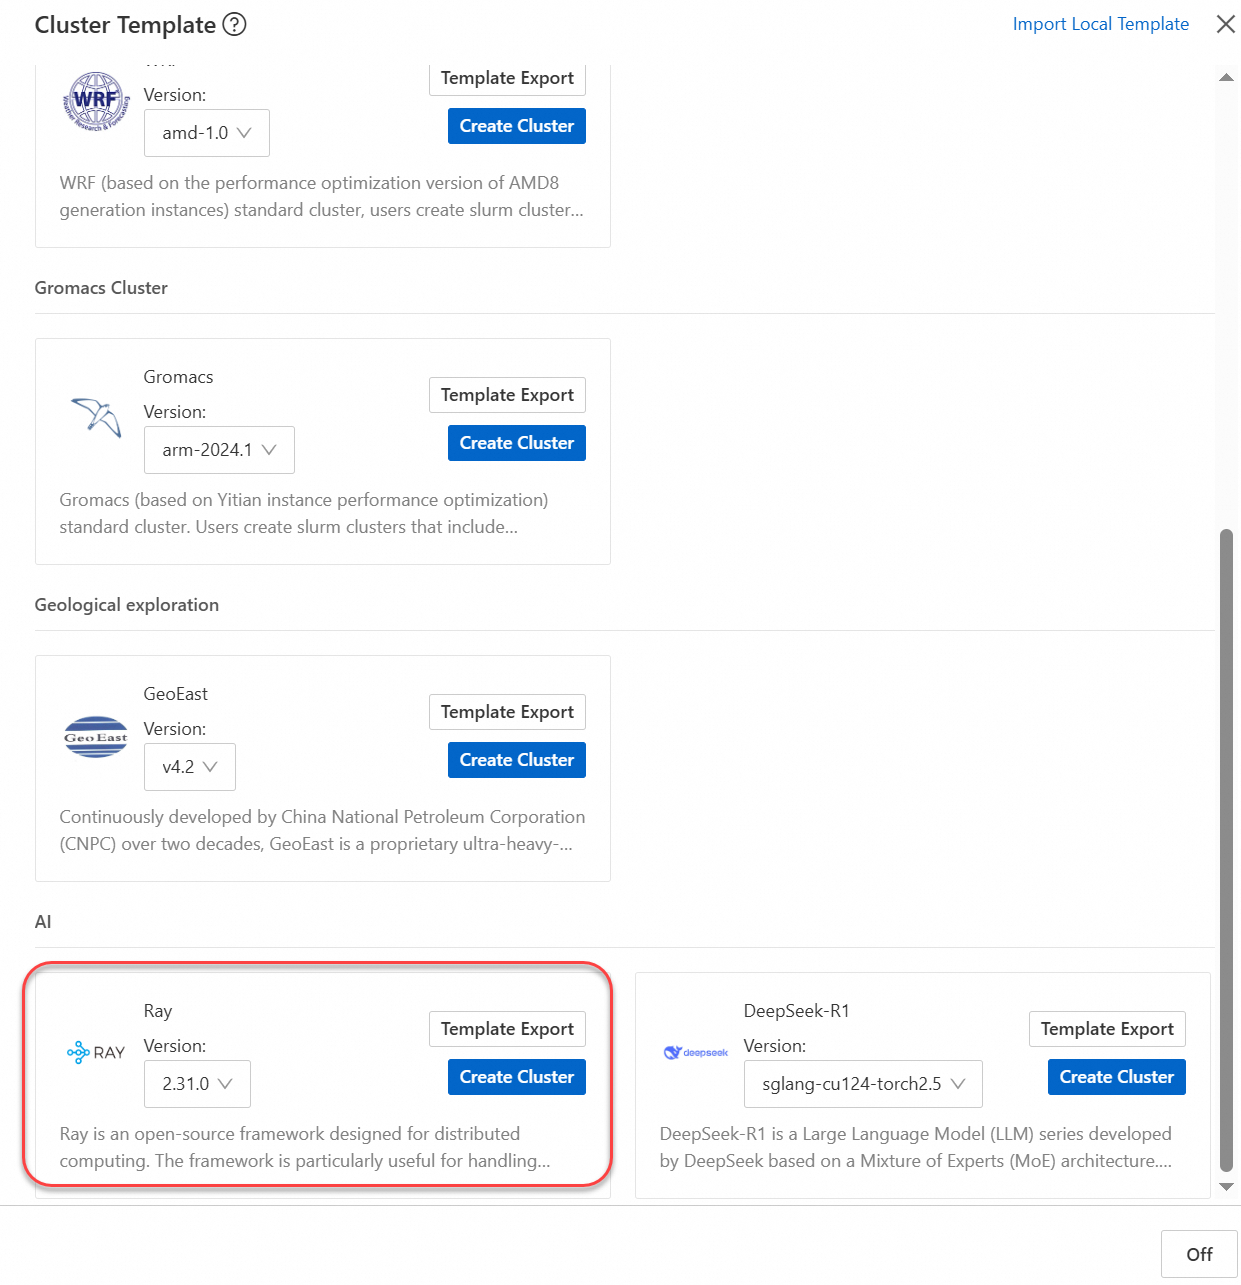
Manually create a cluster. For more information, see Create a standard cluster.
In this example, the following configurations are used for the cluster:
Configuration item
Configuration
Series
Standard Edition
Deployment mode
Custom cluster
Cluster type
CUSTOM
Node configuration
Includes
1logon node and1compute node with the following specifications:Logon node: Uses the ecs.c8a.xlarge instance type, which is configured with 4 vCPU and 8 GiB memory.
Compute node: Uses the ecs.c8a.xlarge instance type, which is configured with 4 vCPU and 8 GiB memory.
ImportantAfter you Create A Cluster, scale out the Ray cluster compute nodes. For more information, see Create a node.
NoteAdjust the instance types of the logon and compute nodes according to your actual business requirements to increase or decrease the resource configuration.
Instance security group
Allow port 5901 (VNC access port) and port 8265 (Ray Dashboard access port). For more information, see Manage security group rules.
Image
Logon node/Compute node: ray_ubuntu20.04_v1.0
NoteSelect ray_ubuntu20.04_v1.0 from Community Image
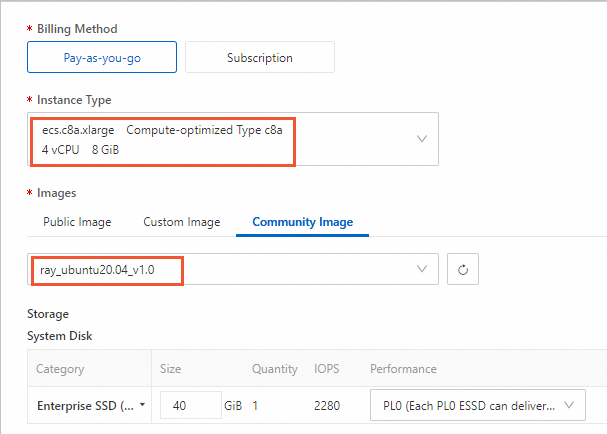
System
Ubuntu 20.04 64-bit
Step 1: View the cluster status
Connect to the Ray cluster logon node remotely through Workbench. For more information, see Use Workbench to connect to a Linux instance over SSH.
Run the
ray statuscommand to view the cluster status.ray status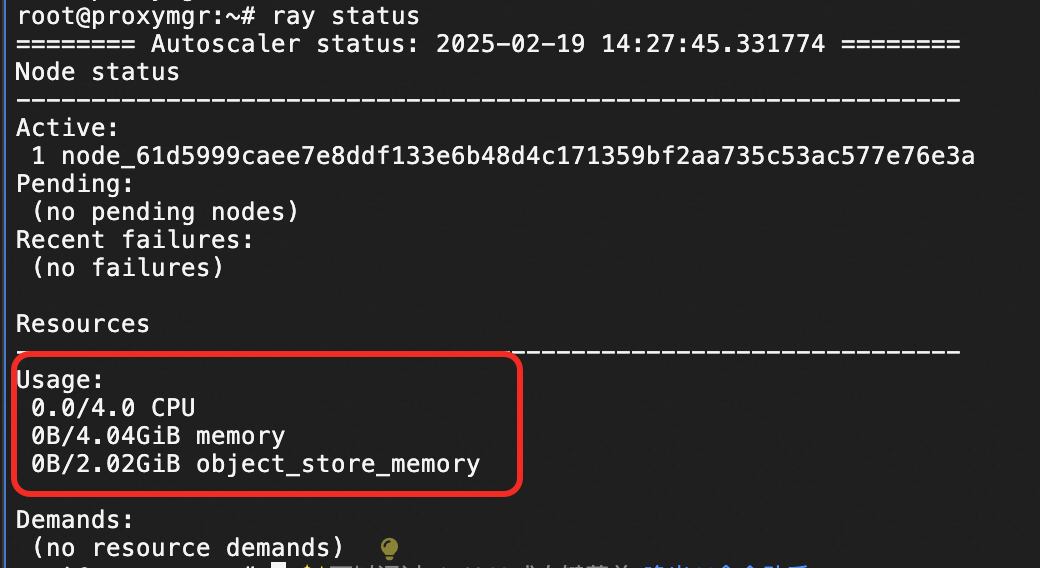
View the Ray Dashboard.
Connect through VNC and enter the address
IP:8265in your browser to view the Genome graphical desktop. For more information, see Connect to an instance by using VNC.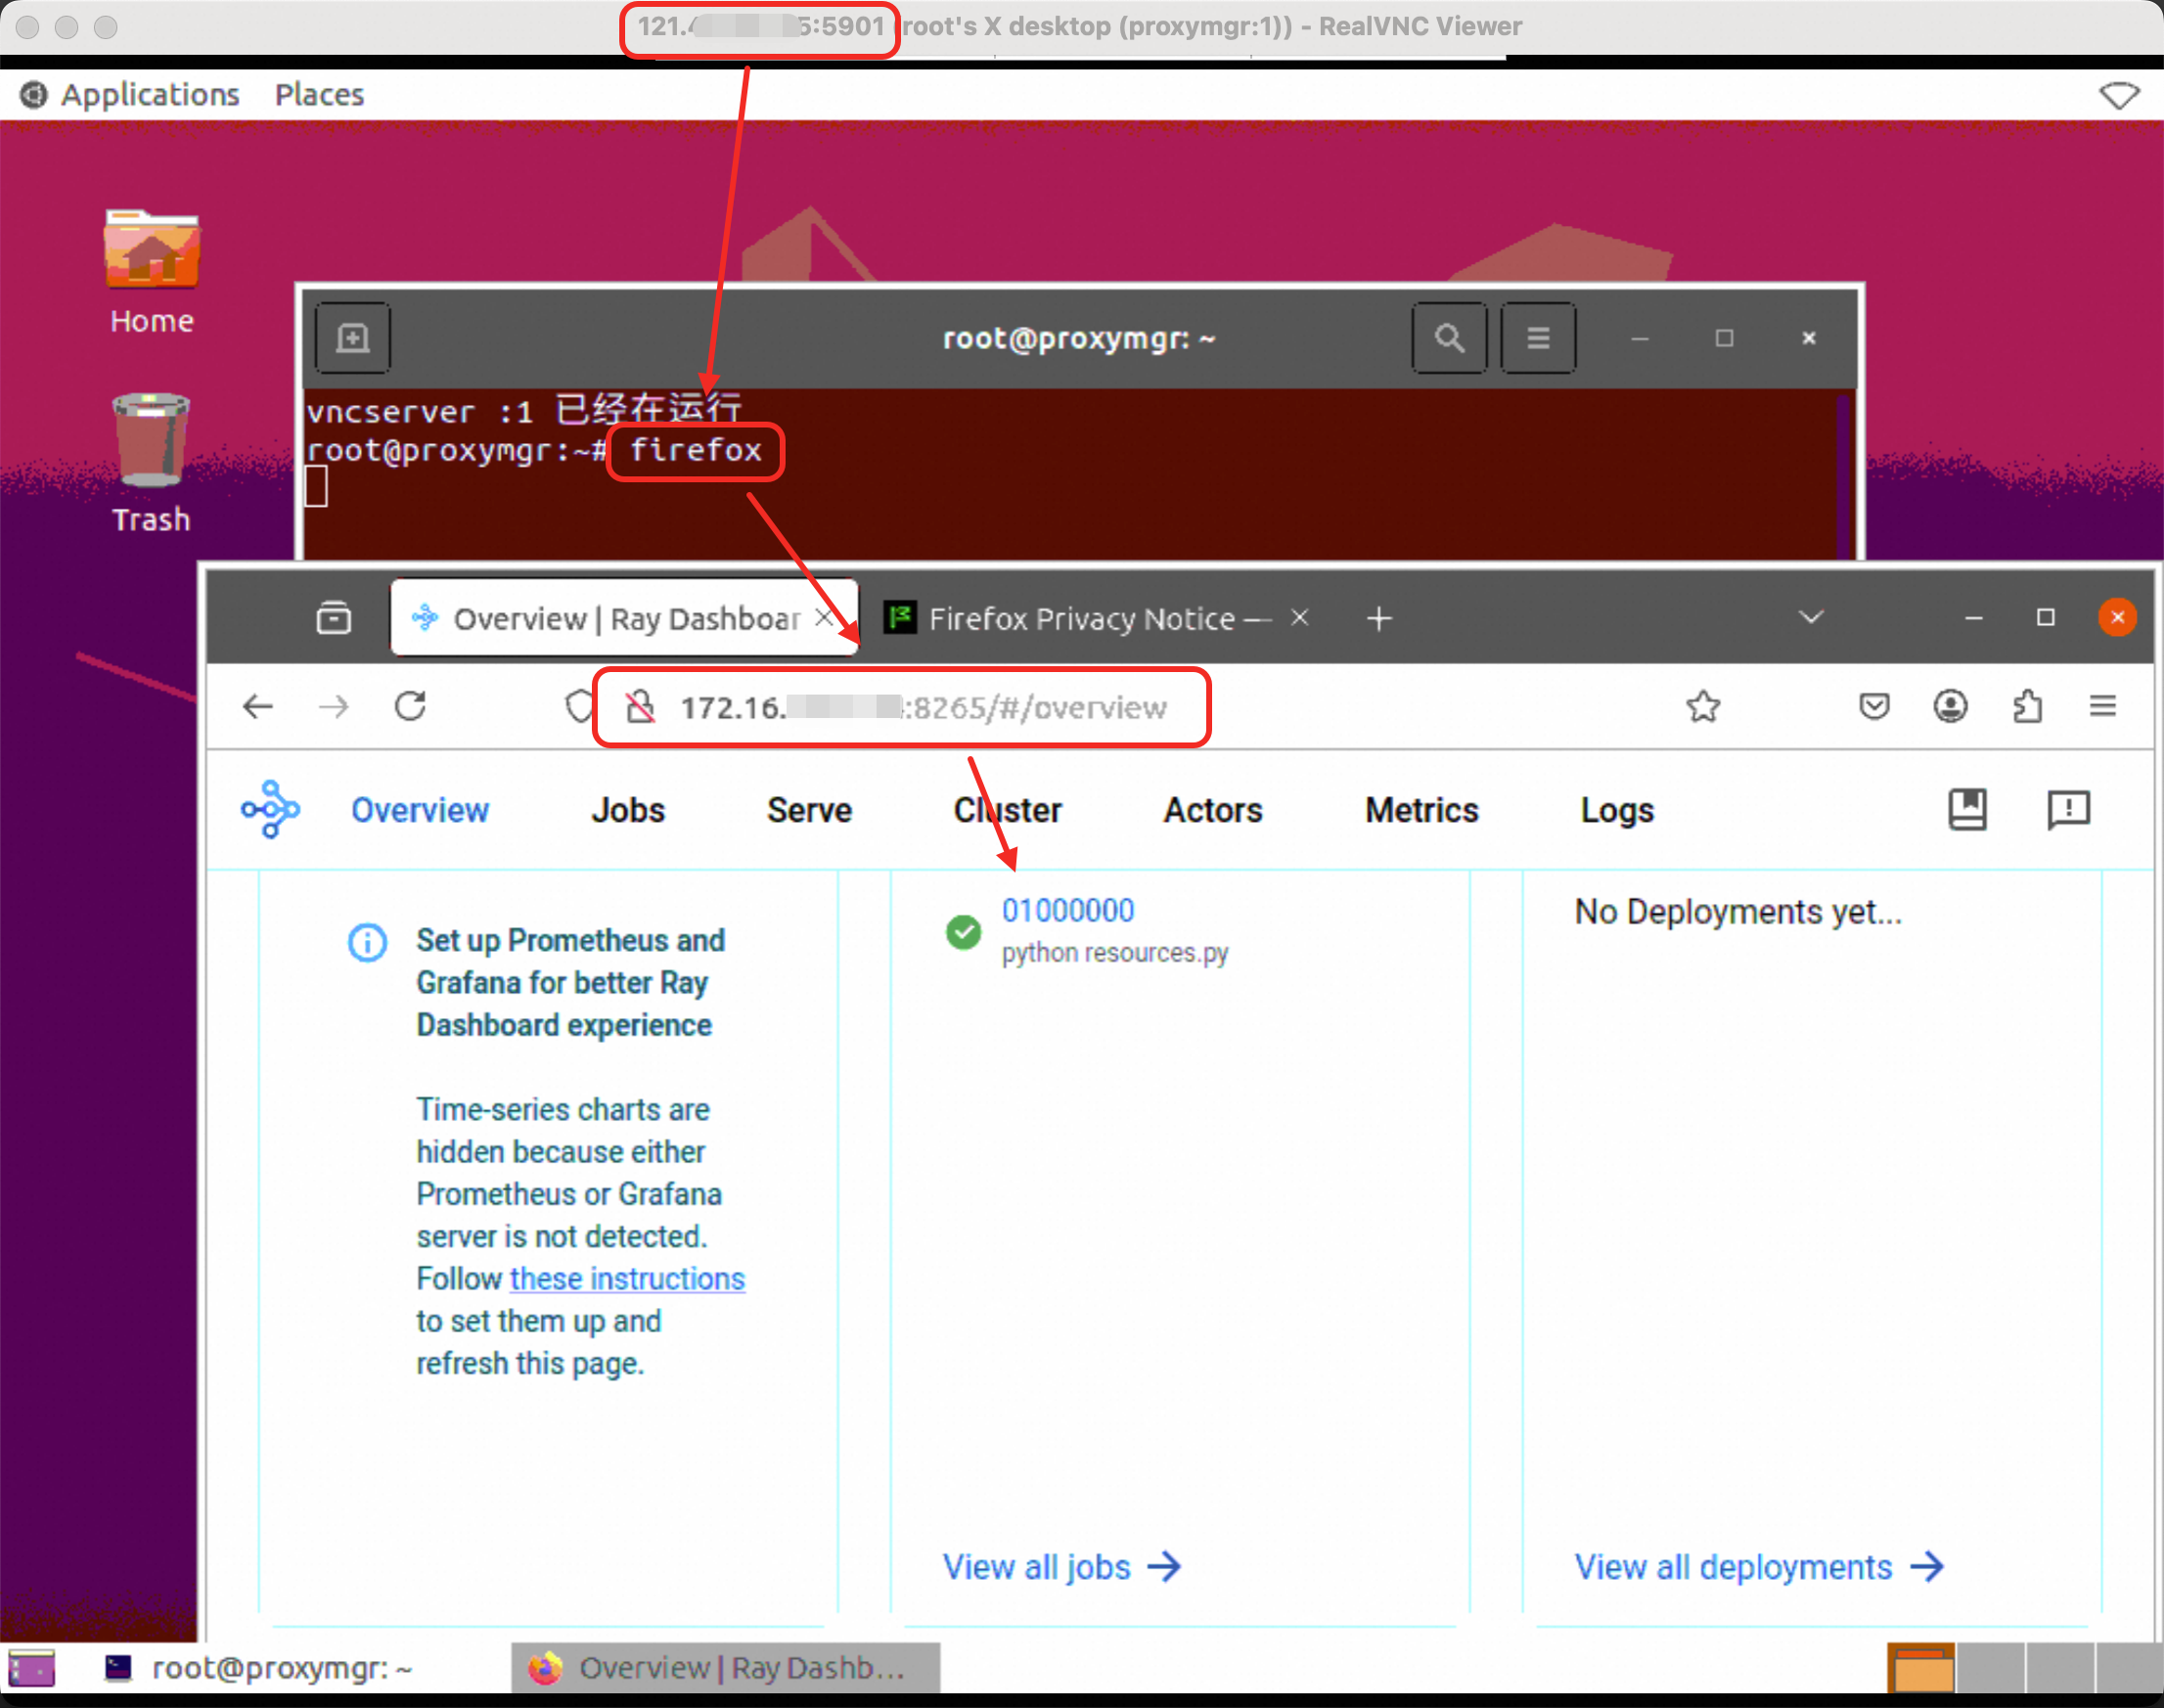
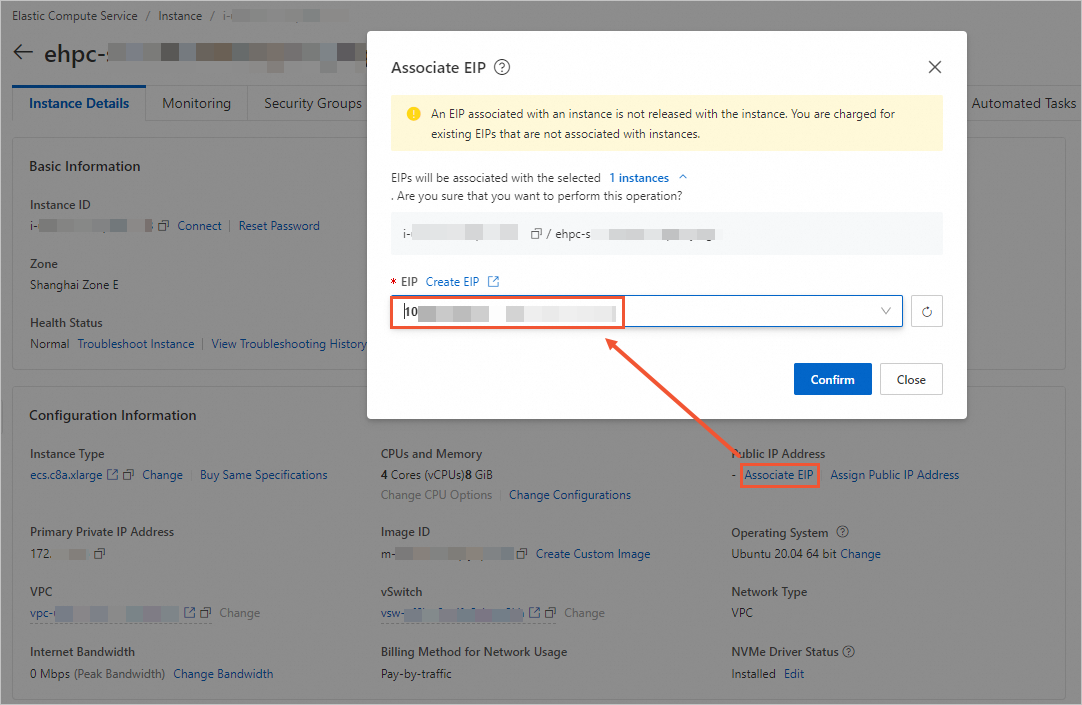
(Optional) If you need public network access, click to configure an Elastic IP Address.
Step 2: PyTorch image classification batch inference
There are two main ways to submit PyTorch inference tasks based on the created Ray cluster.
Submit through Ray job (recommended)
NoteThe Ray job method is suitable for batch processing and scenarios that do not require a persistent connection. You can execute it on the Ray cluster Head node or on a remote machine that has network and port 8265 connectivity with the Head node.
Execute a single task.
Connect to the Ray cluster logon node remotely through Workbench. For more information, see Use Workbench to connect to a Linux instance over SSH.
Download the test file images.tar and extract it to the
/home/testdirectory.tar -zxvf images.tar -C /home/test/Download the ray_image_classify.py script to the
/home/testdirectory.View the Ray cluster basic information.
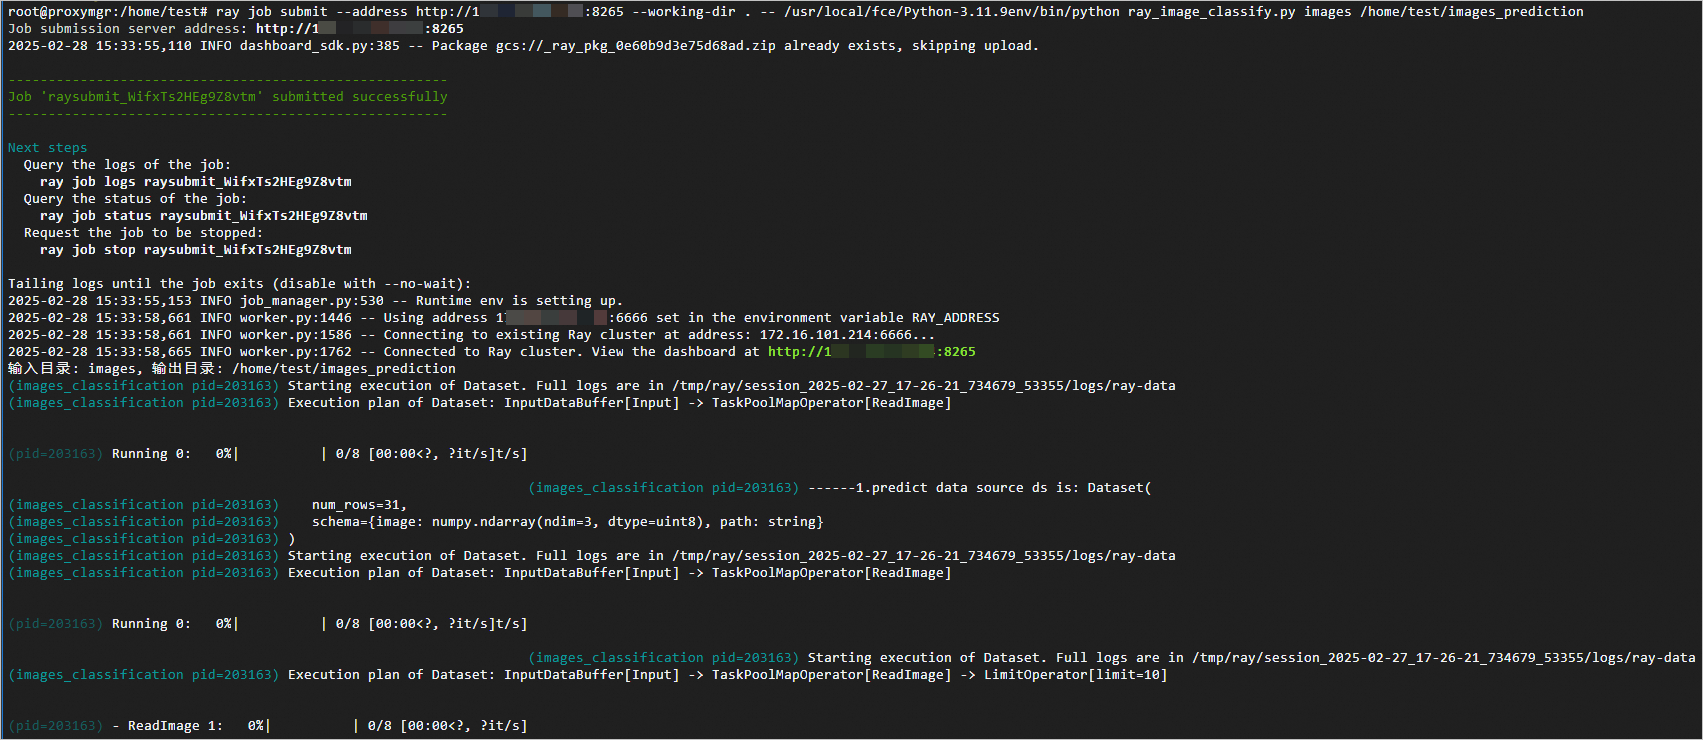
python -c "import ray; ray.init(); print(ray.cluster_resources())"Submit a single Ray job, replacing IP with the logon node IP. Specify
/home/test/imagesas the input file path and/home/test/images_predictionas the output path.ray job submit --address http://IP:8265 --working-dir . -- /usr/local/fce/Python-3.11.9env/bin/python ray_image_classify.py /home/test/images /home/test/images_predictionThe successful execution output is as follows:
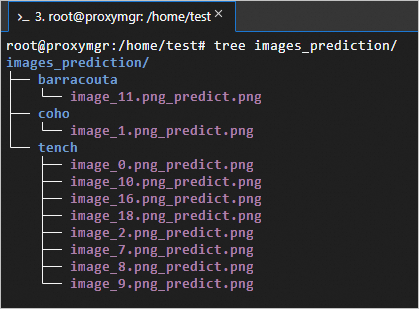
The classification prediction data and results are as follows: images is the input image data, images_prediction is the output data, and the predicted image classifications include tench, bittern, and coho.
Connect through VNC and check the corresponding output directory. For more information, see Connect to an instance by using VNC.
Execute batch tasks.
Taking the classification of all images in the images directory as an example (the number of jobs corresponds to the number of subdirectories), batch submit ray jobs and output classification prediction results.
Create a
ray_jobs_batch.shscript in the/home/test/directory. Replace theIPin the export RAY_ADDRESS parameter with the logon nodeIP.#!/bin/bash # Input and output directories input_dir=$1 output_dir=$2 export RAY_ADDRESS="http://IP:8265" # Check if the input directory exists if [ ! -d "$input_dir" ]; then echo "Input directory does not exist: $input_dir" exit 1 fi # Check if the output directory exists if [ ! -d "$output_dir" ]; then echo "Input directory does not exist, creating.." mkdir -p "$output_dir" fi # Traverse all subdirectories under input_dir for subdir in "$input_dir"/*; do if [ -d "$subdir" ]; then subdir_name=$(basename "$subdir") input_subdir="${input_dir}/${subdir_name}" output_subdir="${output_dir}/${subdir_name}_prediction" # Submit Ray task echo "Submitting Ray job for directory: $input_subdir" ray job submit --no-wait --working-dir . -- /usr/local/fce/Python-3.11.9env/bin/python ray_image_classify.py $input_subdir $output_subdir fi done echo "All Ray jobs have been submitted."Execute the
ray_jobs_batch.shscript.source ray_jobs_batch.sh /home/test/images /home/test/images_predictionRun the
ray job listcommand to view the task list.ray job list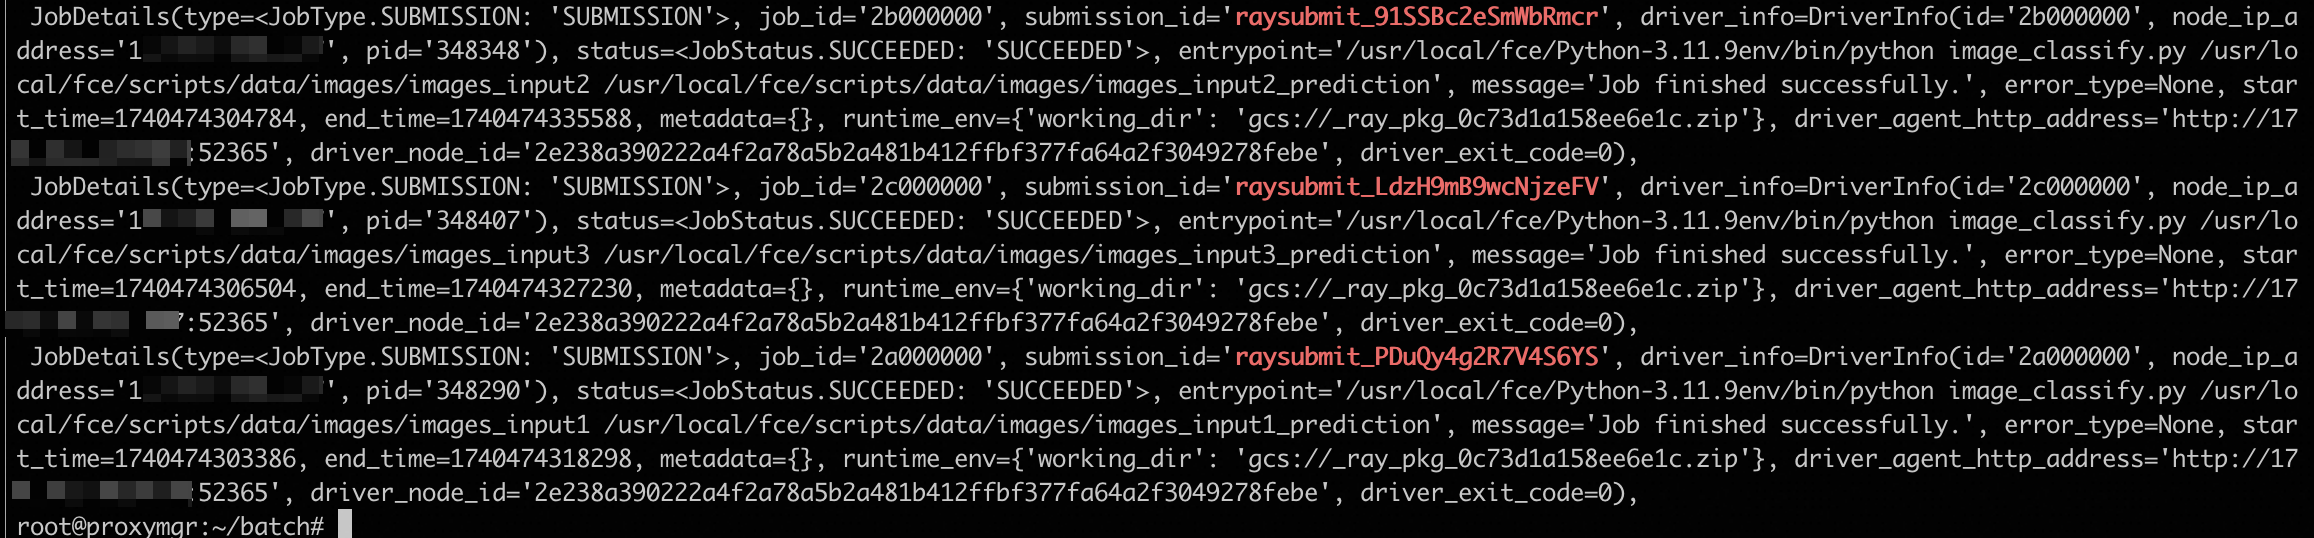
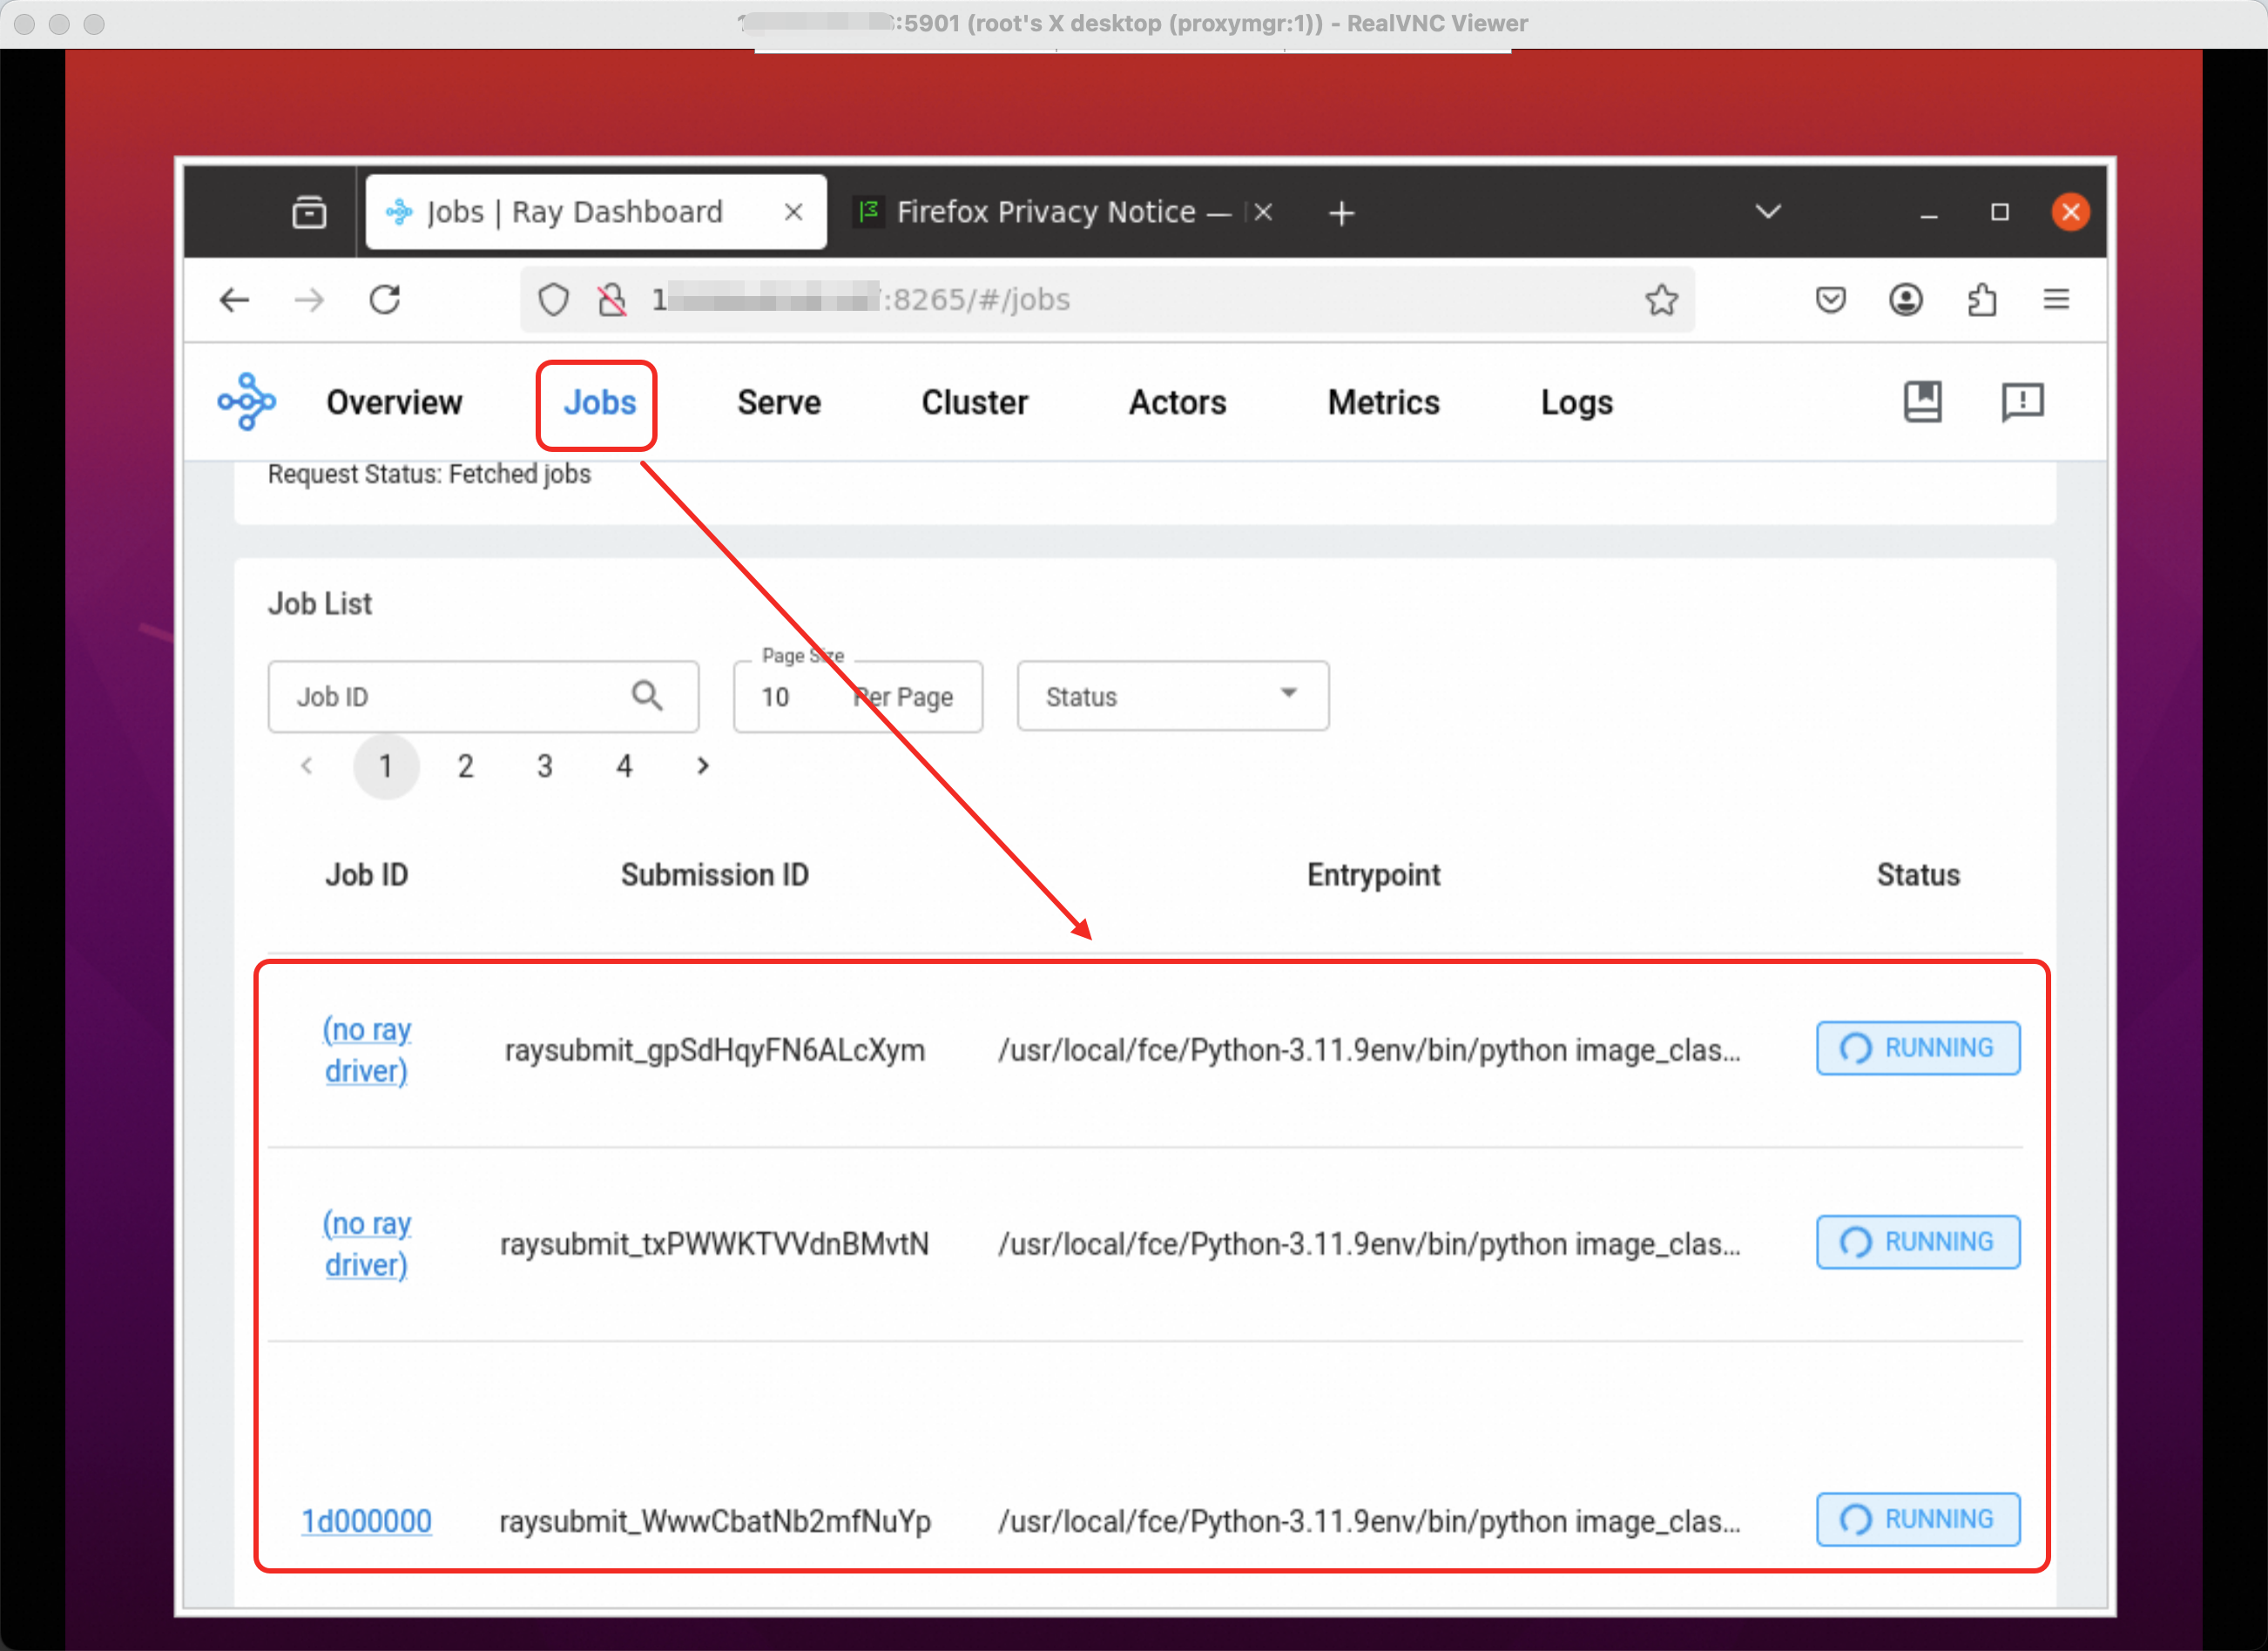
You can also view it through the Ray Server Dashboard. The jobs in progress are shown below:
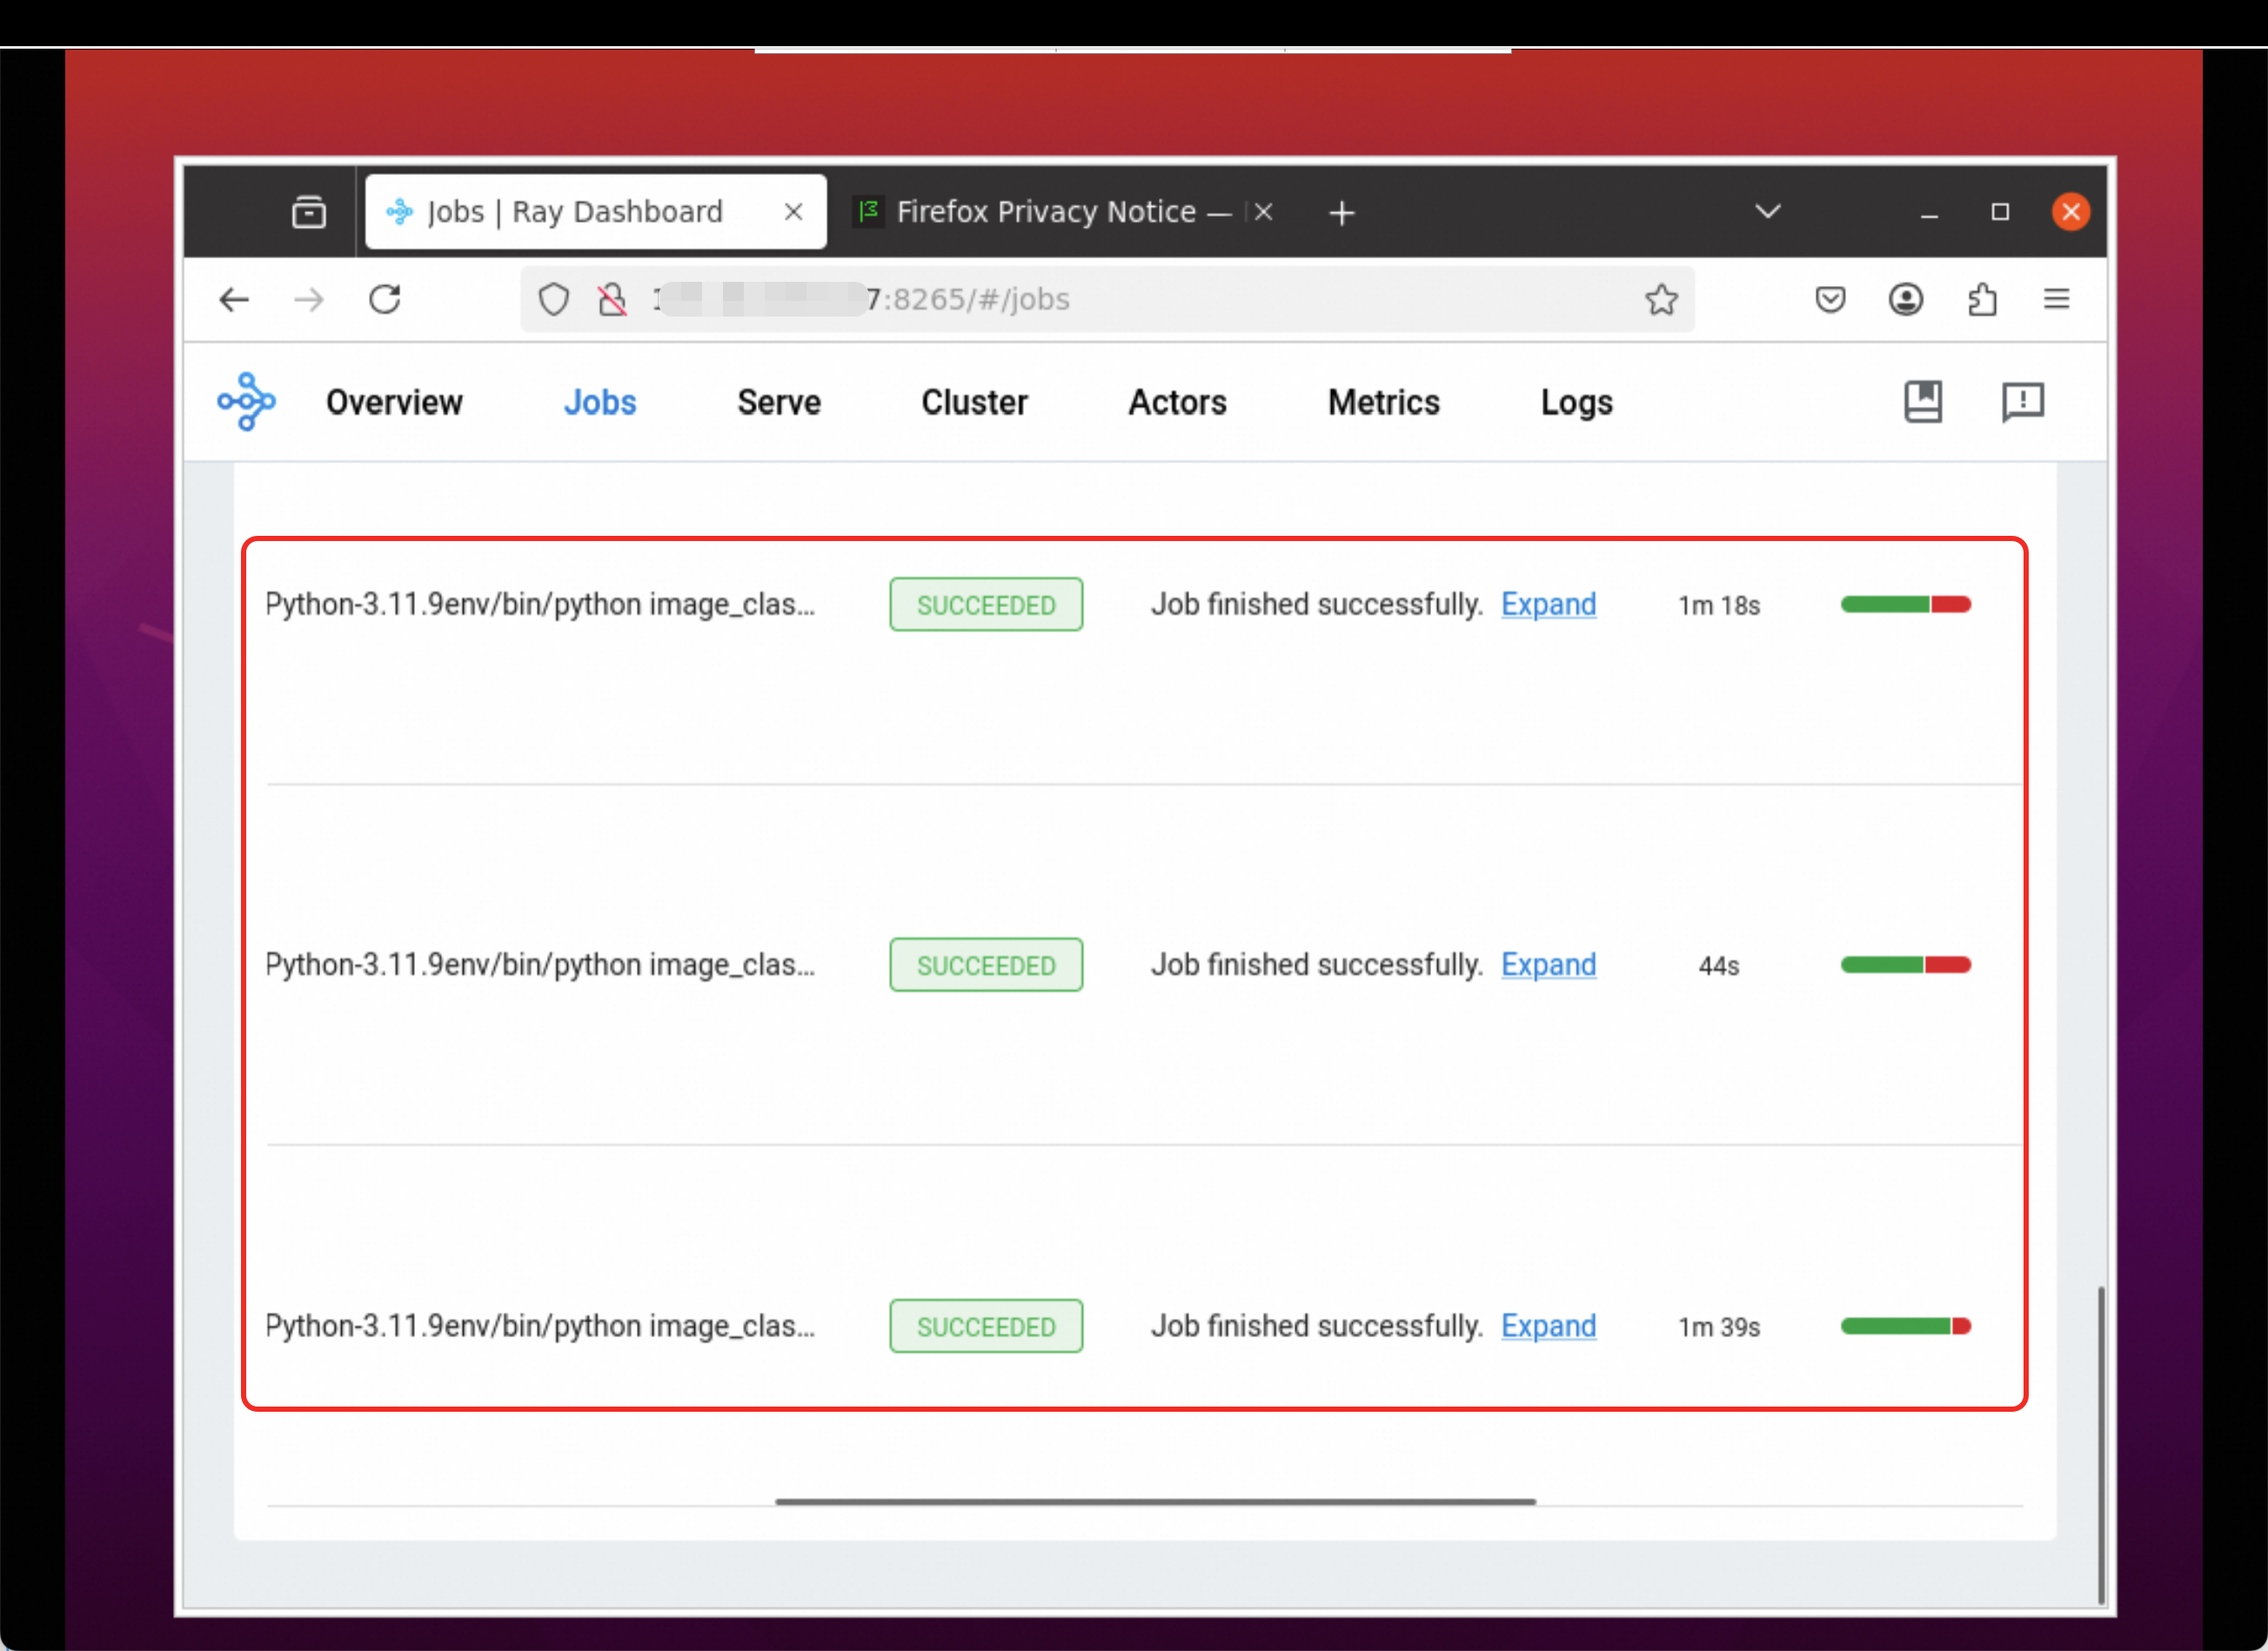
The completed jobs are shown below:
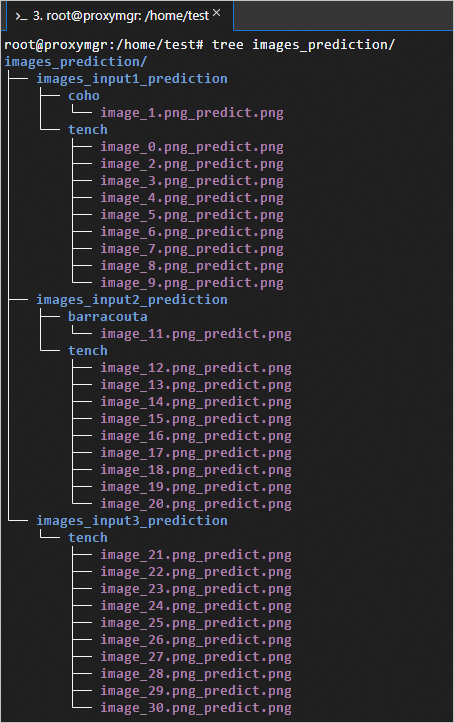
The classification prediction data and results are as follows:
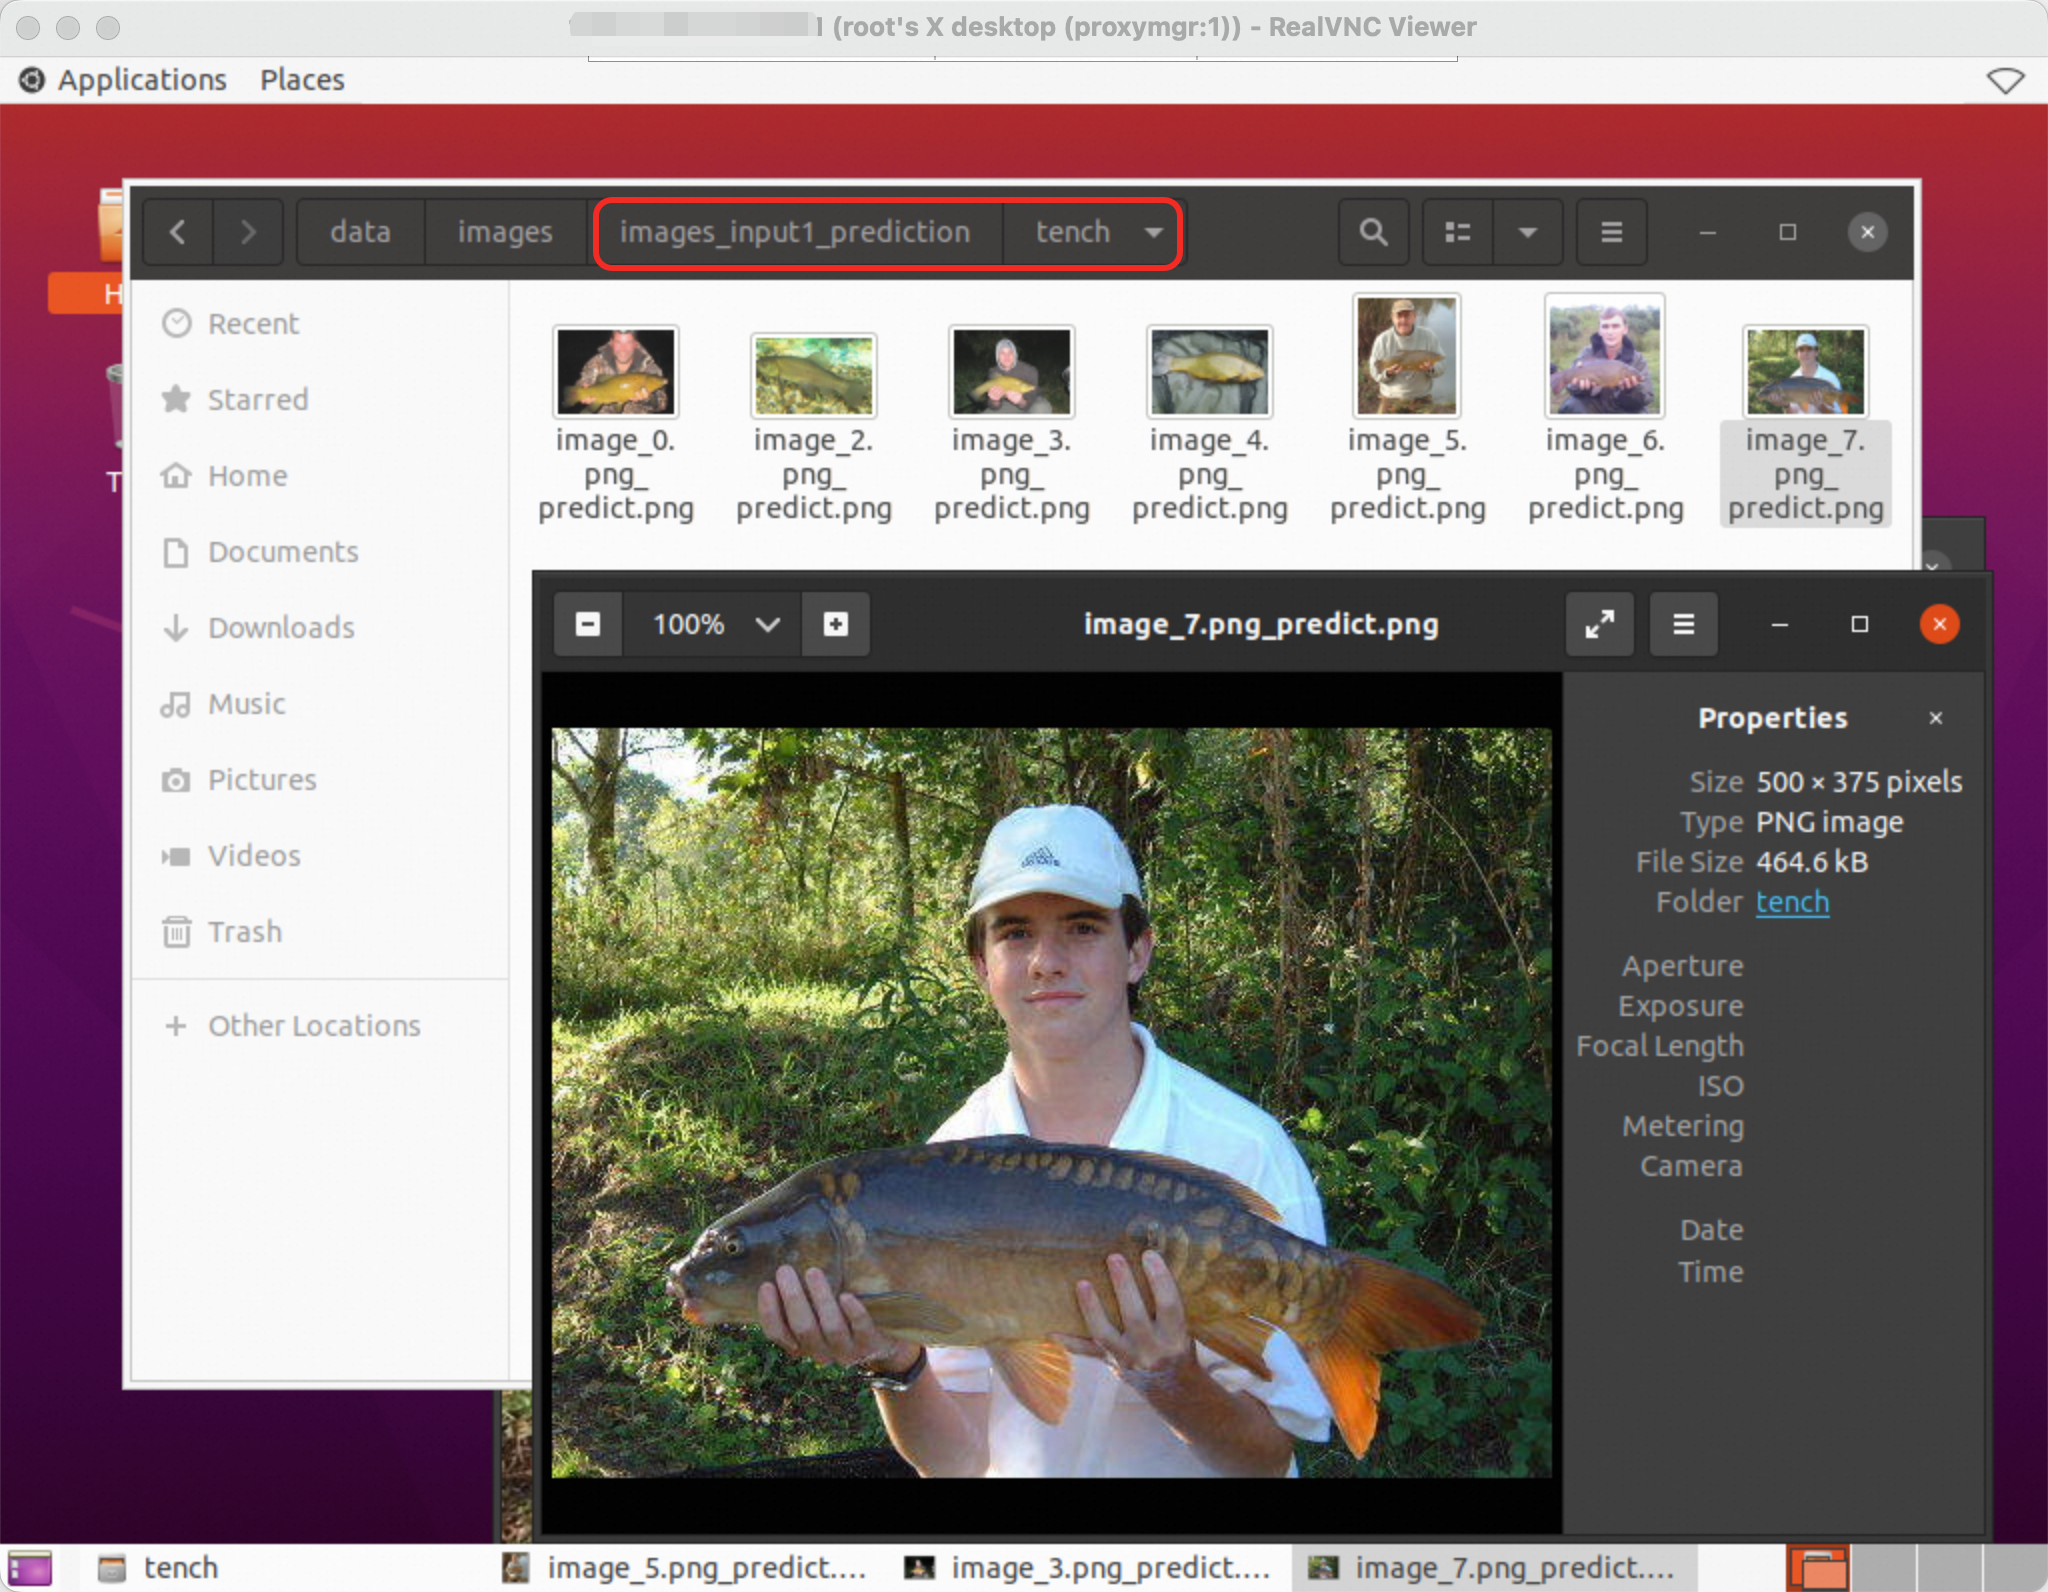
images_input1/images_input2/images_input3 are the input image data, and images_input1_prediction/images_input2_prediction/images_input3_prediction are the output data. The predicted image classifications include tench, barracouta, and coho.
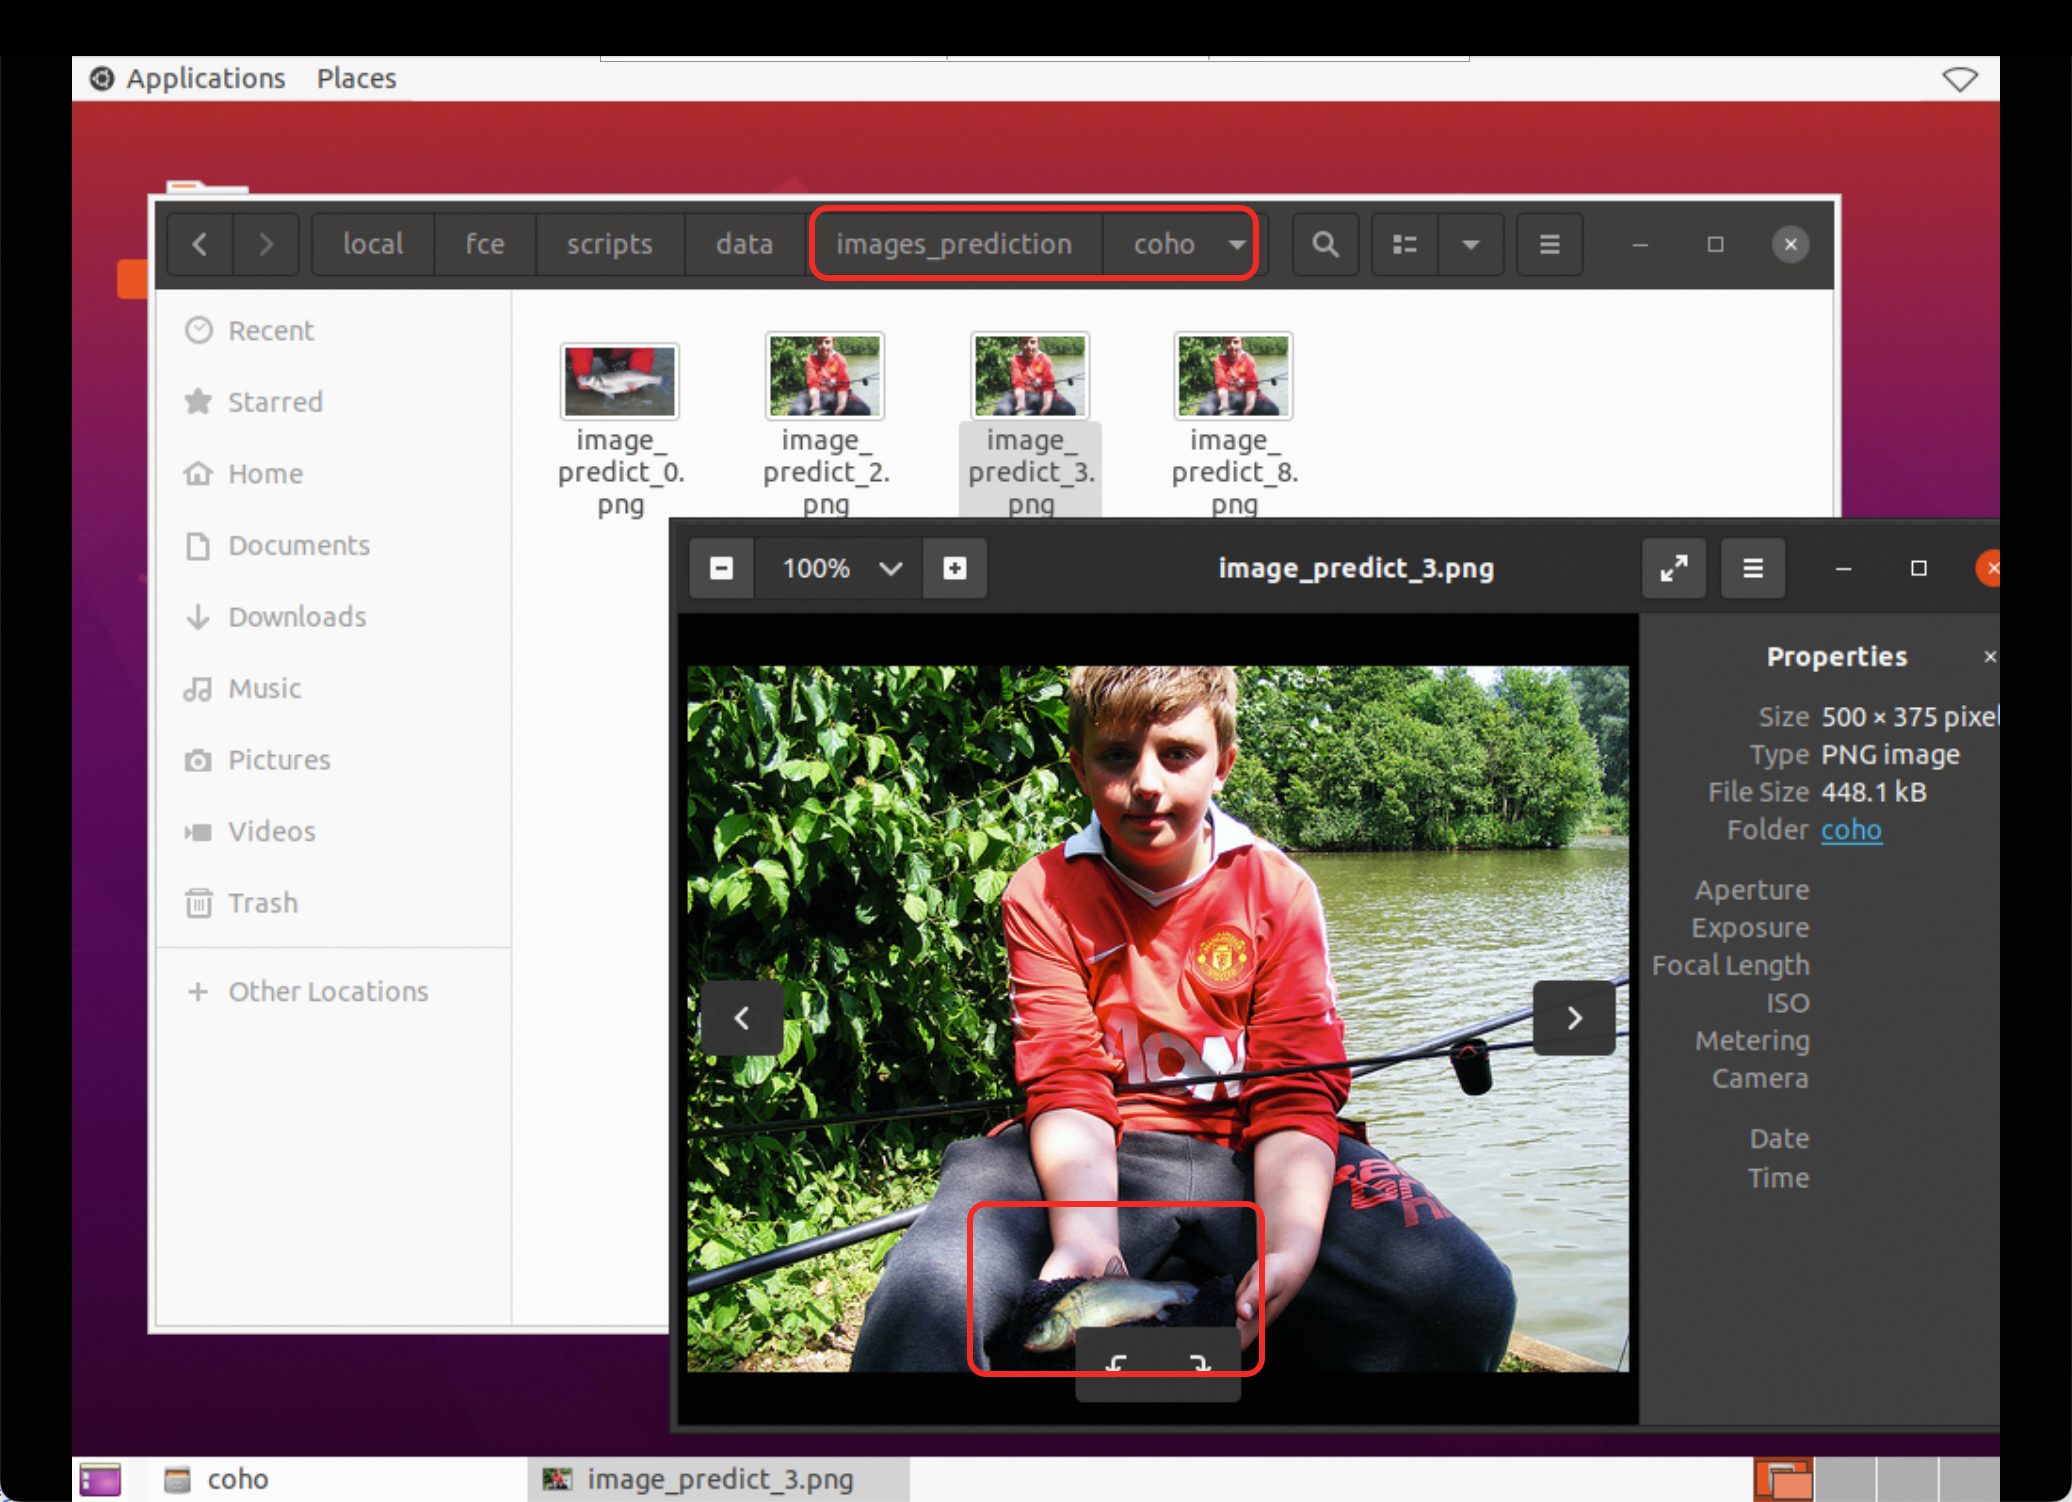
An example of the predicted carp classification image in images_input1_prediction is shown below:
Submit through Ray Client
NoteThe Ray Client method is mainly suitable for interactive development and debugging task scenarios that require a persistent client connection.
Create a
raytask.pyscript in the/home/test/directory with the following content.import ray ray.init(address='auto') # Define the task. @ray.remote def square(x): return x * x # Start four parallel tasks. futures = [square.remote(i) for i in range(4)] # Get the results. print(ray.get(futures)) # -> [0, 1, 4, 9]Execute the
raytask.pyscript.python raytask.py