This section describes how to use the console to submit a job. The job aims to count the number of times INFO, WARN, ERROR, and DEBUG appear in a log file.
Make sure that you have signed up Batch Compute service in advance.
Contents:
Prepare a job.
1.1. Upload the data file to the OSS.
1.2. Upload the task program to the OSS.
Use the console to submit the job.
Check the job status.
Check the result.
1. Prepare a job
The job aims to count the number of times INFO, WARN, ERROR, and DEBUG appear in a log file.
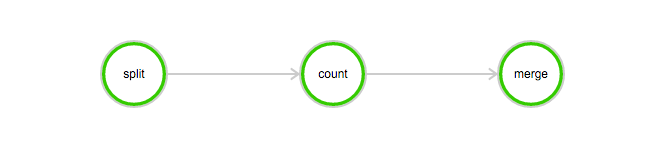
This job contains the following tasks:
The split task is used to divide the log file into three parts.
The count task is used to count the number of times INFO, WARN, ERROR, and DEBUG appear in each part of the log file. In the count task, InstanceCount must be set to 3, indicating that three count tasks are started concurrently.
The merge task is used to merge all the count results.
DAG:
1.1 Upload data file to OSS
Download the data file used in this example: log-count-data.txt
Upload the log-count-data.txt file to:
oss://your-bucket/log-count/log-count-data.txtyour-bucketindicates the bucket created by yourself. In this example, it is assumed that the region iscn-shenzhen.For more information about how to upload data to the OSS, see Upload files to OSS and Common OSS tools.
1.2 Upload task program to OSS
The job program used in this example is compiled using Python. Download the program log-count.tar.gz.
In this example, it is unnecessary to modify the sample codes. You can directly upload log-count.tar.gz to the OSS, for example:
oss://your-bucket/log-count/log-count.tar.gz.
The upload method has been described earlier.
Batch Compute supports only the compressed packages with the extension tar.gz. Make sure that you use the preceding method (gzip) for packaging; otherwise, the package cannot be parsed.
If you must modify codes, decompress the file, modify the codes, and then follow these steps to pack the modified codes:
The command is as follows:
> cd log-count  # Switch to the directory.
> tar -czf log-count.tar.gz * # Pack all files under this directory to log-count.tar.gz.
You can run the following command to check the content of the compressed package:
$ tar -tvf log-count.tar.gzThe following list is displayed:
conf.py
count.py
merge.py
split.py
2. Use console to submit job
Log on to the Batch Compute console.
Choose Job List > Submit Job, and submit the job. Select an appropriate region, which must be the same as the region of the bucket.
Here, AutoCluster is used to submit a job. For AutoCluster, you must configure at least two parameters, including:
Available image ID. You can use the image provided by the system or custom an image. For more information about how to custom an image, see Use an image.
InstanceType. For more information about the instance type, see Currently supported instance types.
To run this example, you also need to change PackagePath (OSS directory to which the job is packed and uploaded. It is
oss://your-bucket/log-count/log-count.tar.gzin this example),StdoutRedirectPath, and StderrRedirectPath (output address of task results and errors) to the corresponding OSS directory (
oss://your-bucket/log-count/logs/in this example).The following shows the JSON template of the job. For more information about parameters, click here.
 {
   "DAG": {
     "Dependencies": {
       "split": [
         "count"
       ],
       "count": [
         "merge"
       ],
       "merge": []
     },
     "Tasks": {
       "split": {
         "InstanceCount": 1,
         "LogMapping": {},
         "AutoCluster": {
           "Configs": {
             "Networks": {
               "VPC": {
                 "CidrBlock": "192.168.0.0/16"
               }
             }
           },
           "ResourceType": "OnDemand",
           "InstanceType": "ecs.sn1ne.large",
           "ImageId": "img-ubuntu-vpc"
         },
         "Parameters": {
           "Command": {
             "EnvVars": {},
             "CommandLine": "python split.py",
             "PackagePath": "oss://your-bucket/log-count/log-count.tar.gz"
           },
           "InputMappingConfig": {
             "Lock": true
           },
           "StdoutRedirectPath": "oss://your-bucket/log-count/logs/",
           "StderrRedirectPath": "oss://your-bucket/log-count/logs/"
         },
         "InputMapping": {
           "oss://your-bucket/log-count/": "/home/input/"
         },
         "OutputMapping": {
           "/home/output/": "oss://your-bucket/log-count/"
         },
         "MaxRetryCount": 0,
         "Timeout": 21600,
         "ClusterId": ""
       },
       "merge": {
         "InstanceCount": 1,
         "LogMapping": {},
         "AutoCluster": {
           "Configs": {
             "Networks": {
               "VPC": {
                 "CidrBlock": "192.168.0.0/16"
               }
             }
           },
           "ResourceType": "OnDemand",
           "InstanceType": "ecs.sn1ne.large",
           "ImageId": "img-ubuntu-vpc"
         },
         "Parameters": {
           "Command": {
             "EnvVars": {},
             "CommandLine": "python merge.py",
             "PackagePath": "oss://your-bucket/log-count/log-count.tar.gz"
           },
           "InputMappingConfig": {
             "Lock": true
           },
           "StdoutRedirectPath": "oss://your-bucket/log-count/logs/",
           "StderrRedirectPath": "oss://your-bucket/log-count/logs/"
         },
         "InputMapping": {
           "oss://your-bucket/log-count/": "/home/input/"
         },
         "OutputMapping": {
           "/home/output/": "oss://your-bucket/log-count/"
         },
         "MaxRetryCount": 0,
         "Timeout": 21600,
         "ClusterId": ""
       },
       "count": {
         "InstanceCount": 3,
         "LogMapping": {},
         "AutoCluster": {
           "Configs": {
             "Networks": {
               "VPC": {
                 "CidrBlock": "192.168.0.0/16"
               }
             }
           },
           "ResourceType": "OnDemand",
           "InstanceType": "ecs.sn1ne.large",
           "ImageId": "img-ubuntu-vpc"
         },
         "Parameters": {
           "Command": {
             "EnvVars": {},
             "CommandLine": "python count.py",
             "PackagePath": "oss://your-bucket/log-count/log-count.tar.gz"
           },
           "InputMappingConfig": {
             "Lock": true
           },
           "StdoutRedirectPath": "oss://your-bucket/log-count/logs/",
           "StderrRedirectPath": "oss://your-bucket/log-count/logs/"
         },
         "InputMapping": {
           "oss://your-bucket/log-count/": "/home/input/"
         },
         "OutputMapping": {
           "/home/output/": "oss://your-bucket/log-count/"
         },
         "MaxRetryCount": 0,
         "Timeout": 21600,
         "ClusterId": ""
       }
     }
   },
   "Description": "batchcompute job",
   "Priority": 0,
   "JobFailOnInstanceFail": true,
   "Type": "DAG",
   "Name": "log-count"
 }
Check that all parameters and directories are correct, click Submit Job in the lower left corner, and then click OK.
3. Check job status
Click the newly submitted job
log-countin the job list to view the details of this job.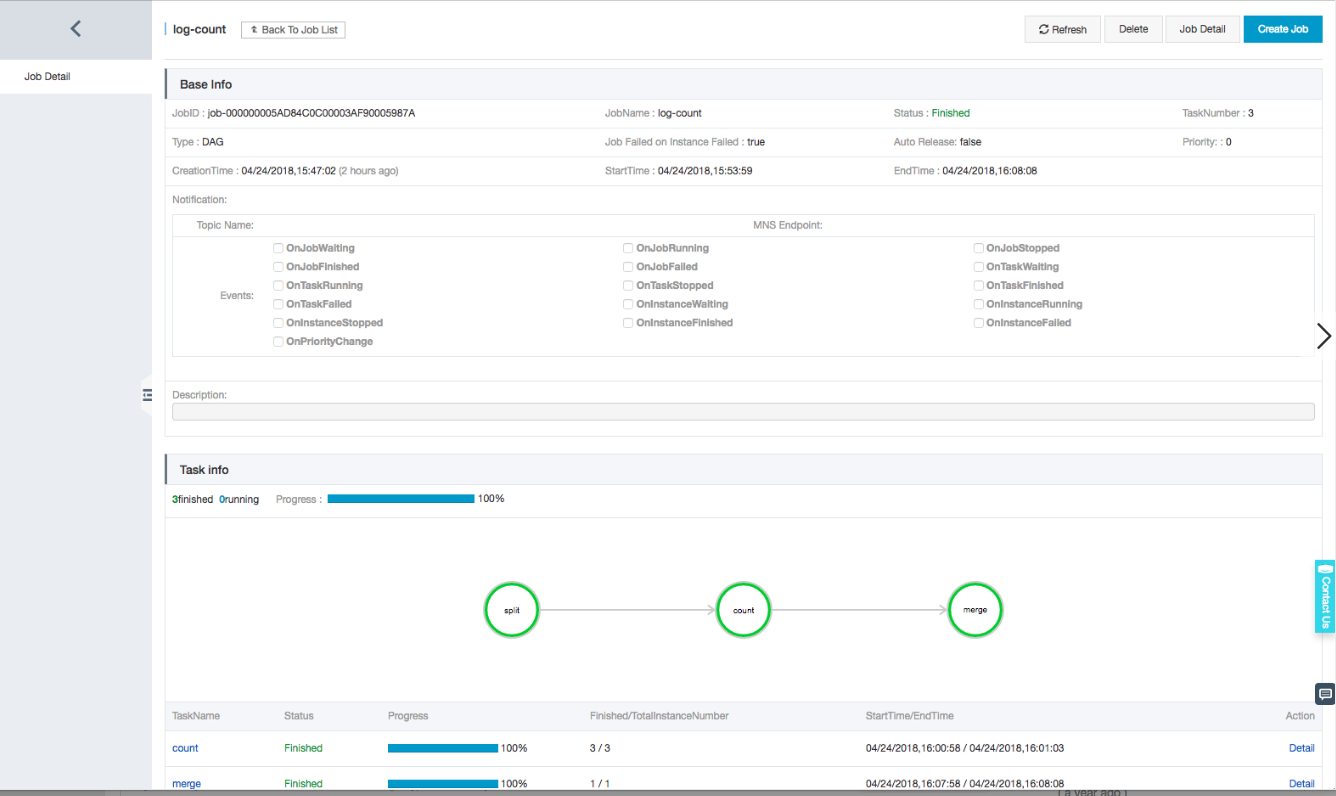
Click the task name
splitto view the details of this task.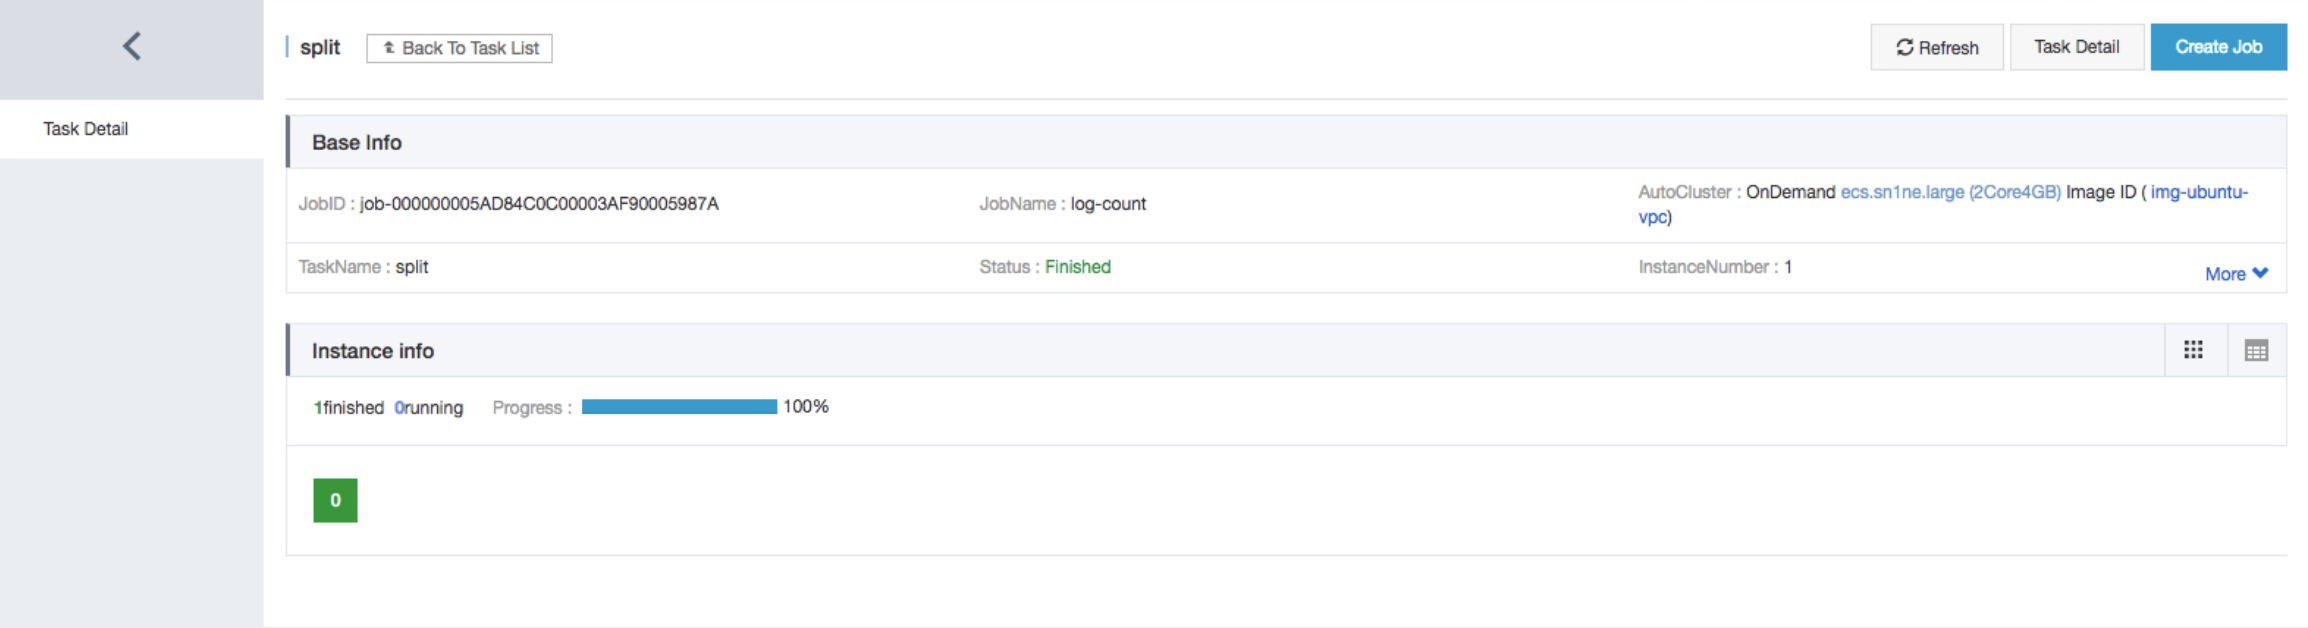
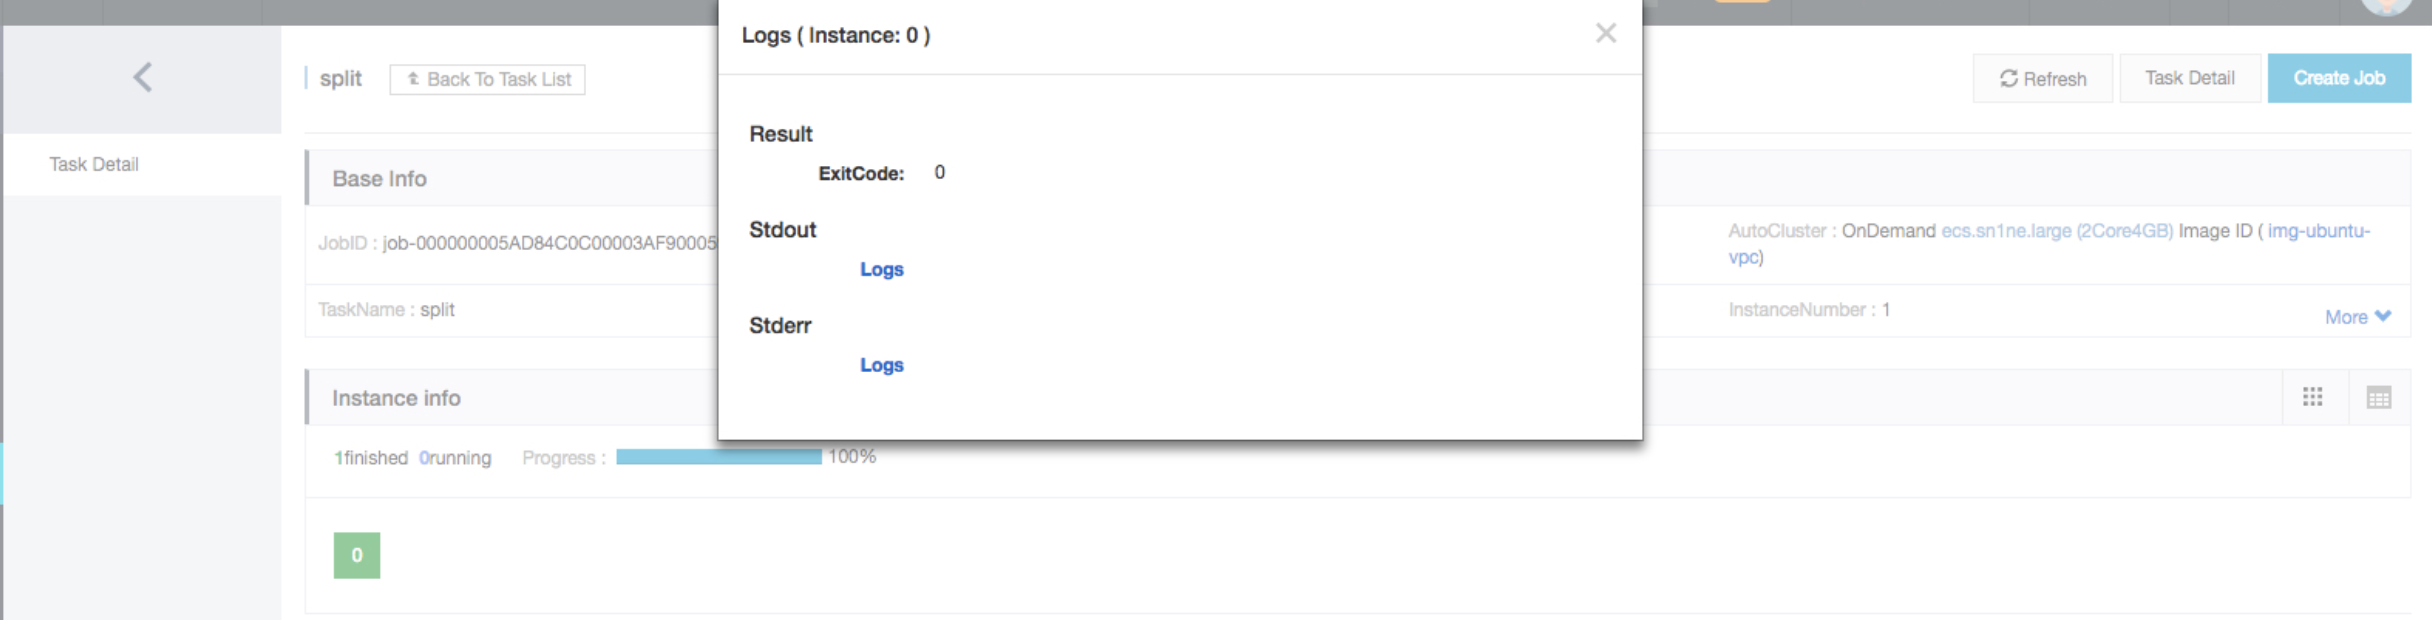
Click the green block to view the instance log.
4. Check job execution result
You can log on to the OSS console and check the following file under your bucket: /log-count/merge_result.json.
The expected result is as follows:
{"INFO": 2460, "WARN": 2448, "DEBUG": 2509, "ERROR": 2583}